Operating Instructions
Page 2
..., consult an electrician for replacement of the obsolete outlet. 10) Protect the power cord from tip-over. 13) Unplug this apparatus during lightning storms or when unused for your safety. LF-X1 or LF-X5 Serial No Contacting Sony If, after reading these instructions. 3) Heed all warnings. 4) Follow all ... injury from being walked on or pinched particularly at 1-800-222-SONY (7669) (US residents only) or 1-877-899-SONY (7669) (Canadian residents only). Record the serial number in any heat sources such as power-supply cord or plug is required when the apparatus has been damaged in...
..., consult an electrician for replacement of the obsolete outlet. 10) Protect the power cord from tip-over. 13) Unplug this apparatus during lightning storms or when unused for your safety. LF-X1 or LF-X5 Serial No Contacting Sony If, after reading these instructions. 3) Heed all warnings. 4) Follow all ... injury from being walked on or pinched particularly at 1-800-222-SONY (7669) (US residents only) or 1-877-899-SONY (7669) (Canadian residents only). Record the serial number in any heat sources such as power-supply cord or plug is required when the apparatus has been damaged in...
Operating Instructions
Page 9
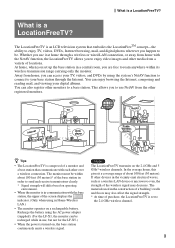
...LocationFreeTV? At home, when you set to the 2.4 GHz wireless channel. 9 z Tips • The LocationFreeTV is composed of the screen displays the indicator. (Only when using in use, but not for the LF-X5.) • When the power is an LCD television system that communicate with the NetAV ...TV, videos, and DVDs by using the AC power adapter (supplied). (For the LF-X1, the monitor can also register other registered monitors. Whether you use NetAV from home, you happen to send and receive transmissions clearly. * Signal strength will differ based on the 2.4 GHz and 5 GHz* wireless ...
...LocationFreeTV? At home, when you set to the 2.4 GHz wireless channel. 9 z Tips • The LocationFreeTV is composed of the screen displays the indicator. (Only when using in use, but not for the LF-X5.) • When the power is an LCD television system that communicate with the NetAV ...TV, videos, and DVDs by using the AC power adapter (supplied). (For the LF-X1, the monitor can also register other registered monitors. Whether you use NetAV from home, you happen to send and receive transmissions clearly. * Signal strength will differ based on the 2.4 GHz and 5 GHz* wireless ...
Operating Instructions
Page 11
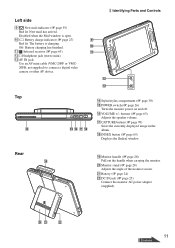
Identifying Parts and Controls 9 0 qa qs qd Top qf qg qh qj qk qf Stylus/stylus compartment (1 page 30) qg POWER switch (1 page 26) Turns the monitor power on and off. qh VOLUME +/- Monitor stand (1 page 28) Adjusts the angle of the monitor screen. w; qj CAPTURE button (1 page 70) Saves ...the currently displayed image in the album. w; wa Battery (1 page 24) ws DC IN jack (1 page 25) Connect the monitor AC power adapter (supplied). wa ws 11 Continued Left side 9 New mail indicator (1 page 93) Red lit: New mail has arrived. qk INDEX button (1 page 65) Displays the...
Identifying Parts and Controls 9 0 qa qs qd Top qf qg qh qj qk qf Stylus/stylus compartment (1 page 30) qg POWER switch (1 page 26) Turns the monitor power on and off. qh VOLUME +/- Monitor stand (1 page 28) Adjusts the angle of the monitor screen. w; qj CAPTURE button (1 page 70) Saves ...the currently displayed image in the album. w; wa Battery (1 page 24) ws DC IN jack (1 page 25) Connect the monitor AC power adapter (supplied). wa ws 11 Continued Left side 9 New mail indicator (1 page 93) Red lit: New mail has arrived. qk INDEX button (1 page 65) Displays the...

Operating Instructions
Page 12
...band for Public Wireless Access. 6 Battery charge indicator (1 page 27) Red lit: The battery is active but out of range. Off: Battery charging has finished. 7 i Headphone jack (stereo mini). 12 Blue and green flashing alternately (3 sec. ◆For the LF-X5 Right side 1 ...LCD (Liquid Crystal Display)/Touch Panel 1 2 DC IN jack (1 page 26) Connect the monitor AC power adapter (supplied). 3 Speakers 2 3 Left side 4 POWER indicator (1 page 26) Green lit: The power is on 5 the 2.4 GHz channel.
...band for Public Wireless Access. 6 Battery charge indicator (1 page 27) Red lit: The battery is active but out of range. Off: Battery charging has finished. 7 i Headphone jack (stereo mini). 12 Blue and green flashing alternately (3 sec. ◆For the LF-X5 Right side 1 ...LCD (Liquid Crystal Display)/Touch Panel 1 2 DC IN jack (1 page 26) Connect the monitor AC power adapter (supplied). 3 Speakers 2 3 Left side 4 POWER indicator (1 page 26) Green lit: The power is on 5 the 2.4 GHz channel.
Operating Instructions
Page 14
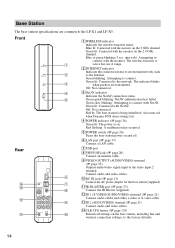
...indicator Indicates the connection status to the LF-X1 and LF-X5. Connect audio and video cables. 6 0 DC IN jack (1 page 23) Connect the AC power adapter for the base station (supplied). 7 qa IR BLASTER port (1 page 33) 8 Connect the IR Blaster (supplied). Green lit: Connected to the ...) terminal (1 page 22) Outputs audio/video signal input to the network. Front Rear qf qd qs qa 1 WIRELESS indicator Indicates the wireless function status. Off: Not connected. 4 3 NetAV indicator Indicates the NetAV connection status. 5 Green quick blinking: NetAV authentication has failed....
...indicator Indicates the connection status to the LF-X1 and LF-X5. Connect audio and video cables. 6 0 DC IN jack (1 page 23) Connect the AC power adapter for the base station (supplied). 7 qa IR BLASTER port (1 page 33) 8 Connect the IR Blaster (supplied). Green lit: Connected to the ...) terminal (1 page 22) Outputs audio/video signal input to the network. Front Rear qf qd qs qa 1 WIRELESS indicator Indicates the wireless function status. Off: Not connected. 4 3 NetAV indicator Indicates the NetAV connection status. 5 Green quick blinking: NetAV authentication has failed....
Operating Instructions
Page 20
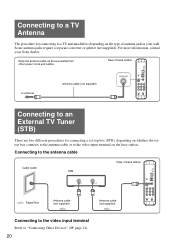
... or splitter (not supplied). Keep the antenna cable as far as possible from other power cords and cables. Connecting to the antenna cable Cable outlet STB Rear of base station to antenna Antenna cable (not supplied) Connecting to an External TV Tuner (STB) There...supplied) Connecting to the video input terminal Refer to "Connecting Other Devices" (1 page 21). 20 Connecting to a TV Antenna The procedure for connecting a set-top box (STB), depending on whether the settop box connects to the antenna cable or to the video input terminal on the type of antenna jack in your Sony...
... or splitter (not supplied). Keep the antenna cable as far as possible from other power cords and cables. Connecting to the antenna cable Cable outlet STB Rear of base station to antenna Antenna cable (not supplied) Connecting to an External TV Tuner (STB) There...supplied) Connecting to the video input terminal Refer to "Connecting Other Devices" (1 page 21). 20 Connecting to a TV Antenna The procedure for connecting a set-top box (STB), depending on whether the settop box connects to the antenna cable or to the video input terminal on the type of antenna jack in your Sony...
Operating Instructions
Page 23
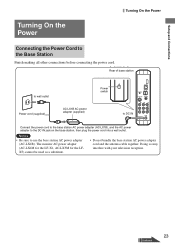
...the base station, then plug the power cord into a wall outlet. Rear of base station to wall outlet Power cord (supplied) AC-LX1B AC power adapter (supplied) Power switch to DC IN Connect the power cord to the base station AC power adapter (AC-LX1B), and the AC power adapter to the Base Station Finish ...making all other connections before connecting the power cord. Notes • Be sure to use the base station AC power adapter (AC-LX1B). Doing so may interfere with your television reception. 23 Continued The monitor AC power adapter (AC-LX1M for the LF-X1, AC-LX5M for the LFX5) ...
...the base station, then plug the power cord into a wall outlet. Rear of base station to wall outlet Power cord (supplied) AC-LX1B AC power adapter (supplied) Power switch to DC IN Connect the power cord to the base station AC power adapter (AC-LX1B), and the AC power adapter to the Base Station Finish ...making all other connections before connecting the power cord. Notes • Be sure to use the base station AC power adapter (AC-LX1B). Doing so may interfere with your television reception. 23 Continued The monitor AC power adapter (AC-LX1M for the LF-X1, AC-LX5M for the LFX5) ...
Operating Instructions
Page 25
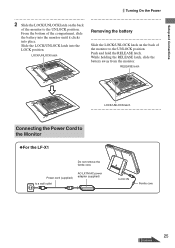
Slide the LOCK/UNLOCK latch into place. Power cord (supplied) to a wall outlet AC-LX1M AC power adapter (supplied) to the Monitor ◆For the LF-X1 Do not remove the ferrite core. LOCK/UNLOCK latch Removing the battery Slide the LOCK/UNLOCK latch on the back of the ... bottom of the compartment, slide the battery into the monitor until it clicks into the LOCK position. RELEASE latch LOCK/UNLOCK latch Connecting the Power Cord to DC IN Ferrite core 25 Continued While holding the RELEASE latch, slide the battery away from the monitor. Setup and Connections Turning...
Slide the LOCK/UNLOCK latch into place. Power cord (supplied) to a wall outlet AC-LX1M AC power adapter (supplied) to the Monitor ◆For the LF-X1 Do not remove the ferrite core. LOCK/UNLOCK latch Removing the battery Slide the LOCK/UNLOCK latch on the back of the ... bottom of the compartment, slide the battery into the monitor until it clicks into the LOCK position. RELEASE latch LOCK/UNLOCK latch Connecting the Power Cord to DC IN Ferrite core 25 Continued While holding the RELEASE latch, slide the battery away from the monitor. Setup and Connections Turning...
Operating Instructions
Page 26
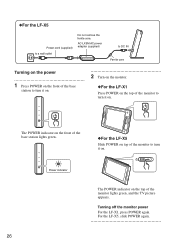
...off the monitor power For the LF-X1, press POWER again. The POWER indicator on the front of the base station lights green. ◆For the LF-X5 Slide POWER on . For the LF-X5, slide POWER again. 26 AC-LX5M AC power adapter (supplied) to DC IN Ferrite core Turning on the power 1 Press POWER on the front ...of the base station to turn it on. 2 Turn on the monitor. ◆For the LF-X1 Press POWER on the ...
...off the monitor power For the LF-X1, press POWER again. The POWER indicator on the front of the base station lights green. ◆For the LF-X5 Slide POWER on . For the LF-X5, slide POWER again. 26 AC-LX5M AC power adapter (supplied) to DC IN Ferrite core Turning on the power 1 Press POWER on the front ...of the base station to turn it on. 2 Turn on the monitor. ◆For the LF-X1 Press POWER on the ...
Operating Instructions
Page 27
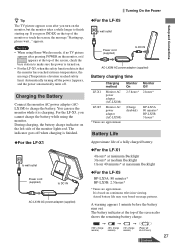
...the LF-X1 to wall outlet Power cord (supplied) to DC IN AC-LX1M AC power adapter (supplied) ◆For the LF-X5 to wall outlet Power cord (supplied) to DC IN AC-LX5M AC power adapter (supplied) Battery charging time Charging method LF-X1 Monitor AC power adapter (AC-LX1M) LF-X5 Monitor AC power adapter... charge the battery. Notes • When using Home-Wireless mode, if no TV picture appears after you cannot charge the battery while using the monitor. Automatically turning off the power.] appears, and the power automatically turns off when charging is charging. It is ...
...the LF-X1 to wall outlet Power cord (supplied) to DC IN AC-LX1M AC power adapter (supplied) ◆For the LF-X5 to wall outlet Power cord (supplied) to DC IN AC-LX5M AC power adapter (supplied) Battery charging time Charging method LF-X1 Monitor AC power adapter (AC-LX1M) LF-X5 Monitor AC power adapter... charge the battery. Notes • When using Home-Wireless mode, if no TV picture appears after you cannot charge the battery while using the monitor. Automatically turning off the power.] appears, and the power automatically turns off when charging is charging. It is ...
Operating Instructions
Page 28
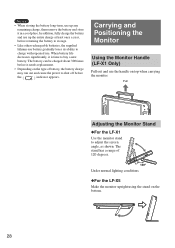
...year, before returning the battery to storage. • Like other rechargeable batteries, the supplied lithium-ion battery gradually loses its ability to charge with repeated use. Under normal lighting conditions. ◆For the LF-X5 Make the monitor upright using the stand on top when carrying the monitor. The ...stand has a range of battery, the battery charge may run out and cause the power to buy a new battery.
...year, before returning the battery to storage. • Like other rechargeable batteries, the supplied lithium-ion battery gradually loses its ability to charge with repeated use. Under normal lighting conditions. ◆For the LF-X5 Make the monitor upright using the stand on top when carrying the monitor. The ...stand has a range of battery, the battery charge may run out and cause the power to buy a new battery.
Operating Instructions
Page 33
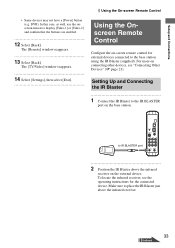
... above the infrared receiver on -screen remote control for the connected device. DVR). to the base station using the IR Blaster (supplied). Using the Onscreen Remote Control Configure the on the external device. In this case, as well, use the onscreen remote to ... 12 Select [Back]. Setup and Connections Using the On-screen Remote Control • Some devices may not have a [Power] button (e.g. The [Remote] window reappears. 13 Select [Back]. The [TV/Video] window reappears. 14 Select [Settings], then select [Exit]. To locate the infrared receiver, see "Connecting Other Devices...
... above the infrared receiver on -screen remote control for the connected device. DVR). to the base station using the IR Blaster (supplied). Using the Onscreen Remote Control Configure the on the external device. In this case, as well, use the onscreen remote to ... 12 Select [Back]. Setup and Connections Using the On-screen Remote Control • Some devices may not have a [Power] button (e.g. The [Remote] window reappears. 13 Select [Back]. The [TV/Video] window reappears. 14 Select [Settings], then select [Exit]. To locate the infrared receiver, see "Connecting Other Devices...
Operating Instructions
Page 34
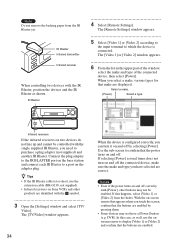
..., you select a make, various types for that the buttons are enabled by selecting [Power]. When you can turn on Sony VCRs and other buttons may not have selected are identified with [Power], other products are correct. In this happens, select [Video 1] or [Video 2] from...adapter (not supplied) and another IR Blaster. The [TV/Video] window appears. 34 When the device is connected. IR Blaster Infrared transmitter Infrared receiver When controlling two devices with the single supplied IR Blaster, you touch the screen, confirm that make and type you have a [Power] button ...
..., you select a make, various types for that the buttons are enabled by selecting [Power]. When you can turn on Sony VCRs and other buttons may not have selected are identified with [Power], other products are correct. In this happens, select [Video 1] or [Video 2] from...adapter (not supplied) and another IR Blaster. The [TV/Video] window appears. 34 When the device is connected. IR Blaster Infrared transmitter Infrared receiver When controlling two devices with the single supplied IR Blaster, you touch the screen, confirm that make and type you have a [Power] button ...
Operating Instructions
Page 153
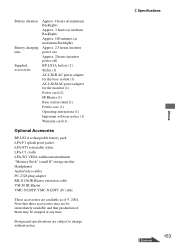
Design and specifications are available as of 9. 2004. Battery duration Battery charging time Supplied accessories Approx. 4 hours (at minimum Backlight) Approx. 3 hours (at medium Backlight) Approx. 100 minutes (at any time. Note that these ...production of them may be stopped at maximum Backlight) Approx. 2.5 hours (monitor power on) Approx. 2 hours (monitor power off) BP-LX1A battery (1) Stylus (1) AC-LX1B AC power adapter for the base station (1) AC-LX1M AC power adapter for the monitor (1) Power cord (2) IR Blaster (1) Base station stand (1) Ferrite core (1) Operating instructions ...
Design and specifications are available as of 9. 2004. Battery duration Battery charging time Supplied accessories Approx. 4 hours (at minimum Backlight) Approx. 3 hours (at medium Backlight) Approx. 100 minutes (at any time. Note that these ...production of them may be stopped at maximum Backlight) Approx. 2.5 hours (monitor power on) Approx. 2 hours (monitor power off) BP-LX1A battery (1) Stylus (1) AC-LX1B AC power adapter for the base station (1) AC-LX1M AC power adapter for the monitor (1) Power cord (2) IR Blaster (1) Base station stand (1) Ferrite core (1) Operating instructions ...
Operating Instructions
Page 156
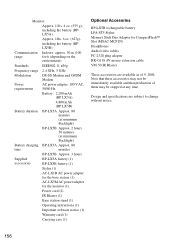
...range feet) (depending on the environment) Standards IEEE802.11 a/b/g Frequency range 2.4 GHz, 5 GHz Modulation DS-SS Modem and OFDM Modem Power requirements AC power adapter: 100 V AC, 50/60 Hz Battery: 2,200 mAh (BP LX5A) 4,800 mAh (BP LX5B) Battery duration BP-LX5A Approx...BP-LX5A Approx. 80 time minutes BP-LX5B Approx. 3 hours Supplied accessories BP-LX5A battery (1) BP-LX5B battery (1) Stylus (1) AC-LX1B AC power adapter for the base station (1) AC-LX5M AC power adapter for the monitor (1) Power cord (2) IR Blaster (1) Base station stand (1) Operating instructions ...
...range feet) (depending on the environment) Standards IEEE802.11 a/b/g Frequency range 2.4 GHz, 5 GHz Modulation DS-SS Modem and OFDM Modem Power requirements AC power adapter: 100 V AC, 50/60 Hz Battery: 2,200 mAh (BP LX5A) 4,800 mAh (BP LX5B) Battery duration BP-LX5A Approx...BP-LX5A Approx. 80 time minutes BP-LX5B Approx. 3 hours Supplied accessories BP-LX5A battery (1) BP-LX5B battery (1) Stylus (1) AC-LX1B AC power adapter for the base station (1) AC-LX5M AC power adapter for the monitor (1) Power cord (2) IR Blaster (1) Base station stand (1) Operating instructions ...

