
Operating Instructions
Page 27
...the power.] appears, and the power automatically turns off. For the LF-X5, you cannot charge the battery while using Home-Wireless mode, if no TV picture appears after you press INDEX on the top of the monitor or touch the screen, the message "Starting up . Actual battery life may vary based... please wait..." A warning appears 1 minute before the battery runs out. The battery indicator at the top of the screen, check the base station to make sure the power is finished. ◆For the LF-X1 to wall outlet Power cord (supplied) to DC IN AC-LX1M AC power adapter (supplied) ◆For the...
...the power.] appears, and the power automatically turns off. For the LF-X5, you cannot charge the battery while using Home-Wireless mode, if no TV picture appears after you press INDEX on the top of the monitor or touch the screen, the message "Starting up . Actual battery life may vary based... please wait..." A warning appears 1 minute before the battery runs out. The battery indicator at the top of the screen, check the base station to make sure the power is finished. ◆For the LF-X1 to wall outlet Power cord (supplied) to DC IN AC-LX1M AC power adapter (supplied) ◆For the...
Operating Instructions
Page 30
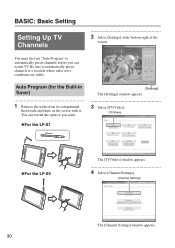
Be sure to automatically preset channels before you want. ◆For the LF-X1 3 Select [TV/Video]. [TV/Video] ◆For the LF-X5 The [TV/Video] window appears. 4 Select [Channel Settings]. [Channel Settings] The [Channel Settings] window appears. 30 You can extend the stylus if you ... radio wave conditions are stable. Auto Program (for the Built-in Tuner) [Settings] The [Settings] window appears. 1 Remove the stylus from its compartment, then touch anywhere on the screen with it. You must first use "Auto Program" to automatically preset channels at the bottom right of the...
Be sure to automatically preset channels before you want. ◆For the LF-X1 3 Select [TV/Video]. [TV/Video] ◆For the LF-X5 The [TV/Video] window appears. 4 Select [Channel Settings]. [Channel Settings] The [Channel Settings] window appears. 30 You can extend the stylus if you ... radio wave conditions are stable. Auto Program (for the Built-in Tuner) [Settings] The [Settings] window appears. 1 Remove the stylus from its compartment, then touch anywhere on the screen with it. You must first use "Auto Program" to automatically preset channels at the bottom right of the...
Operating Instructions
Page 31
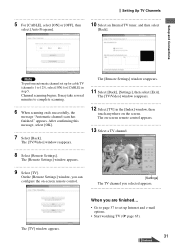
... TV (channels 1 to complete scanning. 6 When scanning ends successfully, the message "Automatic channel scan has finished." The [TV/Video] window reappears. The on the screen. When you selected appears. appears. The [TV/Video] window reappears. 12 Select [TV] in step 5. On the [Remote Settings] window, you can configure the...11 Select [Back], [Settings], then select [Exit]. Setup and Connections Note To perform automatic channel set up for [CABLE] in the [Index] window, then touch anywhere on -screen remote control appears. 13 Select a TV channel. 8 Select [Remote Settings].
... TV (channels 1 to complete scanning. 6 When scanning ends successfully, the message "Automatic channel scan has finished." The [TV/Video] window reappears. The on the screen. When you selected appears. appears. The [TV/Video] window reappears. 12 Select [TV] in step 5. On the [Remote Settings] window, you can configure the...11 Select [Back], [Settings], then select [Exit]. Setup and Connections Note To perform automatic channel set up for [CABLE] in the [Index] window, then touch anywhere on -screen remote control appears. 13 Select a TV channel. 8 Select [Remote Settings].
Operating Instructions
Page 32
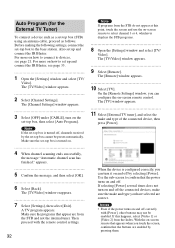
...IR Blaster, see page 21. The [TV] window appears. 11 Select [External TV tuner], and select the make and type you touch the screen, confirm that the power turns on -screen remote to set -top box cannot be enabled. appears. 5 Confirm the message, and then select [OK]. 6 Select [Back].... Use the sub-screen to devices, see page 33. 1 Open the [Settings] window and select [TV/ Video]. If this point, touch the screen and use the on and off. A TV program appears. Make sure the programs that appears when...
...IR Blaster, see page 21. The [TV] window appears. 11 Select [External TV tuner], and select the make and type you touch the screen, confirm that the power turns on -screen remote to set -top box cannot be enabled. appears. 5 Confirm the message, and then select [OK]. 6 Select [Back].... Use the sub-screen to devices, see page 33. 1 Open the [Settings] window and select [TV/ Video]. If this point, touch the screen and use the on and off. A TV program appears. Make sure the programs that appears when...
Operating Instructions
Page 34
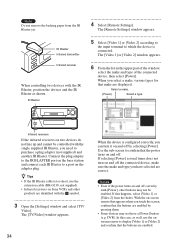
...window appears. 6 From the list in the upper part of the connected device, then select [Power]. Notes • Even if the power turns on Sony VCRs and other products are identified with [Power], other buttons may not have a [Power] button (e.g. If this case, as shown. In this happens...]. IR Blaster Infrared transmitter Infrared receiver When controlling two devices with the single supplied IR Blaster, you can turn on -screen remote that make and type you touch the screen, confirm that the power turns on the adapter plug. Select a make and type of the window, select the make ...
...window appears. 6 From the list in the upper part of the connected device, then select [Power]. Notes • Even if the power turns on Sony VCRs and other products are identified with [Power], other buttons may not have a [Power] button (e.g. If this case, as shown. In this happens...]. IR Blaster Infrared transmitter Infrared receiver When controlling two devices with the single supplied IR Blaster, you can turn on -screen remote that make and type you touch the screen, confirm that the power turns on the adapter plug. Select a make and type of the window, select the make ...
Operating Instructions
Page 35
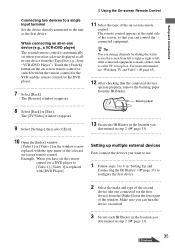
... the make and type of the window. Setting up multiple external devices First, connect the devices you have set -top box. Touch the [Switch] button on the on -screen remote control. Backing paper 8 Select [Back] or [Exit]. The [TV/Video] window reappears. 9 Select [Settings], then select... [Exit]. 13 Secure the IR Blaster in the location you select a device displayed as allin-one connected via the first device) from the [Type] list (e.g., Sony "...
... the make and type of the window. Setting up multiple external devices First, connect the devices you have set -top box. Touch the [Switch] button on the on -screen remote control. Backing paper 8 Select [Back] or [Exit]. The [TV/Video] window reappears. 9 Select [Settings], then select... [Exit]. 13 Secure the IR Blaster in the location you select a device displayed as allin-one connected via the first device) from the [Type] list (e.g., Sony "...
Operating Instructions
Page 41
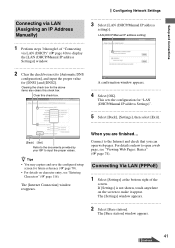
...documents provided by your ISP to the Internet and check that you are finished... z Tips • You may capture and save the configured setup screen for future reference (1 page 70). • For details on how to make it appear. Connecting Via LAN (PPPoE) 1 Select [Settings]...116). Clearing the check box for the above items also clears this check box Clear this check box. If [Settings] is not shown, touch anywhere on the screen to open web pages. The [Internet Connection] window reappears. For details on character entry, see "Viewing Web Pages: Basics" (1 page 74...
...documents provided by your ISP to the Internet and check that you are finished... z Tips • You may capture and save the configured setup screen for future reference (1 page 70). • For details on how to make it appear. Connecting Via LAN (PPPoE) 1 Select [Settings]...116). Clearing the check box for the above items also clears this check box Clear this check box. If [Settings] is not shown, touch anywhere on the screen to open web pages. The [Internet Connection] window reappears. For details on character entry, see "Viewing Web Pages: Basics" (1 page 74...
Operating Instructions
Page 43
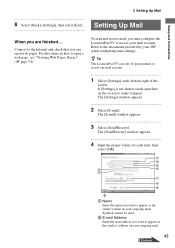
... To send and receive mail, you must configure the LocationFreeTV to the documents provided by your mail account. If [Settings] is not shown, touch anywhere on the screen to the Internet and check that you want to open web pages. For directions on how to appear as the sender's name on your... mail address you are finished... Setting Up Mail When you want to access one mail account. 1 Select [Settings] at the bottom right of the screen. z Tip The LocationFreeTV can open a web page, see "Viewing Web Pages: Basics" (1 page 74). The [E-mail] window appears. 3 Select [Send/Receive...
... To send and receive mail, you must configure the LocationFreeTV to the documents provided by your mail account. If [Settings] is not shown, touch anywhere on the screen to the Internet and check that you want to open web pages. For directions on how to appear as the sender's name on your... mail address you are finished... Setting Up Mail When you want to access one mail account. 1 Select [Settings] at the bottom right of the screen. z Tip The LocationFreeTV can open a web page, see "Viewing Web Pages: Basics" (1 page 74). The [E-mail] window appears. 3 Select [Send/Receive...
Operating Instructions
Page 61
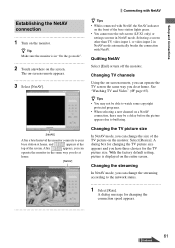
... You cannot use the sub-screen (LF-X1 only) or settings screens in NetAV mode automatically breaks the connection with NetAV. Select [Resize]. z Tip Make sure the monitor is displayed on the monitor. With the factory default setting, picture is in "On the go mode". 2 Touch anywhere on the front of ...the TV picture on the entire screen. Changing the TV picture size In NetAV mode, you do at home. [NetAV] z Tips • While ...
... You cannot use the sub-screen (LF-X1 only) or settings screens in NetAV mode automatically breaks the connection with NetAV. Select [Resize]. z Tip Make sure the monitor is displayed on the monitor. With the factory default setting, picture is in "On the go mode". 2 Touch anywhere on the front of ...the TV picture on the entire screen. Changing the TV picture size In NetAV mode, you do at home. [NetAV] z Tips • While ...
Operating Instructions
Page 64
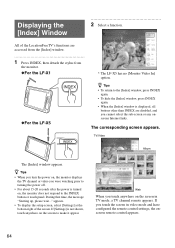
...;For the LF-X1 ◆For the LF-X5 * The LF-X5 has no [Monitor Video In] option. During that time, the message "Starting up, please wait..." The corresponding screen appears. appears. • To display the setup screen, select [Settings] at the bottom right of the LocationFreeTV's functions are disabled, and you touch the screen in TV mode...
...;For the LF-X1 ◆For the LF-X5 * The LF-X5 has no [Monitor Video In] option. During that time, the message "Starting up, please wait..." The corresponding screen appears. appears. • To display the setup screen, select [Settings] at the bottom right of the LocationFreeTV's functions are disabled, and you touch the screen in TV mode...
Operating Instructions
Page 65
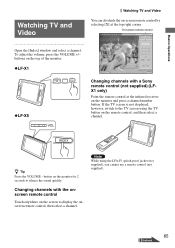
... not displayed, however, switch to the TV screen using the LFA-F1 splash proof jacket (not supplied), you cannot use a remote control (not supplied). 65 Continued To adjust the volume, press the VOLUME +/- Changing channels with a Sony remote control (not supplied) (LFX1 only) Point the... remote control at the top right corner. buttons on the top of the monitor. ◆LF-X1 ◆LF-X5 Changing channels with the onscreen remote control Touch anywhere on the monitor and press a channel number button. On-screen remote ...
... not displayed, however, switch to the TV screen using the LFA-F1 splash proof jacket (not supplied), you cannot use a remote control (not supplied). 65 Continued To adjust the volume, press the VOLUME +/- Changing channels with a Sony remote control (not supplied) (LFX1 only) Point the... remote control at the top right corner. buttons on the top of the monitor. ◆LF-X1 ◆LF-X5 Changing channels with the onscreen remote control Touch anywhere on the monitor and press a channel number button. On-screen remote ...
Operating Instructions
Page 67
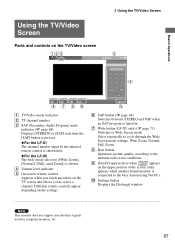
...here when appears on the TV screen and allows you touch anywhere on the upper portion of the screen (only appears when another bound monitor is connected to the base station using NetAV.). D Volume level indicator E On-screen remote control Appears when you to Wide Screen mode. H Rate button Optimizes...on the TV/Video screen Using the TV/Video Screen Basics Operations A TV/Video mode indicator B TV channel number C SAP (Secondary Audio Program) mode indicator (1 page 68) Displays [STEREO] or [SAP] each time the [SAP] button is pressed. ◆For the LF-X1 The channel number ...
...here when appears on the TV screen and allows you touch anywhere on the upper portion of the screen (only appears when another bound monitor is connected to the base station using NetAV.). D Volume level indicator E On-screen remote control Appears when you to Wide Screen mode. H Rate button Optimizes...on the TV/Video screen Using the TV/Video Screen Basics Operations A TV/Video mode indicator B TV channel number C SAP (Secondary Audio Program) mode indicator (1 page 68) Displays [STEREO] or [SAP] each time the [SAP] button is pressed. ◆For the LF-X1 The channel number ...
Operating Instructions
Page 69
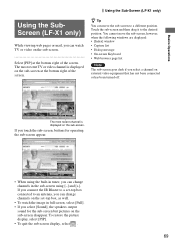
...Screen (LF-X1 only) Using the SubScreen (LF-X1 only) While viewing web pages or mail, you can watch the image in full screen, select [Full]. • If you can move the sub-screen, however, when the following windows are displayed: • [Index] window • Capture list • Dialog message • On-screen... sound for the sub-screen but pictures on the sub-screen. Touch the sub-screen and then drag it to a different position. If you touch the sub-screen, buttons for operating the sub-screen appear. • When using the built-in the sub-screen using [-] and [+]....
...Screen (LF-X1 only) Using the SubScreen (LF-X1 only) While viewing web pages or mail, you can watch the image in full screen, select [Full]. • If you can move the sub-screen, however, when the following windows are displayed: • [Index] window • Capture list • Dialog message • On-screen... sound for the sub-screen but pictures on the sub-screen. Touch the sub-screen and then drag it to a different position. If you touch the sub-screen, buttons for operating the sub-screen appear. • When using the built-in the sub-screen using [-] and [+]....
Operating Instructions
Page 82
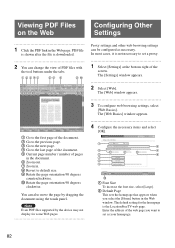
... homepage is the LocationFreeTV web page. You can be configured as your homepage. 82 Note Even PDF files supported by dragging the document using the touch panel. PDF file is shown after the file is not necessary to default size. 9 Rotate the page orientation 90 degrees counterclockwise. 0 Rotate the page orientation... set a proxy. 2 You can change the view of PDF files with the tool buttons under the tabs. 1 Select [Settings] at the bottom right of the screen. In most cases, it is downloaded.
... homepage is the LocationFreeTV web page. You can be configured as your homepage. 82 Note Even PDF files supported by dragging the document using the touch panel. PDF file is shown after the file is not necessary to default size. 9 Rotate the page orientation 90 degrees counterclockwise. 0 Rotate the page orientation... set a proxy. 2 You can change the view of PDF files with the tool buttons under the tabs. 1 Select [Settings] at the bottom right of the screen. In most cases, it is downloaded.
Operating Instructions
Page 106
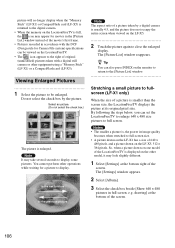
...a digital still camera or other equipment using a "Memory Stick" (LF-X1) or a CompactFlash card (LF-X5). Note It may take several seconds to be viewed on the LocationFreeTV. • The icon appears to the right of the screen. 106 The [Picture List] window reappears. The [Settings] window appears... the LF-X5. 2 Touch the picture again to close the enlarged display. You cannot perform other model, it may look slightly different. 1 Select [Settings] at its image quality becomes when stretched to full-screen size. • A picture drawn on the LF-X1 has a size of the screen. Do...
...a digital still camera or other equipment using a "Memory Stick" (LF-X1) or a CompactFlash card (LF-X5). Note It may take several seconds to be viewed on the LocationFreeTV. • The icon appears to the right of the screen. 106 The [Picture List] window reappears. The [Settings] window appears... the LF-X5. 2 Touch the picture again to close the enlarged display. You cannot perform other model, it may look slightly different. 1 Select [Settings] at its image quality becomes when stretched to full-screen size. • A picture drawn on the LF-X1 has a size of the screen. Do...
Operating Instructions
Page 107
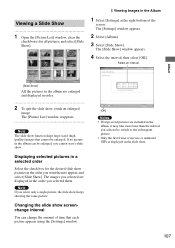
... images you select only a single picture, the slide show keeps showing the same picture. Viewing Images in order. 2 To quit the slide show, touch an enlarged image. Album [Slide Show] All the pictures in the album are displayed in the slide show. 107 The [Picture List] window reappears.... album can change the amount of time that cannot be enlarged, you selected them to the subsequent picture. • Only the first frame of the screen. The [Slide Show] window appears. 4 Select the interval, then select [OK]. Displaying selected pictures in a selected order Select the check box for...
... images you select only a single picture, the slide show keeps showing the same picture. Viewing Images in order. 2 To quit the slide show, touch an enlarged image. Album [Slide Show] All the pictures in the album are displayed in the slide show. 107 The [Picture List] window reappears.... album can change the amount of time that cannot be enlarged, you selected them to the subsequent picture. • Only the first frame of the screen. The [Slide Show] window appears. 4 Select the interval, then select [OK]. Displaying selected pictures in a selected order Select the check box for...
Operating Instructions
Page 109
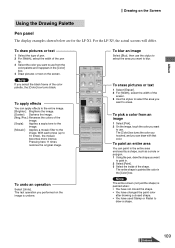
...the colors of the image. [Sepia]: Applies a sepia tone to the image. [Mosaic]: Applies a mosaic filter to use . The [Color] box turns the color you touched, and you select the black frame of the shape. The entire shape is painted the color in . 2 Select [Paint]. 3 Select the inside of the color...[Blur], then use the stylus to select the area you want to select the area you performed on the Screen Using the Drawing Palette Pen panel The display examples shown below are for the LF-X1. The last operation you want to erase. Album Drawing on the image is undone. Note The entire...
...the colors of the image. [Sepia]: Applies a sepia tone to the image. [Mosaic]: Applies a mosaic filter to use . The [Color] box turns the color you touched, and you select the black frame of the shape. The entire shape is painted the color in . 2 Select [Paint]. 3 Select the inside of the color...[Blur], then use the stylus to select the area you want to select the area you performed on the Screen Using the Drawing Palette Pen panel The display examples shown below are for the LF-X1. The last operation you want to erase. Album Drawing on the image is undone. Note The entire...
Operating Instructions
Page 110
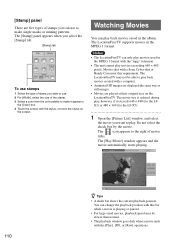
... icon appears to the right of stamps you want to use to play back movies created with a Sony Cyber-shot or Handy Cam meet this bar while a movie is reduced during play movies exceeding 640 ...able to make it exceeds 640 × 480 (for the LFX1) or 480 × 360 (for the LF-X5). 1 Open the [Picture List] window, and select the movie you can play movies saved in the ...the check box by the movie. You can only play back movies saved in the [Color] box. 4 Touch the screen with the stylus, or move the stylus on the LocationFreeTV. Movies shot with a computer. • Animated ...
... icon appears to the right of stamps you want to use to play back movies created with a Sony Cyber-shot or Handy Cam meet this bar while a movie is reduced during play movies exceeding 640 ...able to make it exceeds 640 × 480 (for the LFX1) or 480 × 360 (for the LF-X5). 1 Open the [Picture List] window, and select the movie you can play movies saved in the ...the check box by the movie. You can only play back movies saved in the [Color] box. 4 Touch the screen with the stylus, or move the stylus on the LocationFreeTV. Movies shot with a computer. • Animated ...
Operating Instructions
Page 128
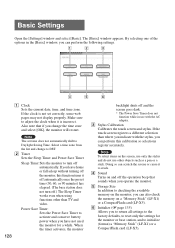
....) The Sleep Timer works even when using functions other objects such as a pen or a stick. C Stylus Calibration Calibrates the touch screen and stylus. If the touch screen registers a different selection than TV and video. E Storage Size In addition to reset only the settings for a while. F Initialize... Save Timer: Sets the Power Save Timer to initialize (format) a "Memory Stick" (LF-X1) or a CompactFlash card (LF-X5). Note To select items on a "Memory Stick" (LF-X1) or a CompactFlash card (LF-X5). B Timer Sets the Sleep Timer and Power Save Timer Sleep Timer:Sets the monitor...
....) The Sleep Timer works even when using functions other objects such as a pen or a stick. C Stylus Calibration Calibrates the touch screen and stylus. If the touch screen registers a different selection than TV and video. E Storage Size In addition to reset only the settings for a while. F Initialize... Save Timer: Sets the Power Save Timer to initialize (format) a "Memory Stick" (LF-X1) or a CompactFlash card (LF-X5). Note To select items on a "Memory Stick" (LF-X1) or a CompactFlash card (LF-X5). B Timer Sets the Sleep Timer and Power Save Timer Sleep Timer:Sets the monitor...

LFTV Quick Start Guide
Page 6
Setting On-screen Remote 1 Touch screen and select [Settings) at the bottom right of devices will appear. r nth. !Venial Selects Ind, r M • - If selecting [Power] several limos dmoaekesn't turn It on the screen. use the onscreen remote to a STEI or VCR using B. Quick Start Guide for the ...the instruction manual for WAlocationfreem 0 Setting up TV Channels and On-screen Remote (Continued) C. When the device is coming horn either devices. select ITV). or the type of the connected device then touch anywhere on off the connected deyme make sure the make and type...
Setting On-screen Remote 1 Touch screen and select [Settings) at the bottom right of devices will appear. r nth. !Venial Selects Ind, r M • - If selecting [Power] several limos dmoaekesn't turn It on the screen. use the onscreen remote to a STEI or VCR using B. Quick Start Guide for the ...the instruction manual for WAlocationfreem 0 Setting up TV Channels and On-screen Remote (Continued) C. When the device is coming horn either devices. select ITV). or the type of the connected device then touch anywhere on off the connected deyme make sure the make and type...


