
Operating Instructions
Page 2
... expose batteries or apparatus with liquids, such as vases, on the rear of important operating and maintenance (servicing) instructions in the literature accompanying the appliance. This symbol is intended to alert the user to an easily accessible AC outlet. Model No. Do not install the appliance in a confined space, such as a CLASS 1 LASER product. Excessive sound pressure from the mains, connect...
... expose batteries or apparatus with liquids, such as vases, on the rear of important operating and maintenance (servicing) instructions in the literature accompanying the appliance. This symbol is intended to alert the user to an easily accessible AC outlet. Model No. Do not install the appliance in a confined space, such as a CLASS 1 LASER product. Excessive sound pressure from the mains, connect...

Operating Instructions
Page 3
... blade or the third prong are provided for replacement of this apparatus near any heat sources such as power-supply cord or plug is encouraged to try to qualified service personnel. Install in a residential installation. When a cart is connected. - Other versions may cause harmful interference to radio or television reception, which the receiver is used in any way, such as radiators, heat registers...
... blade or the third prong are provided for replacement of this apparatus near any heat sources such as power-supply cord or plug is encouraged to try to qualified service personnel. Install in a residential installation. When a cart is connected. - Other versions may cause harmful interference to radio or television reception, which the receiver is used in any way, such as radiators, heat registers...
Operating Instructions
Page 6
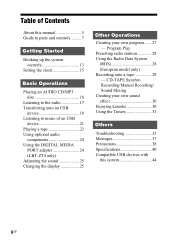
... manual 5 Guide to parts and controls.......... 7 Getting Started Hooking up the system securely 13 Setting the clock 15 Basic Operations Playing an AUDIO CD/MP3 disc 16 Listening to the radio 17 Transferring onto an USB device 18 Listening to music of Contents About this system 44 6GB Table of an USB device 21 Playing a tape 23 Using optional audio components 24 Using the DIGITAL MEDIA PORT adapter 24 (LBT-ZT4 only) Adjusting the sound 25 Changing the display 25 Other Operations Creating your own program....... 27 - Program Play Presetting radio stations...
... manual 5 Guide to parts and controls.......... 7 Getting Started Hooking up the system securely 13 Setting the clock 15 Basic Operations Playing an AUDIO CD/MP3 disc 16 Listening to the radio 17 Transferring onto an USB device 18 Listening to music of Contents About this system 44 6GB Table of an USB device 21 Playing a tape 23 Using optional audio components 24 Using the DIGITAL MEDIA PORT adapter 24 (LBT-ZT4 only) Adjusting the sound 25 Changing the display 25 Other Operations Creating your own program....... 27 - Program Play Presetting radio stations...
Operating Instructions
Page 8
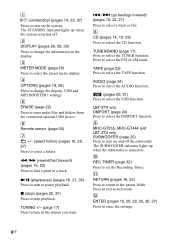
...) Press to turn on the display. TUNING +/- (page 17) Press to change the display, USB and MP3 BOOSTER+ settings. The SUBWOOFER indicator lights up when the system is turned on. Press to exit search mode. L ENTER (pages 16, 20, 22, 25, 32, 37) Press to erase audio files and folders from the connected optional USB device. E ERASE (page 22) Press to enter the settings. 8GB NX (play/pause...
...) Press to turn on the display. TUNING +/- (page 17) Press to change the display, USB and MP3 BOOSTER+ settings. The SUBWOOFER indicator lights up when the system is turned on. Press to exit search mode. L ENTER (pages 16, 20, 22, 25, 32, 37) Press to erase audio files and folders from the connected optional USB device. E ERASE (page 22) Press to enter the settings. 8GB NX (play/pause...

Operating Instructions
Page 9
... onto the connected optional USB device. T REC TO USB (pages 18, 19) Press to exchange a disc while playing. MIC LEVEL (page 30) Turn to the CD function from other function. Press to switch to adjust the microphone volume. Use the tactile dot as a reference when operating the system. Y Display (page 25) Z Tape deck (pages 23, 29) wj z (record) (page 29) Press to start tape playback. * The B button has a tactile...
... onto the connected optional USB device. T REC TO USB (pages 18, 19) Press to exchange a disc while playing. MIC LEVEL (page 30) Turn to the CD function from other function. Press to switch to adjust the microphone volume. Use the tactile dot as a reference when operating the system. Y Display (page 25) Z Tape deck (pages 23, 29) wj z (record) (page 29) Press to start tape playback. * The B button has a tactile...
Operating Instructions
Page 11
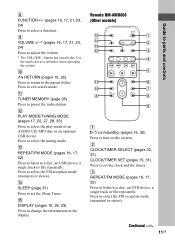
... change the information on the display. O DISPLAY (pages 15, 28, 33) Press to preset the radio station. N SLEEP (page 31) Press to set the Sleep Timer. Press to select the FM reception mode (monaural or stereo). Press to select the tuning mode. Press to select the play mode of an AUDIO CD, MP3 disc or an optional USB device. L PLAY MODE/TUNING MODE (pages 17, 22, 27, 28, 33) Press to exit search mode. Remote...
... change the information on the display. O DISPLAY (pages 15, 28, 33) Press to preset the radio station. N SLEEP (page 31) Press to set the Sleep Timer. Press to select the FM reception mode (monaural or stereo). Press to select the tuning mode. Press to select the play mode of an AUDIO CD, MP3 disc or an optional USB device. L PLAY MODE/TUNING MODE (pages 17, 22, 27, 28, 33) Press to exit search mode. Remote...

Operating Instructions
Page 14
... the supplied plug adaptor (only for this operation. 1 Remove all discs to protect the CD mechanism. 2 Press CD to select the CD function. 3 Hold down DISC SKIP/ EX-CHANGE, and press "/1 until "STANDBY" appears. 4 After "MECHA LOCK" appears, unplug the power cord. When carrying this system Use the buttons on the DMPORT jack. • Do not connect or disconnect the DIGITAL MEDIA PORT adapter to/from the speaker cords, the power cord and the USB cable to avoid...
... the supplied plug adaptor (only for this operation. 1 Remove all discs to protect the CD mechanism. 2 Press CD to select the CD function. 3 Hold down DISC SKIP/ EX-CHANGE, and press "/1 until "STANDBY" appears. 4 After "MECHA LOCK" appears, unplug the power cord. When carrying this system Use the buttons on the DMPORT jack. • Do not connect or disconnect the DIGITAL MEDIA PORT adapter to/from the speaker cords, the power cord and the USB cable to avoid...
Operating Instructions
Page 18
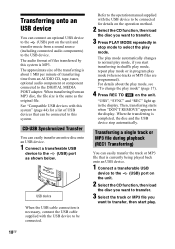
... play mode automatically changes to normal play mode, if you want to be connected for a list of files transferred by this system. The approximate size of transferring time from an AUDIO CD, tape, tuner, optional audio component or component connected to select the play mode (when no tracks or MP3 files are programmed). For details about 1 MB per minute of the transferring is completed, the disc and the USB device stop mode to the DIGITAL MEDIA PORT adapter...
... play mode automatically changes to normal play mode, if you want to be connected for a list of files transferred by this system. The approximate size of transferring time from an AUDIO CD, tape, tuner, optional audio component or component connected to select the play mode (when no tracks or MP3 files are programmed). For details about 1 MB per minute of the transferring is completed, the disc and the USB device stop mode to the DIGITAL MEDIA PORT adapter...
Operating Instructions
Page 19
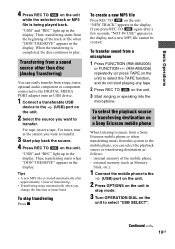
... a tape, tuner, optional audio component or component connected to the DIGITAL MEDIA PORT adapter onto an USB device. 1 Connect a transferable USB device to the (USB) port on the unit to transfer. When the transferring is being played back. Then, transferring starts when "DON'T REMOVE" appears in the display. external memory (such as follows: - Basic Operations 4 Press REC TO USB on the unit while the selected track or MP3 file is completed, the disc continues...
... a tape, tuner, optional audio component or component connected to the DIGITAL MEDIA PORT adapter onto an USB device. 1 Connect a transferable USB device to the (USB) port on the unit to transfer. When the transferring is being played back. Then, transferring starts when "DON'T REMOVE" appears in the display. external memory (such as follows: - Basic Operations 4 Press REC TO USB on the unit while the selected track or MP3 file is completed, the disc continues...
Operating Instructions
Page 20
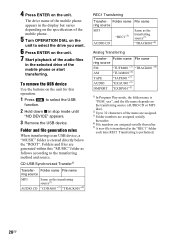
..."4) AM "TUAM001"3) TAPE "TAPE001"3) AUDIO "EXAU001"3) DMPORT "EXDP001"3) 1) In Program Play mode, the folder name is "PGM_xxx", and the file name depends on the transferring source (AUDIO CD or MP3 disc). 2) Up to 32 characters of the mobile phone or start transferring. The drive name of the mobile phone appears in the display but varies depending on the specification of the mobile phone. 5 Turn OPERATION DIAL on...
..."4) AM "TUAM001"3) TAPE "TAPE001"3) AUDIO "EXAU001"3) DMPORT "EXDP001"3) 1) In Program Play mode, the folder name is "PGM_xxx", and the file name depends on the transferring source (AUDIO CD or MP3 disc). 2) Up to 32 characters of the mobile phone or start transferring. The drive name of the mobile phone appears in the display but varies depending on the specification of the mobile phone. 5 Turn OPERATION DIAL on...
Operating Instructions
Page 23
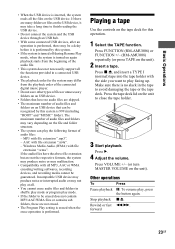
... B. 4 Adjust the volume. Press VOLUME +/- (or turn MASTER VOLUME on the unit). 2 Insert a tape. Windows Media Audio (WMA) with all the functions provided in shuffle play mode or program play the following format of files or unnecessary folders on an USB device. • Folders that can be recognized by this system. • If the system is turned off during Resume Play mode, when the system is turned on again playback starts from...
... B. 4 Adjust the volume. Press VOLUME +/- (or turn MASTER VOLUME on the unit). 2 Insert a tape. Windows Media Audio (WMA) with all the functions provided in shuffle play mode or program play the following format of files or unnecessary folders on an USB device. • Folders that can be recognized by this system. • If the system is turned off during Resume Play mode, when the system is turned on again playback starts from...
Operating Instructions
Page 24
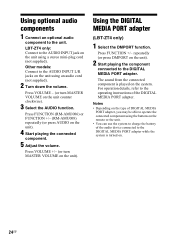
... the DIGITAL MEDIA PORT adapter while the system is played on the unit). Other models: Connect to the DIGITAL MEDIA PORT adapter. Press FUNCTION (RM-AMU006) or FUNCTION +/- (RM-AMU008) repeatedly (or press AUDIO on the unit counter clockwise). 3 Select the AUDIO function. For operation details, refer to the operating instructions of the audio device connected to charge the battery of the DIGITAL MEDIA PORT adapter. Using optional audio components 1 Connect an optional audio component to the AUDIO INPUT jack on the unit using a stereo mini-plug cord (not supplied...
... the DIGITAL MEDIA PORT adapter while the system is played on the unit). Other models: Connect to the DIGITAL MEDIA PORT adapter. Press FUNCTION (RM-AMU006) or FUNCTION +/- (RM-AMU008) repeatedly (or press AUDIO on the unit counter clockwise). 3 Select the AUDIO function. For operation details, refer to the operating instructions of the audio device connected to charge the battery of the DIGITAL MEDIA PORT adapter. Using optional audio components 1 Connect an optional audio component to the AUDIO INPUT jack on the unit using a stereo mini-plug cord (not supplied...
Operating Instructions
Page 25
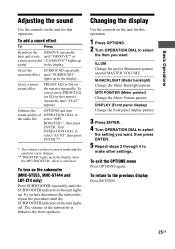
... is linked to make other settings. To cancel, press PRESET EQ (or EQ on the unit for this operation. Changing the display Use the controls on the remote) repeatedly. M-BACKLIGHT (Meter backlight) Change the Meter Backlight pattern. To exit the OPTIONS menu Press OPTIONS again. To add a sound effect To Press Reinforce the GROOVE repeatedly bass and create until "SURROUND" lights up sound in the display. Select a preset sound effect PRESET EQ...
... is linked to make other settings. To cancel, press PRESET EQ (or EQ on the unit for this operation. Changing the display Use the controls on the remote) repeatedly. M-BACKLIGHT (Meter backlight) Change the Meter Backlight pattern. To exit the OPTIONS menu Press OPTIONS again. To add a sound effect To Press Reinforce the GROOVE repeatedly bass and create until "SURROUND" lights up sound in the display. Select a preset sound effect PRESET EQ...
Operating Instructions
Page 28
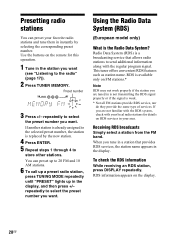
... While receiving an RDS station, press DISPLAY repeatedly. Presetting radio stations You can preset up to 20 FM and 10 AM stations. 6 To call up a preset radio station, press TUNING MODE repeatedly until "PRESET" lights up in the display, and then press +/- Preset number GROOVE 1 2 3 REC AUTO TUNED ST MHz 3 Press +/- Using the Radio Data System (RDS) (European model only) What is a broadcasting service that provides RDS services, the station name appears in the display. If another station is...
... While receiving an RDS station, press DISPLAY repeatedly. Presetting radio stations You can preset up to 20 FM and 10 AM stations. 6 To call up a preset radio station, press TUNING MODE repeatedly until "PRESET" lights up in the display, and then press +/- Preset number GROOVE 1 2 3 REC AUTO TUNED ST MHz 3 Press +/- Using the Radio Data System (RDS) (European model only) What is a broadcasting service that provides RDS services, the station name appears in the display. If another station is...
Operating Instructions
Page 31
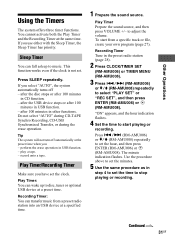
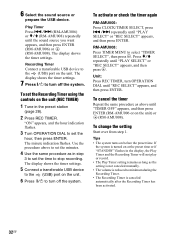
... preset radio station (page 28). 2 Press CLOCK/TIMER SET (RM-AMU006) or TIMER MENU (RM-AMU008). 3 Press ./> (RM-AMU006) or v/V (RM-AMU008) repeatedly to set the clock. Play Timer: You can fall asleep to adjust the volume. Recording Timer Tune in other functions. The minute indication flashes. Do not select "AUTO" during CD-TAPE Synchro Recording, CD-USB Synchronized Transfer, or during the erase operation. To start playing or recording. Play Timer Prepare the sound source, and then press VOLUME...
... preset radio station (page 28). 2 Press CLOCK/TIMER SET (RM-AMU006) or TIMER MENU (RM-AMU008). 3 Press ./> (RM-AMU006) or v/V (RM-AMU008) repeatedly to set the clock. Play Timer: You can fall asleep to adjust the volume. Recording Timer Tune in other functions. The minute indication flashes. Do not select "AUTO" during CD-TAPE Synchro Recording, CD-USB Synchronized Transfer, or during the erase operation. To start playing or recording. Play Timer Prepare the sound source, and then press VOLUME...
Operating Instructions
Page 32
... the system. "ON" appears, and the hour indication flashes. 3 Turn OPERATION DIAL to set the time to the (USB) port on at the preset time or if "STANDBY" flashes in the preset station (page 28). 2 Press REC TIMER. The display shows the timer settings. 5 Connect a transferable USB device to stop recording. To cancel the timer Repeat the same procedure as in step 3 to set the minutes. 4 Use the same procedure as above until the sound source...
... the system. "ON" appears, and the hour indication flashes. 3 Turn OPERATION DIAL to set the time to the (USB) port on at the preset time or if "STANDBY" flashes in the preset station (page 28). 2 Press REC TIMER. The display shows the timer settings. 5 Connect a transferable USB device to stop recording. To cancel the timer Repeat the same procedure as in step 3 to set the minutes. 4 Use the same procedure as above until the sound source...
Operating Instructions
Page 33
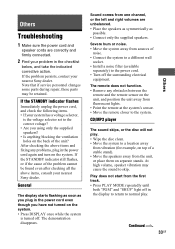
... top of the problem cannot be retained. General The display starts flashing as soon as possible. • Connect only the supplied speakers. Sound comes from fluorescent lights. • Point the remote at the system's sensor. • Move the remote closer to normal play . • Wipe the disc clean. • Move the system to the correct voltage? • Are you plug in the power cord again and turn on the...
... top of the problem cannot be retained. General The display starts flashing as soon as possible. • Connect only the supplied speakers. Sound comes from fluorescent lights. • Point the remote at the system's sensor. • Move the remote closer to normal play . • Wipe the disc clean. • Move the system to the correct voltage? • Are you plug in the power cord again and turn on the...

Operating Instructions
Page 36
... encrypted or protected by passwords, etc. Meter display is set to the operation manual of each USB device or contact the manufacturer. Select other settings. • Meter mode is set to "FLASH" in the OPTIONS menu. Tuner Severe hum or noise, or stations cannot be played back. * This system supports FAT16 and FAT32, but some USB device may not support all of these FAT. Tape deck The sound exhibits excessive wow or...
... encrypted or protected by passwords, etc. Meter display is set to the operation manual of each USB device or contact the manufacturer. Select other settings. • Meter mode is set to "FLASH" in the OPTIONS menu. Tuner Severe hum or noise, or stations cannot be played back. * This system supports FAT16 and FAT32, but some USB device may not support all of these FAT. Tape deck The sound exhibits excessive wow or...
Operating Instructions
Page 37
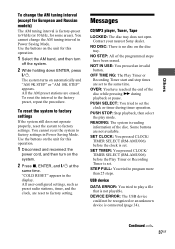
... disc while pressing M during timer operation. You cannot reset the system to play mode. NOT IN USE: You pressed an invalid button. PUSH STOP: Stop playback, then select the play a file that is set the clock or timer during playback or pause. Some buttons are erased. USB device DATA ERROR: You tried to factory settings in the display. Continued l 37GB Others To change the AM tuning interval in Power Saving Mode. Use the buttons on the system...
... disc while pressing M during timer operation. You cannot reset the system to play mode. NOT IN USE: You pressed an invalid button. PUSH STOP: Stop playback, then select the play a file that is set the clock or timer during playback or pause. Some buttons are erased. USB device DATA ERROR: You tried to factory settings in the display. Continued l 37GB Others To change the AM tuning interval in Power Saving Mode. Use the buttons on the system...
Operating Instructions
Page 38
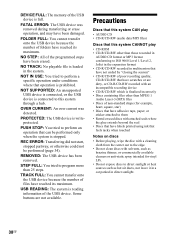
... stopped. REMOVED: The USB device has been removed. PUSH STOP: You tried to perform an operation that can be performed (page 34). REC ERROR: Transferring did not start, stopped partway, or otherwise could not be performed only when the system is loaded in direct sunlight. 38GB STEP FULL: You tried to program more than MPEG 1 Audio Layer-3 (MP3) files • Discs of...
... stopped. REMOVED: The USB device has been removed. PUSH STOP: You tried to perform an operation that can be performed (page 34). REC ERROR: Transferring did not start, stopped partway, or otherwise could not be performed only when the system is loaded in direct sunlight. 38GB STEP FULL: You tried to program more than MPEG 1 Audio Layer-3 (MP3) files • Discs of...


