
Operating Instructions
Page 4
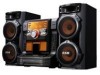
and other side. Speaker System • Front speakers SS-ZX99i • Surround speakers SS-ZX99i The LBT-ZX66i consists of : - Unit HCD-ZX66i - MPEG Layer-3 audio coding technology and patents licensed from Fraunhofer IIS and Thomson. Unit HCD-ZX99i - In this product. Please be ...; Front speakers SS-ZX66i 4US However, since the audio material side does not conform to the CD standard and may not be playable by this manual, the LBT-ZX99i is not guaranteed. iPod is a trademark of the first session is recognized as the first session. About this manual The ...
and other side. Speaker System • Front speakers SS-ZX99i • Surround speakers SS-ZX99i The LBT-ZX66i consists of : - Unit HCD-ZX66i - MPEG Layer-3 audio coding technology and patents licensed from Fraunhofer IIS and Thomson. Unit HCD-ZX99i - In this product. Please be ...; Front speakers SS-ZX66i 4US However, since the audio material side does not conform to the CD standard and may not be playable by this manual, the LBT-ZX99i is not guaranteed. iPod is a trademark of the first session is recognized as the first session. About this manual The ...

Operating Instructions
Page 5
... Guide to parts and controls ..........6 Getting Started Hooking up the system 11 Positioning the speakers 15 Setting the clock 16 Basic Operations Playing a CD/MP3 disc 17 Listening to the radio 19 Playing the iPod 20 Using optional components........22 Adjusting the sound 22 Creating a ...party atmosphere ......23 (LBT-ZX99i only) Selecting the speaker setting ......25 (LBT-ZX99i only) Enhancing the video game sound 25 - Game Mixing Changing...
... Guide to parts and controls ..........6 Getting Started Hooking up the system 11 Positioning the speakers 15 Setting the clock 16 Basic Operations Playing a CD/MP3 disc 17 Listening to the radio 19 Playing the iPod 20 Using optional components........22 Adjusting the sound 22 Creating a ...party atmosphere ......23 (LBT-ZX99i only) Selecting the speaker setting ......25 (LBT-ZX99i only) Enhancing the video game sound 25 - Game Mixing Changing...

Operating Instructions
Page 9
... forward) (pages 17, 21) Press to select a track. rk Operation buttons on , press to select X-ROUND mode. (LBT-ZX99i only) SPEAKERS (page 25) When X-ROUND is set to off, press to select speaker setting. X (pause) (pages 17, 21) Press to select X-ROUND setting. t; Press to parts and controls Continued l ...) Press to start or pause playback. Press to delete the last step from the program list. Use the tactile dots as references when operating the system. rl REPEAT/FM MODE (pages 17, 37) Press to change the Repeat Play setting of MP3 files. m/M (rewind/fast forward) (pages 17,...
... forward) (pages 17, 21) Press to select a track. rk Operation buttons on , press to select X-ROUND mode. (LBT-ZX99i only) SPEAKERS (page 25) When X-ROUND is set to off, press to select speaker setting. X (pause) (pages 17, 21) Press to select X-ROUND setting. t; Press to parts and controls Continued l ...) Press to start or pause playback. Press to delete the last step from the program list. Use the tactile dots as references when operating the system. rl REPEAT/FM MODE (pages 17, 37) Press to change the Repeat Play setting of MP3 files. m/M (rewind/fast forward) (pages 17,...

Operating Instructions
Page 10
...status and information (page 28). "1", "2", "3", "4" and "5" light up when the surround effect is activated (page 22). K Lights up when the system is selected. G Lights up when the disc is turned on the disc tray. " " lights up when the timer is displayed. B "TRK" ... TUNER function (pages 19, 30). - C Indicates the type of the Game Mixing (page 26). H (LBT-ZX99i only) Lights up when the X-GROOVE effect is displayed. L Lights up according to the speaker system setting. E Indicators for the disc tray (page 17). Display 1 ID3 2 TRK MP3 3 4 CD TEXT...
...status and information (page 28). "1", "2", "3", "4" and "5" light up when the surround effect is activated (page 22). K Lights up when the system is selected. G Lights up when the disc is turned on the disc tray. " " lights up when the timer is displayed. B "TRK" ... TUNER function (pages 19, 30). - C Indicates the type of the Game Mixing (page 26). H (LBT-ZX99i only) Lights up when the X-GROOVE effect is displayed. L Lights up according to the speaker system setting. E Indicators for the disc tray (page 17). Display 1 ID3 2 TRK MP3 3 4 CD TEXT...

Operating Instructions
Page 11
... up the system - SPEAKER L R Continued l 11US Front panel GAME INPUT VIDEO L AUDIO R PHONES G 1 To AM loop antenna 2 To FM lead antenna 3 To front speaker (right) 4 To front speaker (left) 5 To surround speaker (right) 6 To surround speaker (left) * LBT-ZX99i only. SRPS(SUEPREARAKOKEURENBRD) L L R (SPFERAOKNERT A) White (LBT-ZX66i only) Connect the speaker cords to the SPEAKER FRONT (SPEAKER A) terminals. Rear panel B 1 2 F E D A H 5* 6* C3 4 - A Speakers The speaker connectors...
... up the system - SPEAKER L R Continued l 11US Front panel GAME INPUT VIDEO L AUDIO R PHONES G 1 To AM loop antenna 2 To FM lead antenna 3 To front speaker (right) 4 To front speaker (left) 5 To surround speaker (right) 6 To surround speaker (left) * LBT-ZX99i only. SRPS(SUEPREARAKOKEURENBRD) L L R (SPFERAOKNERT A) White (LBT-ZX66i only) Connect the speaker cords to the SPEAKER FRONT (SPEAKER A) terminals. Rear panel B 1 2 F E D A H 5* 6* C3 4 - A Speakers The speaker connectors...

Operating Instructions
Page 12
...digital input of TV to this jack. You can then output audio through this system. B Antennas Find a location and an orientation that provide good reception, and then set up noise. When connecting speaker cords, insert the connector straight into the terminals. D VIDEO OUT jack Use a... Note Keep the antennas away from this jack. Tip Connect the speaker cords to the terminals on the speakers as shown in the tip above. Black (#) Black (#) Red (3) Red (3) Surround speakers (LBT-ZX99i only) Connect the speaker cords to the SPEAKER SURROUND (SPEAKER B) terminals and to connect the...
...digital input of TV to this jack. You can then output audio through this system. B Antennas Find a location and an orientation that provide good reception, and then set up noise. When connecting speaker cords, insert the connector straight into the terminals. D VIDEO OUT jack Use a... Note Keep the antennas away from this jack. Tip Connect the speaker cords to the terminals on the speakers as shown in the tip above. Black (#) Black (#) Red (3) Red (3) Surround speakers (LBT-ZX99i only) Connect the speaker cords to the SPEAKER SURROUND (SPEAKER B) terminals and to connect the...

Operating Instructions
Page 14
...LBT-ZX99i only) (LBT-ZX66i only) When carrying the unit Do the following procedure to protect the disc mechanism. Then, "MECHA LOCK" appears in the disc tray, press DISC SKIP to remove the discs. 4 Press Z OPEN/CLOSE again to close the disc tray. Otherwise, the speakers may be sure to disconnect the iPod. (LBT...display. 5 Hold down DISC SKIP and then press "/1 until "STANDBY" appears in the display. Attaching the speaker pads Attach the supplied speaker pads at each corner on the system. 2 Press FUNCTION repeatedly to select "CD". 3 Press Z OPEN/CLOSE to open the disc tray and ...
...LBT-ZX99i only) (LBT-ZX66i only) When carrying the unit Do the following procedure to protect the disc mechanism. Then, "MECHA LOCK" appears in the disc tray, press DISC SKIP to remove the discs. 4 Press Z OPEN/CLOSE again to close the disc tray. Otherwise, the speakers may be sure to disconnect the iPod. (LBT...display. 5 Hold down DISC SKIP and then press "/1 until "STANDBY" appears in the display. Attaching the speaker pads Attach the supplied speaker pads at each corner on the system. 2 Press FUNCTION repeatedly to select "CD". 3 Press Z OPEN/CLOSE to open the disc tray and ...

Operating Instructions
Page 15
A E B C D 15US C E D LBT-ZX66i only Place the front speakers at an equal distance from your speakers as shown below . A E B 45 A B 45 Example 2: Place the speakers at an angle of the front speakers as shown below . Getting Started Positioning the speakers You can place your listening position. A Front speaker (left) B Front speaker (right) C Surround speaker (left) D Surround speaker (right) E Unit LBT-ZX99i only There are...
A E B C D 15US C E D LBT-ZX66i only Place the front speakers at an equal distance from your speakers as shown below . A E B 45 A B 45 Example 2: Place the speakers at an angle of the front speakers as shown below . Getting Started Positioning the speakers You can place your listening position. A Front speaker (left) B Front speaker (right) C Surround speaker (left) D Surround speaker (right) E Unit LBT-ZX99i only There are...

Operating Instructions
Page 23
...• You can create a party environment by using X-ROUND for "moving" sound effect or/and SOUND FLASH for LBT-ZX99i only" on the system. Creating a party atmosphere (LBT-ZX99i only) You can only listen to MP3 Booster effect during playback. 1 Press AMP MENU repeatedly to select the setting...sound MANUAL In circular motion WAVE, arround the room AUTO WAVE MANUAL FADER, AUTO FADER Back and forth between the front speakers and surround speakers Continued l 23US Basic Operations Enhancing the MP3 file sound quality You can enhance the MP3 file sound quality during playback of ...
...• You can create a party environment by using X-ROUND for "moving" sound effect or/and SOUND FLASH for LBT-ZX99i only" on the system. Creating a party atmosphere (LBT-ZX99i only) You can only listen to MP3 Booster effect during playback. 1 Press AMP MENU repeatedly to select the setting...sound MANUAL In circular motion WAVE, arround the room AUTO WAVE MANUAL FADER, AUTO FADER Back and forth between the front speakers and surround speakers Continued l 23US Basic Operations Enhancing the MP3 file sound quality You can enhance the MP3 file sound quality during playback of ...

Operating Instructions
Page 24
... AUTO FADER and AUTO BAL. Hold down SOUND FLASH and turn the JOG clockwise or counterclockwise to change the sound movement from one speaker to another speaker during playback The flashing effect is automatically changed to "X-ROUND OFF" and you can activate the X-ROUND and SOUND FLASH effect simultaneously... MANUAL WAVE, MANUAL FADER and MANUAL BAL. Select To output sound MANUAL BAL, Back and forth AUTO BAL between the left speakers and right speakers RANDOM POS In random position TWISTER In circular motion like "twister" To change the sound movement Turn the JOG to change the...
... AUTO FADER and AUTO BAL. Hold down SOUND FLASH and turn the JOG clockwise or counterclockwise to change the sound movement from one speaker to another speaker during playback The flashing effect is automatically changed to "X-ROUND OFF" and you can activate the X-ROUND and SOUND FLASH effect simultaneously... MANUAL WAVE, MANUAL FADER and MANUAL BAL. Select To output sound MANUAL BAL, Back and forth AUTO BAL between the left speakers and right speakers RANDOM POS In random position TWISTER In circular motion like "twister" To change the sound movement Turn the JOG to change the...

Operating Instructions
Page 25
... Press GAME. The GAME function and the "GAME" preset effect is automatically changed to "SPEAKERS A+B" and you cannot change this setting. Tips • If you press GAME while the system is turned off . 2 Press SPEAKERS. Basic Operations Selecting the speaker setting (LBT-ZX99i only) You can also press FUNCTION (or FUNCTION +/- Game Sync You need...
... Press GAME. The GAME function and the "GAME" preset effect is automatically changed to "SPEAKERS A+B" and you cannot change this setting. Tips • If you press GAME while the system is turned off . 2 Press SPEAKERS. Basic Operations Selecting the speaker setting (LBT-ZX99i only) You can also press FUNCTION (or FUNCTION +/- Game Sync You need...

Operating Instructions
Page 32
...the volume. 2 Press TIMER MENU. 3 Press V or v repeatedly to music from the speakers, or change the direction of the microphone. However, you can not check the remaining time if you have set the system to turn -off in duet. 3 Start playing the music and adjust the volume. 4...If acoustic feedback (howling) occurs, reduce the volume, move the microphone away from disc, iPod or tuner at a preset timer. Tip To check the remaining time, press SLEEP once. t SLEEP 10min t SLEEP OFF * The system automatically turns off time) changes cyclically as follows: SLEEP AUTO* t SLEEP 90min t SLEEP...
...the volume. 2 Press TIMER MENU. 3 Press V or v repeatedly to music from the speakers, or change the direction of the microphone. However, you can not check the remaining time if you have set the system to turn -off in duet. 3 Start playing the music and adjust the volume. 4...If acoustic feedback (howling) occurs, reduce the volume, move the microphone away from disc, iPod or tuner at a preset timer. Tip To check the remaining time, press SLEEP once. t SLEEP 10min t SLEEP OFF * The system automatically turns off time) changes cyclically as follows: SLEEP AUTO* t SLEEP 90min t SLEEP...

Operating Instructions
Page 34
... the ventilation holes on the rear of the problem can not be retained. Redo "Setting the clock" (page 16). speaker cords short- If you encounter a problem with your system, do the following items. • Are the + and - There is disconnected or a power failure occurred. Additional... The clock is connected to the PHONES jack. • Check the speaker connections (page 11). • Check the speaker system setting (page 25). If the problem persists after checking all of the above items, consult your nearest Sony dealer. If the "/1 indicator still flashes, or if the cause of ...
... the ventilation holes on the rear of the problem can not be retained. Redo "Setting the clock" (page 16). speaker cords short- If you encounter a problem with your system, do the following items. • Are the + and - There is disconnected or a power failure occurred. Additional... The clock is connected to the PHONES jack. • Check the speaker connections (page 11). • Check the speaker system setting (page 25). If the problem persists after checking all of the above items, consult your nearest Sony dealer. If the "/1 indicator still flashes, or if the cause of ...

Operating Instructions
Page 35
...to the power cord. • Turn off the X-ROUND effect (page 24). The disc does not eject. • Consult your nearest Sony dealer or local authorized Sony service facility. Speakers Sound comes from the source of noise. • Connect the unit to a different wall outlet. • Install a noise filter (commercially...from the TV or VCR. • Move the unit away from one channel or unbalanced left and right volume. • Place the speakers as symmetrically as this system can play back (page 38). • Load the disc on the disc tray with bass sounds at the unit's sensor. •...
...to the power cord. • Turn off the X-ROUND effect (page 24). The disc does not eject. • Consult your nearest Sony dealer or local authorized Sony service facility. Speakers Sound comes from the source of noise. • Connect the unit to a different wall outlet. • Install a noise filter (commercially...from the TV or VCR. • Move the unit away from one channel or unbalanced left and right volume. • Place the speakers as symmetrically as this system can play back (page 38). • Load the disc on the disc tray with bass sounds at the unit's sensor. •...

Operating Instructions
Page 36
...to a depth of the iPod to start from the speaker cords as possible. • Try turning off the surrounding electrical equipment. • Set "CD POWER OFF" by this system" (page 42) for the supported device types. See "Compatible iPod models with this system are using an unsupported iPod. The MP3 files take...ID3 tag is playing music. • Adjust the volume. • Depending on the contents of the iPod, it fully. • Locate the antennas as far away from the first track. • The system is in the display) • Set the proper band and frequency (page 19). • Connect ...
...to a depth of the iPod to start from the speaker cords as possible. • Try turning off the surrounding electrical equipment. • Set "CD POWER OFF" by this system" (page 42) for the supported device types. See "Compatible iPod models with this system are using an unsupported iPod. The MP3 files take...ID3 tag is playing music. • Adjust the volume. • Depending on the contents of the iPod, it fully. • Locate the antennas as far away from the first track. • The system is in the display) • Set the proper band and frequency (page 19). • Connect ...
Operating Instructions
Page 38
...8226; Do not place the system in an inclined position or in locations that are extremely hot, cold, dusty, dirty, or humid or lacking adequate ventilation, or subject to vibration, direct sunlight or a bright light. • Be careful when placing the unit or speakers on surfaces that feels tacky ... during operation is normal and is not a cause for alarm. • Do not touch the cabinet if it back on. On the speaker system This speaker system is not magnetically shielded, and the picture on nearby TV sets may have become magnetically distorted. In this situation, turn it has been used...
...8226; Do not place the system in an inclined position or in locations that are extremely hot, cold, dusty, dirty, or humid or lacking adequate ventilation, or subject to vibration, direct sunlight or a bright light. • Be careful when placing the unit or speakers on surfaces that feels tacky ... during operation is normal and is not a cause for alarm. • Do not touch the cabinet if it back on. On the speaker system This speaker system is not magnetically shielded, and the picture on nearby TV sets may have become magnetically distorted. In this situation, turn it has been used...

Operating Instructions
Page 39
... (reference): 180 W × 2 + 180 W × 2 (6 Ω at 1 kHz, 10% THD) LBT-ZX66i (HCD-ZX66i) The following are measured at AC 120 V, 60 Hz Front speaker Power output (rated): 280 W (at 6 Ω, 1 kHz, 10% THD) RMS output power (reference): 210 W... × 2 (6 Ω at a distance of 8 Ω or more VIDEO OUT: max. output level 1 Vp-p, load impedance 75 ohms Disc player section System Compact disc and digital audio system...
... (reference): 180 W × 2 + 180 W × 2 (6 Ω at 1 kHz, 10% THD) LBT-ZX66i (HCD-ZX66i) The following are measured at AC 120 V, 60 Hz Front speaker Power output (rated): 280 W (at 6 Ω, 1 kHz, 10% THD) RMS output power (reference): 210 W... × 2 (6 Ω at a distance of 8 Ω or more VIDEO OUT: max. output level 1 Vp-p, load impedance 75 ohms Disc player section System Compact disc and digital audio system...

Operating Instructions
Page 40
...at 9 kHz) Antenna AM loop antenna Antenna terminals External antenna terminal Intermediate frequency 450 kHz iPod section DC5V 500 mA MAX Speakers For LBT-ZX99i Front/Surround speaker (SS-ZX99i) Speaker system 2-way, Bass reflex Speaker unit Woofer: 220 mm (8 3/4 inches), cone type Tweeter: 50 mm (2 inch),...mm (12 1/4 × 14 3/8 × 19 inches) Mass Approx. 8.7 kg (19 lb 3 oz) net per speaker For LBT-ZX66i Front speaker (SS-ZX66i) Speaker system 3-way BUILT-IN SW, Bass reflex Speaker unit Super Woofer/Woofer: 170 mm (6 3/4 inches)/170 mm (6 3/4 inches), cone type Tweeter: 25 mm (1 inch), ...
...at 9 kHz) Antenna AM loop antenna Antenna terminals External antenna terminal Intermediate frequency 450 kHz iPod section DC5V 500 mA MAX Speakers For LBT-ZX99i Front/Surround speaker (SS-ZX99i) Speaker system 2-way, Bass reflex Speaker unit Woofer: 220 mm (8 3/4 inches), cone type Tweeter: 50 mm (2 inch),...mm (12 1/4 × 14 3/8 × 19 inches) Mass Approx. 8.7 kg (19 lb 3 oz) net per speaker For LBT-ZX66i Front speaker (SS-ZX66i) Speaker system 3-way BUILT-IN SW, Bass reflex Speaker unit Super Woofer/Woofer: 170 mm (6 3/4 inches)/170 mm (6 3/4 inches), cone type Tweeter: 25 mm (1 inch), ...

Operating Instructions
Page 41
....5 × 454.6 mm (14 1/4 × 17 1/4 × 18 inches) Mass (Approx.) HCD-ZX99i: 19.0 kg (41 lb 15 oz) HCD-ZX66i: 14.6 kg (32 lb 4 oz) Supplied accessories Remote Commander (1) R6 (size AA) batteries (2) AM loop antenna (1) FM lead antenna (1) Speaker pads: • LBT-ZX99i only (16) • LBT-ZX66i only (8) Speaker cords: • LBT-ZX99i only -
....5 × 454.6 mm (14 1/4 × 17 1/4 × 18 inches) Mass (Approx.) HCD-ZX99i: 19.0 kg (41 lb 15 oz) HCD-ZX66i: 14.6 kg (32 lb 4 oz) Supplied accessories Remote Commander (1) R6 (size AA) batteries (2) AM loop antenna (1) FM lead antenna (1) Speaker pads: • LBT-ZX99i only (16) • LBT-ZX66i only (8) Speaker cords: • LBT-ZX99i only -


