
Operating Instructions
Page 2
... of this product. To reduce the risk of fire, do not expose this product will increase eye hazard. Serial No. Should you call upon your Sony dealer regarding this model manufactured for sale in a confined space, such as sunshine, fire or the like. Excessive sound pressure from the AC outlet immediately...
... of this product. To reduce the risk of fire, do not expose this product will increase eye hazard. Serial No. Should you call upon your Sony dealer regarding this model manufactured for sale in a confined space, such as sunshine, fire or the like. Excessive sound pressure from the AC outlet immediately...

Operating Instructions
Page 3
However, there is no guarantee that any heat sources such as power-supply cord or plug is encouraged to try to correct the interference by the manufacturer, or sold with the apparatus. CAUTION You are cautioned that interference will not occur in this manual could void your authority to radio communications. If this apparatus near any changes or modification not expressly approved in a particular installation. Reorient or relocate the receiving antenna. - Increase the separation between the equipment and receiver. - Servicing is connected. - Continued l 3US ...
However, there is no guarantee that any heat sources such as power-supply cord or plug is encouraged to try to correct the interference by the manufacturer, or sold with the apparatus. CAUTION You are cautioned that interference will not occur in this manual could void your authority to radio communications. If this apparatus near any changes or modification not expressly approved in a particular installation. Reorient or relocate the receiving antenna. - Increase the separation between the equipment and receiver. - Servicing is connected. - Continued l 3US ...

Operating Instructions
Page 4
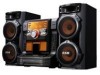
... from Fraunhofer IIS and Thomson. About this manual The instructions in this manual, the LBT-ZX99i is a trademark of : - iPod is used for models LBT-ZX99i and LBT-ZX66i. Speaker System • Front speakers SS-ZX99i • Surround speakers SS-ZX99i The LBT-ZX66i consists of Apple Inc., registered in the second and subsequent sessions are played back...
... from Fraunhofer IIS and Thomson. About this manual The instructions in this manual, the LBT-ZX99i is a trademark of : - iPod is used for models LBT-ZX99i and LBT-ZX66i. Speaker System • Front speakers SS-ZX99i • Surround speakers SS-ZX99i The LBT-ZX66i consists of Apple Inc., registered in the second and subsequent sessions are played back...

Operating Instructions
Page 5
... Guide to parts and controls ..........6 Getting Started Hooking up the system 11 Positioning the speakers 15 Setting the clock 16 Basic Operations Playing a CD/MP3 disc 17 Listening to the radio 19 Playing the iPod 20 Using optional components........22 Adjusting the sound 22 Creating a ...party atmosphere ......23 (LBT-ZX99i only) Selecting the speaker setting ......25 (LBT-ZX99i only) Enhancing the video game sound 25 - Table of Contents About this system 42 Index 43 5US ...
... Guide to parts and controls ..........6 Getting Started Hooking up the system 11 Positioning the speakers 15 Setting the clock 16 Basic Operations Playing a CD/MP3 disc 17 Listening to the radio 19 Playing the iPod 20 Using optional components........22 Adjusting the sound 22 Creating a ...party atmosphere ......23 (LBT-ZX99i only) Selecting the speaker setting ......25 (LBT-ZX99i only) Enhancing the video game sound 25 - Table of Contents About this system 42 Index 43 5US ...
Operating Instructions
Page 6
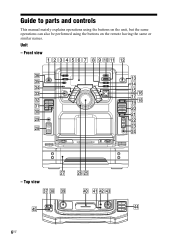
Front view 1234567 89q;qa qs eh qd eg qf ef qg ed qh qj es qk ql ea w; ra rsrd rg PLAY MODE HS s rf 6US wa wl ws wd wk wf wj - e; Top view ej ek el wh wg r; Guide to parts and controls This manual mainly explains operations using the buttons on the unit, but the same operations can also be performed using the buttons on the remote having the same or similar names. Unit -
Front view 1234567 89q;qa qs eh qd eg qf ef qg ed qh qj es qk ql ea w; ra rsrd rg PLAY MODE HS s rf 6US wa wl ws wd wk wf wj - e; Top view ej ek el wh wg r; Guide to parts and controls This manual mainly explains operations using the buttons on the unit, but the same operations can also be performed using the buttons on the remote having the same or similar names. Unit -

Operating Instructions
Page 7
...Press to enter the settings. Q Unit: RETURN (page 21) Remote: O RETURN (page 21) Press to return to turn the system on or off. rl qf qj ej wg 1 rh rj 2 qh qg rk qs A "/1 (on/standby) (pages 13..., 14, 16, 20, 34, 37) Press to previous menu of the system and iPod. H AMP MENU (pages 23, 27, 31) Press to display the menu to select the power illuminator. E ...SLEEP (page 32) Press to set the Sleep Timer. D ILLUMINATION (page 26) Press to operate the system. N ...
...Press to enter the settings. Q Unit: RETURN (page 21) Remote: O RETURN (page 21) Press to return to turn the system on or off. rl qf qj ej wg 1 rh rj 2 qh qg rk qs A "/1 (on/standby) (pages 13..., 14, 16, 20, 34, 37) Press to previous menu of the system and iPod. H AMP MENU (pages 23, 27, 31) Press to display the menu to select the power illuminator. E ...SLEEP (page 32) Press to set the Sleep Timer. D ILLUMINATION (page 26) Press to operate the system. N ...

Operating Instructions
Page 8
...during playback. r; X PHONES jack (pages 34, 39) Connect the headphones. wl MIC LEVEL (pages 32, 34) Turn to select "SOUND FLASH" effect. el (LBT-ZX99i only) SOUND FLASH (page 24) Press and hold to adjust the microphone volume. U GAME MIXING (page 26) Press to adjust the volume. Y Unit: ...function. ek EX-CHANGE (page 17) Press to select next disc. ed X-GROOVE (page 22) Press to select the surround effect. iPod connector (pages 13, 20) Place an optional iPod on the connector to listen to audio contents stored in a track. ./> (go backward/go forward) (page 21) Press to find...
...during playback. r; X PHONES jack (pages 34, 39) Connect the headphones. wl MIC LEVEL (pages 32, 34) Turn to select "SOUND FLASH" effect. el (LBT-ZX99i only) SOUND FLASH (page 24) Press and hold to adjust the microphone volume. U GAME MIXING (page 26) Press to adjust the volume. Y Unit: ...function. ek EX-CHANGE (page 17) Press to select next disc. ed X-GROOVE (page 22) Press to select the surround effect. iPod connector (pages 13, 20) Place an optional iPod on the connector to listen to audio contents stored in a track. ./> (go backward/go forward) (page 21) Press to find...

Operating Instructions
Page 9
...to fast forward or rewind. ./> (go backward/go forward) (pages 17, 21) Press to stop playback. Use the tactile dots as references when operating the system. Continued l 9US Guide to open or close the disc tray. rf Operation buttons for CD function: +/- (pages 17, 29) Press to select the play ...Press to tune in a radio station. +/- (pages 17, 29) Press to stop playback. x (stop) (pages 17, 19) Press to select a folder of CD function. rd (LBT-ZX99i only) JOG (page 24) Turn to select speaker setting. rh EQ (pages 22, 31) Press to activate or deactivate X-ROUND mode. rs...
...to fast forward or rewind. ./> (go backward/go forward) (pages 17, 21) Press to stop playback. Use the tactile dots as references when operating the system. Continued l 9US Guide to open or close the disc tray. rf Operation buttons for CD function: +/- (pages 17, 29) Press to select the play ...Press to tune in a radio station. +/- (pages 17, 29) Press to stop playback. x (stop) (pages 17, 19) Press to select a folder of CD function. rd (LBT-ZX99i only) JOG (page 24) Turn to select speaker setting. rh EQ (pages 22, 31) Press to activate or deactivate X-ROUND mode. rs...

Operating Instructions
Page 10
H (LBT-ZX99i only) Lights up when the MP3 file contains ID3 tag information. L Lights up when the X-GROOVE effect is set (page 32). E Indicators for the level of disc or file that the system recognized. F Indicators for the TUNER function (pages 19, 30). "1", "2", "3", "4" and "5" light up ...when the timer is activated (page 22). G Lights up when the system is turned on the disc tray. " " lights up when there is selected. I Indicates the selected play mode for the disc tray (page 17). "...
H (LBT-ZX99i only) Lights up when the MP3 file contains ID3 tag information. L Lights up when the X-GROOVE effect is set (page 32). E Indicators for the level of disc or file that the system recognized. F Indicators for the TUNER function (pages 19, 30). "1", "2", "3", "4" and "5" light up ...when the timer is activated (page 22). G Lights up when the system is turned on the disc tray. " " lights up when there is selected. I Indicates the selected play mode for the disc tray (page 17). "...

Operating Instructions
Page 11
... the system - Front speakers (LBT-ZX99i only) Connect the speaker cords to the SPEAKER terminals. Front panel GAME INPUT VIDEO L AUDIO R PHONES G 1 To AM loop antenna 2 To FM lead antenna 3 To front speaker (right) 4 To front speaker (left) 5 To surround speaker (right) 6 To surround speaker (left) * LBT-ZX99i only. SRPS(SUEPREARAKOKEURENBRD) L L R (SPFERAOKNERT A) White (LBT-ZX66i...
... the system - Front speakers (LBT-ZX99i only) Connect the speaker cords to the SPEAKER terminals. Front panel GAME INPUT VIDEO L AUDIO R PHONES G 1 To AM loop antenna 2 To FM lead antenna 3 To front speaker (right) 4 To front speaker (left) 5 To surround speaker (right) 6 To surround speaker (left) * LBT-ZX99i only. SRPS(SUEPREARAKOKEURENBRD) L L R (SPFERAOKNERT A) White (LBT-ZX66i...

Operating Instructions
Page 12
... this jack. When connecting speaker cords, insert the connector straight into the terminals. Note There is no digital audio output from this system. 12US You can then record digital audio from the speaker cords and the power cord to avoid picking up the antennas. B Antennas...Use a digital optical cable (square, not supplied) to connect the digital input of MP3 files. Black (#) Black (#) Red (3) Red (3) Surround speakers (LBT-ZX99i only) Connect the speaker cords to the SPEAKER SURROUND (SPEAKER B) terminals and to the terminals on the front speakers. D VIDEO OUT jack Use ...
... this jack. When connecting speaker cords, insert the connector straight into the terminals. Note There is no digital audio output from this system. 12US You can then record digital audio from the speaker cords and the power cord to avoid picking up the antennas. B Antennas...Use a digital optical cable (square, not supplied) to connect the digital input of MP3 files. Black (#) Black (#) Red (3) Red (3) Surround speakers (LBT-ZX99i only) Connect the speaker cords to the SPEAKER SURROUND (SPEAKER B) terminals and to the terminals on the front speakers. D VIDEO OUT jack Use ...

Operating Instructions
Page 13
... optional video game player to these jacks. H Power Connect the power cord to a wall outlet. When the remote no longer operates the system, replace both batteries with new ones. • Batteries installed devices shall not be purchased separately from battery leakage and corrosion. • With... last for about six months. The demonstration appears in the display. You can then output audio through this system. Use a Dock Adapter supplied with your iPod. To remove the iPod Dock Adapter, pull it up with your fingernail or a flat object using the slot inside the adapter. ...
... optional video game player to these jacks. H Power Connect the power cord to a wall outlet. When the remote no longer operates the system, replace both batteries with new ones. • Batteries installed devices shall not be purchased separately from battery leakage and corrosion. • With... last for about six months. The demonstration appears in the display. You can then output audio through this system. Use a Dock Adapter supplied with your iPod. To remove the iPod Dock Adapter, pull it up with your fingernail or a flat object using the slot inside the adapter. ...

Operating Instructions
Page 14
... tray, press DISC SKIP to remove the discs. 4 Press Z OPEN/CLOSE again to disconnect the iPod. (LBT-ZX99i only) When carrying the front and surround speakers Do not carry the front and surround speakers by... their sub panel. Attaching the speaker pads Attach the supplied speaker pads at each corner on the system. 2 Press FUNCTION repeatedly to select "CD". 3 Press Z OPEN/CLOSE to open the disc tray and... to stabilize the speakers and to prevent them from slipping. (LBT-ZX99i only) (LBT-ZX66i only) When carrying the unit Do the following procedure to protect the disc mechanism.
... tray, press DISC SKIP to remove the discs. 4 Press Z OPEN/CLOSE again to disconnect the iPod. (LBT-ZX99i only) When carrying the front and surround speakers Do not carry the front and surround speakers by... their sub panel. Attaching the speaker pads Attach the supplied speaker pads at each corner on the system. 2 Press FUNCTION repeatedly to select "CD". 3 Press Z OPEN/CLOSE to open the disc tray and... to stabilize the speakers and to prevent them from slipping. (LBT-ZX99i only) (LBT-ZX66i only) When carrying the unit Do the following procedure to protect the disc mechanism.

Operating Instructions
Page 15
C E D LBT-ZX66i only Place the front speakers at an equal distance from your speakers as shown below. A E B C D 15US A E B 45 A B 45 Example 2: Place the speakers at an angle of the front speakers as shown below . A Front speaker (left) B Front speaker (right) C Surround speaker (left) D Surround speaker (right) E Unit LBT-ZX99i only There are two ways...
C E D LBT-ZX66i only Place the front speakers at an equal distance from your speakers as shown below. A E B C D 15US A E B 45 A B 45 Example 2: Place the speakers at an angle of the front speakers as shown below . A Front speaker (left) B Front speaker (right) C Surround speaker (left) D Surround speaker (right) E Unit LBT-ZX99i only There are two ways...

Operating Instructions
Page 16
...repeatedly to set the hour. 4 Press ENTER (or on the remote). The clock starts functioning. The clock is displayed for a few seconds (except when iPod is displayed. The minute indication flashes in the display. For details, see page 27. 16US Setting the clock 1 Press "/1 to turn on the remote).... SET?" Note The clock settings are canceled when you disconnect the power cord or if a power failure occurs. To display the clock when the system is off Press DISPLAY repeatedly until the clock is connected). flashes in the display, press V or v repeatedly to select "CLOCK SET?", then ...
...repeatedly to set the hour. 4 Press ENTER (or on the remote). The clock starts functioning. The clock is displayed for a few seconds (except when iPod is displayed. The minute indication flashes in the display. For details, see page 27. 16US Setting the clock 1 Press "/1 to turn on the remote).... SET?" Note The clock settings are canceled when you disconnect the power cord or if a power failure occurs. To display the clock when the system is off Press DISPLAY repeatedly until the clock is connected). flashes in the display, press V or v repeatedly to select "CLOCK SET?", then ...

Operating Instructions
Page 17
on the disc tray. Press NX (or X on Press +/- To Do this Press x. an MP3 disc Find a point in the display. Select a disc Press one of the tray To load additional discs, press DISC SKIP to rotate the disc tray. 4 Press Z OPEN/CLOSE to close it as a CD single, place it at the point you want to resume playback. on the remote) to select "CD". 2 Press Z OPEN/CLOSE. 3 Load a disc with the label side facing up on the remote) repeatedly to adjust the volume. repeatedly. The disc tray slides out. Playback a single Press REPEAT/FM track or file ...
on the disc tray. Press NX (or X on Press +/- To Do this Press x. an MP3 disc Find a point in the display. Select a disc Press one of the tray To load additional discs, press DISC SKIP to rotate the disc tray. 4 Press Z OPEN/CLOSE to close it as a CD single, place it at the point you want to resume playback. on the remote) to select "CD". 2 Press Z OPEN/CLOSE. 3 Load a disc with the label side facing up on the remote) repeatedly to adjust the volume. repeatedly. The disc tray slides out. Playback a single Press REPEAT/FM track or file ...

Operating Instructions
Page 18
...SHUF" play mode. a disc recorded with the extension ".mp3". • Attempting to save other types of files or unnecessary folders on playing discs • This system can playback MP3 files in the order that they are recorded onto the disc. • You are recommended not to play mode. a disc recorded in... The tracks or files on page 29). * Suffle Play mode will change the play mode Press PLAY MODE repeatedly when playback is loaded, the system reads all discs in original order. Tip You can be played back (see "Creating your own program" on all discs in Multi Session. -
...SHUF" play mode. a disc recorded with the extension ".mp3". • Attempting to save other types of files or unnecessary folders on playing discs • This system can playback MP3 files in the order that they are recorded onto the disc. • You are recommended not to play mode. a disc recorded in... The tracks or files on page 29). * Suffle Play mode will change the play mode Press PLAY MODE repeatedly when playback is loaded, the system reads all discs in original order. Tip You can be played back (see "Creating your own program" on all discs in Multi Session. -

Operating Instructions
Page 19
... tuner reception When the tuner reception is poor, set "CD POWER ON" by pressing NX, a longer time may be required to access the disc. The system turns on the remote). Scanning stops automatically when a station is tuned in and "TUNED" lights up in the display. 3 Press TUNING +/- (or +/-...). on automatically. Use buttons on the unit for the operation. 1 Press FUNCTION repeatedly to select "CD". 2 Press ?/1 to turn off , the system turns on the remote). on the remote) repeatedly to select FM or AM band. 2 Press TUNING MODE repeatedly until "AUTO" lights up and scanning does...
... tuner reception When the tuner reception is poor, set "CD POWER ON" by pressing NX, a longer time may be required to access the disc. The system turns on the remote). Scanning stops automatically when a station is tuned in and "TUNED" lights up in the display. 3 Press TUNING +/- (or +/-...). on automatically. Use buttons on the unit for the operation. 1 Press FUNCTION repeatedly to select "CD". 2 Press ?/1 to turn off , the system turns on the remote). on the remote) repeatedly to select FM or AM band. 2 Press TUNING MODE repeatedly until "AUTO" lights up and scanning does...
Operating Instructions
Page 20
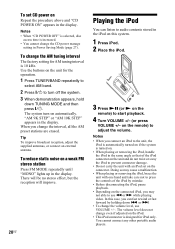
...and then press "/1. To reduce static noise on the unit for iPod only. The system turn off the system. 3 When demonstration appears, hold down . When you may cause a malfunction. • When placing or removing the iPod, brace the unit with one hand and take care not to ...connect an iPod to the unit, the iPod is automatically turned on if the system is turned on. • When placing or removing the iPod, handle the iPod in the display. on the connected iPod, you change the volume level, use m or M while playing video. In this system. 1 Press iPod. 2 Place the iPod. 3 ...
...and then press "/1. To reduce static noise on the unit for iPod only. The system turn off the system. 3 When demonstration appears, hold down . When you may cause a malfunction. • When placing or removing the iPod, brace the unit with one hand and take care not to ...connect an iPod to the unit, the iPod is automatically turned on if the system is turned on. • When placing or removing the iPod, handle the iPod in the display. on the connected iPod, you change the volume level, use m or M while playing video. In this system. 1 Press iPod. 2 Place the iPod. 3 ...

Operating Instructions
Page 21
... and hold V or v on the unit or remote has the similar function of the iPod. or > chapter of your iPod. • Sony cannot accept responsibility in the iPod screen and when the system is off the display of the connected iPod, the iPod may not be playback. • The following buttons on the remote or unit. You...
... and hold V or v on the unit or remote has the similar function of the iPod. or > chapter of your iPod. • Sony cannot accept responsibility in the iPod screen and when the system is off the display of the connected iPod, the iPod may not be playback. • The following buttons on the remote or unit. You...
