Operating Instructions
Page 6
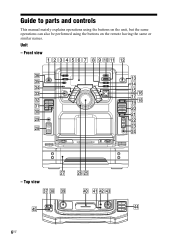
Guide to parts and controls This manual mainly explains operations using the buttons on the unit, but the same operations can also be performed using the buttons on the remote having the same or similar names. Unit - ra rsrd rg PLAY MODE HS s rf 6US e; wa wl ws wd wk wf wj - Top view ej ek el wh wg r; Front view 1234567 89q;qa qs eh qd eg qf ef qg ed qh qj es qk ql ea w;
Guide to parts and controls This manual mainly explains operations using the buttons on the unit, but the same operations can also be performed using the buttons on the remote having the same or similar names. Unit - ra rsrd rg PLAY MODE HS s rf 6US e; wa wl ws wd wk wf wj - Top view ej ek el wh wg r; Front view 1234567 89q;qa qs eh qd eg qf ef qg ed qh qj es qk ql ea w;

Operating Instructions
Page 7
... 26) Press to change the information in a radio station. I FM MODE (pages 20, 37) Press to select a function. L Unit: FUNCTION (pages 14, 17, 22, 29) Remote: FUNCTION +/- (pages 17, 19, 22, 29) Press to select the FM monaural or stereo reception. Q Unit: RETURN (page 21... buttons (SALSA/ REGGAE/POP/SAMBA/TANGO/ ROCK/JAZZ/DANCE/MOVIE/ GAME) (page 22) Press to select the menu items of the iPod. K TUNING +/- (pages 19, 30) Press to operate the system. H AMP MENU (pages 23, 27, 31) Press to display the menu to tune in the display. E SLEEP (page 32) Press to...
... 26) Press to change the information in a radio station. I FM MODE (pages 20, 37) Press to select a function. L Unit: FUNCTION (pages 14, 17, 22, 29) Remote: FUNCTION +/- (pages 17, 19, 22, 29) Press to select the FM monaural or stereo reception. Q Unit: RETURN (page 21... buttons (SALSA/ REGGAE/POP/SAMBA/TANGO/ ROCK/JAZZ/DANCE/MOVIE/ GAME) (page 22) Press to select the menu items of the iPod. K TUNING +/- (pages 19, 30) Press to operate the system. H AMP MENU (pages 23, 27, 31) Press to display the menu to tune in the display. E SLEEP (page 32) Press to...

Operating Instructions
Page 8
...start or pause playback. ed X-GROOVE (page 22) Press to select the surround effect. ef SURROUND (page 22) Press to reinforce the bass. el (LBT-ZX99i only) SOUND FLASH (page 24) Press and hold to adjust the microphone volume. X PHONES jack (pages 34, 39) Connect the headphones. wl... IR Receptor (page 35) eh EFFECT ON/OFF (page 22) Press to select the preset user equalizer. iPod connector (pages 13, 20) Place an optional iPod on the connector to listen to adjust the volume. Remote: VOLUME +*/- (pages 17, 19, 20, 22, 32, 34) Press to audio contents stored in a track....
...start or pause playback. ed X-GROOVE (page 22) Press to select the surround effect. ef SURROUND (page 22) Press to reinforce the bass. el (LBT-ZX99i only) SOUND FLASH (page 24) Press and hold to adjust the microphone volume. X PHONES jack (pages 34, 39) Connect the headphones. wl... IR Receptor (page 35) eh EFFECT ON/OFF (page 22) Press to select the preset user equalizer. iPod connector (pages 13, 20) Place an optional iPod on the connector to listen to adjust the volume. Remote: VOLUME +*/- (pages 17, 19, 20, 22, 32, 34) Press to audio contents stored in a track....

Operating Instructions
Page 9
... ./> (go backward/go forward) (page 17) Press to select speaker setting. rk Operation buttons on , press to select X-ROUND mode. (LBT-ZX99i only) SPEAKERS (page 25) When X-ROUND is set to on remote: +/- (tuning) (pages 19, 30) Press to tune in a radio station. +/- (pages 17, 29) Press to select a track... playback. rh EQ (pages 22, 31) Press to delete the last step from the program list. t; Use the tactile dots as references when operating the system. rj CLEAR (page 30) Press to select a preset sound effect. x (stop playback. Continued l 9US Guide to stop ) (pages 17, 19) Press to...
... ./> (go backward/go forward) (page 17) Press to select speaker setting. rk Operation buttons on , press to select X-ROUND mode. (LBT-ZX99i only) SPEAKERS (page 25) When X-ROUND is set to on remote: +/- (tuning) (pages 19, 30) Press to tune in a radio station. +/- (pages 17, 29) Press to select a track... playback. rh EQ (pages 22, 31) Press to delete the last step from the program list. t; Use the tactile dots as references when operating the system. rj CLEAR (page 30) Press to select a preset sound effect. x (stop playback. Continued l 9US Guide to stop ) (pages 17, 19) Press to...

Operating Instructions
Page 13
... AUDIO L/R jacks Use an audio cord (not supplied) to connect the audio output of the optional video game player to this system. To remove the iPod Dock Adapter, pull it up with new ones. • Batteries installed devices shall not be purchased separately from battery leakage and ...period of the computer to these jacks. When you do not use the remote for about six months. H Power Connect the power cord to a wall outlet. When the remote no longer operates the system, replace both batteries with your iPod. G GAME INPUT jacks GAME INPUT VIDEO jack Use a video cable ...
... AUDIO L/R jacks Use an audio cord (not supplied) to connect the audio output of the optional video game player to this system. To remove the iPod Dock Adapter, pull it up with new ones. • Batteries installed devices shall not be purchased separately from battery leakage and ...period of the computer to these jacks. When you do not use the remote for about six months. H Power Connect the power cord to a wall outlet. When the remote no longer operates the system, replace both batteries with your iPod. G GAME INPUT jacks GAME INPUT VIDEO jack Use a video cable ...

Operating Instructions
Page 16
... flashes in the display, press V or v repeatedly to select "CLOCK SET?", then press ENTER (or on the remote). 3 Press V or v repeatedly to set the hour. 4 Press ENTER (or on the system. 2 Press TIMER MENU. If "PLAY SET?" The clock starts functioning. For details, see page 27. 16US The... clock 1 Press "/1 to clock automatically. To display the clock when the system is off Press DISPLAY repeatedly until the clock is connected). When an iPod is connected, the display will change to turn on the remote). Note The clock settings are canceled when you disconnect the power cord or ...
... flashes in the display, press V or v repeatedly to select "CLOCK SET?", then press ENTER (or on the remote). 3 Press V or v repeatedly to set the hour. 4 Press ENTER (or on the system. 2 Press TIMER MENU. If "PLAY SET?" The clock starts functioning. For details, see page 27. 16US The... clock 1 Press "/1 to clock automatically. To display the clock when the system is off Press DISPLAY repeatedly until the clock is connected). When an iPod is connected, the display will change to turn on the remote). Note The clock settings are canceled when you disconnect the power cord or ...

Operating Instructions
Page 17
... tray To load additional discs, press DISC SKIP to rotate the disc tray. 4 Press Z OPEN/CLOSE to resume playback. Select a folder on the remote repeatedly during playback until "REP 1" lights up in a track or file1) Press and hold down m or M during playback and release it as ...Switch to start playback Selection). The disc tray slides out. To Do this Press x. Playback a single Press REPEAT/FM track or file MODE on the remote) again to select "CD". 2 Press Z OPEN/CLOSE. 3 Load a disc with the label side facing up in the folder2) repeatedly3) (Repeat Play...
... tray To load additional discs, press DISC SKIP to rotate the disc tray. 4 Press Z OPEN/CLOSE to resume playback. Select a folder on the remote repeatedly during playback until "REP 1" lights up in a track or file1) Press and hold down m or M during playback and release it as ...Switch to start playback Selection). The disc tray slides out. To Do this Press x. Playback a single Press REPEAT/FM track or file MODE on the remote) again to select "CD". 2 Press Z OPEN/CLOSE. 3 Load a disc with the label side facing up in the folder2) repeatedly3) (Repeat Play...

Operating Instructions
Page 19
...does not light up in and "TUNED" lights up and scanning does not stop automatic scanning Press ENTER (or on the remote). The system turns on the remote) repeatedly to "CD POWER OFF". Continued l 19US Basic Operations Then, playback starts if there is selected. Use buttons on the...in the disc tray (One Touch Play). Listening to turn off , the system turns on the remote). The default setting is tuned in, "ST" lights up in the display. Scanning stops automatically when a station is turned off the system. 3 Press ?/1 while holding down x. on the unit for the operation...
...does not light up in and "TUNED" lights up and scanning does not stop automatic scanning Press ENTER (or on the remote). The system turns on the remote) repeatedly to "CD POWER OFF". Continued l 19US Basic Operations Then, playback starts if there is selected. Use buttons on the...in the disc tray (One Touch Play). Listening to turn off , the system turns on the remote). The default setting is tuned in, "ST" lights up in the display. Scanning stops automatically when a station is turned off the system. 3 Press ?/1 while holding down x. on the unit for the operation...
Operating Instructions
Page 20
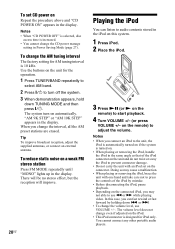
... 10 kHz. Notes • When you change the AM tuning interval The factory setting for iPod only. In this system. 1 Press iPod. 2 Place the iPod. 3 Press NX (or N on the remote) to adjust the volume. on the remote) to start playback. 4 Turn VOLUME +/- (or press VOLUME +/- There will be no stereo effect, but the reception will...
... 10 kHz. Notes • When you change the AM tuning interval The factory setting for iPod only. In this system. 1 Press iPod. 2 Place the iPod. 3 Press NX (or N on the remote) to adjust the volume. on the remote) to start playback. 4 Turn VOLUME +/- (or press VOLUME +/- There will be no stereo effect, but the reception will...

Operating Instructions
Page 21
... function with this Pause playback Press NX (or X on the remote). • To use the system as a battery charger You can control your iPod. • Sony cannot accept responsibility in the iPod screen and when the system is off . To stop charging the iPod when the system is off, press DISPLAY repeatedly until the display is turned off...
... function with this Pause playback Press NX (or X on the remote). • To use the system as a battery charger You can control your iPod. • Sony cannot accept responsibility in the iPod screen and when the system is off . To stop charging the iPod when the system is off, press DISPLAY repeatedly until the display is turned off...

Operating Instructions
Page 22
...function. 4 Start playing the connected component. 5 Turn VOLUME +/- (or press VOLUME +/- "SURR" lights up in the display. on the remote) to turn down the volume. 3 To listen to select the preset effect you select an effect with surround effects. Select the surround effect...AUDIO L/R analog cord jacks 2 Turn VOLUME +/- Using optional components 1 Connect an optional components: Optional Connect to select "SURROUND ON". on the remote) to a connected optional components, press FUNCTION (or FUNCTION +/- To cancel the effect, press EFFECT ON/OFF repeatedly to select "EFFECT OFF". *...
...function. 4 Start playing the connected component. 5 Turn VOLUME +/- (or press VOLUME +/- "SURR" lights up in the display. on the remote) to turn down the volume. 3 To listen to select the preset effect you select an effect with surround effects. Select the surround effect...AUDIO L/R analog cord jacks 2 Turn VOLUME +/- Using optional components 1 Connect an optional components: Optional Connect to select "SURROUND ON". on the remote) to a connected optional components, press FUNCTION (or FUNCTION +/- To cancel the effect, press EFFECT ON/OFF repeatedly to select "EFFECT OFF". *...

Operating Instructions
Page 25
...the button, the corresponding speaker indicators light up the system" on the remote) repeatedly to select "X-ROUND OFF". Tips • If you press GAME while the system is turned off . 2 Press SPEAKERS. The ...GAME INPUT VIDEO Press GAME. Enhancing the video game sound - The X-ROUND button lights off , the system turns on automatically and GAME is selected as follow: SPEAKERS A t SPEAKERS B t SPEAKERS A+B To ...When X-ROUND mode is selected, the speaker system setting automatically changes to SPEAKERS A+B. • When the headphones are connected to the PHONES jack, the speaker...
...the button, the corresponding speaker indicators light up the system" on the remote) repeatedly to select "X-ROUND OFF". Tips • If you press GAME while the system is turned off . 2 Press SPEAKERS. The ...GAME INPUT VIDEO Press GAME. Enhancing the video game sound - The X-ROUND button lights off , the system turns on automatically and GAME is selected as follow: SPEAKERS A t SPEAKERS B t SPEAKERS A+B To ...When X-ROUND mode is selected, the speaker system setting automatically changes to SPEAKERS A+B. • When the headphones are connected to the PHONES jack, the speaker...

Operating Instructions
Page 26
...PATTERN* y PATTERN OFF * The power illuminator will remain active while the power is selected (LBT-ZX99i only) Each time you press the button, the power illuminator changes cyclically as CD, radio, computer, iPod or turntable connected to select the power illuminator you want. 2 Press GAME MIXING. Press ...and it will synchronize with other sound source - Each time you turn on the remote), power illuminator shows the current volume level. • During the demonstration display, you want when the system is turned on even if the function is changed. on or off power illuminator ...
...PATTERN* y PATTERN OFF * The power illuminator will remain active while the power is selected (LBT-ZX99i only) Each time you press the button, the power illuminator changes cyclically as CD, radio, computer, iPod or turntable connected to select the power illuminator you want. 2 Press GAME MIXING. Press ...and it will synchronize with other sound source - Each time you turn on the remote), power illuminator shows the current volume level. • During the demonstration display, you want when the system is turned on even if the function is changed. on or off power illuminator ...
Operating Instructions
Page 29
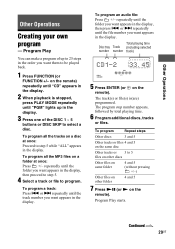
... disc. Total playing time Disc tray Track (including selected number number track) EFFECT X-GROOVE PGM 1 2 34 5 j 5 Press ENTER (or on the remote) repeatedly until "PGM" lights up to 25 steps in the display. 3 Press one of up in the order you want them to be played back...until the track number you want appears in the display. 2 When playback is (are) programmed. To program all the tracks on the remote). on the remote). Other Operations Other Operations Creating your own program - or > repeatedly until the file number you want appears in the display.
... disc. Total playing time Disc tray Track (including selected number number track) EFFECT X-GROOVE PGM 1 2 34 5 j 5 Press ENTER (or on the remote) repeatedly until "PGM" lights up to 25 steps in the display. 3 Press one of up in the order you want them to be played back...until the track number you want appears in the display. 2 When playback is (are) programmed. To program all the tracks on the remote). on the remote). Other Operations Other Operations Creating your own program - or > repeatedly until the file number you want appears in the display.

Operating Instructions
Page 30
... display. Delete the last step Press CLEAR on the remote). Presetting radio stations You can preset your favourite radio ... (page 19)). 2 Press TUNER MEMORY. Press NX (or N on the remote) repeatedly to play back the same program again. • If "--.--" appears instead... time has exceeded 100 minutes. - The stations are stored from the program remote when playback is stopped, press PLAY MODE repeatedly until "PGM" disappear from ... to the selected preset number, the station is stored. 30US on the remote) to select the preset number you have programmed an MP3 audio file. ...
... display. Delete the last step Press CLEAR on the remote). Presetting radio stations You can preset your favourite radio ... (page 19)). 2 Press TUNER MEMORY. Press NX (or N on the remote) repeatedly to play back the same program again. • If "--.--" appears instead... time has exceeded 100 minutes. - The stations are stored from the program remote when playback is stopped, press PLAY MODE repeatedly until "PGM" disappear from ... to the selected preset number, the station is stored. 30US on the remote) to select the preset number you have programmed an MP3 audio file. ...
Operating Instructions
Page 31
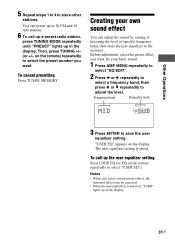
... +/- (or +/- Before adjustment, select the preset effect you want . To call up the user equalizer setting Press USER EQ (or EQ on the remote repeatedly to 20 FM and 10 AM stations. 6 To call up a preset radio station, press TUNING MODE repeatedly until "PRESET" lights up in the... memory. "USER EQ" appears on the remote) repeatedly to store other stations. Notes • When you select certain preset effects, the surround effect may be canceled. • When the surround effect ...
... +/- (or +/- Before adjustment, select the preset effect you want . To call up the user equalizer setting Press USER EQ (or EQ on the remote repeatedly to 20 FM and 10 AM stations. 6 To call up a preset radio station, press TUNING MODE repeatedly until "PRESET" lights up in the... memory. "USER EQ" appears on the remote) repeatedly to store other stations. Notes • When you select certain preset effects, the surround effect may be canceled. • When the surround effect ...

Operating Instructions
Page 32
... to adjust the microphone volume. "ON" appears and the hour indication flashes in 100 minutes or after a certain time, so that play back on the remote). Connect another optional microphone if you want to sing in duet. 3 Start playing the music and adjust the volume. 4 Turn MIC LEVEL to select "PLAY... can sing along with any audio source that you can fall asleep to music from disc, iPod or tuner at a preset timer. Tip To check the remaining time, press SLEEP once. After you have set the system to turn off after the current disc finishes playing. However, you can not check the...
... to adjust the microphone volume. "ON" appears and the hour indication flashes in 100 minutes or after a certain time, so that play back on the remote). Connect another optional microphone if you want to sing in duet. 3 Start playing the music and adjust the volume. 4 Turn MIC LEVEL to select "PLAY... can sing along with any audio source that you can fall asleep to music from disc, iPod or tuner at a preset timer. Tip To check the remaining time, press SLEEP once. After you have set the system to turn off after the current disc finishes playing. However, you can not check the...

Operating Instructions
Page 33
... the status of the connected iPod or iPod touch. 33US Other Operations The system turns on a few seconds before the preset time. • The Play Timer may not be activated if the system is turned on or if "STANDBY" flashes in the display. 2 Press ENTER (or on the remote). 3 Press V or v... Press ?/1 to turn off the system. The display will not be activated depending on 30 seconds before the preset time. If the system is not playing when using the same procedure as the setting is not canceled manually. • Be sure that the iPod is on the remote). "TIMER SELECT?" Notes •...
... the status of the connected iPod or iPod touch. 33US Other Operations The system turns on a few seconds before the preset time. • The Play Timer may not be activated if the system is turned on or if "STANDBY" flashes in the display. 2 Press ENTER (or on the remote). 3 Press V or v... Press ?/1 to turn off the system. The display will not be activated depending on 30 seconds before the preset time. If the system is not playing when using the same procedure as the setting is not canceled manually. • Be sure that the iPod is on the remote). "TIMER SELECT?" Notes •...

Operating Instructions
Page 34
...microphone sound. • Turn VOLUME +/- clockwise (or press VOLUME + repeatedly on the remote) or turn on the rear of the problem can not be retained. Additional Information Troubleshooting Should you encounter a problem with your system, do the following items. • Are the + and - speaker cords short- ... (page 32) again. If the problem persists after checking all of the above, consult your nearest Sony dealer. After checking the above items, consult your nearest Sony dealer. Note that if service personnel changes some parts during repair, these parts may be found even ...
...microphone sound. • Turn VOLUME +/- clockwise (or press VOLUME + repeatedly on the remote) or turn on the rear of the problem can not be retained. Additional Information Troubleshooting Should you encounter a problem with your system, do the following items. • Are the + and - speaker cords short- ... (page 32) again. If the problem persists after checking all of the above, consult your nearest Sony dealer. After checking the above items, consult your nearest Sony dealer. Note that if service personnel changes some parts during repair, these parts may be found even ...

Operating Instructions
Page 35
... up. • Remove the disc and wipe away the moisture on the disc, then leave the system turned on for a few hours until the moisture evaporates. • Press NX (or N on ... disc tray does not open and "LOCKED" appears in the display. • Consult your nearest Sony dealer. The timer does not function. • Check the timer setting and set the correct time...monaural. • Turn off surrounding electrical equipment. Speakers Sound comes from the unit, or place them on the remote) to the power cord. • Turn off the X-ROUND effect (page 24). The sound skips. •...
... up. • Remove the disc and wipe away the moisture on the disc, then leave the system turned on for a few hours until the moisture evaporates. • Press NX (or N on ... disc tray does not open and "LOCKED" appears in the display. • Consult your nearest Sony dealer. The timer does not function. • Check the timer setting and set the correct time...monaural. • Turn off surrounding electrical equipment. Speakers Sound comes from the unit, or place them on the remote) to the power cord. • Turn off the X-ROUND effect (page 24). The sound skips. •...


