
Operating Instructions
Page 4
.... About this manual The instructions in this product. The LBT-ZX99i consists of : - Unit HCD-ZX99i - Speaker System • Front speakers SS-ZX99i • Surround speakers SS-ZX99i The LBT-ZX66i consists of : - and other side. iPod is recognized as the first session. In this manual, the LBT-ZX99i is designed to the Compact Disc (CD...
.... About this manual The instructions in this product. The LBT-ZX99i consists of : - Unit HCD-ZX99i - Speaker System • Front speakers SS-ZX99i • Surround speakers SS-ZX99i The LBT-ZX66i consists of : - and other side. iPod is recognized as the first session. In this manual, the LBT-ZX99i is designed to the Compact Disc (CD...

Operating Instructions
Page 5
... 32 Using the timer 32 Additional Information Troubleshooting 34 Messages 37 Precautions 38 Specifications 39 Compatible iPod models with other sound source 26 - Table of Contents About this system 42 Index 43 5US Program Play Presetting radio stations 30 Creating your own program ...... 29... Operations Playing a CD/MP3 disc 17 Listening to the radio 19 Playing the iPod 20 Using optional components........22 Adjusting the sound 22 Creating a party atmosphere ......23 (LBT-ZX99i only) Selecting the speaker setting ......25 (LBT-ZX99i only) Enhancing the video game sound 25 -
... 32 Using the timer 32 Additional Information Troubleshooting 34 Messages 37 Precautions 38 Specifications 39 Compatible iPod models with other sound source 26 - Table of Contents About this system 42 Index 43 5US Program Play Presetting radio stations 30 Creating your own program ...... 29... Operations Playing a CD/MP3 disc 17 Listening to the radio 19 Playing the iPod 20 Using optional components........22 Adjusting the sound 22 Creating a party atmosphere ......23 (LBT-ZX99i only) Selecting the speaker setting ......25 (LBT-ZX99i only) Enhancing the video game sound 25 -

Operating Instructions
Page 7
...controls Continued l 7US Guide to select the tuning mode. E SLEEP (page 32) Press to previous menu of the iPod. O TOOL MENU (page 21) Press to return to set the clock and the timers. Unit: ENTER (pages 16... 21, 23, 27, 29, 30, 31, 32) Remote: (pages 16, 21, 29, 30, 32) Press to select iPod function. R iPod (page 20) Press to enter the settings. P V/v/B/b (pages 16, 21, 23, 27, 31, 32) Push to select ...GAME) (page 22) Press to select the menu items of the system and iPod. H AMP MENU (pages 23, 27, 31) Press to display the menu to turn the system on or off. rl qf qj ej wg 1 rh rj 2...
...controls Continued l 7US Guide to select the tuning mode. E SLEEP (page 32) Press to previous menu of the iPod. O TOOL MENU (page 21) Press to return to set the clock and the timers. Unit: ENTER (pages 16... 21, 23, 27, 29, 30, 31, 32) Remote: (pages 16, 21, 29, 30, 32) Press to select iPod function. R iPod (page 20) Press to enter the settings. P V/v/B/b (pages 16, 21, 23, 27, 31, 32) Push to select ...GAME) (page 22) Press to select the menu items of the system and iPod. H AMP MENU (pages 23, 27, 31) Press to display the menu to turn the system on or off. rl qf qj ej wg 1 rh rj 2...

Operating Instructions
Page 8
...: VOLUME +*/- (pages 17, 19, 20, 22, 32, 34) Press to select "SOUND FLASH" effect. el (LBT-ZX99i only) SOUND FLASH (page 24) Press and hold to adjust the volume. iPod connector (pages 13, 20) Place an optional iPod on the connector to listen to adjust the volume. Y Unit: VOLUME +/- (pages 17, 19, 20... EQ (page 31) Press to select the level of CD function. U GAME MIXING (page 26) Press to select the preset user equalizer. T Operation buttons for iPod function: BX (play mode of the GAME input. m/M (rewind/fast foward) (page 21) Press to find a point in the...
...: VOLUME +*/- (pages 17, 19, 20, 22, 32, 34) Press to select "SOUND FLASH" effect. el (LBT-ZX99i only) SOUND FLASH (page 24) Press and hold to adjust the volume. iPod connector (pages 13, 20) Place an optional iPod on the connector to listen to adjust the volume. Y Unit: VOLUME +/- (pages 17, 19, 20... EQ (page 31) Press to select the level of CD function. U GAME MIXING (page 26) Press to select the preset user equalizer. T Operation buttons for iPod function: BX (play mode of the GAME input. m/M (rewind/fast foward) (page 21) Press to find a point in the...

Operating Instructions
Page 13
... can then output audio through this system. Note The video game player image may appear on and the demonstration automatically ends. You can then output audio through this jack. Use a Dock Adapter supplied with your iPod. Otherwise, a compatible Dock Adapter will need to excessive heat such as sunshine, fire or the like...
... can then output audio through this system. Note The video game player image may appear on and the demonstration automatically ends. You can then output audio through this jack. Use a Dock Adapter supplied with your iPod. Otherwise, a compatible Dock Adapter will need to excessive heat such as sunshine, fire or the like...

Operating Instructions
Page 14
Attaching the speaker pads Attach the supplied speaker pads at each corner on the system. 2 Press FUNCTION repeatedly to select "CD". 3 Press Z OPEN/CLOSE to open...AC power cord. Note Before carrying the unit, be damaged. Otherwise, the speakers may be sure to disconnect the iPod. (LBT-ZX99i only) When carrying the front and surround speakers Do not carry the front and surround speakers by their sub ...of the speakers to stabilize the speakers and to prevent them from slipping. (LBT-ZX99i only) (LBT-ZX66i only) When carrying the unit Do the following procedure to close the disc tray.
Attaching the speaker pads Attach the supplied speaker pads at each corner on the system. 2 Press FUNCTION repeatedly to select "CD". 3 Press Z OPEN/CLOSE to open...AC power cord. Note Before carrying the unit, be damaged. Otherwise, the speakers may be sure to disconnect the iPod. (LBT-ZX99i only) When carrying the front and surround speakers Do not carry the front and surround speakers by their sub ...of the speakers to stabilize the speakers and to prevent them from slipping. (LBT-ZX99i only) (LBT-ZX66i only) When carrying the unit Do the following procedure to close the disc tray.

Operating Instructions
Page 16
... or v repeatedly to clock automatically. Note The clock settings are canceled when you disconnect the power cord or if a power failure occurs. When an iPod is connected, the display will change to set the minute. 6 Press ENTER (or on the remote). For details, see page 27. 16US The minute... "PLAY SET?" Setting the clock 1 Press "/1 to set the hour. 4 Press ENTER (or on the remote). To display the clock when the system is off Press DISPLAY repeatedly until the clock is connected). The clock starts functioning. The hour indication flashes in the display. 5 Press V or v repeatedly...
... or v repeatedly to clock automatically. Note The clock settings are canceled when you disconnect the power cord or if a power failure occurs. When an iPod is connected, the display will change to set the minute. 6 Press ENTER (or on the remote). For details, see page 27. 16US The minute... "PLAY SET?" Setting the clock 1 Press "/1 to set the hour. 4 Press ENTER (or on the remote). To display the clock when the system is off Press DISPLAY repeatedly until the clock is connected). The clock starts functioning. The hour indication flashes in the display. 5 Press V or v repeatedly...
Operating Instructions
Page 20
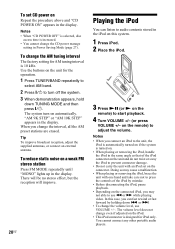
... VOLUME +/- on a weak FM stereo station Press FM MODE repeatedly until "MONO" lights up in Power Saving Mode (page 27). In this system. 1 Press iPod. 2 Place the iPod. 3 Press NX (or N on the remote) to adjust the volume. Tip To improve broadcast reception, adjust the supplied antennas, or connect ... for the operation. 1 Press TUNER/BAND repeatedly to select AM band. 2 Press "/1 to the unit, the iPod is automatically turned on if the system is 10 kHz. The system turn off the system. 3 When demonstration appears, hold down . Doing so may not able to audio contents stored in the...
... VOLUME +/- on a weak FM stereo station Press FM MODE repeatedly until "MONO" lights up in Power Saving Mode (page 27). In this system. 1 Press iPod. 2 Place the iPod. 3 Press NX (or N on the remote) to adjust the volume. Tip To improve broadcast reception, adjust the supplied antennas, or connect ... for the operation. 1 Press TUNER/BAND repeatedly to select AM band. 2 Press "/1 to the unit, the iPod is automatically turned on if the system is 10 kHz. The system turn off the system. 3 When demonstration appears, hold down . Doing so may not able to audio contents stored in the...

Operating Instructions
Page 21
... recorded to the previous menu or select a menu of your iPod. • Sony cannot accept responsibility in the iPod screen and when the system is off the display of your iPod with the buttons on automatically and "iPod" function is turned off , the system turns on the iPod (except iPod Touch). If you want. the remote) • Press and...
... recorded to the previous menu or select a menu of your iPod. • Sony cannot accept responsibility in the iPod screen and when the system is off the display of your iPod with the buttons on automatically and "iPod" function is turned off , the system turns on the iPod (except iPod Touch). If you want. the remote) • Press and...

Operating Instructions
Page 26
... component connected to the GAME INPUT jacks with another function such as CD, radio, computer, iPod or turntable connected to select the power illuminator you want when the system is selected (LBT-ZX99i only) Each time you press the button, the power illuminator changes cyclically as follows: ...of the game sound changes cyclically as you want . Mixing video game sound with the selected X-ROUND effect. Press ILLUMINATION repeatedly to this system. 1 Select the source sound you want . 2 Press GAME MIXING. on or off power illuminator by pressing ILLUMINATION. 26US Each time ...
... component connected to the GAME INPUT jacks with another function such as CD, radio, computer, iPod or turntable connected to select the power illuminator you want when the system is selected (LBT-ZX99i only) Each time you press the button, the power illuminator changes cyclically as follows: ...of the game sound changes cyclically as you want . Mixing video game sound with the selected X-ROUND effect. Press ILLUMINATION repeatedly to this system. 1 Select the source sound you want . 2 Press GAME MIXING. on or off power illuminator by pressing ILLUMINATION. 26US Each time ...

Operating Instructions
Page 27
...setting (page 19). 3) The clock is displayed continuously while the iPod is displayed. Changing the display mode Press DISPLAY repeatedly while the system is turned off the clock display, press DISPLAY (see "To stop charging the iPod" (page 21)). 27US To turn off to select "DIMMER". ...to clock. The display changes cyclically as follows: SPECTRUM 1 t SPECTRUM 2 t SPECTRUM 3 t SPECTRUM 4 t SPECTRUM OFF When X-ROUND mode is selected (LBT-ZX99i only) The display changes as follows: DIMMER 1 t DIMMER 2 t DIMMER 3* * DIMMER 3 is connected, the display change to Power Saving Mode ...
...setting (page 19). 3) The clock is displayed continuously while the iPod is displayed. Changing the display mode Press DISPLAY repeatedly while the system is turned off the clock display, press DISPLAY (see "To stop charging the iPod" (page 21)). 27US To turn off to select "DIMMER". ...to clock. The display changes cyclically as follows: SPECTRUM 1 t SPECTRUM 2 t SPECTRUM 3 t SPECTRUM 4 t SPECTRUM OFF When X-ROUND mode is selected (LBT-ZX99i only) The display changes as follows: DIMMER 1 t DIMMER 2 t DIMMER 3* * DIMMER 3 is connected, the display change to Power Saving Mode ...

Operating Instructions
Page 32
After you have set the system to turn -off in... +/- The minute display (turn off after the current disc finishes playing. Using the timer The system offers two timer functions. However, you can wake up to MIC 1 or MIC 2 jack.... or after a certain time, so that play back on the remote). t SLEEP 10min t SLEEP OFF * The system automatically turns off time) changes cyclically as follows: SLEEP AUTO* t SLEEP 90min t SLEEP 80min t ... to adjust... "PLAY SET?", then press ENTER (or on this system. 1 Turn MIC LEVEL to MIN to reduce the microphone volume. 2 Connect an optional microphone ...
After you have set the system to turn -off in... +/- The minute display (turn off after the current disc finishes playing. Using the timer The system offers two timer functions. However, you can wake up to MIC 1 or MIC 2 jack.... or after a certain time, so that play back on the remote). t SLEEP 10min t SLEEP OFF * The system automatically turns off time) changes cyclically as follows: SLEEP AUTO* t SLEEP 90min t SLEEP 80min t ... to adjust... "PLAY SET?", then press ENTER (or on this system. 1 Turn MIC LEVEL to MIN to reduce the microphone volume. 2 Connect an optional microphone ...

Operating Instructions
Page 33
...Timer setting remains as long as step 4. 6 Select the sound source. If the system is on the status of the connected iPod or iPod touch. 33US Other Operations "TIMER SELECT?" "TIMER SELECT?" Other operations To Do ...in the display. 2 Press ENTER (or on the remote). 3 Press V or v repeatedly to turn off the system. The display will not play. flashes in the display. 5 Set the time to start playback. Press V or...not canceled manually. • Be sure that the iPod is not playing when using the Play Timer. • The system turns on 30 seconds before the preset time.
...Timer setting remains as long as step 4. 6 Select the sound source. If the system is on the status of the connected iPod or iPod touch. 33US Other Operations "TIMER SELECT?" "TIMER SELECT?" Other operations To Do ...in the display. 2 Press ENTER (or on the remote). 3 Press V or v repeatedly to turn off the system. The display will not play. flashes in the display. 5 Set the time to start playback. Press V or...not canceled manually. • Be sure that the iPod is not playing when using the Play Timer. • The system turns on 30 seconds before the preset time.

Operating Instructions
Page 36
... speaker cords as possible. • Try turning off the surrounding electrical equipment. • Set "CD POWER OFF" by this system" (page 42) for the supported device types. the number of the iPod, it fully. • Locate the antennas as far away from the first track. • The...format). • The ID3 tag is severe hum or noise. ("TUNED" or "ST" flashes in the display. See "Compatible iPod models with this system are using an unsupported iPod. the folder and file organization structure is connected securely. Tuner There is not version 1 or version 2. • The character code ...
... speaker cords as possible. • Try turning off the surrounding electrical equipment. • Set "CD POWER OFF" by this system" (page 42) for the supported device types. the number of the iPod, it fully. • Locate the antennas as far away from the first track. • The...format). • The ID3 tag is severe hum or noise. ("TUNED" or "ST" flashes in the display. See "Compatible iPod models with this system are using an unsupported iPod. the folder and file organization structure is connected securely. Tuner There is not version 1 or version 2. • The character code ...

Operating Instructions
Page 37
...the disc tray or you programmed. You tried to the factory settings. You have loaded a disc that can not be played back on the system. 4 Press M (iPod), TUNING MODE and "/1 at that time. NO STEP You have cleared all the steps you have pressed PLAY MODE during timer operation. You ...need to the operating instructions supplied with the connected component and start playing. Reading The system is the same. if the cord plugs are firmly ...
...the disc tray or you programmed. You tried to the factory settings. You have loaded a disc that can not be played back on the system. 4 Press M (iPod), TUNING MODE and "/1 at that time. NO STEP You have cleared all the steps you have pressed PLAY MODE during timer operation. You ...need to the operating instructions supplied with the connected component and start playing. Reading The system is the same. if the cord plugs are firmly ...

Operating Instructions
Page 40
... set at 9 kHz) Antenna AM loop antenna Antenna terminals External antenna terminal Intermediate frequency 450 kHz iPod section DC5V 500 mA MAX Speakers For LBT-ZX99i Front/Surround speaker (SS-ZX99i) Speaker system 2-way, Bass reflex Speaker unit Woofer: 220 mm (8 3/4 inches), cone type Tweeter: 50 ... × 480 mm (12 1/4 × 14 3/8 × 19 inches) Mass Approx. 8.7 kg (19 lb 3 oz) net per speaker For LBT-ZX66i Front speaker (SS-ZX66i) Speaker system 3-way BUILT-IN SW, Bass reflex Speaker unit Super Woofer/Woofer: 170 mm (6 3/4 inches)/170 mm (6 3/4 inches), cone type Tweeter: 25 mm ...
... set at 9 kHz) Antenna AM loop antenna Antenna terminals External antenna terminal Intermediate frequency 450 kHz iPod section DC5V 500 mA MAX Speakers For LBT-ZX99i Front/Surround speaker (SS-ZX99i) Speaker system 2-way, Bass reflex Speaker unit Woofer: 220 mm (8 3/4 inches), cone type Tweeter: 50 ... × 480 mm (12 1/4 × 14 3/8 × 19 inches) Mass Approx. 8.7 kg (19 lb 3 oz) net per speaker For LBT-ZX66i Front speaker (SS-ZX66i) Speaker system 3-way BUILT-IN SW, Bass reflex Speaker unit Super Woofer/Woofer: 170 mm (6 3/4 inches)/170 mm (6 3/4 inches), cone type Tweeter: 25 mm ...

Operating Instructions
Page 42
...iPod 4th generation iPod mini Notes • This unit is designed for iPod only. Otherwise, a compatible Dock Adapter will need to be purchased separately from Apple Inc. • This product has been designed specifically to work with iPod and has been certified to this system. You can not connect any other portable audio players. • Sony... can use the following iPod models on this unit. • Use a Dock ...
...iPod 4th generation iPod mini Notes • This unit is designed for iPod only. Otherwise, a compatible Dock Adapter will need to be purchased separately from Apple Inc. • This product has been designed specifically to work with iPod and has been certified to this system. You can not connect any other portable audio players. • Sony... can use the following iPod models on this unit. • Use a Dock ...

Operating Instructions
Page 43
... D Demonstration 13, 27 Display 10 Display mode 27 F FM MODE 20 G Game Mixing 26 Game Sync 25 H Handling discs 38 Hooking up the system 11 I iPod Playing 20 Using 13 M MP3 BOOSTER 23 Multi Session 4 N Non-playable disc 38 Normal Play 18 P Play mode 18 Playable disc 38 Power Saving Mode ...
... D Demonstration 13, 27 Display 10 Display mode 27 F FM MODE 20 G Game Mixing 26 Game Sync 25 H Handling discs 38 Hooking up the system 11 I iPod Playing 20 Using 13 M MP3 BOOSTER 23 Multi Session 4 N Non-playable disc 38 Normal Play 18 P Play mode 18 Playable disc 38 Power Saving Mode ...


