Operating Instructions
Page 1
4-130-433-13(2) Mini HI-FI Component System Operating Instructions MHC-GTZ5 MHC-GTZ4 / GTZ4i MHC-GTZ3 / GTZ3i MHC-GTZ2 / GTZ2i LBT-GTZ4i ©2009 Sony Corporation
4-130-433-13(2) Mini HI-FI Component System Operating Instructions MHC-GTZ5 MHC-GTZ4 / GTZ4i MHC-GTZ3 / GTZ3i MHC-GTZ2 / GTZ2i LBT-GTZ4i ©2009 Sony Corporation
Operating Instructions
Page 2
... unit from the mains, connect the unit to the AC outlet, even if the unit itself has been turned off. Should you call upon your Sony dealer regarding this apparatus to excessive heat such as lighted candles on the rear exterior. 2GB CAUTION The use of the unit. Other versions may...
... unit from the mains, connect the unit to the AC outlet, even if the unit itself has been turned off. Should you call upon your Sony dealer regarding this apparatus to excessive heat such as lighted candles on the rear exterior. 2GB CAUTION The use of the unit. Other versions may...
Operating Instructions
Page 3
The wide blade or the third prong are cautioned that any changes or modifications not expressly approved in this manual could void your authority to operate this equipment does cause harmful interference to radio or television reception, which the receiver is used in accordance with one or more of time. 14) Refer all instructions. 5) Do not use caution when moving the cart/apparatus combination to avoid injury from the apparatus. 11) Only use attachments/accessories specified by the manufacturer. 12) Use only with the cart, stand, tripod, bracket, or table specified by one ...
The wide blade or the third prong are cautioned that any changes or modifications not expressly approved in this manual could void your authority to operate this equipment does cause harmful interference to radio or television reception, which the receiver is used in accordance with one or more of time. 14) Refer all instructions. 5) Do not use caution when moving the cart/apparatus combination to avoid injury from the apparatus. 11) Only use attachments/accessories specified by the manufacturer. 12) Use only with the cart, stand, tripod, bracket, or table specified by one ...
Operating Instructions
Page 4
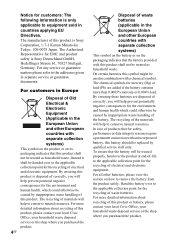
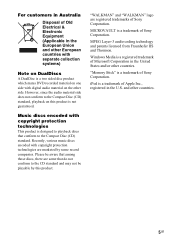
...it shall be handed over to the applicable collection point for the recycling of waste batteries. On certain batteries this product is Sony Deutschland GmbH, Hedelfinger Strasse 61, 70327 Stuttgart, Germany. In case of products that the battery will be replaced by inappropriate waste...product or on its packaging indicates that the battery provided with separate collection systems) This symbol on the battery or on how to conserve natural resources. Notice for customers: The following information is Sony Corporation, 1-7-1 Konan Minato-ku Tokyo, 108-0075 Japan. For more ...
...it shall be handed over to the applicable collection point for the recycling of waste batteries. On certain batteries this product is Sony Deutschland GmbH, Hedelfinger Strasse 61, 70327 Stuttgart, Germany. In case of products that the battery will be replaced by inappropriate waste...product or on its packaging indicates that the battery provided with separate collection systems) This symbol on the battery or on how to conserve natural resources. Notice for customers: The following information is Sony Corporation, 1-7-1 Konan Minato-ku Tokyo, 108-0075 Japan. For more ...
Operating Instructions
Page 5
...and Thomson. "Memory Stick" is a two sided disc product which mates DVD recorded material on one side with separate collection systems) Note on this product. Recently, various music discs encoded with copyright protection technologies This product is not guaranteed. Windows Media is a ...Apple Inc., registered in the United States and/or other countries. iPod is a registered trademark of Sony Corporation. However, since the audio material side does not conform to the CD standard and may not be playable by some record companies. "WALKMAN" and "WALKMAN" logo are ...
...and Thomson. "Memory Stick" is a two sided disc product which mates DVD recorded material on one side with separate collection systems) Note on this product. Recently, various music discs encoded with copyright protection technologies This product is not guaranteed. Windows Media is a ...Apple Inc., registered in the United States and/or other countries. iPod is a registered trademark of Sony Corporation. However, since the audio material side does not conform to the CD standard and may not be playable by some record companies. "WALKMAN" and "WALKMAN" logo are ...
Operating Instructions
Page 6
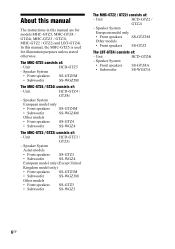
...manual are for illustration purposes unless stated otherwise. Unit HCD-GTZ5 - Unit HCD-GTZ4i - Speaker System European model only • Front speakers SS-GTZ3M Other models • Front speakers SS-GTZ3 The LBT-GTZ4i consists of : - The MHC-GTZ5 consists of : - About this manual The... MHC-GTZ5 is used for models MHC-GTZ5, MHC-GTZ4 / GTZ4i, MHC-GTZ3 / GTZ3i, MHC-GTZ2 / GTZ2i and LBT-GTZ4i. Unit HCD-GTZ4 / GTZ4i - Speaker System • Front speakers SS-GTZ5M • Subwoofer SS-WGZ5M The MHC-GTZ4 / GTZ4i consists of: - Unit HCD-GTZ3 / GTZ3i - Unit HCD...
...manual are for illustration purposes unless stated otherwise. Unit HCD-GTZ5 - Unit HCD-GTZ4i - Speaker System European model only • Front speakers SS-GTZ3M Other models • Front speakers SS-GTZ3 The LBT-GTZ4i consists of : - The MHC-GTZ5 consists of : - About this manual The... MHC-GTZ5 is used for models MHC-GTZ5, MHC-GTZ4 / GTZ4i, MHC-GTZ3 / GTZ3i, MHC-GTZ2 / GTZ2i and LBT-GTZ4i. Unit HCD-GTZ4 / GTZ4i - Speaker System • Front speakers SS-GTZ5M • Subwoofer SS-WGZ5M The MHC-GTZ4 / GTZ4i consists of: - Unit HCD-GTZ3 / GTZ3i - Unit HCD...
Operating Instructions
Page 7
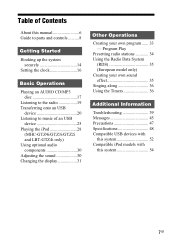
... ..........8 Getting Started Hooking up the system securely 14 Setting the clock 16 Basic Operations Playing an AUDIO CD/MP3 disc 17 Listening to the radio 19 Transferring onto an USB device 20 Listening to music of an USB device 25 Playing the iPod 28 (MHC-GTZ4i/GTZ3i/GTZ2i and LBT-GTZ4i only) Using optional audio...
... ..........8 Getting Started Hooking up the system securely 14 Setting the clock 16 Basic Operations Playing an AUDIO CD/MP3 disc 17 Listening to the radio 19 Transferring onto an USB device 20 Listening to music of an USB device 25 Playing the iPod 28 (MHC-GTZ4i/GTZ3i/GTZ2i and LBT-GTZ4i only) Using optional audio...
Operating Instructions
Page 8
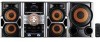
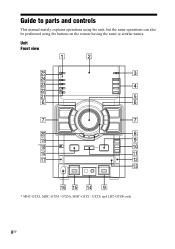
Guide to parts and controls This manual mainly explains operations using the unit, but the same operations can also be performed using the buttons on the remote having the same or similar names. qg qa qj qs qd qh qg qf 9 * MHC-GTZ5, MHC-GTZ4 / GTZ4i, MHC-GTZ3 / GTZ3i and LBT-GTZ4i only. 8GB Unit Front view 1 2 wg 3 wf wd 4 ws wa 5 6 6 7 7 w; 8 ql 9 *qk q;
Guide to parts and controls This manual mainly explains operations using the unit, but the same operations can also be performed using the buttons on the remote having the same or similar names. qg qa qj qs qd qh qg qf 9 * MHC-GTZ5, MHC-GTZ4 / GTZ4i, MHC-GTZ3 / GTZ3i and LBT-GTZ4i only. 8GB Unit Front view 1 2 wg 3 wf wd 4 ws wa 5 6 6 7 7 w; 8 ql 9 *qk q;
Operating Instructions
Page 9
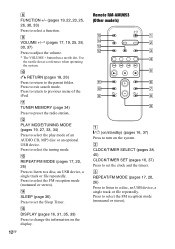
... and controls Continued l 9GB Guide to select a track, file or folder. The STANDBY indicator lights up in the OPTIONS menu. B indicator Lights up when the system is turned off. N (play) (pages 17, 25, 28, 33, 34, 40, 43) Press to an optional USB device. B port (pages 20, 25, 28, 37, ... and transfer to start playback. Press to switch to pause playback. X (pause) (pages 17, 26, 29) Press to the CD function from other function. TUNER/BAND (page 19) Press to turn on the system. 1 "/1 (on/standby) (pages 16, 39, 45) Press to select the TUNER function. PC (pages 22, 30) Press to...
... and controls Continued l 9GB Guide to select a track, file or folder. The STANDBY indicator lights up in the OPTIONS menu. B indicator Lights up when the system is turned off. N (play) (pages 17, 25, 28, 33, 34, 40, 43) Press to an optional USB device. B port (pages 20, 25, 28, 37, ... and transfer to start playback. Press to switch to pause playback. X (pause) (pages 17, 26, 29) Press to the CD function from other function. TUNER/BAND (page 19) Press to turn on the system. 1 "/1 (on/standby) (pages 16, 39, 45) Press to select the TUNER function. PC (pages 22, 30) Press to...
Operating Instructions
Page 10
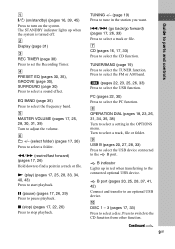
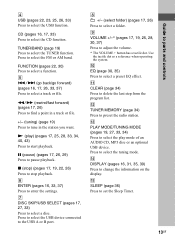
R MHC-GTZ5, MHC-GTZ4 / GTZ4i, MHC-GTZ3 / GTZ3i and LBT-GTZ4i only SUBWOOFER (page 30) Press to change the display, USB and MP3 BOOSTER+ settings. X DISPLAY (pages 16, 31, 35, 39) Press to turn on . MIC ... when the subwoofer is connected to select a disc during playback. Y Remote sensor (page 40) 10GB V OPTIONS (pages 23, 31) Press to exchange other discs during CD tray open. Q DISC SKIP/EX-CHANGE (pages 16, 18) Press to the B port.
R MHC-GTZ5, MHC-GTZ4 / GTZ4i, MHC-GTZ3 / GTZ3i and LBT-GTZ4i only SUBWOOFER (page 30) Press to change the display, USB and MP3 BOOSTER+ settings. X DISPLAY (pages 16, 31, 35, 39) Press to turn on . MIC ... when the subwoofer is connected to select a disc during playback. Y Remote sensor (page 40) 10GB V OPTIONS (pages 23, 31) Press to exchange other discs during CD tray open. Q DISC SKIP/EX-CHANGE (pages 16, 18) Press to the B port.
Operating Instructions
Page 11
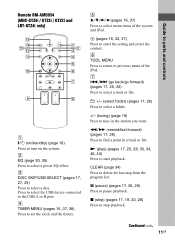
... to stop ) (pages 17, 19, 22, 26) Press to pause playback. x (stop playback. Remote RM-AMU054 (MHC-GTZ4i / GTZ3i / GTZ2i and LBT-GTZ4i only) qg qf qd qs qa q; 1 2 3 4 5 6 7 9 8 1 "/1 (on the system. Continued l 11GB Guide to turn on /standby) (page 16) Press to parts and controls C DISC SKIP/USB SELECT (pages... MENU (pages 16, 37, 38) Press to find a point in the station you want. F TOOL MENU Press to return to previous menu of the system and iPod. (pages 16, 33, 37) Press to select menu items of the iPod. m/M (rewind/fast forward) (pages 17, 26) Press to set...
... to stop ) (pages 17, 19, 22, 26) Press to pause playback. x (stop playback. Remote RM-AMU054 (MHC-GTZ4i / GTZ3i / GTZ2i and LBT-GTZ4i only) qg qf qd qs qa q; 1 2 3 4 5 6 7 9 8 1 "/1 (on the system. Continued l 11GB Guide to turn on /standby) (page 16) Press to parts and controls C DISC SKIP/USB SELECT (pages... MENU (pages 16, 37, 38) Press to find a point in the station you want. F TOOL MENU Press to return to previous menu of the system and iPod. (pages 16, 33, 37) Press to select menu items of the iPod. m/M (rewind/fast forward) (pages 17, 26) Press to set...
Operating Instructions
Page 12
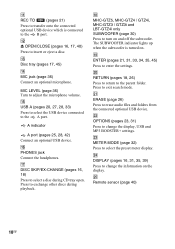
...qa 6 q; 7 8 8 9 1 "/1 (on/standby) (pages 16, 37) Press to select the FM reception mode (monaural or stereo). Use the tactile dot as a reference when operating the system. C REPEAT/FM MODE (pages 17, 20, 26) Press to listen to select the tuning mode. Press to a disc, an USB device, a single track or file... USB device, a single track or file repeatedly. H FUNCTION +/- (pages 19, 22, 23, 25, 26, 30, 33) Press to previous menu of an AUDIO CD, MP3 disc or an optional USB device. B CLOCK/TIMER SELECT (pages 38, 45) CLOCK/TIMER SET (pages 16, 37) Press to select the FM reception...
...qa 6 q; 7 8 8 9 1 "/1 (on/standby) (pages 16, 37) Press to select the FM reception mode (monaural or stereo). Use the tactile dot as a reference when operating the system. C REPEAT/FM MODE (pages 17, 20, 26) Press to listen to select the tuning mode. Press to a disc, an USB device, a single track or file... USB device, a single track or file repeatedly. H FUNCTION +/- (pages 19, 22, 23, 25, 26, 30, 33) Press to previous menu of an AUDIO CD, MP3 disc or an optional USB device. B CLOCK/TIMER SELECT (pages 38, 45) CLOCK/TIMER SET (pages 16, 37) Press to select the FM reception...
Operating Instructions
Page 13
..., 26) Press to select a disc. M PLAY MODE/TUNING MODE (pages 19, 27, 33, 34) Press to select the CD function. CD (pages 16, 17, 33) Press to select the play ) (pages 17, 25, 28, 33, 34, 40, 43)... Press to enter the settings. N (play mode of an AUDIO CD, MP3 disc or an optional USB device. F ENTER (pages 16, 33, 37) Press to start playback. Press ...) (pages 17, 26) Press to the USB A or B port. Use the tactile dot as a reference when operating the system. K CLEAR (page 34) Press to change the information on the display. N DISPLAY (pages 16, 31, 35, 39)...
..., 26) Press to select a disc. M PLAY MODE/TUNING MODE (pages 19, 27, 33, 34) Press to select the CD function. CD (pages 16, 17, 33) Press to select the play ) (pages 17, 25, 28, 33, 34, 40, 43)... Press to enter the settings. N (play mode of an AUDIO CD, MP3 disc or an optional USB device. F ENTER (pages 16, 33, 37) Press to start playback. Press ...) (pages 17, 26) Press to the USB A or B port. Use the tactile dot as a reference when operating the system. K CLEAR (page 34) Press to change the information on the display. N DISPLAY (pages 16, 31, 35, 39)...
Operating Instructions
Page 14
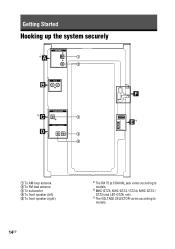
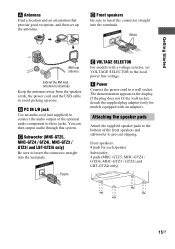
c) The VOLTAGE SELECTOR varies according to models. Getting Started Hooking up the system securely ANTENNA A a) 1 2 PC IN B F SUBWOOFER C b) 3 FRONT SPEAKER D 4 5 VOLTAGE SELECTOR E c) 1 To AM loop antenna 2 To FM lead antenna 3 To subwoofer 4 To front speaker (left) 5 To front speaker (right) 14GB a) The FM 75 Ω COAXIAL jack varies according to models. b) MHC-GTZ5, MHC-GTZ4 / GTZ4i, MHC-GTZ3 / GTZ3i and LBT-GTZ4i only.
c) The VOLTAGE SELECTOR varies according to models. Getting Started Hooking up the system securely ANTENNA A a) 1 2 PC IN B F SUBWOOFER C b) 3 FRONT SPEAKER D 4 5 VOLTAGE SELECTOR E c) 1 To AM loop antenna 2 To FM lead antenna 3 To subwoofer 4 To front speaker (left) 5 To front speaker (right) 14GB a) The FM 75 Ω COAXIAL jack varies according to models. b) MHC-GTZ5, MHC-GTZ4 / GTZ4i, MHC-GTZ3 / GTZ3i and LBT-GTZ4i only.
Operating Instructions
Page 15
... plug adaptor (only for each speaker Subwoofer: 4 pads (MHC-GTZ5, MHC-GTZ4 / GTZ4i, MHC-GTZ3 / GTZ3i and LBT-GTZ4i only) 15GB C Subwoofer (MHC-GTZ5, MHC-GTZ4 / GTZ4i, MHC-GTZ3 / GTZ3i and LBT-GTZ4i only) Be sure to a wall socket. Attaching the speaker pads Attach the supplied speaker ...pads to the bottom of the optional audio component to these jacks. You can then output audio through this system....
... plug adaptor (only for each speaker Subwoofer: 4 pads (MHC-GTZ5, MHC-GTZ4 / GTZ4i, MHC-GTZ3 / GTZ3i and LBT-GTZ4i only) 15GB C Subwoofer (MHC-GTZ5, MHC-GTZ4 / GTZ4i, MHC-GTZ3 / GTZ3i and LBT-GTZ4i only) Be sure to a wall socket. Attaching the speaker pads Attach the supplied speaker ...pads to the bottom of the optional audio component to these jacks. You can then output audio through this system....
Operating Instructions
Page 16
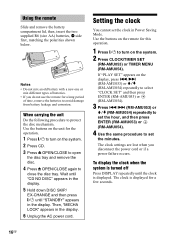
...when you do not use the remote for a few seconds. 16GB Use the buttons on the remote for the operation. 1 Press "/1 to turn on the system. 2 Press CD. 3 Press Z OPEN/CLOSE to open the disc tray and remove the disc. 4 Press Z OPEN/CLOSE again to avoid damage from battery leakage and ...corrosion. To display the clock when the system is turned off Press DISPLAY repeatedly until "STANDBY" appears in the display. 6 Unplug the AC power cord. Notes •...
...when you do not use the remote for a few seconds. 16GB Use the buttons on the remote for the operation. 1 Press "/1 to turn on the system. 2 Press CD. 3 Press Z OPEN/CLOSE to open the disc tray and remove the disc. 4 Press Z OPEN/CLOSE again to avoid damage from battery leakage and ...corrosion. To display the clock when the system is turned off Press DISPLAY repeatedly until "STANDBY" appears in the display. 6 Unplug the AC power cord. Notes •...
Operating Instructions
Page 17
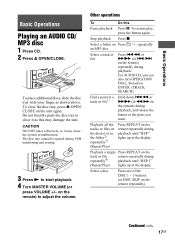
...press Z OPEN/ CLOSE on the remote) during playback until "REP" lights up in the display. Basic Operations Basic Operations Playing an AUDIO CD/ MP3 disc 1 Press CD. 2 Press Z OPEN/CLOSE. Do not forcibly push the disc tray to start playback. 4 Turn MASTER VOLUME (or press VOLUME +/-... Other operations To Do this may cause the system to adjust the volume. Playback a single Press REPEAT on the track or file repeatedly4) remote repeatedly ...
...press Z OPEN/ CLOSE on the remote) during playback until "REP" lights up in the display. Basic Operations Basic Operations Playing an AUDIO CD/ MP3 disc 1 Press CD. 2 Press Z OPEN/CLOSE. Do not forcibly push the disc tray to start playback. 4 Turn MASTER VOLUME (or press VOLUME +/-... Other operations To Do this may cause the system to adjust the volume. Playback a single Press REPEAT on the track or file repeatedly4) remote repeatedly ...
Operating Instructions
Page 18
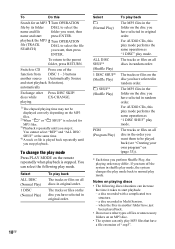
...Do this Search for MP3 files. 3) Playback repeatedly until you stop it takes to start playback: - when the files in shuffle play mode, the system changes the play mode back to select the name and file folder you want , then press ENTER. playback the MP3 2 Turn OPERATION file (TRACK ...on (page 33)). * Each time you want , then name and start playback Selection). For AUDIO CDs, this play mode performs the same operation as "1 DISC SHUF" play mode. Notes on an MP3 disc. • The system can increase the time it . Select ALL DISC (Normal Play) 1 DISC (Normal Play) To play...
...Do this Search for MP3 files. 3) Playback repeatedly until you stop it takes to start playback: - when the files in shuffle play mode, the system changes the play mode back to select the name and file folder you want , then press ENTER. playback the MP3 2 Turn OPERATION file (TRACK ...on (page 33)). * Each time you want , then name and start playback Selection). For AUDIO CDs, this play mode performs the same operation as "1 DISC SHUF" play mode. Notes on an MP3 disc. • The system can increase the time it . Select ALL DISC (Normal Play) 1 DISC (Normal Play) To play...
Operating Instructions
Page 19
...for stereo programs only) light up in the first session. Notes on playing multisession discs • This system can play back Multi Session discs when an MP3 file is recorded in AUDIO CD format, only the first session will not play if it has not been correctly finalized. •.../writing software, recording device, and recording media cannot be played back. • If the first session is contained in the display. Basic Operations • The system can recognize up to - 999 folders (including root folder). - 999 MP3 files. - 150 MP3 files on a single folder. - 8 folder levels (tree ...
...for stereo programs only) light up in the first session. Notes on playing multisession discs • This system can play back Multi Session discs when an MP3 file is recorded in AUDIO CD format, only the first session will not play if it has not been correctly finalized. •.../writing software, recording device, and recording media cannot be played back. • If the first session is contained in the display. Basic Operations • The system can recognize up to - 999 folders (including root folder). - 999 MP3 files. - 150 MP3 files on a single folder. - 8 folder levels (tree ...
Operating Instructions
Page 20
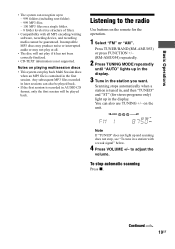
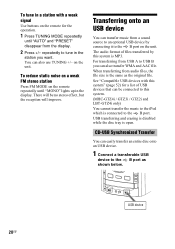
... noise on a weak FM stereo station Press FM MODE on the unit. CD-USB Synchronized Transfer You can easily transfer an entire disc onto an USB device...a sound source to an optional USB device by this system. (MHC-GTZ4i / GTZ3i / GTZ2i and LBT-GTZ4i only) You cannot transfer the music to the iPod which is connected to this system is open. Transferring onto an USB device You can ... "Compatible USB devices with a weak signal Use buttons on the unit. To tune in a station with this system" (page 52) for the operation. 1 Press TUNING MODE repeatedly until "MONO" lights up in the display....
... noise on a weak FM stereo station Press FM MODE on the unit. CD-USB Synchronized Transfer You can easily transfer an entire disc onto an USB device...a sound source to an optional USB device by this system. (MHC-GTZ4i / GTZ3i / GTZ2i and LBT-GTZ4i only) You cannot transfer the music to the iPod which is connected to this system is open. Transferring onto an USB device You can ... "Compatible USB devices with a weak signal Use buttons on the unit. To tune in a station with this system" (page 52) for the operation. 1 Press TUNING MODE repeatedly until "MONO" lights up in the display....
