Primary User Manual
Page 5
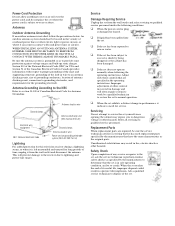
... by the manufacturer that are required, be located in the operating instructions. An outdoor antenna system should not be sure the service technician certifies in a picture tube implosion. Antennas Outdoor Antenna Grounding If an outdoor antenna is damaged or frayed. ❑ If liquid has been spilled into the set. ❑ If...
... by the manufacturer that are required, be located in the operating instructions. An outdoor antenna system should not be sure the service technician certifies in a picture tube implosion. Antennas Outdoor Antenna Grounding If an outdoor antenna is damaged or frayed. ❑ If liquid has been spilled into the set. ❑ If...
Primary User Manual
Page 10
... an optimized display by outstanding contrast, uncompromising accuracy, and corner-tocorner detail. This flat-screen technology improves picture detail without leaving the current channel. Features 2 Some of Wega technology almost immediately. Introducing the FD Trinitron Wega Presenting the FD Trinitron Wega The FD Trinitron Wega (pronounced VAY-GAH) is characterized by automatically detecting film content and applying a reverse 3/2 pulldown process. Moving...
... an optimized display by outstanding contrast, uncompromising accuracy, and corner-tocorner detail. This flat-screen technology improves picture detail without leaving the current channel. Features 2 Some of Wega technology almost immediately. Introducing the FD Trinitron Wega Presenting the FD Trinitron Wega The FD Trinitron Wega (pronounced VAY-GAH) is characterized by automatically detecting film content and applying a reverse 3/2 pulldown process. Moving...
Primary User Manual
Page 12
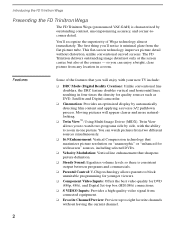
... for more advanced functions. Select the equipment (TV or SAT/CABLE) that are for movement of the joystick selects the item. Introducing the FD Trinitron Wega The following table describes the buttons on setting the time. Button 1 MUTING 2 SLEEP 3 DISPLAY 4 ANT 5 JUMP 6 DRC/ CINEMOTION ...have programmed into the remote control. For details, see "Selecting Video Options" on page 36. Cycles through the available high-resolution picture modes: Interlaced, Progressive, Cinemotion. Pressing down the CH+ or CH- ql qa w; For instructions, see "Programming the Remote ...
... for more advanced functions. Select the equipment (TV or SAT/CABLE) that are for movement of the joystick selects the item. Introducing the FD Trinitron Wega The following table describes the buttons on setting the time. Button 1 MUTING 2 SLEEP 3 DISPLAY 4 ANT 5 JUMP 6 DRC/ CINEMOTION ...have programmed into the remote control. For details, see "Selecting Video Options" on page 36. Cycles through the available high-resolution picture modes: Interlaced, Progressive, Cinemotion. Pressing down the CH+ or CH- ql qa w; For instructions, see "Programming the Remote ...
Primary User Manual
Page 13
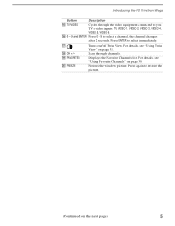
... changes after 2 seconds. For details, see "Using Twin View" on the next page) 5 qj qk CH +/- Displays the Favorite Channels list. Freezes the window picture. Introducing the FD Trinitron Wega Button Description qg TV/VIDEO Cycles through channels. For details, see "Using Favorite Channels" on /off Twin View. qh 0 - 9 and ENTER Press 0 - 9 to you...
... changes after 2 seconds. For details, see "Using Twin View" on the next page) 5 qj qk CH +/- Displays the Favorite Channels list. Freezes the window picture. Introducing the FD Trinitron Wega Button Description qg TV/VIDEO Cycles through channels. For details, see "Using Favorite Channels" on /off Twin View. qh 0 - 9 and ENTER Press 0 - 9 to you...
Primary User Manual
Page 16
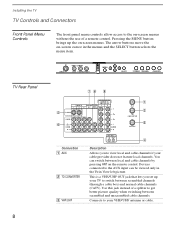
...to the AUX input can switch between local and cable channels by pressing ANT on -screen menus without the use of a splitter to get better picture quality when switching between scrambled channels (through a cable box) and normal cable channels (CATV). Use this jack instead of a remote control. TV... 8 78 9 1 2 5 3 6 Connection 1 AUX 2 TO CONVERTER 3 VHF/UHF 4 Description Allows you set up the on -screen cursor in the Twin View left picture. Pressing the MENU button brings up your TV to switch between scrambled and unscrambled cable channels. You can be viewed only in the menus and...
...to the AUX input can switch between local and cable channels by pressing ANT on -screen menus without the use of a splitter to get better picture quality when switching between scrambled channels (through a cable box) and normal cable channels (CATV). Use this jack instead of a remote control. TV... 8 78 9 1 2 5 3 6 Connection 1 AUX 2 TO CONVERTER 3 VHF/UHF 4 Description Allows you set up the on -screen cursor in the Twin View left picture. Pressing the MENU button brings up your TV to switch between scrambled and unscrambled cable channels. You can be viewed only in the menus and...
Primary User Manual
Page 17
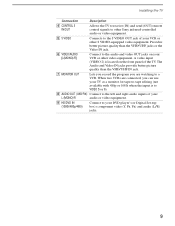
... watching to a VCR. Installing the TV Connection Description 4 CONTROL S IN/OUT Allows the TV to receive (IN) and send (OUT) remote control signals to other Sony infrared-controlled audio or video equipment. 5 S VIDEO Connects to the S VIDEO OUT jack of the TV. A video input (VIDEO 2) is to VIDEO 5 or ... Connect to -tape editing (not available with 480p or 1080i when the input is located on your VCR or other video equipment. Provides better picture quality than the VHF/UHF IN jack. 7 MONITOR OUT Lets you record the program you can use your DVD player's or Digital Set-top...
... watching to a VCR. Installing the TV Connection Description 4 CONTROL S IN/OUT Allows the TV to receive (IN) and send (OUT) remote control signals to other Sony infrared-controlled audio or video equipment. 5 S VIDEO Connects to the S VIDEO OUT jack of the TV. A video input (VIDEO 2) is to VIDEO 5 or ... Connect to -tape editing (not available with 480p or 1080i when the input is located on your VCR or other video equipment. Provides better picture quality than the VHF/UHF IN jack. 7 MONITOR OUT Lets you record the program you can use your DVD player's or Digital Set-top...

Primary User Manual
Page 19
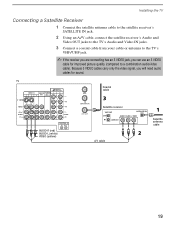
... TV, so you can display the signal from both AUX and VHF/UHF inputs in the right Twin View picture. 11 the unscrambled picture from the VHF/UHF input in the left Twin View picture, but not all of them (pay channels vs. Cable Box Connections Cable Box and Cable This is the...
... TV, so you can display the signal from both AUX and VHF/UHF inputs in the right Twin View picture. 11 the unscrambled picture from the VHF/UHF input in the left Twin View picture, but not all of them (pay channels vs. Cable Box Connections Cable Box and Cable This is the...
Primary User Manual
Page 22
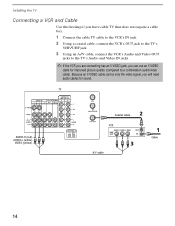
Because an S VIDEO cable carries only the video signal, you can use an S VIDEO cable for improved picture quality (compared to the TV's Audio and Video IN jacks. ✍ If the VCR you are connecting has an S VIDEO jack, you will need audio ...
Because an S VIDEO cable carries only the video signal, you can use an S VIDEO cable for improved picture quality (compared to the TV's Audio and Video IN jacks. ✍ If the VCR you are connecting has an S VIDEO jack, you will need audio ...
Primary User Manual
Page 25
Installing the TV To use Twin View with the cable box ❑ Turn on the VCR. (The VCR's tuner is used as one Twin View channel by changing channels on the VCR, the Twin View will not work.) Use the remote control's TV/VIDEO button to set the Twin View output to VIDEO 1. Change one of the Twin View picture sources; if you do not turn on the cable box. 17
Installing the TV To use Twin View with the cable box ❑ Turn on the VCR. (The VCR's tuner is used as one Twin View channel by changing channels on the VCR, the Twin View will not work.) Use the remote control's TV/VIDEO button to set the Twin View output to VIDEO 1. Change one of the Twin View picture sources; if you do not turn on the cable box. 17

Primary User Manual
Page 26
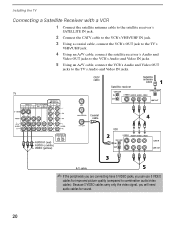
... to the TV's Audio and Video IN jacks. The procedure below shows you can connect the recording VCR into your VCR's user guide for improved picture quality (compared to monitor what is connected. (VIDEO 1 in the illustration above.) ✍ If the VCRs you are connecting have S VIDEO jacks, you how to...
... to the TV's Audio and Video IN jacks. The procedure below shows you can connect the recording VCR into your VCR's user guide for improved picture quality (compared to monitor what is connected. (VIDEO 1 in the illustration above.) ✍ If the VCRs you are connecting have S VIDEO jacks, you how to...
Primary User Manual
Page 27
... your cable or antenna to a combination audio/video cable). Because S VIDEO cables carry only the video signal, you can use an S VIDEO cable for improved picture quality (compared to the TV's VHF/UHF jack. ✍ If the receiver you are connecting has an S VIDEO jack, you will need audio cables for...
... your cable or antenna to a combination audio/video cable). Because S VIDEO cables carry only the video signal, you can use an S VIDEO cable for improved picture quality (compared to the TV's VHF/UHF jack. ✍ If the receiver you are connecting has an S VIDEO jack, you will need audio cables for...
Primary User Manual
Page 28
...) AUDIO-L (white) VIDEO (yellow) Coaxial cable VCR A/V cable ✍ If the peripherals you are connecting have S VIDEO jacks, you will need audio cables for improved picture quality (compared to the TV's Audio and Video IN jacks. Installing the TV Connecting a Satellite Receiver with a VCR 1 Connect the satellite antenna cable to the...
...) AUDIO-L (white) VIDEO (yellow) Coaxial cable VCR A/V cable ✍ If the peripherals you are connecting have S VIDEO jacks, you will need audio cables for improved picture quality (compared to the TV's Audio and Video IN jacks. Installing the TV Connecting a Satellite Receiver with a VCR 1 Connect the satellite antenna cable to the...
Primary User Manual
Page 33
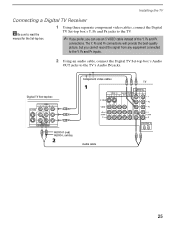
... Digital TV Set-top box's Y, PB and PR jacks to the TV's Audio IN jacks. The Y, PB and PR connections will provide the best-quality picture, but you cannot record the signal from any equipment connected to the Y, PB and PR inputs. 2 Using an audio cable, connect the Digital TV Set...
... Digital TV Set-top box's Y, PB and PR jacks to the TV's Audio IN jacks. The Y, PB and PR connections will provide the best-quality picture, but you cannot record the signal from any equipment connected to the Y, PB and PR inputs. 2 Using an audio cable, connect the Digital TV Set...
Primary User Manual
Page 34
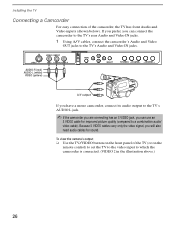
... camcorder is connected. (VIDEO 2 in the illustration above.) 26 Because S VIDEO cables carry only the video signal, you will also need audio cables for improved picture quality (compared to a combination audio/ video cable).
... camcorder is connected. (VIDEO 2 in the illustration above.) 26 Because S VIDEO cables carry only the video signal, you will also need audio cables for improved picture quality (compared to a combination audio/ video cable).
Primary User Manual
Page 39
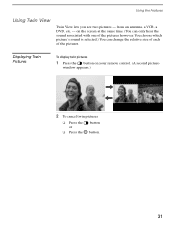
window appears.) , , 2 To cancel twin pictures ❑ Press the or ❑ Press the button button. 31 Displaying Twin Pictures To display twin pictures 1 Press the button on the screen at the same time. (You can change the relative size of each of the pictures however. You choose which picture's sound is selected.) You can only hear the sound associated with one of the pictures. on your remote control. (A second picture- from an antenna, a VCR, a DVD, etc, - Using the Features Using Twin View Twin View lets you see two pictures -
window appears.) , , 2 To cancel twin pictures ❑ Press the or ❑ Press the button button. 31 Displaying Twin Pictures To display twin pictures 1 Press the button on the screen at the same time. (You can change the relative size of each of the pictures however. You choose which picture's sound is selected.) You can only hear the sound associated with one of the pictures. on your remote control. (A second picture- from an antenna, a VCR, a DVD, etc, - Using the Features Using Twin View Twin View lets you see two pictures -
Primary User Manual
Page 40
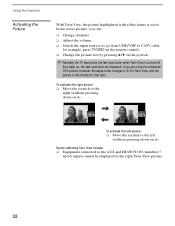
... include: ❑ Equipment connected to the AUX and HD/DVD IN (numbers 5 and 6) inputs cannot be displayed in Twin View, and the picture is active. If you can: ❑ Change channels ❑ Adjust the volume. ❑ Switch the input sources (to go from UHF/VHF... changes to 4:3 in the right Twin View picture. 32 To activate the right picture ❑ Move the joystick to the right (without pressing down on it ). In the active picture, you are displayed. Using the Features Activating the Picture With Twin View, the picture highlighted with a blue frame is reformatted to ...
... include: ❑ Equipment connected to the AUX and HD/DVD IN (numbers 5 and 6) inputs cannot be displayed in Twin View, and the picture is active. If you can: ❑ Change channels ❑ Adjust the volume. ❑ Switch the input sources (to go from UHF/VHF... changes to 4:3 in the right Twin View picture. 32 To activate the right picture ❑ Move the joystick to the right (without pressing down on it ). In the active picture, you are displayed. Using the Features Activating the Picture With Twin View, the picture highlighted with a blue frame is reformatted to ...
Primary User Manual
Page 41
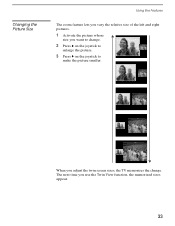
When you adjust the twin screen sizes, the TV memorizes the change . 2 Press V on the joystick to enlarge the picture. 3 Press v on the joystick to make the picture smaller. The next time you use the Twin View function, the memorized sizes appear. 33 Changing the Picture Size Using the Features The zoom feature lets you vary the relative size of the left and right pictures. 1 Activate the picture whose size you want to change .
When you adjust the twin screen sizes, the TV memorizes the change . 2 Press V on the joystick to enlarge the picture. 3 Press v on the joystick to make the picture smaller. The next time you use the Twin View function, the memorized sizes appear. 33 Changing the Picture Size Using the Features The zoom feature lets you vary the relative size of the left and right pictures. 1 Activate the picture whose size you want to change .
Primary User Manual
Page 42
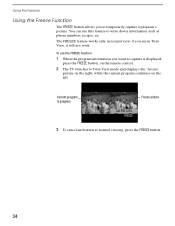
... capture is displayed, press the FREEZE button, on the remote control. 2 The TV switches to Twin View mode and displays the "frozen" picture on the right, while the current program continues on the left. To use this feature to write down information such as phone numbers, recipes,... etc. if you to temporarily capture a program's picture. Using the Features Using the Freeze Function The FREEZE button allows you are in progress Frozen picture Call 555-1234 FREEZE 3 To cancel and return to normal viewing, press the FREEZE button. ...
... capture is displayed, press the FREEZE button, on the remote control. 2 The TV switches to Twin View mode and displays the "frozen" picture on the right, while the current program continues on the left. To use this feature to write down information such as phone numbers, recipes,... etc. if you to temporarily capture a program's picture. Using the Features Using the Freeze Function The FREEZE button allows you are in progress Frozen picture Call 555-1234 FREEZE 3 To cancel and return to normal viewing, press the FREEZE button. ...
Primary User Manual
Page 43
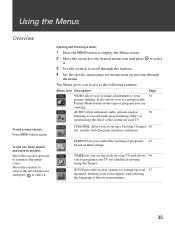
... to the menu icons. TIMER lets you set the clock on your TV and allows 46 you to set up your 47 channels, labeling your picture settings. Opening and choosing a menu: 1 Press the MENU button to display the Menu screen. 2 Move the joystick to the desired menu icon and press to... select it . The Menu gives you access to scroll through the menu. It also allows you to customize the Picture Mode based on -screen menus. 35 Move the joystick to choose the next menu icon and press to your video inputs, and selecting the language...
... to the menu icons. TIMER lets you set the clock on your TV and allows 46 you to set up your 47 channels, labeling your picture settings. Opening and choosing a menu: 1 Press the MENU button to display the Menu screen. 2 Move the joystick to the desired menu icon and press to... select it . The Menu gives you access to scroll through the menu. It also allows you to customize the Picture Mode based on -screen menus. 35 Move the joystick to choose the next menu icon and press to your video inputs, and selecting the language...
Primary User Manual
Page 44
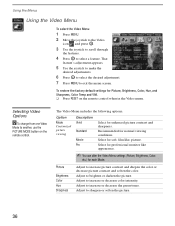
..., film like appearance. ✍ You can alter the Video Menu settings (Picture, Brightness, Color, etc.) for each Mode. Adjust to increase or decrease color intensity. Option Mode Customized picture viewing Description Vivid Standard Movie Pro Select for normal viewing conditions. Adjust to ...increase or decrease the green tones. Adjust to sharpen or soften the picture. 36 Adjust to brighten or darken the picture. Select for Picture, Brightness, Color, Hue, and Sharpness, Color Temp and VM. ❑ Press RESET on the remote...
..., film like appearance. ✍ You can alter the Video Menu settings (Picture, Brightness, Color, etc.) for each Mode. Adjust to increase or decrease color intensity. Option Mode Customized picture viewing Description Vivid Standard Movie Pro Select for normal viewing conditions. Adjust to ...increase or decrease the green tones. Adjust to sharpen or soften the picture. 36 Adjust to brighten or darken the picture. Select for Picture, Brightness, Color, Hue, and Sharpness, Color Temp and VM. ❑ Press RESET on the remote...


