Operating Instructions
Page 2
...RM-Y907 MODELS: KP-57XBR10W, KP-65XBR10W Please keep the brightness and contrast functions at a high brightness or contrast setting, the image can be determined by turning the equipment off and on the screen for proper grounding and, in this manual could void your Sony dealer regarding this ...notice with the limits for a Class B digital device pursuant to operate this polarized AC plug with your projection TV, keep this product....
...RM-Y907 MODELS: KP-57XBR10W, KP-65XBR10W Please keep the brightness and contrast functions at a high brightness or contrast setting, the image can be determined by turning the equipment off and on the screen for proper grounding and, in this manual could void your Sony dealer regarding this ...notice with the limits for a Class B digital device pursuant to operate this polarized AC plug with your projection TV, keep this product....
Operating Instructions
Page 6
...8226; To prevent internal heat buildup, do not expose the screen to direct illumination or direct sunlight. It is transported directly from the screen, wipe it gently with a dry soft cloth. It shows you how to install your projection TV, to connect your new components and to connect to the ... cold to a warm location, or if the room temperature changes suddenly, the picture may be using the projection TV for a long period of time, it checked by qualified service personnel before turning on the cord. In this case, please wait a few hours to let the moisture evaporate before operating ...
...8226; To prevent internal heat buildup, do not expose the screen to direct illumination or direct sunlight. It is transported directly from the screen, wipe it gently with a dry soft cloth. It shows you how to install your projection TV, to connect your new components and to connect to the ... cold to a warm location, or if the room temperature changes suddenly, the picture may be using the projection TV for a long period of time, it checked by qualified service personnel before turning on the cord. In this case, please wait a few hours to let the moisture evaporate before operating ...
Operating Instructions
Page 28
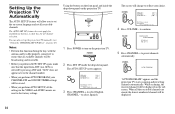
...turn on the projection TV. When all the receivable channels are reset to the factory settings. You can also set all receivable channels. POWER 2 Press SET UP inside the drop-down panel. Setting Up the Projection TV Automatically The AUTO SET UP feature will allow you to set the on-screen language and set up the projection TV... to select Spanish. CHANNEL AUTO PROGRAM "AUTO PROGRAM" appears and the projection TV starts scanning and presetting channels automatically. Using the buttons on the sub screen. to exit. 4 Press VOLUME - While scanning, the received channel will...
...turn on the projection TV. When all the receivable channels are reset to the factory settings. You can also set all receivable channels. POWER 2 Press SET UP inside the drop-down panel. Setting Up the Projection TV Automatically The AUTO SET UP feature will allow you to set the on-screen language and set up the projection TV... to select Spanish. CHANNEL AUTO PROGRAM "AUTO PROGRAM" appears and the projection TV starts scanning and presetting channels automatically. Using the buttons on the sub screen. to exit. 4 Press VOLUME - While scanning, the received channel will...

Operating Instructions
Page 29
... sure to adjust the convergence. to exit. Press CHANNEL + to perform FLASH FOCUS about 30 minutes after the projection TV is first turned on. TV/VIDEO - To obtain an optimum convergence for every wide screen mode; Notes: • You cannot perform any other functions until FLASH FOCUS has completed its cycle. • If you ... (see "CABLE" and "AUTO PROGRAM" on page 42) To perform AUTO SET UP again • Press SET UP inside the drop-down panel on the projection TV, and perform steps 3-5 on the screen in progress, FLASH FOCUS operation is set AUTO PROGRAM to YES to work.
... sure to adjust the convergence. to exit. Press CHANNEL + to perform FLASH FOCUS about 30 minutes after the projection TV is first turned on. TV/VIDEO - To obtain an optimum convergence for every wide screen mode; Notes: • You cannot perform any other functions until FLASH FOCUS has completed its cycle. • If you ... (see "CABLE" and "AUTO PROGRAM" on page 42) To perform AUTO SET UP again • Press SET UP inside the drop-down panel on the projection TV, and perform steps 3-5 on the screen in progress, FLASH FOCUS operation is set AUTO PROGRAM to YES to work.
Operating Instructions
Page 30
... FRONT COVER OF THIS MANUAL AS YOU REVIEW THE FOLLOWING DESCRIPTIONS TV (FUNCTION) Activates the remote control for detailed connection information, see "FREEZE MODE" on the screen, press TV/VIDEO until a channel number appears. 0 - 9 and ENTER Use for immediate selection. TV POWER Turns the projection TV on your remote control. FREEZE - (yellow labeled button) This is useful...
... FRONT COVER OF THIS MANUAL AS YOU REVIEW THE FOLLOWING DESCRIPTIONS TV (FUNCTION) Activates the remote control for detailed connection information, see "FREEZE MODE" on the screen, press TV/VIDEO until a channel number appears. 0 - 9 and ENTER Use for immediate selection. TV POWER Turns the projection TV on your remote control. FREEZE - (yellow labeled button) This is useful...

Operating Instructions
Page 31
... graphics such as BRIGHTNESS, COLOR, etc.) to suit your projection TV will skip the video input you want the projection TV to display a finely detailed picture for enhanced picture contrast and sharpness. Cancel by pressing until the projection TV displays the approximate time in the SET UP menu, your ...(see "VIDEO LABEL" on page 46) MTS Press to scroll through available displays: Caption Vision Displayed on the screen if the broadcaster offers this service. To turn the display off, press DISPLAY again. [CC] Press repeatedly to display a standard picture for more than an hour...
... graphics such as BRIGHTNESS, COLOR, etc.) to suit your projection TV will skip the video input you want the projection TV to display a finely detailed picture for enhanced picture contrast and sharpness. Cancel by pressing until the projection TV displays the approximate time in the SET UP menu, your ...(see "VIDEO LABEL" on page 46) MTS Press to scroll through available displays: Caption Vision Displayed on the screen if the broadcaster offers this service. To turn the display off, press DISPLAY again. [CC] Press repeatedly to display a standard picture for more than an hour...
Operating Instructions
Page 33
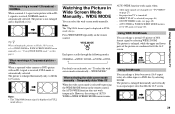
... - Watching the Picture in WIDE SCREEN MODE menu remains. Press WIDE MODE repeatedly on the remote control, the AUTO WIDE function does not work temporarily. the projection TV is displayed in FULL mode always. Note: The 720p/1080i format signal is turned off - Temporarily Auto Wide Off ...When the wide screen mode is displayed in FULL mode always. The picture is enlarged ...
... - Watching the Picture in WIDE SCREEN MODE menu remains. Press WIDE MODE repeatedly on the remote control, the AUTO WIDE function does not work temporarily. the projection TV is displayed in FULL mode always. Note: The 720p/1080i format signal is turned off - Temporarily Auto Wide Off ...When the wide screen mode is displayed in FULL mode always. The picture is enlarged ...

Operating Instructions
Page 52
... CONTROL menu to OFF, the PARENTAL CONTROL feature will be canceled and you can view all TV programs and movies shown on page 49. 8 Press MENU to exit the menu. If you turn your projection TV off. The PARENTAL CONTROL menu appears. 5 Move the joystick up or down to select ...press . PARENTAL CONTROL PARENTAL LOCK: ON RATING: CHOILFDF CHANGE PASSWORD Move Select Exit MENU 4 Move the joystick up or down to display the "Password" screen. 2 Enter your four digit password using the 0-9 buttons. To view the program, follow the steps below. 1 Press ENTER to select PARENTAL LOCK, ...
... CONTROL menu to OFF, the PARENTAL CONTROL feature will be canceled and you can view all TV programs and movies shown on page 49. 8 Press MENU to exit the menu. If you turn your projection TV off. The PARENTAL CONTROL menu appears. 5 Move the joystick up or down to select ...press . PARENTAL CONTROL PARENTAL LOCK: ON RATING: CHOILFDF CHANGE PASSWORD Move Select Exit MENU 4 Move the joystick up or down to display the "Password" screen. 2 Enter your four digit password using the 0-9 buttons. To view the program, follow the steps below. 1 Press ENTER to select PARENTAL LOCK, ...
Operating Instructions
Page 61
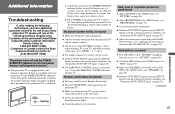
...twice at least 3-4 feet away from the screen. (see "MUTING" on page 26) b Check the MTS setting in the AUDIO menu. (see "PICTURE" on the projection TV to turn it off and the TIMER/ STAND BY indicator on both the projection TV and the remote control. It could be station...SET UP again" on page 37) b Make sure SPEAKER is correct: when watching TV, set to TV, and when watching video tapes, set to the use of your Sony projection TV, please call one of the projection TV's condition. Additional Information Troubleshooting If, after reading the following numbers (English only). ...
...twice at least 3-4 feet away from the screen. (see "MUTING" on page 26) b Check the MTS setting in the AUDIO menu. (see "PICTURE" on the projection TV to turn it off and the TIMER/ STAND BY indicator on both the projection TV and the remote control. It could be station...SET UP again" on page 37) b Make sure SPEAKER is correct: when watching TV, set to TV, and when watching video tapes, set to the use of your Sony projection TV, please call one of the projection TV's condition. Additional Information Troubleshooting If, after reading the following numbers (English only). ...

Operating Instructions
Page 62
... fixed to one channel b Use AUTO PROGRAM to choose appears in TV's memory. (see "AUTO PROGRAM" on page 42) b Try turning CHANNEL FIX off and on page 26) Dotted lines or stripes b Adjust the antenna. b Press the projection TV's power button off . (see "CHANNEL FIX" on page 42) Double images or ghosts b Use a ... "To perform AUTO SET UP again" on page 25) Only snow and noise appear on the screen b Check the CABLE setting in your local listings to add receivable channels that are not presently in the TV's memory. (see "AUTO PROGRAM" on page 42) No color b Adjust the COLOR in the VIDEO ...
... fixed to one channel b Use AUTO PROGRAM to choose appears in TV's memory. (see "AUTO PROGRAM" on page 42) b Try turning CHANNEL FIX off and on page 26) Dotted lines or stripes b Adjust the antenna. b Press the projection TV's power button off . (see "CHANNEL FIX" on page 42) Double images or ghosts b Use a ... "To perform AUTO SET UP again" on page 25) Only snow and noise appear on the screen b Check the CABLE setting in your local listings to add receivable channels that are not presently in the TV's memory. (see "AUTO PROGRAM" on page 42) No color b Adjust the COLOR in the VIDEO ...


