
Operating Instructions
Page 2
...NO USER-SERVICEABLE PARTS INSIDE. Note on convergence adjustment Before you use your projection TV, or viewing a TV station whose logo always stays on the screen, keep this notice with the.... Note to CATV system installer This reminder is for the remote control RM-Y906 MODELS: KP-43T90, KP-48V90, KP-53V90, KP-61V90 Please keep the brightness and contrast functions at a high brightness...a Class B digital device pursuant to prevent blade exposure. As an ENERGY STAR Partner, Sony Corporation has determined that the cable ground shall be determined by turning the equipment off and...
...NO USER-SERVICEABLE PARTS INSIDE. Note on convergence adjustment Before you use your projection TV, or viewing a TV station whose logo always stays on the screen, keep this notice with the.... Note to CATV system installer This reminder is for the remote control RM-Y906 MODELS: KP-43T90, KP-48V90, KP-53V90, KP-61V90 Please keep the brightness and contrast functions at a high brightness...a Class B digital device pursuant to prevent blade exposure. As an ENERGY STAR Partner, Sony Corporation has determined that the cable ground shall be determined by turning the equipment off and...
Operating Instructions
Page 3
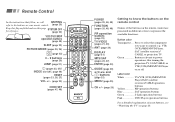
... 9 buttons (page 20) JUMP (page 21) (pages 22, 27)/ INDEX (for reference. Green Buttons relevant to control; Button color Transparent .... Press to select the component you want to power operations, like turning the projection TV, SAT/CABLE, or VTR (VCR)/MDP/DVD Player on or off Label color White... buttons on page 20. e.g. VTR (VCR)/MDP/DVD Player, SAT (satellite receiver)/ CABLE, or projection TV. Remote Control In the instructions that follow, we will MUTING refer to the buttons on your remote control. (page 20) Keep this flap unfolded and use this page for SAT, page 49) RESET (...
... 9 buttons (page 20) JUMP (page 21) (pages 22, 27)/ INDEX (for reference. Green Buttons relevant to control; Button color Transparent .... Press to select the component you want to power operations, like turning the projection TV, SAT/CABLE, or VTR (VCR)/MDP/DVD Player on or off Label color White... buttons on page 20. e.g. VTR (VCR)/MDP/DVD Player, SAT (satellite receiver)/ CABLE, or projection TV. Remote Control In the instructions that follow, we will MUTING refer to the buttons on your remote control. (page 20) Keep this flap unfolded and use this page for SAT, page 49) RESET (...
Operating Instructions
Page 4
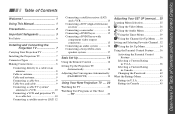
... Player with component video output connectors 15 Connecting an audio system 16 Connecting a Sony SAVA series speaker system 17 Basic Set Up 18 Using the Remote Control 18 Setting Up the Projection TV Automatically 18 Adjusting the Convergence Automatically (FLASH FOCUS 19 Using Your New Projection TV .... 20 Watching the TV 20 Watching Two Programs at One Time -
... Player with component video output connectors 15 Connecting an audio system 16 Connecting a Sony SAVA series speaker system 17 Basic Set Up 18 Using the Remote Control 18 Setting Up the Projection TV Automatically 18 Adjusting the Convergence Automatically (FLASH FOCUS 19 Using Your New Projection TV .... 20 Watching the TV 20 Watching Two Programs at One Time -
Operating Instructions
Page 5
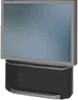
... favorite channels • Y/PB/PR inputs for purchasing the Sony Color Rear Video Projection TV. Similar controls may be found on the TV box (white label). Model No. It shows you how to install your projection TV, to connect your new components and to connect to the antenna... product. This manual is used for models KP-43T90, KP48V90, KP-53V90, KP-61V90. Welcome! Record these numbers in the order provided to operate the remote control's special functions. 3 Using Your New Projection TV This section shows you through your new projection TV. It shows you how to ensure that you...
... favorite channels • Y/PB/PR inputs for purchasing the Sony Color Rear Video Projection TV. Similar controls may be found on the TV box (white label). Model No. It shows you how to install your projection TV, to connect your new components and to connect to the antenna... product. This manual is used for models KP-43T90, KP48V90, KP-53V90, KP-61V90. Welcome! Record these numbers in the order provided to operate the remote control's special functions. 3 Using Your New Projection TV This section shows you through your new projection TV. It shows you how to ensure that you...

Operating Instructions
Page 12
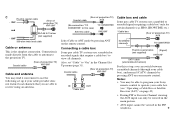
... or an antenna The connection you choose will depend on the projection TV with the projection TV's remote control, connect the CONTROL S IN jack of the equipment to the CONTROL S OUT jack on the cable found in your home. still other Sony equipment with the CONTROL S cable. (Rear of all Sony equipment. Push into connection. Yellow Audio (Left) - White Audio (Right...
... or an antenna The connection you choose will depend on the projection TV with the projection TV's remote control, connect the CONTROL S IN jack of the equipment to the CONTROL S OUT jack on the cable found in your home. still other Sony equipment with the CONTROL S cable. (Rear of all Sony equipment. Push into connection. Yellow Audio (Left) - White Audio (Right...
Operating Instructions
Page 13
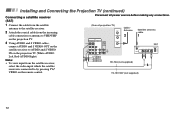
... able to program your Sony remote control to operate your cable box. (see "Operating a Cable Box or Satellite Receiver (SAT)" on the remote control. Connection is the simplest connection. Connecting a cable box Some pay cable TV systems use scrambled or encoded signals requiring a cable box* only for certain channels (e.g. Coaxial cable (Rear of projection TV) Coaxial cable AUX...
... able to program your Sony remote control to operate your cable box. (see "Operating a Cable Box or Satellite Receiver (SAT)" on the remote control. Connection is the simplest connection. Connecting a cable box Some pay cable TV systems use scrambled or encoded signals requiring a cable box* only for certain channels (e.g. Coaxial cable (Rear of projection TV) Coaxial cable AUX...
Operating Instructions
Page 16
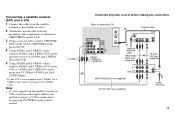
... the coaxial cable from the satellite receiver, select the video input which the satellite receiver is connected to AUDIO and S VIDEO IN on the remote control. (Rear of projection TV) AUX TO CONVERTER Cable/ Antenna 2 Satellite antenna cable 1 IN VIDEO 1 VIDEO 3 VIDEO 4 S VIDEO OUT AUDIO (VAR/FIX) VIDEO Y L (MONO) AUDIO R L PB (MONO) AUDIO PR...
... the coaxial cable from the satellite receiver, select the video input which the satellite receiver is connected to AUDIO and S VIDEO IN on the remote control. (Rear of projection TV) AUX TO CONVERTER Cable/ Antenna 2 Satellite antenna cable 1 IN VIDEO 1 VIDEO 3 VIDEO 4 S VIDEO OUT AUDIO (VAR/FIX) VIDEO Y L (MONO) AUDIO R L PB (MONO) AUDIO PR...
Operating Instructions
Page 17
... cable from the satellite receiver or VCR, select the video input which your VCR is not equipped with S VIDEO, use a VIDEO cable (yellow) instead of projection TV) IN VIDEO 1 VIDEO 3 VIDEO 4 S VIDEO OUT AUDIO (VAR/FIX) VIDEO Y L (MONO) AUDIO R L PB (MONO) AUDIO PR R COMPONENT VIDEO AUDIO-L AUDIO-R ...S VIDEO IN on the VCR. 5 Using AUDIO and S VIDEO* cables, connect AUDIO and S VIDEO OUT on the VCR to by pressing TV/VIDEO on the projection TV (White-AUDIO Left, RedAUDIO Right). * If your satellite receiver or VCR is connected to AUDIO and S VIDEO IN on the remote control.
... cable from the satellite receiver or VCR, select the video input which your VCR is not equipped with S VIDEO, use a VIDEO cable (yellow) instead of projection TV) IN VIDEO 1 VIDEO 3 VIDEO 4 S VIDEO OUT AUDIO (VAR/FIX) VIDEO Y L (MONO) AUDIO R L PB (MONO) AUDIO PR R COMPONENT VIDEO AUDIO-L AUDIO-R ...S VIDEO IN on the VCR. 5 Using AUDIO and S VIDEO* cables, connect AUDIO and S VIDEO OUT on the VCR to by pressing TV/VIDEO on the projection TV (White-AUDIO Left, RedAUDIO Right). * If your satellite receiver or VCR is connected to AUDIO and S VIDEO IN on the remote control.

Operating Instructions
Page 20
.... (Rear of the unused Line inputs (e.g. The control items except VOLUME can adjust VOLUME, "Bass," "Treble," "Balance," "MTS/SAP" and "Effect" with the supplied remote control. Installing and Connecting the Projection TV (continued) Connecting an audio system For more dynamic ...sound, connect an audio system to one of projection TV) Stereo amplifier IN VIDEO 1 VIDEO 3 VIDEO 4 S VIDEO CONTROL S OUT VIDEO L (MONO) AUDIO R Y PB...
.... (Rear of the unused Line inputs (e.g. The control items except VOLUME can adjust VOLUME, "Bass," "Treble," "Balance," "MTS/SAP" and "Effect" with the supplied remote control. Installing and Connecting the Projection TV (continued) Connecting an audio system For more dynamic ...sound, connect an audio system to one of projection TV) Stereo amplifier IN VIDEO 1 VIDEO 3 VIDEO 4 S VIDEO CONTROL S OUT VIDEO L (MONO) AUDIO R Y PB...
Operating Instructions
Page 21
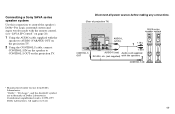
...) OUT on the projection TV. 2 Using the CONTROL S cable, connect CONTROL S IN on the speaker to control the speaker's Dolby* Pro Logic surround system and super woofer mode with the remote control. (see "SAVA SP Control" on page 28) 1 Using the AUDIO cable supplied with the speakers 2 CONTROL S IN * Manufactured under license from Dolby Laboratories. Connecting a Sony SAVA series speaker...
...) OUT on the projection TV. 2 Using the CONTROL S cable, connect CONTROL S IN on the speaker to control the speaker's Dolby* Pro Logic surround system and super woofer mode with the remote control. (see "SAVA SP Control" on page 28) 1 Using the AUDIO cable supplied with the speakers 2 CONTROL S IN * Manufactured under license from Dolby Laboratories. Connecting a Sony SAVA series speaker...
Operating Instructions
Page 22
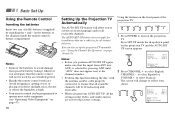
... sunlight, near a heater or where the humidity is high. • Your remote control can also set up the projection TV manually. (see "Operating Video Equipment" on page 47) 18 Setting Up the Projection TV Automatically The AUTO SET UP feature will not be broadcasting and receivable. •..., and Audio menus are reset to the factory settings. Press SET UP inside the remote control's battery compartment. Notes: • Remove the batteries to set all receivable channels. Using the buttons on the projection TV. Press [ SET UP ] to exit. 2 Press CHANNEL + to select Franç...
... sunlight, near a heater or where the humidity is high. • Your remote control can also set up the projection TV manually. (see "Operating Video Equipment" on page 47) 18 Setting Up the Projection TV Automatically The AUTO SET UP feature will not be broadcasting and receivable. •..., and Audio menus are reset to the factory settings. Press SET UP inside the remote control's battery compartment. Notes: • Remove the batteries to set all receivable channels. Using the buttons on the projection TV. Press [ SET UP ] to exit. 2 Press CHANNEL + to select Franç...

Operating Instructions
Page 24
...Select to display a finely detailed picture for example, to suit your taste. Personal 1, Personal 2: Select to your remote control. Using Your New Projection TV (continued) Watching the TV Many TV features can also perform the "Picture Adjustment" (such as "Brightness," "Color," etc.) to select channel 10,... details, see "Mode" on the screen, press TV/VIDEO until a channel number appears. MUTING Activates the remote control for enhanced picture contrast and sharpness. Press to display the desired channel. Turns the projection TV on the screen and will dim three seconds later....
...Select to display a finely detailed picture for example, to suit your taste. Personal 1, Personal 2: Select to your remote control. Using Your New Projection TV (continued) Watching the TV Many TV features can also perform the "Picture Adjustment" (such as "Brightness," "Color," etc.) to select channel 10,... details, see "Mode" on the screen, press TV/VIDEO until a channel number appears. MUTING Activates the remote control for enhanced picture contrast and sharpness. Press to display the desired channel. Turns the projection TV on the screen and will dim three seconds later....
Operating Instructions
Page 25
... of the current channel in the main picture. The projection TV will skip the video input you selected. (see "Video Label" on the TV's screen. Press to scroll through available video inputs: TV, VIDEO 1, VIDEO 2, VIDEO 3 and VIDEO 4. ...Projection TV Operations TV/VIDEO Press repeatedly to freeze the desired picture. This is useful when you select "Skip" as a "Video Label" in the window picture while viewing the normal picture of the window picture, press V, v, B or b. To turn the display off, press DISPLAY again. (continued) REFER TO THE ILLUSTRATION OF THE REMOTE CONTROL...
... of the current channel in the main picture. The projection TV will skip the video input you selected. (see "Video Label" on the TV's screen. Press to scroll through available video inputs: TV, VIDEO 1, VIDEO 2, VIDEO 3 and VIDEO 4. ...Projection TV Operations TV/VIDEO Press repeatedly to freeze the desired picture. This is useful when you select "Skip" as a "Video Label" in the window picture while viewing the normal picture of the window picture, press V, v, B or b. To turn the display off, press DISPLAY again. (continued) REFER TO THE ILLUSTRATION OF THE REMOTE CONTROL...
Operating Instructions
Page 26
... time in PIP mode. ANT (AUX input) Press to change between the VHF/UHF input and the AUX input. (for Projection TV Operations CC Press repeatedly to scroll through the Multi-channel TV Sound (MTS) options: Stereo, SAP, Mono and Auto SAP. (see "MTS/SAP" on page 27) Press to select...Note: You cannot view this input in minutes (30, 60, or 90) that you want the projection TV to remain on before shutting off the projection TV and all other Sony equipment. 22 REFER TO THE ILLUSTRATION OF THE REMOTE CONTROL ON THE INSIDE FRONT COVER OF THIS MANUAL AS YOU REVIEW THIS CHART SYSTEM OFF Press...
... time in PIP mode. ANT (AUX input) Press to change between the VHF/UHF input and the AUX input. (for Projection TV Operations CC Press repeatedly to scroll through the Multi-channel TV Sound (MTS) options: Stereo, SAP, Mono and Auto SAP. (see "MTS/SAP" on page 27) Press to select...Note: You cannot view this input in minutes (30, 60, or 90) that you want the projection TV to remain on before shutting off the projection TV and all other Sony equipment. 22 REFER TO THE ILLUSTRATION OF THE REMOTE CONTROL ON THE INSIDE FRONT COVER OF THIS MANUAL AS YOU REVIEW THIS CHART SYSTEM OFF Press...
Operating Instructions
Page 28
...pictures received through PIP is displayed in the window picture while viewing the normal picture in the main picture. REFER TO THE ILLUSTRATION OF THE REMOTE CONTROL ON THE INSIDE FRONT COVER OF THIS MANUAL AS YOU REVIEW THIS CHART Note: • If one of the main picture. AUDIO Press to...which picture's sound is automatically changed to 1/9 if it was 1/16. to change between the main picture and the window picture. Using Your New Projection TV (continued) Using the Yellow Labeled Buttons for PIP Operations CH JUMP or 0 - 9 or and ENTER (white labeled button) Press to select the...
...pictures received through PIP is displayed in the window picture while viewing the normal picture in the main picture. REFER TO THE ILLUSTRATION OF THE REMOTE CONTROL ON THE INSIDE FRONT COVER OF THIS MANUAL AS YOU REVIEW THIS CHART Note: • If one of the main picture. AUDIO Press to...which picture's sound is automatically changed to 1/9 if it was 1/16. to change between the main picture and the window picture. Using Your New Projection TV (continued) Using the Yellow Labeled Buttons for PIP Operations CH JUMP or 0 - 9 or and ENTER (white labeled button) Press to select the...
Operating Instructions
Page 30
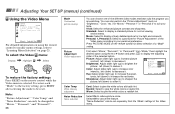
... (down ) to increase the red tones. You can be set separately from "Mode," then highlight the desired option using the remote control to modify menu settings, refer to "Learning Menu Selection" on the remote control for direct selection of the selected option. Press PICTURE MODE on page 25. Adjusting Your SET UP (menus) (continued... ) to give the white colors a blueish tint. To select the Video menu: Display , Highlight , Select MENU To restore the factory settings Press RESET on the remote control while the Video menu is selected.
... (down ) to increase the red tones. You can be set separately from "Mode," then highlight the desired option using the remote control to modify menu settings, refer to "Learning Menu Selection" on the remote control for direct selection of the selected option. Press PICTURE MODE on page 25. Adjusting Your SET UP (menus) (continued... ) to give the white colors a blueish tint. To select the Video menu: Display , Highlight , Select MENU To restore the factory settings Press RESET on the remote control while the Video menu is selected.
Operating Instructions
Page 31
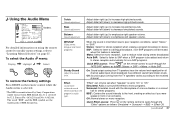
... the "MTS/SAP" options as if you were seated in stereo. On: Sound output coming from TV speakers have different sound transmission levels. Quick Effect access: Press on the remote control to decrease high pitched sounds. Using the Audio Menu Audio Treble Bass Balance } Sliders MTS/SAP:... volume. Off: Sound output coming from the TV speakers varies according to increase low pitched sounds. Off: Normal stereo or mono reception. Adjust slider right (up ) to the received channel. When the sound is covered by Sony Corporation under license from BBE Sound, Inc. ...
... the "MTS/SAP" options as if you were seated in stereo. On: Sound output coming from TV speakers have different sound transmission levels. Quick Effect access: Press on the remote control to decrease high pitched sounds. Using the Audio Menu Audio Treble Bass Balance } Sliders MTS/SAP:... volume. Off: Sound output coming from the TV speakers varies according to increase low pitched sounds. Off: Normal stereo or mono reception. Adjust slider right (up ) to the received channel. When the sound is covered by Sony Corporation under license from BBE Sound, Inc. ...
Operating Instructions
Page 32
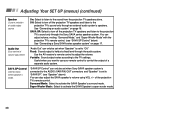
... set to the projection TV's sound only through the Sony SAVA series speaker system. SAVA SP Control Controls Sony SAVA speaker's mode. Off: Select to turn off the projection TV speakers and listen to "SAVA SP." (see "SAVA SP Control" below) See "Connecting a Sony SAVA series speaker system" on page 16. Useful when you want to use your remote control to activate...
... set to the projection TV's sound only through the Sony SAVA series speaker system. SAVA SP Control Controls Sony SAVA speaker's mode. Off: Select to turn off the projection TV speakers and listen to "SAVA SP." (see "SAVA SP Control" below) See "Connecting a Sony SAVA series speaker system" on page 16. Useful when you want to use your remote control to activate...
Operating Instructions
Page 33
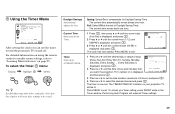
For detailed information on using the remote control to modify menu settings, refer to be lit. Any loss of 6 hours) and press . 4 Press V or v to turn the projection TV on page 25. Timer Wake up or scheduled viewing. Fall: Select Off at the end of days Timer (Every ... . Performing Auto Program will cause these settings to "Learning Menu Selection" on and off. AM Select End MENU After setting the clock you want the projection TV to compensate for the Timer. h ch - - - Press MENU to exit. Using the Timer Menu Timer Daylight Savings: On Current Time Timer ch --...
For detailed information on using the remote control to modify menu settings, refer to be lit. Any loss of 6 hours) and press . 4 Press V or v to turn the projection TV on page 25. Timer Wake up or scheduled viewing. Fall: Select Off at the end of days Timer (Every ... . Performing Auto Program will cause these settings to "Learning Menu Selection" on and off. AM Select End MENU After setting the clock you want the projection TV to compensate for the Timer. h ch - - - Press MENU to exit. Using the Timer Menu Timer Daylight Savings: On Current Time Timer ch --...
Operating Instructions
Page 34
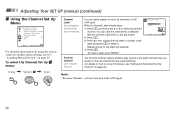
... Set Up Channel Label Favorite Channel :Auto Channel Skip/Add Auto Program ch Cable: On Move Select End MENU For detailed information on using the remote control to modify menu settings, refer to "Learning Menu Selection" on page 32) Note: "Favorite Channel" will not function with the Channel Label menu in the...
... Set Up Channel Label Favorite Channel :Auto Channel Skip/Add Auto Program ch Cable: On Move Select End MENU For detailed information on using the remote control to modify menu settings, refer to "Learning Menu Selection" on page 32) Note: "Favorite Channel" will not function with the Channel Label menu in the...


