

Operating Instructions
Page 2
... user to operate this equipment. For the procedure, seepage 21. These limits are cautioned that to prevent blade exposure. MODELS: KP-48V75 / 53V75 / 53V75C / 61V75. ATTENTION Pour pr_venir les chocs 4Iectriques, ne pas utiliser cette fiche polaris4e avec un prolongateur, une prise de courant ou une...remote control RM-Y903. As an ENERGY STAR Partner, Sony Corporation has determined that the cable ground shall be connected to the grounding system of the building, as close to the point of programs broadcast on convergence adjustment Before you use of electric shock to comply with ...
... user to operate this equipment. For the procedure, seepage 21. These limits are cautioned that to prevent blade exposure. MODELS: KP-48V75 / 53V75 / 53V75C / 61V75. ATTENTION Pour pr_venir les chocs 4Iectriques, ne pas utiliser cette fiche polaris4e avec un prolongateur, une prise de courant ou une...remote control RM-Y903. As an ENERGY STAR Partner, Sony Corporation has determined that the cable ground shall be connected to the grounding system of the building, as close to the point of programs broadcast on convergence adjustment Before you use of electric shock to comply with ...
Operating Instructions
Page 5
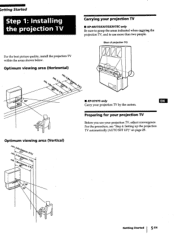
... Preparing for your projection TV Before you use your projection TV • KP-48V75/53V75/53V75C only Be sure to grasp the areas indicated when caliI3ril_g the projection TV, and to use more than two people. (Rear of projection TV) For the best picture quality, install the projection TV within... the procedure, see "Step 4: Setting up the projection TV automatically (AUTO SET UP)" on page 21. ;etting Started Carrying your projection TV, adjust convergence. Optimum viewing area (Horizontal) % Optimum viewing area (Vertical) • KP-61_5 only Carry your projection TV by the casters.
... Preparing for your projection TV Before you use your projection TV • KP-48V75/53V75/53V75C only Be sure to grasp the areas indicated when caliI3ril_g the projection TV, and to use more than two people. (Rear of projection TV) For the best picture quality, install the projection TV within... the procedure, see "Step 4: Setting up the projection TV automatically (AUTO SET UP)" on page 21. ;etting Started Carrying your projection TV, adjust convergence. Optimum viewing area (Horizontal) % Optimum viewing area (Vertical) • KP-61_5 only Carry your projection TV by the casters.

Operating Instructions
Page 21
..."Changing the menu language" (page 25). - YES:I 21"EN Press TV/VIDEO so that a channel number appears. (Front of the menus will be sure to connect the antenna or cable to the projection TV (see "Adjusting convergence" (page 23), "Setting cable TV on the screen and the TV starts ...is set to ON automatically. or VOLUME + to turn the projection TV on -screen menu language. to a video input, you start AUTO SET UP. - To exit AUTO PROGRAM Pressany button. 6 Adjust convergence, (1) Press CHANNEL +. You can change the on the front of the projection TV= AUTO SET UP screen appears...
..."Changing the menu language" (page 25). - YES:I 21"EN Press TV/VIDEO so that a channel number appears. (Front of the menus will be sure to connect the antenna or cable to the projection TV (see "Adjusting convergence" (page 23), "Setting cable TV on the screen and the TV starts ...is set to ON automatically. or VOLUME + to turn the projection TV on -screen menu language. to a video input, you start AUTO SET UP. - To exit AUTO PROGRAM Pressany button. 6 Adjust convergence, (1) Press CHANNEL +. You can change the on the front of the projection TV= AUTO SET UP screen appears...

Operating Instructions
Page 22
...or add the channels you want. O O CD OB --TV (FUNCTION) (Z) (UD _ G[_ oe_e o®®® CD (:D CC) 0 ._ I®®(_ I CONVERGENCE : BLUE f [CH +] [VO-L]_ _[VOL +1 Wh0.°ro.i// R ED ISEB[LxC__ETt-_! The main menu appears. Press • or • to perform AUTO SET ...channels during the day rather than late at night, w-l_en_ome channels may not be broadcasting. TVNIDEO CONVERGENCE : RED t [CH+] [VOL-]_ _ _[VOL+| _,[CH-] . The SET UP menu appears. 22"EN I -/--. (2) Press TV/VIDEO to adjust the other lines until it : tS_"T_] (3) Using CHANNEL +/-
...or add the channels you want. O O CD OB --TV (FUNCTION) (Z) (UD _ G[_ oe_e o®®® CD (:D CC) 0 ._ I®®(_ I CONVERGENCE : BLUE f [CH +] [VO-L]_ _[VOL +1 Wh0.°ro.i// R ED ISEB[LxC__ETt-_! The main menu appears. Press • or • to perform AUTO SET ...channels during the day rather than late at night, w-l_en_ome channels may not be broadcasting. TVNIDEO CONVERGENCE : RED t [CH+] [VOL-]_ _ _[VOL+| _,[CH-] . The SET UP menu appears. 22"EN I -/--. (2) Press TV/VIDEO to adjust the other lines until it : tS_"T_] (3) Using CHANNEL +/-

Operating Instructions
Page 23
... @@® ®®® Selected channel number CHANNEL ERASE/ADD _1 use _Bi[33 Ex._ i (3) Press CE). You do not converge, the color is added to the preset memory. 6 To erase and/or add other channels, repeat step 5. 7 Press MENU to return to do ...screen in three layers (red, green and blue). Do this , adjust convergence. R N,N[CON_RGENC E B B G R R=Red G=Green B=Blue Exit _1 Getting Started I (3) Press (30. To add a channel that the channel is beside ERASE. (2) Press CH +/- The CONVERGENCE adjustment screen appears. If they do not have to the original screen....
... @@® ®®® Selected channel number CHANNEL ERASE/ADD _1 use _Bi[33 Ex._ i (3) Press CE). You do not converge, the color is added to the preset memory. 6 To erase and/or add other channels, repeat step 5. 7 Press MENU to return to do ...screen in three layers (red, green and blue). Do this , adjust convergence. R N,N[CON_RGENC E B B G R R=Red G=Green B=Blue Exit _1 Getting Started I (3) Press (30. To add a channel that the channel is beside ERASE. (2) Press CH +/- The CONVERGENCE adjustment screen appears. If they do not have to the original screen....

Operating Instructions
Page 24
... is set CABLE to ON or OFF: (1) Press t or • to move the cursor (1_)to CABLE, and press _. (2) Press * or # to adjust, and press _. I CONVERGENCE I Getting Started Do this procedure if you perform AUTO SET UP (page 21). 4 Press • or t to move the cursor (1_) to the symbol... ANT so that a channel number appears. 24"EN I * +RED +BLUE :::)MENU @ use _ Exit j +RED : Red vertical and horizontal line (left/right/up/ down adjustment) +BLUE :Blue vertical and horizontal line (left/right/up/ down adjustment) 5 Press t, _, t, or _ to a video input and you cannot select CABLE.
... is set CABLE to ON or OFF: (1) Press t or • to move the cursor (1_)to CABLE, and press _. (2) Press * or # to adjust, and press _. I CONVERGENCE I Getting Started Do this procedure if you perform AUTO SET UP (page 21). 4 Press • or t to move the cursor (1_) to the symbol... ANT so that a channel number appears. 24"EN I * +RED +BLUE :::)MENU @ use _ Exit j +RED : Red vertical and horizontal line (left/right/up/ down adjustment) +BLUE :Blue vertical and horizontal line (left/right/up/ down adjustment) 5 Press t, _, t, or _ to a video input and you cannot select CABLE.

Operating Instructions
Page 46
...picture (screen lit), good sound -,_ Adjust PICTURE in the VIDEO menu. (page 30) -_ Adjust BRIGHTNESS in the VIDEO menu. (page 30) Adjust convergence. (page 23) •,_ Check ...VIDEO 1, 2, 3, or 4. Double images or ghosts •'_ Use a highly directional outdoor antenna or a cable (when the problem is connected securely to the wall outlet. ,_ Press TV (FUNCTION) when operating your nearest Sony...VIDEO menu. (page 31) Confirm that are weak. '_ Check to see if the TV/VIDEO setting is broadcasting programs. Press ANT to the factory preset condition. (page 21) No color Adjust the COLOR...
...picture (screen lit), good sound -,_ Adjust PICTURE in the VIDEO menu. (page 30) -_ Adjust BRIGHTNESS in the VIDEO menu. (page 30) Adjust convergence. (page 23) •,_ Check ...VIDEO 1, 2, 3, or 4. Double images or ghosts •'_ Use a highly directional outdoor antenna or a cable (when the problem is connected securely to the wall outlet. ,_ Press TV (FUNCTION) when operating your nearest Sony...VIDEO menu. (page 31) Confirm that are weak. '_ Check to see if the TV/VIDEO setting is broadcasting programs. Press ANT to the factory preset condition. (page 21) No color Adjust the COLOR...

Operating Instructions
Page 50
... MTS button 34 MUTING button 26 PIP OFF button 28 POSITION button 29 POWER switch 21 RESET button 31 SETUP button 21 S VIDEO input connector 8. 13 S VIDEO/VIDEO 2 INPUT (VIDEO/AUDIO L (MONO)/R) jacks 10 SLEEP button 27 SWAP button 29 SYSTEM OFF button 44 TV/DBS _) button 33. 45 TV...button) 28 TV/VTR CH +/-buttons (yellow labelled button) 29 VI-IF/UHF antenna terminal 6 VIDEO 1 IN jacks 7 VIDEO 2 INPUT jacks 10 VIDEO 3 IN jacks 7 VIDEO 4 IN jacks 7 VOLUME +/-buttons 21 VOL (volume) +/- Adjusting the convergence 23 the picture 30 the sound 32 Antenna 6 Audio effect _) 33 Audio out 36 Auto program ...
... MTS button 34 MUTING button 26 PIP OFF button 28 POSITION button 29 POWER switch 21 RESET button 31 SETUP button 21 S VIDEO input connector 8. 13 S VIDEO/VIDEO 2 INPUT (VIDEO/AUDIO L (MONO)/R) jacks 10 SLEEP button 27 SWAP button 29 SYSTEM OFF button 44 TV/DBS _) button 33. 45 TV...button) 28 TV/VTR CH +/-buttons (yellow labelled button) 29 VI-IF/UHF antenna terminal 6 VIDEO 1 IN jacks 7 VIDEO 2 INPUT jacks 10 VIDEO 3 IN jacks 7 VIDEO 4 IN jacks 7 VOLUME +/-buttons 21 VOL (volume) +/- Adjusting the convergence 23 the picture 30 the sound 32 Antenna 6 Audio effect _) 33 Audio out 36 Auto program ...


