
Operating Instructions
Page 2
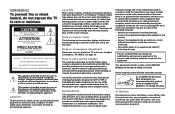
... the user to the presence of important operating and maintenance (servicing) instructions in this manual could void your warranty because they are not covered by your authority to operate this ...this product meets the ENERGY STAR guidelines for the remote control RM-Y905 MODELS: KP-48V85, KP-53V85, KP-61V85 Please keep the brightness and contrast functions at a high brightness or contrast setting...the dealer or an experienced radio/TV technician for help. As an ENERGY STAR Partner, Sony Corporation has determined that to which can radiate radio frequency energy and, if not installed and...
... the user to the presence of important operating and maintenance (servicing) instructions in this manual could void your warranty because they are not covered by your authority to operate this ...this product meets the ENERGY STAR guidelines for the remote control RM-Y905 MODELS: KP-48V85, KP-53V85, KP-61V85 Please keep the brightness and contrast functions at a high brightness or contrast setting...the dealer or an experienced radio/TV technician for help. As an ENERGY STAR Partner, Sony Corporation has determined that to which can radiate radio frequency energy and, if not installed and...
Operating Instructions
Page 4
...28 Watching Two Programs at One Time - Open Here For Table of Contents and Remote Control Graphics Table of Contents Welcome 1 Using This Manual 2 Precautions 2 Important Safeguards 3 Installing and Connecting the Projection TV 7 Carrying Your Projection TV 7 Installing the Projection TV 7 Connector ...tape editing 15 Connecting a DVD Player 16 Connecting a DVD Player with component video output connectors 16 Connecting an AV receiver 17 Connecting an audio system 18 Connecting a Sony SAVA series speaker system 18 Connecting an amplifier that supports Dolby Pro Logic decoder ...
...28 Watching Two Programs at One Time - Open Here For Table of Contents and Remote Control Graphics Table of Contents Welcome 1 Using This Manual 2 Precautions 2 Important Safeguards 3 Installing and Connecting the Projection TV 7 Carrying Your Projection TV 7 Installing the Projection TV 7 Connector ...tape editing 15 Connecting a DVD Player 16 Connecting a DVD Player with component video output connectors 16 Connecting an AV receiver 17 Connecting an audio system 18 Connecting a Sony SAVA series speaker system 18 Connecting an amplifier that supports Dolby Pro Logic decoder ...
Operating Instructions
Page 5
This manual is manufactured by other Sony components. • Two Y/PB/PR inputs for purchasing the Sony Color Rear Video Projection TV. Additionally licensed under license from SRS Labs, Inc. "Dolby," the double-D symbol a, "Pro Logic," "VIRTUAL DOLBY and DIGITAL"...(SOUND RETRIEVAL SYSTEM) is for illustration purposes. and foreign patents pendeing. Refer to block programs that you feel are located at the rear of your Sony dealer regarding this product. Welcome! It is used for models KP-48V85, KP53V85 and KP-61V85. Model KP-53V85 is covered by U.S.
This manual is manufactured by other Sony components. • Two Y/PB/PR inputs for purchasing the Sony Color Rear Video Projection TV. Additionally licensed under license from SRS Labs, Inc. "Dolby," the double-D symbol a, "Pro Logic," "VIRTUAL DOLBY and DIGITAL"...(SOUND RETRIEVAL SYSTEM) is for illustration purposes. and foreign patents pendeing. Refer to block programs that you feel are located at the rear of your Sony dealer regarding this product. Welcome! It is used for models KP-48V85, KP53V85 and KP-61V85. Model KP-53V85 is covered by U.S.
Operating Instructions
Page 6
... TV. It is transported directly from a cold to a warm location, or if the room temperature changes suddenly, the picture may be blurred or show poor color. If you are unable to insert the plug fully into the wall outlet only one way. It shows you how to operate the remote control... carefully review the contents of the following four sections in the order provided to ensure that face the screen with a dry soft cloth. In this manual are not of a reflective material. 2
... TV. It is transported directly from a cold to a warm location, or if the room temperature changes suddenly, the picture may be blurred or show poor color. If you are unable to insert the plug fully into the wall outlet only one way. It shows you how to operate the remote control... carefully review the contents of the following four sections in the order provided to ensure that face the screen with a dry soft cloth. In this manual are not of a reflective material. 2
Operating Instructions
Page 7
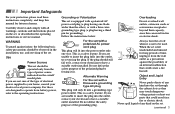
... possibility of any kind into a grounding-type power outlet. Grounding or Polarization This set , or described in the operating instructions or service manual. Do not defeat the safety purpose of any kind on the serial/ model plate. Overloading Do not overload wall outlets, extension cords or... convenience receptacles beyond their capacity, since this manual for future reference. When the set with a three-wire grounding type AC plug This plug will fit into the outlet, try reversing the...
... possibility of any kind into a grounding-type power outlet. Grounding or Polarization This set , or described in the operating instructions or service manual. Do not defeat the safety purpose of any kind on the serial/ model plate. Overloading Do not overload wall outlets, extension cords or... convenience receptacles beyond their capacity, since this manual for future reference. When the set with a three-wire grounding type AC plug This plug will fit into the outlet, try reversing the...
Operating Instructions
Page 19
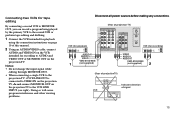
... connection instructions on page 10 of this manual. 2 Using an AUDIO/VIDEO cable, connect AUDIO and VIDEO IN on the VCR intended for recording) AUDIO R AUDIO L VIDEO LINE IN OUT IN AUDIO-R AUDIO-L VIDEO VMC-810S/820S 1 (not supplied) VIDEO AUDIO-L AUDIO-R VMC-810S/820S (not supplied) 2 (Rear of projectionTV) VIDEO IN VCR MONITOR OUT Indicates direction of...
... connection instructions on page 10 of this manual. 2 Using an AUDIO/VIDEO cable, connect AUDIO and VIDEO IN on the VCR intended for recording) AUDIO R AUDIO L VIDEO LINE IN OUT IN AUDIO-R AUDIO-L VIDEO VMC-810S/820S 1 (not supplied) VIDEO AUDIO-L AUDIO-R VMC-810S/820S (not supplied) 2 (Rear of projectionTV) VIDEO IN VCR MONITOR OUT Indicates direction of...
Operating Instructions
Page 27
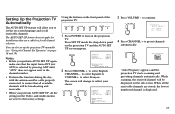
You can also set up the projection TV manually. (see "Using the Channel Set Up menu" on the front panel of the projection TV: - + FLASH FOCUS TV/VIDEO VOLUME - Using the buttons on pages 38 and 39) Notes: • Before you perform AUTO SET UP again, make sure that the input from ANT... receivable. • When you perform AUTO SET UP, all channel selection. The AUTO SET UP feature does not apply for all the settings in the Video, and Audio menus are stored, the lowest numbered channel is selected by pressing ANT until "AUX" does not appear next to the channel number. •...
You can also set up the projection TV manually. (see "Using the Channel Set Up menu" on the front panel of the projection TV: - + FLASH FOCUS TV/VIDEO VOLUME - Using the buttons on pages 38 and 39) Notes: • Before you perform AUTO SET UP again, make sure that the input from ANT... receivable. • When you perform AUTO SET UP, all channel selection. The AUTO SET UP feature does not apply for all the settings in the Video, and Audio menus are stored, the lowest numbered channel is selected by pressing ANT until "AUX" does not appear next to the channel number. •...
Operating Instructions
Page 29
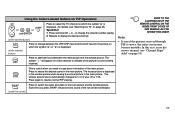
...2 seconds, or you can also perform the "Picture Adjustment" (such as "Brightness," "Color," etc.) to adjust the volume (+ up or - down ). Movie: Select to customize the "Picture Adjustment" of five different video modes that best suits the program you are watching. Speed Surf 1 Press and hold CH ...REFER TO THE ILLUSTRATION OF THE REMOTE CONTROL ON THE INSIDE FRONT COVER OF THIS MANUAL AS YOU REVIEW THIS CHART PICTURE MODE Press PICTURE MODE repeatedly to directly choose one of the Video menu according to scan through the remote control. VOL +/- Using the White Labeled Buttons...
...2 seconds, or you can also perform the "Picture Adjustment" (such as "Brightness," "Color," etc.) to adjust the volume (+ up or - down ). Movie: Select to customize the "Picture Adjustment" of five different video modes that best suits the program you are watching. Speed Surf 1 Press and hold CH ...REFER TO THE ILLUSTRATION OF THE REMOTE CONTROL ON THE INSIDE FRONT COVER OF THIS MANUAL AS YOU REVIEW THIS CHART PICTURE MODE Press PICTURE MODE repeatedly to directly choose one of the Video menu according to scan through the remote control. VOL +/- Using the White Labeled Buttons...

Operating Instructions
Page 31
... equipment connected with S- (under the cover) Link. (see page 20) REFER TO THE ILLUSTRATION OF THE REMOTE CONTROL ON THE INSIDE FRONT COVER OF THIS MANUAL AS YOU REVIEW THIS CHART 27 ANT (AUX input) Press to change between the VHF/UHF input and the AUX input. (for Projection TV Operations...
... equipment connected with S- (under the cover) Link. (see page 20) REFER TO THE ILLUSTRATION OF THE REMOTE CONTROL ON THE INSIDE FRONT COVER OF THIS MANUAL AS YOU REVIEW THIS CHART 27 ANT (AUX input) Press to change between the VHF/UHF input and the AUX input. (for Projection TV Operations...
Operating Instructions
Page 33
... This is useful when you press SWAP, the picture and sound of the main picture. SWAP (under the cover) Press to switch the audio and video of the pictures received through PIP is automatically changed to 1/4 if it was 1/9 or 1/16. In this case, erase the snowy channel. (see "Watching the...) Press to freeze the desired scene in the main picture. REFER TO THE ILLUSTRATION OF THE REMOTE CONTROL ON THE INSIDE FRONT COVER OF THIS MANUAL AS YOU REVIEW THIS CHART Note: • If one of the main picture and the window picture. The frozen picture is displayed. (for the picture...
... This is useful when you press SWAP, the picture and sound of the main picture. SWAP (under the cover) Press to switch the audio and video of the pictures received through PIP is automatically changed to 1/4 if it was 1/9 or 1/16. In this case, erase the snowy channel. (see "Watching the...) Press to freeze the desired scene in the main picture. REFER TO THE ILLUSTRATION OF THE REMOTE CONTROL ON THE INSIDE FRONT COVER OF THIS MANUAL AS YOU REVIEW THIS CHART Note: • If one of the main picture and the window picture. The frozen picture is displayed. (for the picture...

Operating Instructions
Page 35
.... In this case, erase the snowy channel. (see "Channel Skip/ Add" on the TV's screen. SWAP (under the cover) Press to switch the audio and video of the right and left pictures. FREEZE GUIDE This is useful when you press SWAP, the picture and sound of the two will appear for... to copy down information that appears on page 39) 31 REFER TO THE ILLUSTRATION OF THE REMOTE CONTROL ON THE INSIDE FRONT COVER OF THIS MANUAL AS YOU REVIEW THIS CHART Notes: • The sound of the pictures received through P&P is snowy, the entire screen may become unstable. The symbol " " will...
.... In this case, erase the snowy channel. (see "Channel Skip/ Add" on the TV's screen. SWAP (under the cover) Press to switch the audio and video of the right and left pictures. FREEZE GUIDE This is useful when you press SWAP, the picture and sound of the two will appear for... to copy down information that appears on page 39) 31 REFER TO THE ILLUSTRATION OF THE REMOTE CONTROL ON THE INSIDE FRONT COVER OF THIS MANUAL AS YOU REVIEW THIS CHART Notes: • The sound of the pictures received through P&P is snowy, the entire screen may become unstable. The symbol " " will...
Operating Instructions
Page 44
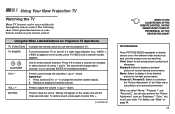
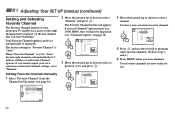
... The factory setting for use the joystick to program other favorite channels. (Follow steps 3 and 4.) 6 Press MENU when you were watching). If you set to "Manual." Favorite Channel ch 1. 1 CNN 2. 8 3. 10 SPTN 4. 20 5. 30 6. 40 7. 50 8. 100 Select a channel 5 Press and use . The... 1 CNN 2. 2 3. 10 SPTN 4. 20 5. 30 6. 40 7. 50 8. 100 Select a position 3 Move the joystick up or down to select "Manual" and press . You have finished. Adjusting Your SET UP (menus) (continued) Setting and Selecting Favorite Channel The Favorite Channel feature of your own selections as...
... The factory setting for use the joystick to program other favorite channels. (Follow steps 3 and 4.) 6 Press MENU when you were watching). If you set to "Manual." Favorite Channel ch 1. 1 CNN 2. 8 3. 10 SPTN 4. 20 5. 30 6. 40 7. 50 8. 100 Select a channel 5 Press and use . The... 1 CNN 2. 2 3. 10 SPTN 4. 20 5. 30 6. 40 7. 50 8. 100 Select a position 3 Move the joystick up or down to select "Manual" and press . You have finished. Adjusting Your SET UP (menus) (continued) Setting and Selecting Favorite Channel The Favorite Channel feature of your own selections as...
Operating Instructions
Page 45
The favorite channel menu and a window picture will be displayed in "Setting Favorite Channel manually" (skip step 2 if "Manual" is not available for normal viewing. Simply proceed as described in the window picture. 1 CNN 2 10 SPTN 20 30 40 50 100 Exit 41 Move ...
The favorite channel menu and a window picture will be displayed in "Setting Favorite Channel manually" (skip step 2 if "Manual" is not available for normal viewing. Simply proceed as described in the window picture. 1 CNN 2 10 SPTN 20 30 40 50 100 Exit 41 Move ...
Operating Instructions
Page 63
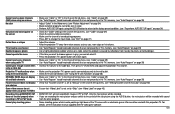
...see "Cable" on page 39) • Use "Auto Program" to add receivable channels that "Video Label" is not set to "Manual" in the Channel Set Up menu. (see "Setting Favorite Channel manually" on page 40) your choices Some video sources do not • Ensure that are not presently in the TV's memory. (see "... • Use "Auto Program" to add receivable channels that are not presently in the TV's memory. (see "Auto Program" on page 39) No color • Adjust "Color" in the Video menu. (see the instruction manual supplied with sound recording in PIP or P&P mode from the other program.
...see "Cable" on page 39) • Use "Auto Program" to add receivable channels that "Video Label" is not set to "Manual" in the Channel Set Up menu. (see "Setting Favorite Channel manually" on page 40) your choices Some video sources do not • Ensure that are not presently in the TV's memory. (see "... • Use "Auto Program" to add receivable channels that are not presently in the TV's memory. (see "Auto Program" on page 39) No color • Adjust "Color" in the Video menu. (see the instruction manual supplied with sound recording in PIP or P&P mode from the other program.

Operating Instructions
Page 66
... 34 (Picture/Brightness/Color/Hue/ Sharpness) Picture and Picture (P&P 30 Picture-in-Picture (PIP 28 PICTURE MODE button 25 PIP/P&P operations ACTIVE B/b 28, 30 AUDIO 29, 31 CH 29, 30 CHANNEL INDEX 32 FREEZE 29, 31 (P & P 30 (PIP 28 POSITION 28 SWAP 29, 31 TV/VIDEO 28, 30 R ... V, W VCR connection 10, 12, 15 operation 56 Video Label 43 Video menu operations 34 VOL 25 VOLUME 23 X XDS 27 Y, Z Y/PB/PR 13, 16, 20 If, after reading this instruction manual, you have additional questions related to the use of your Sony projection TV, please call one of the following numbers ...
... 34 (Picture/Brightness/Color/Hue/ Sharpness) Picture and Picture (P&P 30 Picture-in-Picture (PIP 28 PICTURE MODE button 25 PIP/P&P operations ACTIVE B/b 28, 30 AUDIO 29, 31 CH 29, 30 CHANNEL INDEX 32 FREEZE 29, 31 (P & P 30 (PIP 28 POSITION 28 SWAP 29, 31 TV/VIDEO 28, 30 R ... V, W VCR connection 10, 12, 15 operation 56 Video Label 43 Video menu operations 34 VOL 25 VOLUME 23 X XDS 27 Y, Z Y/PB/PR 13, 16, 20 If, after reading this instruction manual, you have additional questions related to the use of your Sony projection TV, please call one of the following numbers ...


