
Operating Instructions
Page 3
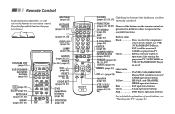
...buttons Green S-Link operation buttons Pink DVD Player operation buttons For a detailed explanation of the buttons on the remote control are TV/VIDEO (page 26) presented in different colors to control; VTR (VCR)/MDP/DVD Player, SAT (satellite receiver)/ CABLE, or projection TV. Keep this flap unfolded and use...MUTING DVD/ SAT/ POWER VTR CABLE TV PICTURE FUNCTION MODE DVD/VTR SAT/CABLE TV DISPLAY ANT TV/VIDEO 123 456 789 JUMP ENTER 0 ACTIVE AUDIO INDEX VOL MENU FREEZE GUIDE CH RESET CODE SET VTR123DVD/MDP TV POWER Getting to know the buttons on the (pages 25, 56, 57...
...buttons Green S-Link operation buttons Pink DVD Player operation buttons For a detailed explanation of the buttons on the remote control are TV/VIDEO (page 26) presented in different colors to control; VTR (VCR)/MDP/DVD Player, SAT (satellite receiver)/ CABLE, or projection TV. Keep this flap unfolded and use...MUTING DVD/ SAT/ POWER VTR CABLE TV PICTURE FUNCTION MODE DVD/VTR SAT/CABLE TV DISPLAY ANT TV/VIDEO 123 456 789 JUMP ENTER 0 ACTIVE AUDIO INDEX VOL MENU FREEZE GUIDE CH RESET CODE SET VTR123DVD/MDP TV POWER Getting to know the buttons on the (pages 25, 56, 57...
Operating Instructions
Page 26
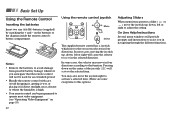
... 55) 22 Using the remote control joystick AUDIO INDEX VOL MENU FREEZE GUIDE CH RESET Move . In most cases, moving the joystick up , down, left or right will provide prompts and instructions to operate most video equipment. (see "Operating Video Equipment" on -screen selector in direct sunlight, near a heater or where the humidity...
... 55) 22 Using the remote control joystick AUDIO INDEX VOL MENU FREEZE GUIDE CH RESET Move . In most cases, moving the joystick up , down, left or right will provide prompts and instructions to operate most video equipment. (see "Operating Video Equipment" on -screen selector in direct sunlight, near a heater or where the humidity...
Operating Instructions
Page 27
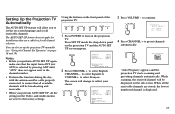
...] para salir. 3 Press VOLUME - Yes : [CH+] No : [CH-] 4 Press CHANNEL + to select English, CHANNEL - When all the receivable channels are reset to the factory settings. Press [ SET UP ] to exit. 2 Press CHANNEL + to preset channels automatically. - CHANNEL + Auto Program "Auto Program" appears and ...TV and the AUTO SET UP screen appears. Using the buttons on the front panel of the projection TV: - + FLASH FOCUS TV/VIDEO VOLUME - VOLUME + - VOLUME + Continue to continue. - You can also set all receivable channels. Setting Up the Projection TV ...
...] para salir. 3 Press VOLUME - Yes : [CH+] No : [CH-] 4 Press CHANNEL + to select English, CHANNEL - When all the receivable channels are reset to the factory settings. Press [ SET UP ] to exit. 2 Press CHANNEL + to preset channels automatically. - CHANNEL + Auto Program "Auto Program" appears and ...TV and the AUTO SET UP screen appears. Using the buttons on the front panel of the projection TV: - + FLASH FOCUS TV/VIDEO VOLUME - VOLUME + - VOLUME + Continue to continue. - You can also set all receivable channels. Setting Up the Projection TV ...
Operating Instructions
Page 32
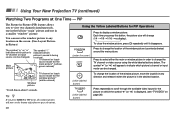
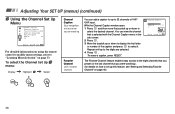
...or "B" indicates which picture's TV channel or input source can be changed . Using the Yellow Labeled Buttons for the window picture* (white-colored) * It will change the location of the window picture (counterclockwise) around the main picture. Press repeatedly to change the location of the ...indicate which the symbol "b" (or "B") is being received. PIP The Picture-in-Picture (PIP) feature allows you press RESET in order to scroll through the available video inputs for the picture on which picture's channel or input mode can be changed . To change (1/4 n1/9 n1/16...
...or "B" indicates which picture's TV channel or input source can be changed . Using the Yellow Labeled Buttons for the window picture* (white-colored) * It will change the location of the window picture (counterclockwise) around the main picture. Press repeatedly to change the location of the ...indicate which the symbol "b" (or "B") is being received. PIP The Picture-in-Picture (PIP) feature allows you press RESET in order to scroll through the available video inputs for the picture on which picture's channel or input mode can be changed . To change (1/4 n1/9 n1/16...

Operating Instructions
Page 38
... customize the "Picture Adjustment" of a "Mode" setting. Sharpness: Adjust slider right (up ) to increase color intensity; To select the Video menu: Display / Highlight / Select MENU To restore the factory settings Press RESET on the remote control while the Video menu is selected. Standard: Select to sharpen the picture; Adjusting Your SET UP (menus) (continued...
... customize the "Picture Adjustment" of a "Mode" setting. Sharpness: Adjust slider right (up ) to increase color intensity; To select the Video menu: Display / Highlight / Select MENU To restore the factory settings Press RESET on the remote control while the Video menu is selected. Standard: Select to sharpen the picture; Adjusting Your SET UP (menus) (continued...
Operating Instructions
Page 39
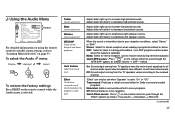
..." on the remote control while the Audio menu is selected. To select the Audio menu: Display / Highlight / Select MENU To restore the factory settings Press RESET on page 33. Adjust slider right (up ) to the received channel. When the sound is set to cycle through the "MTS/SAP" options as follows...
..." on the remote control while the Audio menu is selected. To select the Audio menu: Display / Highlight / Select MENU To restore the factory settings Press RESET on page 33. Adjust slider right (up ) to the received channel. When the sound is set to cycle through the "MTS/SAP" options as follows...

Operating Instructions
Page 41
... the current minute (00-59) is displayed, and press . 2 Move the joystick up or down to turn the projection TV on your timer setting, press RESET while in the On/Off Timer window. Using the Timer Menu Timer Daylight Savings: Yes Current Time On / Off Timer ch --Move - - : - - To select the...
... the current minute (00-59) is displayed, and press . 2 Move the joystick up or down to turn the projection TV on your timer setting, press RESET while in the On/Off Timer window. Using the Timer Menu Timer Daylight Savings: Yes Current Time On / Off Timer ch --Move - - : - - To select the...
Operating Instructions
Page 42
... can add a caption for details on how to set up this feature, see "Setting and Selecting Favorite Channel" on page 33. To erase a caption, press RESET. With the Channel Caption window open: 1 Press and then move the joystick up or down to select it. Move Select Exit MENU The Favorite Channel...
... can add a caption for details on how to set up this feature, see "Setting and Selecting Favorite Channel" on page 33. To erase a caption, press RESET. With the Channel Caption window open: 1 Press and then move the joystick up or down to select it. Move Select Exit MENU The Favorite Channel...
Operating Instructions
Page 61
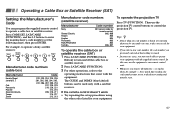
..., 208, 218 227, 228, 229 219, 220, 221 214, 215 209, 210, 211 216, 217 212, 213 Manufacturer code numbers (satellite receiver) Manufacturer Sony Geneal Electric Hitachi Hughes Panasonic RCA/PROSCAN Toshiba Code number 801 (preset code for remote control) 802, 808 805 804 803 802 806, 807 To...at that come to operate a cable box or satellite receiver. Operating a Cable Box or Satellite Receiver (SAT) Setting the Manufacturer's Code You can be reset. 57 Press CODE SET, SAT/CABLE (FUNCTION), and the 0-9 buttons to replace them one by one until you remove the batteries - The GUIDE ...
..., 208, 218 227, 228, 229 219, 220, 221 214, 215 209, 210, 211 216, 217 212, 213 Manufacturer code numbers (satellite receiver) Manufacturer Sony Geneal Electric Hitachi Hughes Panasonic RCA/PROSCAN Toshiba Code number 801 (preset code for remote control) 802, 808 805 804 803 802 806, 807 To...at that come to operate a cable box or satellite receiver. Operating a Cable Box or Satellite Receiver (SAT) Setting the Manufacturer's Code You can be reset. 57 Press CODE SET, SAT/CABLE (FUNCTION), and the 0-9 buttons to replace them one by one until you remove the batteries - The GUIDE ...

Operating Instructions
Page 66
... in the continental United States contact the Direct Response Center at: 1-800-222-SONY (7669) Customers in U.S.A. 62 S S-Link cable 8 S-Link connector 20, 21 S-Link function 20 S Video cable 8 Safety 2 SAP 35 SAT/CABLE (FUNCTION 57 Satellite receiver (SAT)...Color/Hue/ Sharpness) Picture and Picture (P&P 30 Picture-in-Picture (PIP 28 PICTURE MODE button 25 PIP/P&P operations ACTIVE B/b 28, 30 AUDIO 29, 31 CH 29, 30 CHANNEL INDEX 32 FREEZE 29, 31 (P & P 30 (PIP 28 POSITION 28 SWAP 29, 31 TV/VIDEO 28, 30 R Remote control 22 Graphic Illustration .... (inside cover) RESET...
... in the continental United States contact the Direct Response Center at: 1-800-222-SONY (7669) Customers in U.S.A. 62 S S-Link cable 8 S-Link connector 20, 21 S-Link function 20 S Video cable 8 Safety 2 SAP 35 SAT/CABLE (FUNCTION 57 Satellite receiver (SAT)...Color/Hue/ Sharpness) Picture and Picture (P&P 30 Picture-in-Picture (PIP 28 PICTURE MODE button 25 PIP/P&P operations ACTIVE B/b 28, 30 AUDIO 29, 31 CH 29, 30 CHANNEL INDEX 32 FREEZE 29, 31 (P & P 30 (PIP 28 POSITION 28 SWAP 29, 31 TV/VIDEO 28, 30 R Remote control 22 Graphic Illustration .... (inside cover) RESET...


