

Operating Instructions
Page 1
KLV-52V550A KLV-46V550A KLV-40V550A/40V530A KLV-40S550A KLV-32V550A/32V530A © 2009 Sony Corporation LCD Colour TV Operating Instructions 4-135-850-12(1)
KLV-52V550A KLV-46V550A KLV-40V550A/40V530A KLV-40S550A KLV-32V550A/32V530A © 2009 Sony Corporation LCD Colour TV Operating Instructions 4-135-850-12(1)

Operating Instructions
Page 2
Before operating the TV, please read this manual thoroughly and retain it for choosing this Sony product. Trademark information HDMI, the HDMI logo and HighDefinition Multimedia Interface are trademarks of HDMI Licensing LLC. "BRAVIA" and are trademarks or registered trademarks of Sony Corporation. The typefaces used...about the dangers of climbing on the screen display are solely developed by the manufacturer of this manual are trademarks of the KLV-40V550A unless otherwise stated. IMPORTANT INFORMATION If a television is not positioned in "Factory Settings" under the "Set-up" ...
Before operating the TV, please read this manual thoroughly and retain it for choosing this Sony product. Trademark information HDMI, the HDMI logo and HighDefinition Multimedia Interface are trademarks of HDMI Licensing LLC. "BRAVIA" and are trademarks or registered trademarks of Sony Corporation. The typefaces used...about the dangers of climbing on the screen display are solely developed by the manufacturer of this manual are trademarks of the KLV-40V550A unless otherwise stated. IMPORTANT INFORMATION If a television is not positioned in "Factory Settings" under the "Set-up" ...

Operating Instructions
Page 3
... ...8 Precautions ...9 Remote and TV Controls/Indicators 10 Watching TV Watching TV ...15 Using the Favourite List ...17 Usin Using Optional Equipment Connecting Optional Equipment 18 Viewing Pictures from Connected Equipment 20 Playing back Photo/Music/Video via USB 21 Using BRAVIA Sync with Control for future reference.... 3 GB Retain this manual for HDMI 22 Usin Using Menu Functions Navigating through TV Home Menu on XMB 23 TV Settings Menu ...24 Usin Additional Information Installing the ...
... ...8 Precautions ...9 Remote and TV Controls/Indicators 10 Watching TV Watching TV ...15 Using the Favourite List ...17 Usin Using Optional Equipment Connecting Optional Equipment 18 Viewing Pictures from Connected Equipment 20 Playing back Photo/Music/Video via USB 21 Using BRAVIA Sync with Control for future reference.... 3 GB Retain this manual for HDMI 22 Usin Using Menu Functions Navigating through TV Home Menu on XMB 23 TV Settings Menu ...24 Usin Additional Information Installing the ...

Operating Instructions
Page 5
... name ready for reference. Have your nearest Sony service centre to secure the TV. z • An optional Sony support belt kit is used to purchase a kit. Start-up Guide 2: Connecting an antenna/ cable/VCR Connecting an antenna/cable 3: Preventing the TV from toppling over 8 Antenna cable (not supplied...) Antenna cable (not supplied) 1 Install a wood screw (4 mm in diameter, not supplied) in the TV stand. 2 Install a machine screw (M4 × 20, not supplied) into the screw hole of the TV. 3 Tie the wood screw and the machine screw with a strong cord (not supplied). VCR 5 GB
... name ready for reference. Have your nearest Sony service centre to secure the TV. z • An optional Sony support belt kit is used to purchase a kit. Start-up Guide 2: Connecting an antenna/ cable/VCR Connecting an antenna/cable 3: Preventing the TV from toppling over 8 Antenna cable (not supplied...) Antenna cable (not supplied) 1 Install a wood screw (4 mm in diameter, not supplied) in the TV stand. 2 Install a machine screw (M4 × 20, not supplied) into the screw hole of the TV. 3 Tie the wood screw and the machine screw with a strong cord (not supplied). VCR 5 GB
Operating Instructions
Page 6
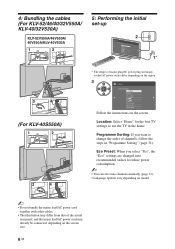
... cables (For KLV-52/46/40/32V550A/ KLV-40/32V530A) KLV-52V550A/46V550A/ 40V550A/KLV-40V530A 5: Performing the initial set-up * The shapes of mains plug/AC power plug and mains socket/AC power outlet differ depending on the region. 3 (For KLV-40S550A) Follow the ...instructions on the screen size. 6 GB Location: Select "Home" for the best TV...
... cables (For KLV-52/46/40/32V550A/ KLV-40/32V530A) KLV-52V550A/46V550A/ 40V550A/KLV-40V530A 5: Performing the initial set-up * The shapes of mains plug/AC power plug and mains socket/AC power outlet differ depending on the region. 3 (For KLV-40S550A) Follow the ...instructions on the screen size. 6 GB Location: Select "Home" for the best TV...

Operating Instructions
Page 7
To wall-mount the TV. Front 7 GB Start-up Guide Adjusting the viewing angle of the TV. • Do not remove the Table-Top Stand for any reason other than listed below . Adjust the angle left and right (swivel) Top view Detaching the Table-Top Stand from the TV ~ • Remove the screws guided by the arrow marks of the TV (For KLV-52/46/40/32V550A/ KLV-40/32V530A only) This TV can be adjusted within the angles shown below . -
To wall-mount the TV. Front 7 GB Start-up Guide Adjusting the viewing angle of the TV. • Do not remove the Table-Top Stand for any reason other than listed below . Adjust the angle left and right (swivel) Top view Detaching the Table-Top Stand from the TV ~ • Remove the screws guided by the arrow marks of the TV (For KLV-52/46/40/32V550A/ KLV-40/32V530A only) This TV can be adjusted within the angles shown below . -

Operating Instructions
Page 8
... The core conductors may be exposed or broken. • Do not modify the AC power cord. • Do not put stress on the LCD panel and the frame around the set. • To ensure proper ventilation and prevent the collection of dirt or dust: - Installed with stand ...bracket SU-WL50B • Be sure to use the TV set in locations, environments or situations such as follows in a fire. KLV-52/46/40/ 32V550A/KLV-40/ 32V530A KLV-40S550A • When lifting or moving the TV set, hold it is strongly recommended that you use Sony accessories, including: - Insert the plug fully into the...
... The core conductors may be exposed or broken. • Do not modify the AC power cord. • Do not put stress on the LCD panel and the frame around the set. • To ensure proper ventilation and prevent the collection of dirt or dust: - Installed with stand ...bracket SU-WL50B • Be sure to use the TV set in locations, environments or situations such as follows in a fire. KLV-52/46/40/ 32V550A/KLV-40/ 32V530A KLV-40S550A • When lifting or moving the TV set, hold it is strongly recommended that you use Sony accessories, including: - Insert the plug fully into the...
Operating Instructions
Page 9
... TV set is recommended to ensure to the screen surface and cabinet material. • Periodic vacuuming of the ventilation openings is used in a cold place, a smear may occur when still pictures are wet, with the cabinet removed, or with a soft cloth. Follow your dealer or Sony ...or the LCD screen may become dark. This does not indicate a failure. Optional Equipment Keep optional components or any type of this TV set shall not be placed on the TV. AC power cord is persistent, wipe with a soft cloth slightly moistened with separate collection systems) This sysmbol...
... TV set is recommended to ensure to the screen surface and cabinet material. • Periodic vacuuming of the ventilation openings is used in a cold place, a smear may occur when still pictures are wet, with the cabinet removed, or with a soft cloth. Follow your dealer or Sony ...or the LCD screen may become dark. This does not indicate a failure. Optional Equipment Keep optional components or any type of this TV set shall not be placed on the TV. AC power cord is persistent, wipe with a soft cloth slightly moistened with separate collection systems) This sysmbol...
Operating Instructions
Page 10
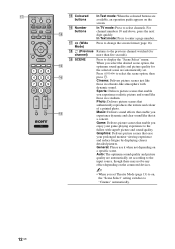
Press to select the previous file. z • The number 5, N, PROG + and AUDIO buttons on the remote. * In the TV menu, these buttons will work the same as those on the remote have a tactile dot. Displays two pictures simultaneously (page 20). Press F/G to select/... 3 - Press to pause/start a slideshow. Press F/f/G/g to the next file. Press f to go to move the on or off. ~ • To turn the TV completely off, turn the TV on -screen cursor. When playing a photo file: Press to select the next file. Press f/g to pause/ start the playback. Press to standby mode...
Press to select the previous file. z • The number 5, N, PROG + and AUDIO buttons on the remote. * In the TV menu, these buttons will work the same as those on the remote have a tactile dot. Displays two pictures simultaneously (page 20). Press F/G to select/... 3 - Press to pause/start a slideshow. Press F/f/G/g to the next file. Press f to go to move the on or off. ~ • To turn the TV completely off, turn the TV on -screen cursor. When playing a photo file: Press to select the next file. Press f/g to pause/ start the playback. Press to standby mode...

Operating Instructions
Page 11
... (-) channel. When playing a photo/music/video file: Press to stop the playback (the display returns to the file or folder list). 7 PROG +/-/ / In TV mode: Press to operate equipment that you want to display current channel number, scene mode, sound mode and screen mode. select/Text In Text mode...: Press to a quiz). answers to hold ) qf Press to mute the sound. The listed options vary depending on the TV without sound, press this button. 0 / (Info/ Text reveal) Press once to turn on the input source. qs / (Text) Press to display a list...
... (-) channel. When playing a photo/music/video file: Press to stop the playback (the display returns to the file or folder list). 7 PROG +/-/ / In TV mode: Press to operate equipment that you want to display current channel number, scene mode, sound mode and screen mode. select/Text In Text mode...: Press to a quiz). answers to hold ) qf Press to mute the sound. The listed options vary depending on the TV without sound, press this button. 0 / (Info/ Text reveal) Press once to turn on the input source. qs / (Text) Press to display a list...
Operating Instructions
Page 12
... In Text mode: When the coloured buttons are available, an operation guide appears on , the "Scene Select" setting switches to "Cinema" automatically. 12 GB In TV mode: Press to display the "Scene Select" menu. When you enjoy your prolonged monitor viewing experience and reduce fatigue by displaying clearer detailed pictures. General...
... In Text mode: When the coloured buttons are available, an operation guide appears on , the "Scene Select" setting switches to "Cinema" automatically. 12 GB In TV mode: Press to display the "Scene Select" menu. When you enjoy your prolonged monitor viewing experience and reduce fatigue by displaying clearer detailed pictures. General...
Operating Instructions
Page 13
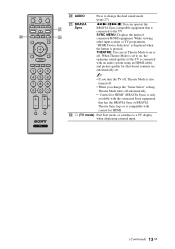
..." (BRAVIA Sync) is only available with the connected Sony equipment that is connected with control for film-based contents are automatically set Theatre Mode to a TV display ...you turn the TV off, Theatre Mode is pressed. wa BRAVIA Sync m/N/X/M/x: You can set . ~ • If you change the dual sound mode (page 27). ws (TV mode) Exit ...TV is connected to change the "Scene Select" setting, Theatre Mode turns off . w; THEATRE: You can operate the BRAVIA Sync-compatible equipment that has the BRAVIA Sync or BRAVIA Theatre Sync logo or is compatible with an audio system...
..." (BRAVIA Sync) is only available with the connected Sony equipment that is connected with control for film-based contents are automatically set Theatre Mode to a TV display ...you turn the TV off, Theatre Mode is pressed. wa BRAVIA Sync m/N/X/M/x: You can set . ~ • If you change the dual sound mode (page 27). ws (TV mode) Exit ...TV is connected to change the "Scene Select" setting, Theatre Mode turns off . w; THEATRE: You can operate the BRAVIA Sync-compatible equipment that has the BRAVIA Sync or BRAVIA Theatre Sync logo or is compatible with an audio system...

Operating Instructions
Page 14
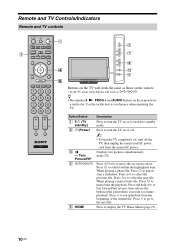
...indicator to remain lit or may affect its function. 2 Remote control sensor Receives signals from the remote. About the operation guide on the TV screen Operation Guide Example: Press or RETURN (see 4 on page 10 or 6 on the operation guide. 14 GB The operation guide ...remote, and is turned on . ~ • Make sure that the TV is completely turned off before unplugging the main lead/AC power cord. Use the remote buttons shown on page 11). Indicators (For KLV-52/46/40/32V550A/KLV-40/32V530A) (For KLV-40S550A) 12 3 4 5 Indicator Description 1 Light sensor (page 24) Do...
...indicator to remain lit or may affect its function. 2 Remote control sensor Receives signals from the remote. About the operation guide on the TV screen Operation Guide Example: Press or RETURN (see 4 on page 10 or 6 on the operation guide. 14 GB The operation guide ...remote, and is turned on . ~ • Make sure that the TV is completely turned off before unplugging the main lead/AC power cord. Use the remote buttons shown on page 11). Indicators (For KLV-52/46/40/32V550A/KLV-40/32V530A) (For KLV-40S550A) 12 3 4 5 Indicator Description 1 Light sensor (page 24) Do...

Operating Instructions
Page 15
Press the corresponding coloured button to access the page. 2 2 1 Press 1 on the TV to turn on the TV. When the TV is in standby mode (the 1 (standby) indicator on the TV front panel is red), press "/1 on the remote to a page by selecting the page number displayed on the ...8226; You can access pages quickly and easily (Fastext). Watching TV Watching TV Watching TV To access Text Press /. Each time you can also jump directly to turn on the TV. 2 Press the number buttons or PROG +/- Press and F/f/G/g to select a TV channel. (Continued) 15 GB To hold a page, press ....
Press the corresponding coloured button to access the page. 2 2 1 Press 1 on the TV to turn on the TV. When the TV is in standby mode (the 1 (standby) indicator on the TV front panel is red), press "/1 on the remote to a page by selecting the page number displayed on the ...8226; You can access pages quickly and easily (Fastext). Watching TV Watching TV Watching TV To access Text Press /. Each time you can also jump directly to turn on the TV. 2 Press the number buttons or PROG +/- Press and F/f/G/g to select a TV channel. (Continued) 15 GB To hold a page, press ....
Operating Instructions
Page 16
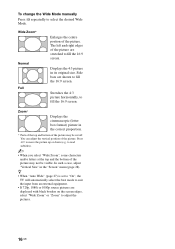
... the desired Wide Mode. z • When "Auto Wide" (page 27) is set to "On", the TV will automatically select the best mode to suit the input from an external equipment. • If 720p, 1080i or 1080p source pictures are shown to adjust the pictures. 16 GB Zoom* Displays the cinemascopic (letter box...
... the desired Wide Mode. z • When "Auto Wide" (page 27) is set to "On", the TV will automatically select the best mode to suit the input from an external equipment. • If 720p, 1080i or 1080p source pictures are shown to adjust the pictures. 16 GB Zoom* Displays the cinemascopic (letter box...

Operating Instructions
Page 17
To Do this Watch a channel Press . Watching TV Using the Favourite List Favourites Favourite List The Favourite feature lets you specify. 1 Press . 2 Perform the desired operation as shown in the following table or ...
To Do this Watch a channel Press . Watching TV Using the Favourite List Favourites Favourite List The Favourite feature lets you specify. 1 Press . 2 Perform the desired operation as shown in the following table or ...

Operating Instructions
Page 18
... with component output PC * This terminal will be labeled as "3" for KLV-40/32V530A only. **This terminal will be labeled as "HDMI 2 IN" for KLV-40/32V530A only. ~ • The terminals and terminal labels may vary depending on TV models. 18 GB Audio system Camcorder DVD player PC (HDMI-output) Blu-ray disc player Using Optional...
... with component output PC * This terminal will be labeled as "3" for KLV-40/32V530A only. **This terminal will be labeled as "HDMI 2 IN" for KLV-40/32V530A only. ~ • The terminals and terminal labels may vary depending on TV models. 18 GB Audio system Camcorder DVD player PC (HDMI-output) Blu-ray disc player Using Optional...

Operating Instructions
Page 19
...the video jack and audio jack as the audio in a Sony digital still camera, camcorder or USB storage device (page 21). Connecting audio/portable equipment Connect to 1 6 USB Connect with ferrite cores. See page 30 to TV sound on the connected Hi-Fi audio equipment. In addition,... 1 AUDIO IN socket/jack is indispensable to Connect with 5 / PC IN PC cable with Description 4 HDMI IN 1, 2, 3, or 4 (HDMI IN 4: KLV-52/46/40/ 32V550A/KLV40S550A only) HDMI cable Digital video and audio signals are input from the connected equipment. We recommend that is supported. You can listen...
...the video jack and audio jack as the audio in a Sony digital still camera, camcorder or USB storage device (page 21). Connecting audio/portable equipment Connect to 1 6 USB Connect with ferrite cores. See page 30 to TV sound on the connected Hi-Fi audio equipment. In addition,... 1 AUDIO IN socket/jack is indispensable to Connect with 5 / PC IN PC cable with Description 4 HDMI IN 1, 2, 3, or 4 (HDMI IN 4: KLV-52/46/40/ 32V550A/KLV40S550A only) HDMI cable Digital video and audio signals are input from the connected equipment. We recommend that is supported. You can listen...
Operating Instructions
Page 20
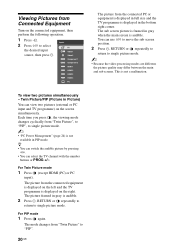
... To view two pictures simultaneously - z • You can switch the audible picture by pressing G/g. • You can view two pictures (external or PC input and TV programme) on the screen simultaneously. For Twin Picture mode 1 Press (except HDMI (PC) or PC input). Video 2 Component 1 Component 2 HDMI 1 HDMI 2 HDMI... Turn on the right. This is displayed in gray is audible. The sub screen picture is framed in Picture) You can select the TV channel with the number buttons or PROG +/-. Twin Picture/PIP (Picture in gray when the main screen is audible. 2 Press , RETURN...
... To view two pictures simultaneously - z • You can switch the audible picture by pressing G/g. • You can view two pictures (external or PC input and TV programme) on the screen simultaneously. For Twin Picture mode 1 Press (except HDMI (PC) or PC input). Video 2 Component 1 Component 2 HDMI 1 HDMI 2 HDMI... Turn on the right. This is displayed in gray is audible. The sub screen picture is framed in Picture) You can select the TV channel with the number buttons or PROG +/-. Twin Picture/PIP (Picture in gray when the main screen is audible. 2 Press , RETURN...
Operating Instructions
Page 21
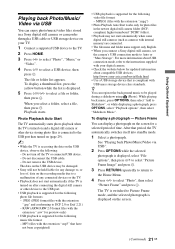
... in the newest digital still camera folder (DCFcompliant, highest-numbered "DCIM" folder). • Playback may be damaged. • Sony will not be played during a slideshow using (Photo). Picture Frame You can display a photograph on the screen for the following ...while displaying a photograph, press OPTIONS, select "Playback options", then select "Slideshow Music". http://www.sony-asia.com/bravia/flash.html • Use a USB storage device that period, the TV automatically switches itself into standby mode. 1 Select a photograph. Using Optional Equipment Playing back Photo/...
... in the newest digital still camera folder (DCFcompliant, highest-numbered "DCIM" folder). • Playback may be damaged. • Sony will not be played during a slideshow using (Photo). Picture Frame You can display a photograph on the screen for the following ...while displaying a photograph, press OPTIONS, select "Playback options", then select "Slideshow Music". http://www.sony-asia.com/bravia/flash.html • Use a USB storage device that period, the TV automatically switches itself into standby mode. 1 Select a photograph. Using Optional Equipment Playing back Photo/...


