Operating Instructions
Page 34
... moet worden. Refer servicing to Part 15 of fire or electric shock, do not open the cabinet. This can radiate radio frequency energy and, if not installed and used in this manual could void your Sony dealer regarding this product, you call ; If you carry the display unit, hold the unit itself, not the speakers. Sony Customer Information Services Center 1-800-222...
... moet worden. Refer servicing to Part 15 of fire or electric shock, do not open the cabinet. This can radiate radio frequency energy and, if not installed and used in this manual could void your Sony dealer regarding this product, you call ; If you carry the display unit, hold the unit itself, not the speakers. Sony Customer Information Services Center 1-800-222...
Operating Instructions
Page 35
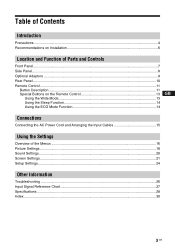
... Function of Parts and Controls Front Panel...7 Side Panel...8 Optional Adaptors ...9 Rear Panel ...10 Remote Control ...11 Button Description...11 Special Buttons on the Remote Control 13 GB Using the Wide Mode...13 Using the Sleep Function 14 Using the ECO Mode Function 14 Connections Connecting the AC Power Cord and Arranging the Input Cables 15 Using the Settings Overview of the Menus ...16 Picture Settings ...18 Sound Settings...20 Screen Settings...21 Setup Settings...24 Other Information Troubleshooting ...26 Input Signal Reference Chart 27 Specifications ...28 Index...
... Function of Parts and Controls Front Panel...7 Side Panel...8 Optional Adaptors ...9 Rear Panel ...10 Remote Control ...11 Button Description...11 Special Buttons on the Remote Control 13 GB Using the Wide Mode...13 Using the Sleep Function 14 Using the ECO Mode Function 14 Connections Connecting the AC Power Cord and Arranging the Input Cables 15 Using the Settings Overview of the Menus ...16 Picture Settings ...18 Sound Settings...20 Screen Settings...21 Setup Settings...24 Other Information Troubleshooting ...26 Input Signal Reference Chart 27 Specifications ...28 Index...
Operating Instructions
Page 36
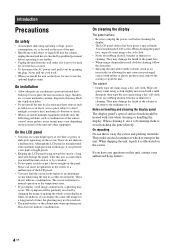
...power cord, pull it out by changing the image or making the whole screen display in a place subject to transport the unit. On cleaning the display The panel surface • Be sure to avoid touching the panel directly. The cabinet • Gently wipe off stains using a dry, soft cloth. • Never use the optional display stand...in white. Wipe off grimy stains using a cloth slightly moistened with volatile solvents (such as malfunction of the remote control, noisy picture, noisy sound, may occur depending on the carton. When shipping the unit, repack it checked by a window....
...power cord, pull it out by changing the image or making the whole screen display in a place subject to transport the unit. On cleaning the display The panel surface • Be sure to avoid touching the panel directly. The cabinet • Gently wipe off stains using a dry, soft cloth. • Never use the optional display stand...in white. Wipe off grimy stains using a cloth slightly moistened with volatile solvents (such as malfunction of the remote control, noisy picture, noisy sound, may occur depending on the carton. When shipping the unit, repack it checked by a window....
Operating Instructions
Page 39
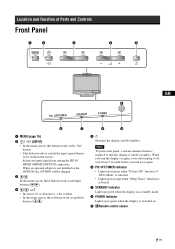
... of Parts and Controls Front Panel MENU GB PIC OFF/TIMER STANDBY POWER 1 MENU (page 16) 2 / (INPUT) • In the menu screen, this button works as the "Set" button. • This button works to switch the input signal when it is not installed in the OPTION slot, OPTION will be skipped. 3/ In the menu screen, these buttons work as left/right buttons ( / ). 4 // • Increases (+) or decreases (-) the volume. • In the menu screen, these buttons work as up in green...
... of Parts and Controls Front Panel MENU GB PIC OFF/TIMER STANDBY POWER 1 MENU (page 16) 2 / (INPUT) • In the menu screen, this button works as the "Set" button. • This button works to switch the input signal when it is not installed in the OPTION slot, OPTION will be skipped. 3/ In the menu screen, these buttons work as left/right buttons ( / ). 4 // • Increases (+) or decreases (-) the volume. • In the menu screen, these buttons work as up in green...
Operating Instructions
Page 40
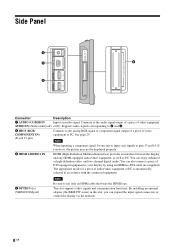
... HDMI cable that bears the HDMI logo. You can enjoy enhanced or high-definition video, and two-channel digital audio. Connects to the audio signal output of a piece of DVI-equipped equipment to your display by using an HDMI-to pins 13 and 14. This slot supports video signals and communication functions. Side Panel RGB/COMPONENT IN AUDIO IN COM MON AUDIO OPTION (VIDEO/COM) HD 15 1 IN 2 IN Connector Description 1 AUDIO (COMMON Inputs...
... HDMI cable that bears the HDMI logo. You can enjoy enhanced or high-definition video, and two-channel digital audio. Connects to the audio signal output of a piece of DVI-equipped equipment to your display by using an HDMI-to pins 13 and 14. This slot supports video signals and communication functions. Side Panel RGB/COMPONENT IN AUDIO IN COM MON AUDIO OPTION (VIDEO/COM) HD 15 1 IN 2 IN Connector Description 1 AUDIO (COMMON Inputs...
Operating Instructions
Page 43
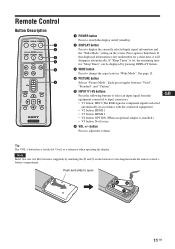
... size AA (R6) batteries (supplied) by pressing DISPLAY button. 3 WIDE button Press to change the aspect ratio in accordance with the connected equipment.) • V2 button: HDMI 1 • V3 button: HDMI 2 • V4 button: OPTION (When an optional adaptor is left undisturbed for use. 6 VOL +/- button Press to open 11 GB Use it will disappear automatically. Remote Control Button Description MUTING DISPLAY POWER MODE SOUND PICTURE WIDE INPUT V1 V2 V3 V4 V5 VOL POWER SAVING MENU FREEZE SLEEP 1 POWER button Press to switch...
... size AA (R6) batteries (supplied) by pressing DISPLAY button. 3 WIDE button Press to change the aspect ratio in accordance with the connected equipment.) • V2 button: HDMI 1 • V3 button: HDMI 2 • V4 button: OPTION (When an optional adaptor is left undisturbed for use. 6 VOL +/- button Press to open 11 GB Use it will disappear automatically. Remote Control Button Description MUTING DISPLAY POWER MODE SOUND PICTURE WIDE INPUT V1 V2 V3 V4 V5 VOL POWER SAVING MENU FREEZE SLEEP 1 POWER button Press to switch...
Operating Instructions
Page 46
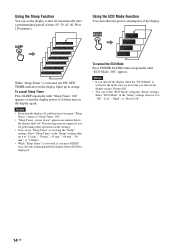
... "ECO Mode : Off" appears. power down" appears one minute before the display shuts off will be displayed. Select "ECO Mode" in the "Setup" settings, then set it on the display except "Picture Off". • You can set the "ECO Mode" using the "Setup" settings. Using the Sleep Function You can set the display to turn on again, "Sleep Timer" returns to "Sleep Timer : Off". • "Sleep Timer - To cancel the ECO Mode Press POWER SAVING button repeatedly...
... "ECO Mode : Off" appears. power down" appears one minute before the display shuts off will be displayed. Select "ECO Mode" in the "Setup" settings, then set it on the display except "Picture Off". • You can set the "ECO Mode" using the "Setup" settings. Using the Sleep Function You can set the display to turn on again, "Sleep Timer" returns to "Sleep Timer : Off". • "Sleep Timer - To cancel the ECO Mode Press POWER SAVING button repeatedly...

Operating Instructions
Page 50
... picture contrast. Press to store preferred settings. The "Picture" settings include the following options: : : : : Picture Mode "Vivid": Select for standard picture settings. "Custom": Allows you can also use PICTURE on the remote control instead. • You can alter the "Picture" settings ("Picture", "Brightness", "Color", etc.) for each input. Picture Mode Reset Resets all settings and adjustments currently selected in "Picture Mode" ("Vivid", "Standard", "Custom") to another, you to confirm the selection. Color Adjust to give the white colors a blue tint...
... picture contrast. Press to store preferred settings. The "Picture" settings include the following options: : : : : Picture Mode "Vivid": Select for standard picture settings. "Custom": Allows you can also use PICTURE on the remote control instead. • You can alter the "Picture" settings ("Picture", "Brightness", "Color", etc.) for each input. Picture Mode Reset Resets all settings and adjustments currently selected in "Picture Mode" ("Vivid", "Standard", "Custom") to another, you to confirm the selection. Color Adjust to give the white colors a blue tint...

Operating Instructions
Page 51
... you to the default setting (except for PC input. • If there is switched to a PC input source, the "Picture" settings specific to give the white colors a red tint. Picture Mode Reset Resets all settings and adjustments currently selected in "Picture Mode" ("Vivid", "Standard", "Custom") to store preferred settings. Color Temp. "Cool": Select to give the white colors a blue tint. Brightness Adjust to increase or decrease picture contrast. "Neutral": Select to give the white colors a neutral tint. GB Picture Adjust to brighten or...
... you to the default setting (except for PC input. • If there is switched to a PC input source, the "Picture" settings specific to give the white colors a red tint. Picture Mode Reset Resets all settings and adjustments currently selected in "Picture Mode" ("Vivid", "Standard", "Custom") to store preferred settings. Color Temp. "Cool": Select to give the white colors a blue tint. Brightness Adjust to increase or decrease picture contrast. "Neutral": Select to give the white colors a neutral tint. GB Picture Adjust to brighten or...
Operating Instructions
Page 52
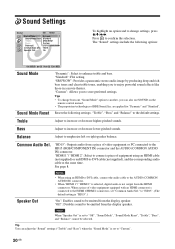
...": Disables sound to store preferred settings. Note When "Speaker Out" is not output from the display speaker. See page 8. Tip You can also use SOUND on the remote control instead. • The proprietary technologies of equipment using an HDMI-to-DVI cable, connect the audio cable to the AUDIO (COMMON AUDIO IN) connector. • When "HDMI 1"/ "HDMI 2" is selected, digital audio is set to be emitted from a piece of video equipment equipped with an HDMI connector is set "Common Audio...
...": Disables sound to store preferred settings. Note When "Speaker Out" is not output from the display speaker. See page 8. Tip You can also use SOUND on the remote control instead. • The proprietary technologies of equipment using an HDMI-to-DVI cable, connect the audio cable to the AUDIO (COMMON AUDIO IN) connector. • When "HDMI 1"/ "HDMI 2" is selected, digital audio is set to be emitted from a piece of video equipment equipped with an HDMI connector is set "Common Audio...
Operating Instructions
Page 54
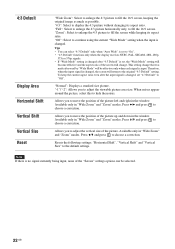
... when each signal is set "4:3 Default" to move the position of the screen will change that was made afterward by "Wide Mode" will return to continue using the current "Wide Mode" setting when the input is changed . "4:3": Select to fill the 16:9 screen. This setting change . Press V/v and press to fill the 16:9 screen, keeping the original image as much as possible. Available only in the window. 4:3 Default Display Area Horizontal Shift Vertical Shift Vertical Size Reset "Wide Zoom...
... when each signal is set "4:3 Default" to move the position of the screen will change that was made afterward by "Wide Mode" will return to continue using the current "Wide Mode" setting when the input is changed . "4:3": Select to fill the 16:9 screen. This setting change . Press V/v and press to fill the 16:9 screen, keeping the original image as much as possible. Available only in the window. 4:3 Default Display Area Horizontal Shift Vertical Shift Vertical Size Reset "Wide Zoom...
Operating Instructions
Page 55
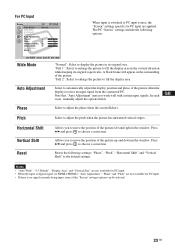
... surrounding of the picture. Note that "Auto Adjustment" may not work well with certain input signals. GB Phase Select to the default settings. Pitch Select to PC input source, the "Screen" settings specific for PC input. • If there is switched to adjust the pitch when the picture has unwanted vertical stripes. Notes • "Auto Wide", "4:3 Default", "Display Area" and "Vertical Size" are not available for PC input. • When the input is digital signal via HDMI 1/HDMI 2, "Auto Adjustment", "Phase" and...
... surrounding of the picture. Note that "Auto Adjustment" may not work well with certain input signals. GB Phase Select to the default settings. Pitch Select to PC input source, the "Screen" settings specific for PC input. • If there is switched to adjust the pitch when the picture has unwanted vertical stripes. Notes • "Auto Wide", "4:3 Default", "Display Area" and "Vertical Size" are not available for PC input. • When the input is digital signal via HDMI 1/HDMI 2, "Auto Adjustment", "Phase" and...
Operating Instructions
Page 56
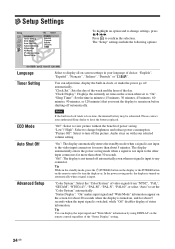
... to change brightness and reduce power consumption. Please contact your selected volume setting. Tip While in clock tends to change settings, press V/v/B/b. In the power saving mode, the display is turned on , and for about 5 seconds when the input signal is input. Press to have the battery replaced. Audio stays on -screen settings in clock, or make the power go off the picture. "Picture Off": Select to turn off automatically. "Status Display": "On" makes input signal and "Wide Mode" information...
... to change brightness and reduce power consumption. Please contact your selected volume setting. Tip While in clock tends to change settings, press V/v/B/b. In the power saving mode, the display is turned on , and for about 5 seconds when the input signal is input. Press to have the battery replaced. Audio stays on -screen settings in clock, or make the power go off the picture. "Picture Off": Select to turn off automatically. "Status Display": "On" makes input signal and "Wide Mode" information...

Operating Instructions
Page 57
.... "DHCP": "OK" allows you turn the power of the display off and on the remote control and press or b. 3 Set the three digit value (0 to 255) for all the "Setup" settings to set properly, the following error codes will not be displayed in the display, and the equipment such as a PC connected with the LAN cable. Sets an IP address to be set manually with V/v and repeat the same...
.... "DHCP": "OK" allows you turn the power of the display off and on the remote control and press or b. 3 Set the three digit value (0 to 255) for all the "Setup" settings to set properly, the following error codes will not be displayed in the display, and the equipment such as a PC connected with the LAN cable. Sets an IP address to be set manually with V/v and repeat the same...
Operating Instructions
Page 58
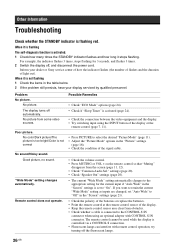
... to retain the current "Wide Mode" setting as inputs are changed, set to "Off" in the "Picture" settings (page 18). • Check the condition of the signal cable. • Check the volume control. • Press MUTING or VOL + on the remote control so that "Muting" disappears from the screen (page 11, 12). • Check "Common Audio Sel." Poor picture. try turning off , and disconnect the power cord. Other Information Troubleshooting Check whether the STANDBY indicator...
... to retain the current "Wide Mode" setting as inputs are changed, set to "Off" in the "Picture" settings (page 18). • Check the condition of the signal cable. • Check the volume control. • Press MUTING or VOL + on the remote control so that "Muting" disappears from the screen (page 11, 12). • Check "Common Audio Sel." Poor picture. try turning off , and disconnect the power cord. Other Information Troubleshooting Check whether the STANDBY indicator...

Operating Instructions
Page 59
Not Supported Signal The selected input signal is HDMI 2. HDMI 2 The selected input signal is nonsupported signal. c) Mac (Macintosh) is a registered trademark of a DVD signal to the 2nd pin of RGB/COMPONENT (D-sub 15 pin) on -screen display of International Business Machines Corporation, U.S.A. Notes • For HDTV signals, input the tri-level sync signal to the display, adjust "Color" in the "Picture" settings. • When the phase is readjusted, the resolution will be reduced. NTSC...
Not Supported Signal The selected input signal is HDMI 2. HDMI 2 The selected input signal is nonsupported signal. c) Mac (Macintosh) is a registered trademark of a DVD signal to the 2nd pin of RGB/COMPONENT (D-sub 15 pin) on -screen display of International Business Machines Corporation, U.S.A. Notes • For HDTV signals, input the tri-level sync signal to the display, adjust "Color" in the "Picture" settings. • When the phase is readjusted, the resolution will be reduced. NTSC...
Operating Instructions
Page 60
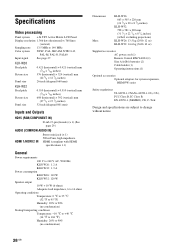
... power cord (1) Remote Control RM-YA004 (1) Size AA (R6) batteries (2) Cable holder (1) Operating instructions (1) Optional accessories Optional adaptors for system expansion, BKM-FW series Safety regulations UL 60950-1, CSA No. 60950-1-03 (c-UL), FCC Class B, IC Class B, EN 60950-1 (NEMKO), CE, C-Tick Design and specifications are subject to 140 MHz Color system NTSC, PAL, SECAM, NTSC4.43, PAL-M, PAL-N, PAL60 Input signal...
... power cord (1) Remote Control RM-YA004 (1) Size AA (R6) batteries (2) Cable holder (1) Operating instructions (1) Optional accessories Optional adaptors for system expansion, BKM-FW series Safety regulations UL 60950-1, CSA No. 60950-1-03 (c-UL), FCC Class B, IC Class B, EN 60950-1 (NEMKO), CE, C-Tick Design and specifications are subject to 140 MHz Color system NTSC, PAL, SECAM, NTSC4.43, PAL-M, PAL-N, PAL60 Input signal...
Pro Displays Brochure
Page 6
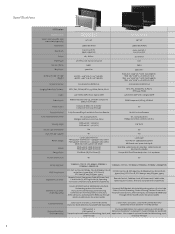
...;cations LCD Displays Model Number Screen Size (viewable area measured diagonally) Resolution Pixel Pitch Colors Panel Type Contrast Ratio Brightness FWD-32LX2F/B & /S FWD-40LX2F/B & /S 32" / 40" 1366 x 768 WXGA 0.51 x 0.51 mm/ 0.648 x 0.648 mm 16.7 Million a-Si-TFT active matrix LCD panel 1300:1 500 cd/m2 Dimensions (W x H x D)/ Weight Screen Protector Anaglog Video Color Systems Audio Video Inputs Video Output Remote Control Color Temperature Control Viewing Angle Closed Caption Decoder High Altitude Capable Mount Design Power Design Color Picture and Picture 32LX2F...
...;cations LCD Displays Model Number Screen Size (viewable area measured diagonally) Resolution Pixel Pitch Colors Panel Type Contrast Ratio Brightness FWD-32LX2F/B & /S FWD-40LX2F/B & /S 32" / 40" 1366 x 768 WXGA 0.51 x 0.51 mm/ 0.648 x 0.648 mm 16.7 Million a-Si-TFT active matrix LCD panel 1300:1 500 cd/m2 Dimensions (W x H x D)/ Weight Screen Protector Anaglog Video Color Systems Audio Video Inputs Video Output Remote Control Color Temperature Control Viewing Angle Closed Caption Decoder High Altitude Capable Mount Design Power Design Color Picture and Picture 32LX2F...

Pro Displays Brochure
Page 7
... or Black Yes Supplied Accessories Optional Accessories (Sold separately) Limited Warranty Optional Card Slots (Sold separately) DVI-D Cable, AC Power Cord, Operating Instructions, AC Plug Holder (2), AA/R6 size Battery (2), Cable Holder (4), Component Cable, Remote Control Universal Table Stands & Wall Brackets, Multiple Networking options which include Status Control/Streaming Content, Storing Content Tuners, Tuners with Hospitality Connections, Alternate Inputs, and Component/RGB Loop Through 2-year parts and labor, 1-year panel onsite service Limited...
... or Black Yes Supplied Accessories Optional Accessories (Sold separately) Limited Warranty Optional Card Slots (Sold separately) DVI-D Cable, AC Power Cord, Operating Instructions, AC Plug Holder (2), AA/R6 size Battery (2), Cable Holder (4), Component Cable, Remote Control Universal Table Stands & Wall Brackets, Multiple Networking options which include Status Control/Streaming Content, Storing Content Tuners, Tuners with Hospitality Connections, Alternate Inputs, and Component/RGB Loop Through 2-year parts and labor, 1-year panel onsite service Limited...

Pro Displays Brochure
Page 9
... Cards • High definition digital signage • Internal design for clean installation • Flash 6 support • Support for up to manage and control your company's network • Integrated Software Support - stream live or store • Macromedia® Flash® and Microsoft® PowerPoint® viewer included • No special software needed, use PJNet!™ Software to 255 Sony displays or projectors • Remote PC Desktop View - Utilize Display...
... Cards • High definition digital signage • Internal design for clean installation • Flash 6 support • Support for up to manage and control your company's network • Integrated Software Support - stream live or store • Macromedia® Flash® and Microsoft® PowerPoint® viewer included • No special software needed, use PJNet!™ Software to 255 Sony displays or projectors • Remote PC Desktop View - Utilize Display...


