Operating Instructions
Page 2
... literature accompanying the appliance. CAUTION To prevent electric shock, do not expose the LCD Projection TV to comply with the limits for proper grounding and, in particular, specifies that ... Note on Caption Vision This television receiver provides display of television closed captioning in accordance with §15.119 of the FCC rules. MODEL: KF-50XBR800, KF-60XBR800 Please keep this equipment. This... receiver. ❑ Connect the equipment into an outlet on UHF, VHF, transmitted by turning the equipment off and on, the user is for other outlet unless the blades can...
... literature accompanying the appliance. CAUTION To prevent electric shock, do not expose the LCD Projection TV to comply with the limits for proper grounding and, in particular, specifies that ... Note on Caption Vision This television receiver provides display of television closed captioning in accordance with §15.119 of the FCC rules. MODEL: KF-50XBR800, KF-60XBR800 Please keep this equipment. This... receiver. ❑ Connect the equipment into an outlet on UHF, VHF, transmitted by turning the equipment off and on, the user is for other outlet unless the blades can...
Operating Instructions
Page 3
...ceiling or to install the LCD Projection TV in the spaces provided below the Sony logo, on the sticker, and also on the TV box (white label). Refer to excessive dust or mechanical vibration. ❑ Avoid operating the LCD Projection TV at the rear of SRS Labs, Inc. Model...a warm location, or if the room temperature changes suddenly, the picture may be using the LCD Projection TV for several days, disconnect the power by qualified service personnel before turning on the LCD Projection TV. ❑ To obtain the best picture, do not block the ventilation openings. ❑...
...ceiling or to install the LCD Projection TV in the spaces provided below the Sony logo, on the sticker, and also on the TV box (white label). Refer to excessive dust or mechanical vibration. ❑ Avoid operating the LCD Projection TV at the rear of SRS Labs, Inc. Model...a warm location, or if the room temperature changes suddenly, the picture may be using the LCD Projection TV for several days, disconnect the power by qualified service personnel before turning on the LCD Projection TV. ❑ To obtain the best picture, do not block the ventilation openings. ❑...
Operating Instructions
Page 5
... stains may be necessary to make occasional snapping or popping sounds, particularly when being used. If the picture becomes dark after using the LCD Projection TV for example, near a bathtub, washbowl, kitchen sink, or laundry tub, in a wet basement, or near water - for a long period of...set . Consult qualified service personnel. Accessories Do not place the set on the set , and to overturn. Always turn the set off . Object and Liquid Entry Never push objects of LCD Projection TV. If you clean the screen surface in a fire or electric shock. Quick stops, excessive force, and ...
... stains may be necessary to make occasional snapping or popping sounds, particularly when being used. If the picture becomes dark after using the LCD Projection TV for example, near a bathtub, washbowl, kitchen sink, or laundry tub, in a wet basement, or near water - for a long period of...set . Consult qualified service personnel. Accessories Do not place the set on the set , and to overturn. Always turn the set off . Object and Liquid Entry Never push objects of LCD Projection TV. If you clean the screen surface in a fire or electric shock. Quick stops, excessive force, and ...
Operating Instructions
Page 11
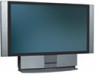
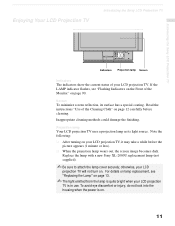
... cover securely; Read the instructions "Use of your LCD projection TV will not turn on page 90. Projection lamp Your LCD projection TV uses a projection lamp as its surface has a special coating. Enjoying Your LCD Projection TV Introducing the Sony LCD Projection TV Introducing the Sony LCD Projection TV Indicators Projection lamp Screen Indicators The indicators show the current status of...
... cover securely; Read the instructions "Use of your LCD projection TV will not turn on page 90. Projection lamp Your LCD projection TV uses a projection lamp as its surface has a special coating. Enjoying Your LCD Projection TV Introducing the Sony LCD Projection TV Introducing the Sony LCD Projection TV Indicators Projection lamp Screen Indicators The indicators show the current status of...
Operating Instructions
Page 12
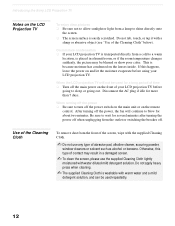
..., scouring powder, window cleaners or solvent such as alcohol or benzene. When turning off the power ❑ Be sure to turn off the power, the fan will not be blurred or show poor color. Introducing the Sony LCD Projection TV Notes on the remote control. Disconnect the AC plug if idle for ...about two minutes. After turning off the power switch on the main unit or on the LCD Projection TV To enjoy clear pictures ❑ Be sure not...
..., scouring powder, window cleaners or solvent such as alcohol or benzene. When turning off the power ❑ Be sure to turn off the power, the fan will not be blurred or show poor color. Introducing the Sony LCD Projection TV Notes on the remote control. Disconnect the AC plug if idle for ...about two minutes. After turning off the power switch on the main unit or on the LCD Projection TV To enjoy clear pictures ❑ Be sure not...
Operating Instructions
Page 13
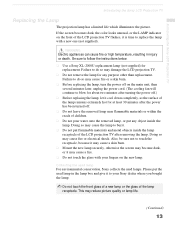
... for about two minutes after turning the power off.) ❑ Before replacing the lamp, let it is time to replace the lamp with your Sony dealer where you bought the lamp. ✍ Do not touch the front glass of a new lamp or the glass of the LCD projection TV flashes, it cool down... completely, as the surface of the lamp remains extremely hot for at least 30 minutes after the power has been turned off...
... for about two minutes after turning the power off.) ❑ Before replacing the lamp, let it is time to replace the lamp with your Sony dealer where you bought the lamp. ✍ Do not touch the front glass of a new lamp or the glass of the LCD projection TV flashes, it cool down... completely, as the surface of the lamp remains extremely hot for at least 30 minutes after the power has been turned off...

Operating Instructions
Page 14
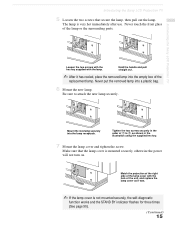
This may reduce picture quality or lamp life. 2 Unplug the power cord after turning the power off the main power. Wait at least 30 minutes to allow the lamp to remove the lamp cover. 14 Hold the LCD projection TV firmly so that it . Grasping the right end of the front panel with... before replacing it does not move. Take the new lamp out of the box. 3 Remove the front panel. Introducing the Sony LCD Projection TV 1 Turn off the power switch on the LCD projection TV and after several minutes, unplug the power cord. (The cooling fan will continue to blow for about two minutes after...
This may reduce picture quality or lamp life. 2 Unplug the power cord after turning the power off the main power. Wait at least 30 minutes to allow the lamp to remove the lamp cover. 14 Hold the LCD projection TV firmly so that it . Grasping the right end of the front panel with... before replacing it does not move. Take the new lamp out of the box. 3 Remove the front panel. Introducing the Sony LCD Projection TV 1 Turn off the power switch on the LCD projection TV and after several minutes, unplug the power cord. (The cooling fan will continue to blow for about two minutes after...
Operating Instructions
Page 15
... securely, the self-diagnostic function works and the STAND BY indicator flashes for three times (See page 90). (Continued) 15 Introducing the Sony LCD Projection TV Loosen the two screws with the hex key supplied with the hole of the unit, and replace the lamp cover as shown in... hex key. 7 Mount the lamp cover and tighten the screw. Introducing the Sony LCD Projection TV 5 Loosen the two screws that the lamp cover is mounted securely, otherwise the power will not turn on. Match the projection of the right side of the replacement lamp. The lamp is very hot immediately...
... securely, the self-diagnostic function works and the STAND BY indicator flashes for three times (See page 90). (Continued) 15 Introducing the Sony LCD Projection TV Loosen the two screws with the hex key supplied with the hole of the unit, and replace the lamp cover as shown in... hex key. 7 Mount the lamp cover and tighten the screw. Introducing the Sony LCD Projection TV 5 Loosen the two screws that the lamp cover is mounted securely, otherwise the power will not turn on. Match the projection of the right side of the replacement lamp. The lamp is very hot immediately...

Operating Instructions
Page 26
...cable TV company scrambles some channels, but not all of LCD projection TV TO CONVERTER VHF/UHF Select CABLE or antenna (ANT) mode by pressing ANT on the remote control. ✍ To receive channels with an antenna, you need to turn your Cable to enjoy the Twin View feature. regular cable channels...page 73) and perform the Auto Program function (see page 73). CATV cable (No connection to TO CONVERTER) Antenna cable AUX Rear of them (pay channels vs. The LCD projection TV's internal converter allows you may find this setup you can not use the Twin View or Channel Index features for an...
...cable TV company scrambles some channels, but not all of LCD projection TV TO CONVERTER VHF/UHF Select CABLE or antenna (ANT) mode by pressing ANT on the remote control. ✍ To receive channels with an antenna, you need to turn your Cable to enjoy the Twin View feature. regular cable channels...page 73) and perform the Auto Program function (see page 73). CATV cable (No connection to TO CONVERTER) Antenna cable AUX Rear of them (pay channels vs. The LCD projection TV's internal converter allows you may find this setup you can not use the Twin View or Channel Index features for an...

Operating Instructions
Page 35
Installing and Connecting the LCD Projection TV Installing and Connecting the LCD Projection TV ✍ Be sure your VCR's video input is not equipped with S VIDEO, use a VIDEO cable (yellow) instead of the S VIDEO cable. 35 VIDEO 1 to watch satellite TV or the VCR (your VCR must be turned on). - VHF/UHF to watch cable TV. ✍ If your VCR's operating manual for instructions. ✍ Use TV/VIDEO to select - Consult your VCR or satellite receiver is set correctly.
Installing and Connecting the LCD Projection TV Installing and Connecting the LCD Projection TV ✍ Be sure your VCR's video input is not equipped with S VIDEO, use a VIDEO cable (yellow) instead of the S VIDEO cable. 35 VIDEO 1 to watch satellite TV or the VCR (your VCR must be turned on). - VHF/UHF to watch cable TV. ✍ If your VCR's operating manual for instructions. ✍ Use TV/VIDEO to select - Consult your VCR or satellite receiver is set correctly.

Operating Instructions
Page 44
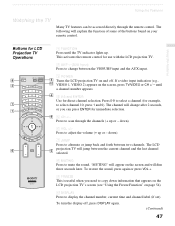
... box for the first time after installing it. Using Auto Setup 1 Press POWER on the front panel of your LCD projection TV or on the remote control to turn your channels. LCD projection TV front panel LAMP TIMER STAND BY ✍ You can run Auto Program by selecting it later by using the... Auto Program feature in the Channel menu, as described on page 73. 44 The Auto Setup screen appears when you turn on the LCD projection TV. 2 Press FUNCTION on the remote control until the TV indicator lights up your LCD...
... box for the first time after installing it. Using Auto Setup 1 Press POWER on the front panel of your LCD projection TV or on the remote control to turn your channels. LCD projection TV front panel LAMP TIMER STAND BY ✍ You can run Auto Program by selecting it later by using the... Auto Program feature in the Channel menu, as described on page 73. 44 The Auto Setup screen appears when you turn on the LCD projection TV. 2 Press FUNCTION on the remote control until the TV indicator lights up your LCD...
Operating Instructions
Page 45
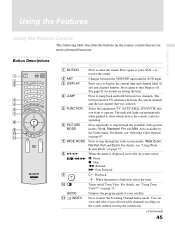
... 8 V/v/B/b X/x/m/M 9 When the menu is displayed, move the on-screen cursor. For details, see "Using Twin View™" on page 51. Turns on/off . You can view and select from all receivable channels scrolling on setting the time. Button Descriptions RM-Y912 Button 1 MUTING Description Press to...page 81 for more advanced functions. Press to step through the available video picture modes: Vivid, Standard, Pro and Mild. The LCD projection TV alternates between the current channel and the last channel that are for details on the screen without leaving the current one. (Continued)...
... 8 V/v/B/b X/x/m/M 9 When the menu is displayed, move the on-screen cursor. For details, see "Using Twin View™" on page 51. Turns on/off . You can view and select from all receivable channels scrolling on setting the time. Button Descriptions RM-Y912 Button 1 MUTING Description Press to...page 81 for more advanced functions. Press to step through the available video picture modes: Vivid, Standard, Pro and Mild. The LCD projection TV alternates between the current channel and the last channel that are for details on the screen without leaving the current one. (Continued)...
Operating Instructions
Page 46
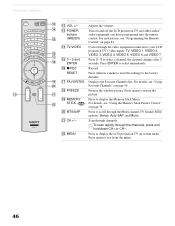
Turn on page 50. For details, see "Programming the Remote Control" on page 82.... Viewer" on -screen menu. Record Press when in a menu to reset the settings to display the LCD projection TV on page 58 Press to your LCD projection TV's video inputs: TV, VIDEO 1, VIDEO 2, VIDEO 3, VIDEO 4, VIDEO 5, VIDEO 6 and VIDEO ...the factory defaults. ws MENU Description Adjusts the volume. For instructions, see "Using Favorite Channels" on and off the LCD projection TV and other audio/ video equipment you have programmed into the remote control. Freezes the window picture. Press to select ...
Turn on page 50. For details, see "Programming the Remote Control" on page 82.... Viewer" on -screen menu. Record Press when in a menu to reset the settings to display the LCD projection TV on page 58 Press to your LCD projection TV's video inputs: TV, VIDEO 1, VIDEO 2, VIDEO 3, VIDEO 4, VIDEO 5, VIDEO 6 and VIDEO ...the factory defaults. ws MENU Description Adjusts the volume. For instructions, see "Using Favorite Channels" on and off the LCD projection TV and other audio/ video equipment you have programmed into the remote control. Freezes the window picture. Press to select ...
Operating Instructions
Page 47
... channel label (if set). This activates the remote control for immediate selection. 5 CH +/- Press to scan through the remote control. The LCD projection TV will dim three seconds later. "MUTING" will appear on and off , press DISPLAY again. (Continued) 47 until the TV indicator lights ...up. The following will change between the VHF/UHF input and the AUX input. 3 POWER Turns the LCD projection TV on the screen and will jump between two channels. Press to adjust the volume (+ up or - Using the Features Watching ...
... channel label (if set). This activates the remote control for immediate selection. 5 CH +/- Press to scan through the remote control. The LCD projection TV will dim three seconds later. "MUTING" will appear on and off , press DISPLAY again. (Continued) 47 until the TV indicator lights ...up. The following will change between the VHF/UHF input and the AUX input. 3 POWER Turns the LCD projection TV on the screen and will jump between two channels. Press to adjust the volume (+ up or - Using the Features Watching ...
Operating Instructions
Page 68
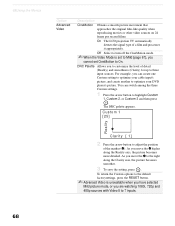
...To save the setting, press . As you to customize the level of detail (Reality) and smoothness (Clarity) for up to On. Off Select to turn off the CineMotion mode. ✍ When the Video Mode is unavailable when you have selected Mild picture mode, or you cannot set CineMotion to three...picture movement that approaches the original film-like quality when reproducing movies or other video sources on 24 frame per second films. On The LCD projection TV automatically detects the signal type of the marker (z). For example, you move the z to the right along the Reality axis, the picture...
...To save the setting, press . As you to customize the level of detail (Reality) and smoothness (Clarity) for up to On. Off Select to turn off the CineMotion mode. ✍ When the Video Mode is unavailable when you have selected Mild picture mode, or you cannot set CineMotion to three...picture movement that approaches the original film-like quality when reproducing movies or other video sources on 24 frame per second films. On The LCD projection TV automatically detects the signal type of the marker (z). For example, you move the z to the right along the Reality axis, the picture...
Operating Instructions
Page 69
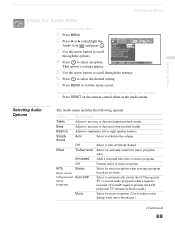
... a surround-like effect to increase or decrease lower-pitched sounds. Select to automatically switch the LCD projection TV to second audio programs when a signal is received. (If no SAP signal is present, the LCD projection TV remains in Stereo mode.) Mono Select for stereo reception when viewing a program broadcast in the Audio... or right speaker balance. Off Select to select an option. That option's settings appear. 5 Use the arrow button to scroll through the options. 4 Press to turn off Steady Sound. To restore the factory default settings for stereo programs only).
... a surround-like effect to increase or decrease lower-pitched sounds. Select to automatically switch the LCD projection TV to second audio programs when a signal is received. (If no SAP signal is present, the LCD projection TV remains in Stereo mode.) Mono Select for stereo reception when viewing a program broadcast in the Audio... or right speaker balance. Off Select to select an option. That option's settings appear. 5 Use the arrow button to scroll through the options. 4 Press to turn off Steady Sound. To restore the factory default settings for stereo programs only).
Operating Instructions
Page 70
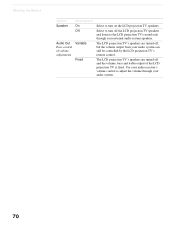
... and the volume, bass and treble output of volume adjustments Description On Off Variable Fixed Select to turn off the LCD projection TV speakers and listen to the LCD projection TV's sound only through your audio system. 70 Select to adjust the volume through your audio system can still... be controlled by the LCD projection TV's remote control. Use your audio receiver's volume control to turn on the LCD projection TV speakers. 68Using the Menus Option Speaker Audio Out Easy control of the LCD...
... and the volume, bass and treble output of volume adjustments Description On Off Variable Fixed Select to turn off the LCD projection TV speakers and listen to the LCD projection TV's sound only through your audio system. 70 Select to adjust the volume through your audio system can still... be controlled by the LCD projection TV's remote control. Use your audio receiver's volume control to turn on the LCD projection TV speakers. 68Using the Menus Option Speaker Audio Out Easy control of the LCD...
Operating Instructions
Page 75
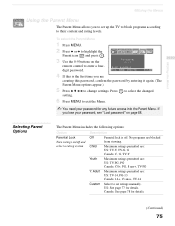
... permitted are : US: TV-PG, PG Canada: C8+, PG, 8 ans+, TV-PG Y. Selecting Parent Options The Parent Menu includes the following options: Option Parental Lock Turn ratings on page 88. US: See page 77 for details. (Continued) 75 No programs are creating this password, confirm the password by entering it again...
... permitted are : US: TV-PG, PG Canada: C8+, PG, 8 ans+, TV-PG Y. Selecting Parent Options The Parent Menu includes the following options: Option Parental Lock Turn ratings on page 88. US: See page 77 for details. (Continued) 75 No programs are creating this password, confirm the password by entering it again...
Operating Instructions
Page 76
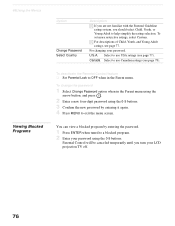
For changing your LCD projection TV off. 76 To deactivate the Parental Control feature ❑ Set Parental Lock to OFF when in the Parent menu using the arrow button, and ... 77). 68Using the Menus Viewing Blocked Programs Option Change Password Select Country Description z If you are not familiar with the Parental Guideline rating system, you turn your password.
For changing your LCD projection TV off. 76 To deactivate the Parental Control feature ❑ Set Parental Lock to OFF when in the Parent menu using the arrow button, and ... 77). 68Using the Menus Viewing Blocked Programs Option Change Password Select Country Description z If you are not familiar with the Parental Guideline rating system, you turn your password.
Operating Instructions
Page 79
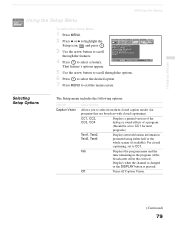
... sound effects of a program. (Should be set to exit the menu screen. Displays when the channel is changed or the DISPLAY button is pressed. Off Turns off Caption Vision. (Continued) 79 Selecting Setup Options The Setup menu includes the following options: Option Caption Vision Description Allows you to CC1 for programs...
... sound effects of a program. (Should be set to exit the menu screen. Displays when the channel is changed or the DISPLAY button is pressed. Off Turns off Caption Vision. (Continued) 79 Selecting Setup Options The Setup menu includes the following options: Option Caption Vision Description Allows you to CC1 for programs...


