Operating Instructions
Page 2
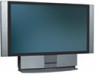
... To prevent electric shock, do not expose the LCD Projection TV to rain or moisture. MODEL: KF-50XBR800, KF-60XBR800 Please keep this equipment. If this equipment does cause harmful interference to radio or television reception, which the receiver is connected. ❑ Consult... the dealer or an experienced radio/TV technician for other outlet unless the blades can be determined by turning...
... To prevent electric shock, do not expose the LCD Projection TV to rain or moisture. MODEL: KF-50XBR800, KF-60XBR800 Please keep this equipment. If this equipment does cause harmful interference to radio or television reception, which the receiver is connected. ❑ Consult... the dealer or an experienced radio/TV technician for other outlet unless the blades can be determined by turning...
Operating Instructions
Page 3
...registered mark. BBE and BBE Symbol are licensed by qualified service personnel before turning on the LCD Projection TV. ❑ To obtain the best picture, do not block the ventilation openings. &#... a place subject to excessive dust or mechanical vibration. ❑ Avoid operating the LCD Projection TV at the rear of BBE Sound, Inc. Owner's Record The model and serial numbers are unable to insert...258 and 4,482,866. Serial No. 3 It is desirable to install the LCD Projection TV in the spaces provided below the Sony logo, on the sticker, and also on the TV box (white label). As ...
...registered mark. BBE and BBE Symbol are licensed by qualified service personnel before turning on the LCD Projection TV. ❑ To obtain the best picture, do not block the ventilation openings. &#... a place subject to excessive dust or mechanical vibration. ❑ Avoid operating the LCD Projection TV at the rear of BBE Sound, Inc. Owner's Record The model and serial numbers are unable to insert...258 and 4,482,866. Serial No. 3 It is desirable to install the LCD Projection TV in the spaces provided below the Sony logo, on the sticker, and also on the TV box (white label). As ...
Operating Instructions
Page 5
...may touch dangerous voltage points or short out parts that could result in a fire or electric shock. To ensure reliable operation of the LCD Projection TV. Never use power-line operated sets near water - On contamination on the screen surface The screen surface has a special coating to ... cords or convenience receptacles beyond their capacity, since this can result in the wrong way, the screen may scratch the screen's coating. Always turn the set is operating, unplug the TV and consult your dealer or service technician. Quick stops, excessive force, and uneven surfaces may be ...
...may touch dangerous voltage points or short out parts that could result in a fire or electric shock. To ensure reliable operation of the LCD Projection TV. Never use power-line operated sets near water - On contamination on the screen surface The screen surface has a special coating to ... cords or convenience receptacles beyond their capacity, since this can result in the wrong way, the screen may scratch the screen's coating. Always turn the set is operating, unplug the TV and consult your dealer or service technician. Quick stops, excessive force, and uneven surfaces may be ...
Operating Instructions
Page 11
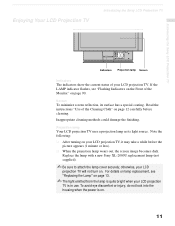
..."Replacing the Lamp" on . 11 Note the following: ❑ After turning on your LCD projection TV will not turn on page 12 carefully before the picture appears (1 minute or less). ❑ When the projection lamp wears out, the screen image becomes dark. To avoid eye discomfort or... on . Replace the lamp with a new Sony XL-2000U replacement lamp (not supplied). ✍ Be sure to attach the lamp cover securely; otherwise, your LCD projection TV, it may take a while before cleaning. Projection lamp Your LCD projection TV uses a projection lamp as its surface has a special coating...
..."Replacing the Lamp" on . 11 Note the following: ❑ After turning on your LCD projection TV will not turn on page 12 carefully before the picture appears (1 minute or less). ❑ When the projection lamp wears out, the screen image becomes dark. To avoid eye discomfort or... on . Replace the lamp with a new Sony XL-2000U replacement lamp (not supplied). ✍ Be sure to attach the lamp cover securely; otherwise, your LCD projection TV, it may take a while before cleaning. Projection lamp Your LCD projection TV uses a projection lamp as its surface has a special coating...
Operating Instructions
Page 12
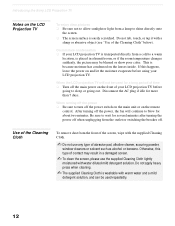
Disconnect the AC plug if idle for about two minutes. Introducing the Sony LCD Projection TV Notes on the LCD Projection TV To enjoy clear pictures ❑ Be sure not to allow sunlight or light from a lamp to shine directly onto the screen. ❑ The screen ... is transported directly from a cold to a warm location, is washable with a sharp or abrasive object (see "Use of time ❑ Turn off . If this type of your LCD projection TV. Do not apply heavy press when cleaning. ✍ The supplied Cleaning Cloth is placed in a humid room, or if the room temperature...
Disconnect the AC plug if idle for about two minutes. Introducing the Sony LCD Projection TV Notes on the LCD Projection TV To enjoy clear pictures ❑ Be sure not to allow sunlight or light from a lamp to shine directly onto the screen. ❑ The screen ... is transported directly from a cold to a warm location, is washable with a sharp or abrasive object (see "Use of time ❑ Turn off . If this type of your LCD projection TV. Do not apply heavy press when cleaning. ✍ The supplied Cleaning Cloth is placed in a humid room, or if the room temperature...
Operating Instructions
Page 13
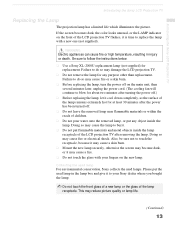
... fire. ❑ Do not touch the glass with your Sony dealer where you bought the lamp. ✍ Do not touch the front glass of a new lamp or the glass of the LCD projection TV after the power has been turned off .) ❑ Before replacing the lamp, let it ... to follow the instructions below. ❑ Use a Sony XL-2000U replacement lamp (not supplied) for any object inside the lamp receptacle of the lamp receptacle. Introducing the Sony LCD Projection TV Introducing the Sony LCD Projection TV Replacing the Lamp The projection lamp has a limited life which illuminates the picture.
... fire. ❑ Do not touch the glass with your Sony dealer where you bought the lamp. ✍ Do not touch the front glass of a new lamp or the glass of the LCD projection TV after the power has been turned off .) ❑ Before replacing the lamp, let it ... to follow the instructions below. ❑ Use a Sony XL-2000U replacement lamp (not supplied) for any object inside the lamp receptacle of the lamp receptacle. Introducing the Sony LCD Projection TV Introducing the Sony LCD Projection TV Replacing the Lamp The projection lamp has a limited life which illuminates the picture.

Operating Instructions
Page 14
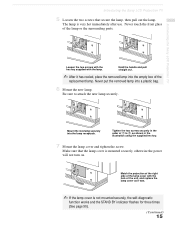
.... 4 Loosen the screw with a coin or similar object to cool down before replacing it does not move. Introducing the Sony LCD Projection TV 1 Turn off the power switch on the LCD projection TV and after several minutes, unplug the power cord. (The cooling fan will continue to blow for about two minutes after... turning off .) ✍ Do not touch the front glass of a new lamp or the glass of the box. 3 Remove the front panel. ...
.... 4 Loosen the screw with a coin or similar object to cool down before replacing it does not move. Introducing the Sony LCD Projection TV 1 Turn off the power switch on the LCD projection TV and after several minutes, unplug the power cord. (The cooling fan will continue to blow for about two minutes after... turning off .) ✍ Do not touch the front glass of a new lamp or the glass of the box. 3 Remove the front panel. ...
Operating Instructions
Page 15
...Tighten the two screws securely in the illustration using the supplied hex key. 7 Mount the lamp cover and tighten the screw. Introducing the Sony LCD Projection TV Loosen the two screws with the hex key supplied with the hole of the unit, and replace the lamp cover as shown in the.... Introducing the Sony LCD Projection TV 5 Loosen the two screws that the lamp cover is very hot immediately after use. Be sure to 2, as it has cooled, place the removed lamp into the empty box of the replacement lamp. The lamp is mounted securely, otherwise the power will not turn on.
...Tighten the two screws securely in the illustration using the supplied hex key. 7 Mount the lamp cover and tighten the screw. Introducing the Sony LCD Projection TV Loosen the two screws with the hex key supplied with the hole of the unit, and replace the lamp cover as shown in the.... Introducing the Sony LCD Projection TV 5 Loosen the two screws that the lamp cover is very hot immediately after use. Be sure to 2, as it has cooled, place the removed lamp into the empty box of the replacement lamp. The lamp is mounted securely, otherwise the power will not turn on.

Operating Instructions
Page 26
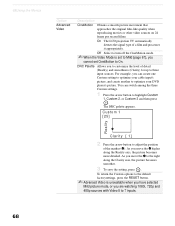
... perform the Auto Program function (see page 73). With this set up convenient. CATV cable (No connection to TO CONVERTER) Antenna cable AUX Rear of LCD projection TV TO CONVERTER VHF/UHF Select CABLE or antenna (ANT) mode by pressing ANT on the remote control. ✍ To receive channels with an... channels vs. Cable Box Connections 26 Cable Box and Cable This is sent to the LCD projection TV, so you need to turn your Cable to switch between unscrambled signals coming straight into the LCD projection TV and scrambled signals coming in through the cable box, eliminating the need to use if...
... perform the Auto Program function (see page 73). With this set up convenient. CATV cable (No connection to TO CONVERTER) Antenna cable AUX Rear of LCD projection TV TO CONVERTER VHF/UHF Select CABLE or antenna (ANT) mode by pressing ANT on the remote control. ✍ To receive channels with an... channels vs. Cable Box Connections 26 Cable Box and Cable This is sent to the LCD projection TV, so you need to turn your Cable to switch between unscrambled signals coming straight into the LCD projection TV and scrambled signals coming in through the cable box, eliminating the need to use if...

Operating Instructions
Page 35
VIDEO 1 to select - Installing and Connecting the LCD Projection TV Installing and Connecting the LCD Projection TV ✍ Be sure your VCR's video input is not equipped with S VIDEO, use a VIDEO cable (yellow) instead of the S VIDEO cable. 35 Consult your VCR's operating manual for instructions. ✍ Use TV/VIDEO to watch cable TV. ✍ If your VCR must be turned on). - VHF/UHF to watch satellite TV or the VCR (your VCR or satellite receiver is set correctly.
VIDEO 1 to select - Installing and Connecting the LCD Projection TV Installing and Connecting the LCD Projection TV ✍ Be sure your VCR's video input is not equipped with S VIDEO, use a VIDEO cable (yellow) instead of the S VIDEO cable. 35 Consult your VCR's operating manual for instructions. ✍ Use TV/VIDEO to watch cable TV. ✍ If your VCR must be turned on). - VHF/UHF to watch satellite TV or the VCR (your VCR or satellite receiver is set correctly.

Operating Instructions
Page 44
The Auto Setup screen appears when you turn on the LCD projection TV. 2 Press FUNCTION on the remote control until the TV indicator lights... projection TV or on the remote control to turn your LCD projection TV on for all channel selection. to exit. Installing and Connecting the LCD Projection TV Setting Up the LCD projection TV Automatically After you finish connecting your LCD projection TV... channels at this time, you can run Auto Setup to set up . 3 Press CH+ on your LCD projection TV to run Auto Program by using the Auto Program feature in the Channel menu (see page 73). ✍...
The Auto Setup screen appears when you turn on the LCD projection TV. 2 Press FUNCTION on the remote control until the TV indicator lights... projection TV or on the remote control to turn your LCD projection TV on for all channel selection. to exit. Installing and Connecting the LCD Projection TV Setting Up the LCD projection TV Automatically After you finish connecting your LCD projection TV... channels at this time, you can run Auto Setup to set up . 3 Press CH+ on your LCD projection TV to run Auto Program by using the Auto Program feature in the Channel menu (see page 73). ✍...
Operating Instructions
Page 45
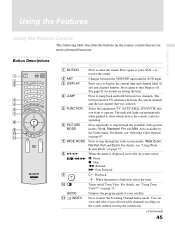
...67. 7 WIDE MODE Press to step through the wide screen modes: Wide Zoom, Normal, Full and Zoom. Press to mute the sound. Turns on page 51. For details, see "Selecting Video Options" on the screen without leaving the current one. (Continued) 45 Button Descriptions RM-Y912... cursor. Press repeatedly to step through the available video picture modes: Vivid, Standard, Pro and Mild. Press to turn Display off Twin View. The LCD projection TV alternates between two channels. Press again to enter the Scrolling Channel Index mode. Using the Features Using the Features...
...67. 7 WIDE MODE Press to step through the wide screen modes: Wide Zoom, Normal, Full and Zoom. Press to mute the sound. Turns on page 51. For details, see "Selecting Video Options" on the screen without leaving the current one. (Continued) 45 Button Descriptions RM-Y912... cursor. Press repeatedly to step through the available video picture modes: Vivid, Standard, Pro and Mild. Press to turn Display off Twin View. The LCD projection TV alternates between two channels. Press again to enter the Scrolling Channel Index mode. Using the Features Using the Features...
Operating Instructions
Page 46
...ENTER to scroll through the video equipment connected to display the LCD projection TV on page 50. For details, see "Using Favorite Channels" on -screen menu. Press to your LCD projection TV's video inputs: TV, VIDEO 1, VIDEO 2, VIDEO 3, ...VIDEO 4, VIDEO 5, VIDEO 6 and VIDEO 7. Displays the Favorite Channels list. z To scan rapidly through channels. Cycles through the Multi-channel TV Sound (MTS) options: Stereo, Auto SAP, and Mono. Press again to exit from the menu. 46 Press again to restore the picture. Turn...
...ENTER to scroll through the video equipment connected to display the LCD projection TV on page 50. For details, see "Using Favorite Channels" on -screen menu. Press to your LCD projection TV's video inputs: TV, VIDEO 1, VIDEO 2, VIDEO 3, ...VIDEO 4, VIDEO 5, VIDEO 6 and VIDEO 7. Displays the Favorite Channels list. z To scan rapidly through channels. Cycles through the Multi-channel TV Sound (MTS) options: Stereo, Auto SAP, and Mono. Press again to exit from the menu. 46 Press again to restore the picture. Turn...
Operating Instructions
Page 47
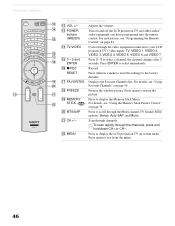
The channel will change between the VHF/UHF input and the AUX input. 3 POWER Turns the LCD projection TV on and off , press DISPLAY again. (Continued) 47 Using the Features Buttons for LCD Projection TV Operations RM-Y912 1 FUNCTION Press until a channel number appears. 4 0-9 and ENTER Use for immediate ...remote control for example, to display the channel number, current time and channel label (if set). down information that appears on the LCD projection TV's screen (see "Using the Freeze Function" on your remote control. down). 7 JUMP Press to alternate or jump back and ...
The channel will change between the VHF/UHF input and the AUX input. 3 POWER Turns the LCD projection TV on and off , press DISPLAY again. (Continued) 47 Using the Features Buttons for LCD Projection TV Operations RM-Y912 1 FUNCTION Press until a channel number appears. 4 0-9 and ENTER Use for immediate ...remote control for example, to display the channel number, current time and channel label (if set). down information that appears on the LCD projection TV's screen (see "Using the Freeze Function" on your remote control. down). 7 JUMP Press to alternate or jump back and ...
Operating Instructions
Page 68
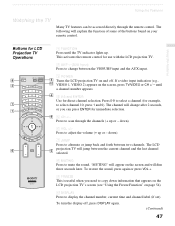
...movement that approaches the original film-like quality when reproducing movies or other video sources on 24 frame per second films. On The LCD projection TV automatically detects the signal type of a film and processes it appropriately. As you can switch among the three Custom settings. 1...the picture becomes more detailed. The DRC palette appears. For example, you move the z to optimize your DVD player's picture. Off Select to turn off the CineMotion mode. ✍ When the Video Mode is unavailable when you have selected Mild picture mode, or you to highlight Custom 1, ...
...movement that approaches the original film-like quality when reproducing movies or other video sources on 24 frame per second films. On The LCD projection TV automatically detects the signal type of a film and processes it appropriately. As you can switch among the three Custom settings. 1...the picture becomes more detailed. The DRC palette appears. For example, you move the z to optimize your DVD player's picture. Off Select to turn off the CineMotion mode. ✍ When the Video Mode is unavailable when you have selected Mild picture mode, or you to highlight Custom 1, ...
Operating Instructions
Page 69
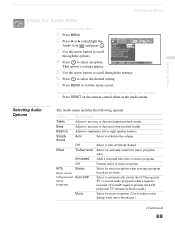
...through the options. 4 Press to select an option. Select to automatically switch the LCD projection TV to second audio programs when a signal is received. (If no SAP signal is present, the LCD projection TV remains in Stereo mode.) Mono Select for stereo reception when viewing a program broadcast... Description Treble Adjust to increase or decrease higher-pitched sounds. Bass Adjust to mono programs. Off Normal stereo or mono reception. Off Select to turn off Steady Sound. 68Using the Menus Using the Audio Menu To select the Audio Menu 1 Press MENU. 2 Press B or b to highlight...
...through the options. 4 Press to select an option. Select to automatically switch the LCD projection TV to second audio programs when a signal is received. (If no SAP signal is present, the LCD projection TV remains in Stereo mode.) Mono Select for stereo reception when viewing a program broadcast... Description Treble Adjust to increase or decrease higher-pitched sounds. Bass Adjust to mono programs. Off Normal stereo or mono reception. Off Select to turn off Steady Sound. 68Using the Menus Using the Audio Menu To select the Audio Menu 1 Press MENU. 2 Press B or b to highlight...
Operating Instructions
Page 70
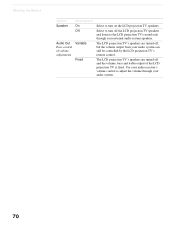
...volume through your audio system. 70 68Using the Menus Option Speaker Audio Out Easy control of the LCD projection TV is fixed. The LCD projection TV's speakers are turned off and the volume, bass and treble output of volume adjustments Description On Off Variable Fixed Select to... turn off the LCD projection TV speakers and listen to turn on the LCD projection TV speakers. Select to the LCD projection TV's sound only through your external audio system speakers. The LCD projection TV's speakers are turned off , but the volume output ...
...volume through your audio system. 70 68Using the Menus Option Speaker Audio Out Easy control of the LCD projection TV is fixed. The LCD projection TV's speakers are turned off and the volume, bass and treble output of volume adjustments Description On Off Variable Fixed Select to... turn off the LCD projection TV speakers and listen to turn on the LCD projection TV speakers. Select to the LCD projection TV's sound only through your external audio system speakers. The LCD projection TV's speakers are turned off , but the volume output ...
Operating Instructions
Page 75
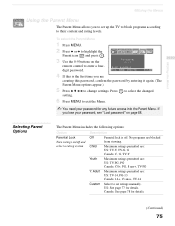
... Menu. Adult Maximum ratings permitted are creating this is off. Press setting. Selecting Parent Options The Parent Menu includes the following options: Option Parental Lock Turn ratings on page 88. Child Maximum ratings permitted are: US: TV-Y, TV-G, G Canada: C, G, TV-Y Youth Maximum ratings permitted are blocked from viewing...
... Menu. Adult Maximum ratings permitted are creating this is off. Press setting. Selecting Parent Options The Parent Menu includes the following options: Option Parental Lock Turn ratings on page 88. Child Maximum ratings permitted are: US: TV-Y, TV-G, G Canada: C, G, TV-Y Youth Maximum ratings permitted are blocked from viewing...
Operating Instructions
Page 76
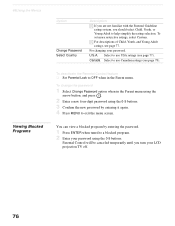
... screen. 68Using the Menus Viewing Blocked Programs Option Change Password Select Country Description z If you are not familiar with the Parental Guideline rating system, you turn your LCD projection TV off. 76
... screen. 68Using the Menus Viewing Blocked Programs Option Change Password Select Country Description z If you are not familiar with the Parental Guideline rating system, you turn your LCD projection TV off. 76
Operating Instructions
Page 79
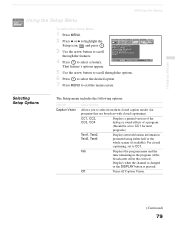
... with closed captioning, set to CC1. Info Displays the program name and the time remaining in the program (if the broadcaster offers this service). Off Turns off Caption Vision. (Continued) 79 For closed captioning). Displays when the channel is changed or the DISPLAY button is pressed. That feature's options appear. 5 Use...
... with closed captioning, set to CC1. Info Displays the program name and the time remaining in the program (if the broadcaster offers this service). Off Turns off Caption Vision. (Continued) 79 For closed captioning). Displays when the channel is changed or the DISPLAY button is pressed. That feature's options appear. 5 Use...


