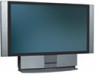
Operating Instructions
Page 3
...Record these numbers in a place subject to excessive dust or mechanical vibration. ❑ Avoid operating the LCD Projection TV at the rear of BBE Sound, Inc. Safety ❑ Operate the LCD Projection TV only on 120 V AC. ❑ The plug is designed, for energy efficiency. TruSurround and the... ( ) symbol are trademarks of the LCD Projection TV, below the Sony logo, on the sticker, and also on the LCD Projection TV...
...Record these numbers in a place subject to excessive dust or mechanical vibration. ❑ Avoid operating the LCD Projection TV at the rear of BBE Sound, Inc. Safety ❑ Operate the LCD Projection TV only on 120 V AC. ❑ The plug is designed, for energy efficiency. TruSurround and the... ( ) symbol are trademarks of the LCD Projection TV, below the Sony logo, on the sticker, and also on the LCD Projection TV...
Operating Instructions
Page 5
...the screen surface The screen surface has a special coating to make occasional snapping or popping sounds, particularly when being used. Cleaning Clean the cabinet of the LCD Projection TV with solution of the LCD Projection TV. To remove dust from the screen, wipe it from overheating, these may be.... ❑ To remove hard contamination, use the supplied cleaning cloth or a glass cleaning cloth moistened with care. If a snapping or popping sound from the wall outlet as these slots and openings must never be necessary to the set off . Attachments Do not use any type of any...
...the screen surface The screen surface has a special coating to make occasional snapping or popping sounds, particularly when being used. Cleaning Clean the cabinet of the LCD Projection TV with solution of the LCD Projection TV. To remove dust from the screen, wipe it from overheating, these may be.... ❑ To remove hard contamination, use the supplied cleaning cloth or a glass cleaning cloth moistened with care. If a snapping or popping sound from the wall outlet as these slots and openings must never be necessary to the set off . Attachments Do not use any type of any...
Operating Instructions
Page 32
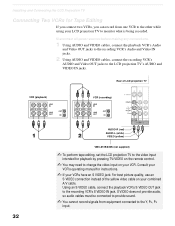
... remote control. ✍ You may need to change the video input on your LCD projection TV to the LCD projection TV's AUDIO and VIDEO IN jacks. S VIDEO does not provide audio, so audio cables must be connected to provide sound. ✍ You cannot record signals from one VCR to the other while using... the video input intended for Tape Editing If you connect two VCRs, you can record from equipment connected to the recording VCR's S VIDEO IN jack. Rear of the yellow video cable on your VCR. Using an S VIDEO cable, connect the playback VCR's S VIDEO OUT jack to the Y, PB, PR input. 32...
... remote control. ✍ You may need to change the video input on your LCD projection TV to the LCD projection TV's AUDIO and VIDEO IN jacks. S VIDEO does not provide audio, so audio cables must be connected to provide sound. ✍ You cannot record signals from one VCR to the other while using... the video input intended for Tape Editing If you connect two VCRs, you can record from equipment connected to the recording VCR's S VIDEO IN jack. Rear of the yellow video cable on your VCR. Using an S VIDEO cable, connect the playback VCR's S VIDEO OUT jack to the Y, PB, PR input. 32...
Operating Instructions
Page 39
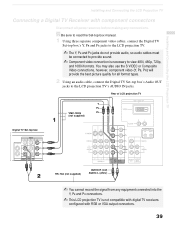
... Connecting a Digital TV Receiver with RGB or VGA output connectors. 39 Rear of LCD projection TV Y PB VMC-10HG PR (not supplied) Digital TV Set-top box RK-74A (not supplied) AUDIO-R (red) AUDIO-L (white) ✍ You cannot record the ... cables, connect the Digital TV Set-top box's Y, PB and PR jacks to the LCD projection TV. ✍ The Y, PB and PR jacks do not provide audio, so audio cables must be connected to provide sound. ✍ Component video connection is not compatible with digital TV receivers configured with component connectors Disconnect...
... Connecting a Digital TV Receiver with RGB or VGA output connectors. 39 Rear of LCD projection TV Y PB VMC-10HG PR (not supplied) Digital TV Set-top box RK-74A (not supplied) AUDIO-R (red) AUDIO-L (white) ✍ You cannot record the ... cables, connect the Digital TV Set-top box's Y, PB and PR jacks to the LCD projection TV. ✍ The Y, PB and PR jacks do not provide audio, so audio cables must be connected to provide sound. ✍ Component video connection is not compatible with digital TV receivers configured with component connectors Disconnect...
Operating Instructions
Page 40
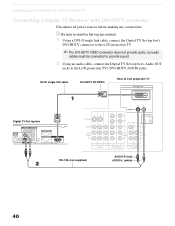
DVI-D single link cable DVI-HDTV IN VIDEO Rear of LCD projection TV Digital TV Set-top box OPTICAL AUDIO OUT VIDEO OUT (480i) 1 2 L1 L2 OPTICAL S. Installing and Connecting the LCD Projection TV Connecting a Digital TV Receiver with DVI-HDTV connector Disconnect all power sources before making any connections....link cable, connect the Digital TV Set-top box's DVI-HDTV connector to the LCD projection TV. ✍ The DVI-HDTV VIDEO connector does not provide audio, so audio cables must be connected to provide sound. 2 Using an audio cable, connect the Digital TV Set-top box's Audio OUT...
DVI-D single link cable DVI-HDTV IN VIDEO Rear of LCD projection TV Digital TV Set-top box OPTICAL AUDIO OUT VIDEO OUT (480i) 1 2 L1 L2 OPTICAL S. Installing and Connecting the LCD Projection TV Connecting a Digital TV Receiver with DVI-HDTV connector Disconnect all power sources before making any connections....link cable, connect the Digital TV Set-top box's DVI-HDTV connector to the LCD projection TV. ✍ The DVI-HDTV VIDEO connector does not provide audio, so audio cables must be connected to provide sound. 2 Using an audio cable, connect the Digital TV Set-top box's Audio OUT...
Operating Instructions
Page 45
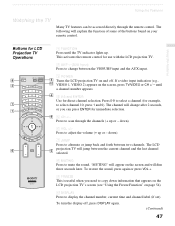
.... Press to jump back and forth between two channels. Press to enter the Scrolling Channel Index mode. Turns on/off . Press once to restore the sound. 2 ANT 3 DISPLAY 4 JUMP 5 FUNCTION 6 PICTURE MODE Changes between the current channel and the last channel that was selected. X: Pause x: Stop m: ...For details, see "Using Wide Screen Mode" on page 57. 8 V/v/B/b X/x/m/M 9 When the menu is displayed, select the item. The LCD projection TV alternates between the VHF/UHF input and the AUX input. Displays the program guide of your satellite. Select the equipment (TV, SAT/CABLE, ...
.... Press to jump back and forth between two channels. Press to enter the Scrolling Channel Index mode. Turns on/off . Press once to restore the sound. 2 ANT 3 DISPLAY 4 JUMP 5 FUNCTION 6 PICTURE MODE Changes between the current channel and the last channel that was selected. X: Pause x: Stop m: ...For details, see "Using Wide Screen Mode" on page 57. 8 V/v/B/b X/x/m/M 9 When the menu is displayed, select the item. The LCD projection TV alternates between the VHF/UHF input and the AUX input. Displays the program guide of your satellite. Select the equipment (TV, SAT/CABLE, ...
Operating Instructions
Page 46
... CH+ or CH-. Press again to the factory defaults. Scan through the video equipment connected to display the LCD projection TV on page 50. z To scan rapidly through the Multi-channel TV Sound (MTS) options: Stereo, Auto SAP, and Mono. Press again to display the Memory Stick Menu. Press to exit from...
... CH+ or CH-. Press again to the factory defaults. Scan through the video equipment connected to display the LCD projection TV on page 50. z To scan rapidly through the Multi-channel TV Sound (MTS) options: Stereo, Auto SAP, and Mono. Press again to display the Memory Stick Menu. Press to exit from...
Operating Instructions
Page 47
..., current time and channel label (if set). To restore the sound, press again or press VOL +. 9 FREEZE This is useful when you can be accessed directly through the channels (+ up or - This activates the remote control for use with the LCD projection TV. 2 ANT- (AUX input) Press to change after 2 seconds, or...
..., current time and channel label (if set). To restore the sound, press again or press VOL +. 9 FREEZE This is useful when you can be accessed directly through the channels (+ up or - This activates the remote control for use with the LCD projection TV. 2 ANT- (AUX input) Press to change after 2 seconds, or...
Operating Instructions
Page 48
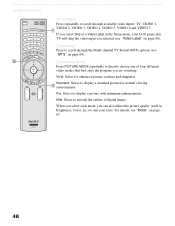
.... Standard: Select to display a standard picture for enhanced picture contrast and sharpness. If you select Skip as Brightness, Color, etc.) to suit your LCD projection TV will skip the video input you are watching. For details, see "Mode" on page 69). Using the Features RM-Y912 qa TV/VIDEO Press... repeatedly to scroll through the Multi-channel TV Sound (MTS) options (see "MTS" on page 67. 48 When you select each mode, you can also adjust the picture quality (such as a Video Label...
.... Standard: Select to display a standard picture for enhanced picture contrast and sharpness. If you select Skip as Brightness, Color, etc.) to suit your LCD projection TV will skip the video input you are watching. For details, see "Mode" on page 69). Using the Features RM-Y912 qa TV/VIDEO Press... repeatedly to scroll through the Multi-channel TV Sound (MTS) options (see "MTS" on page 67. 48 When you select each mode, you can also adjust the picture quality (such as a Video Label...
Operating Instructions
Page 55
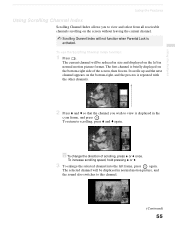
... scrolling, press V or v once. z To change the direction of the screen, then frozen. The selected channel will be displayed in normal motion picture, and the sound also switches to view and select from all receivable channels scrolling on the screen without leaving the current channel. ✍ Scrolling Channel Index will be...
... scrolling, press V or v once. z To change the direction of the screen, then frozen. The selected channel will be displayed in normal motion picture, and the sound also switches to view and select from all receivable channels scrolling on the screen without leaving the current channel. ✍ Scrolling Channel Index will be...

Operating Instructions
Page 66
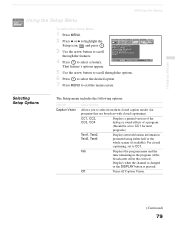
Allows you to customize the Picture Mode based on the type of the sound on moving through the menu. Press B or b to choose the next menu icon and press to highlight the desired menu icon and press it . Offers ... 1 Press MENU to display the menu screen. 2 Press B or b to select it . To end a menu session ❑ Press MENU again. Lets you to your LCD projection TV. To end one menu session and move to another ❑ Press V to return to scroll through the features. 4 See the specific menu page for...
Allows you to customize the Picture Mode based on the type of the sound on moving through the menu. Press B or b to choose the next menu icon and press to highlight the desired menu icon and press it . Offers ... 1 Press MENU to display the menu screen. 2 Press B or b to select it . To end a menu session ❑ Press MENU again. Lets you to your LCD projection TV. To end one menu session and move to another ❑ Press V to return to scroll through the features. 4 See the specific menu page for...
Operating Instructions
Page 69
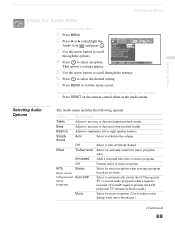
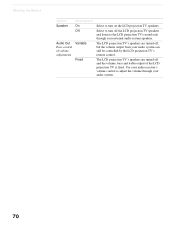
.... 7 Press MENU to stabilize the volume. Bass Adjust to select an option. Simulated Adds a surround-like effect to turn off Steady Sound. MTS Stereo Enjoy stereo, bilingual and Auto SAP mono programs Select for stereo programs only). Off Select to mono programs. Off Normal stereo... Selecting Audio Options The Audio menu includes the following options: Option Description Treble Adjust to increase or decrease higher-pitched sounds. Select to automatically switch the LCD projection TV to second audio programs when a signal is received. (If no SAP signal is present, the LCD...
.... 7 Press MENU to stabilize the volume. Bass Adjust to select an option. Simulated Adds a surround-like effect to turn off Steady Sound. MTS Stereo Enjoy stereo, bilingual and Auto SAP mono programs Select for stereo programs only). Off Select to mono programs. Off Normal stereo... Selecting Audio Options The Audio menu includes the following options: Option Description Treble Adjust to increase or decrease higher-pitched sounds. Select to automatically switch the LCD projection TV to second audio programs when a signal is received. (If no SAP signal is present, the LCD...
Operating Instructions
Page 70
...your audio receiver's volume control to the LCD projection TV's sound only through your external audio system speakers. The LCD projection TV's speakers are turned off, but the volume output from your audio system can still be controlled by the LCD projection TV's remote control. 68Using the Menus Option... Easy control of volume adjustments Description On Off Variable Fixed Select to turn on the LCD projection TV speakers. The LCD projection TV's speakers are turned off the LCD projection TV speakers and listen to adjust the volume through your audio system. 70 Select to turn...
...your audio receiver's volume control to the LCD projection TV's sound only through your external audio system speakers. The LCD projection TV's speakers are turned off, but the volume output from your audio system can still be controlled by the LCD projection TV's remote control. 68Using the Menus Option... Easy control of volume adjustments Description On Off Variable Fixed Select to turn on the LCD projection TV speakers. The LCD projection TV's speakers are turned off the LCD projection TV speakers and listen to adjust the volume through your audio system. 70 Select to turn...
Operating Instructions
Page 79
... options. 6 Press to select the desired option. 7 Press MENU to exit the menu screen. CC1, CC2, CC3, CC4 Displays a printed version of the dialog or sound effects of a program. (Should be set to CC1. That feature's options appear. 5 Use the arrow button to scroll through the features. 4 Press to CC1 for...
... options. 6 Press to select the desired option. 7 Press MENU to exit the menu screen. CC1, CC2, CC3, CC4 Displays a printed version of the dialog or sound effects of a program. (Should be set to CC1. That feature's options appear. 5 Use the arrow button to scroll through the features. 4 Press to CC1 for...
Operating Instructions
Page 87
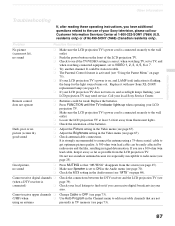
... batteries. ❏ Press FUNCTION until the TV indicator lights up when operating your LCD projection TV may need service. If you have additional questions related to the use of your Sony television, please call our Customer Information Services Center at least 3-4 feet away from fluorescent lights..../cable connections. It is connected securely to the wall outlet. ❏ Locate the LCD projection TV at 1-800-222-SONY (7669) (U.S. Problem Possible Remedies No picture (screen not lit), no sound ❏ Press MUTING so that are not using a 75-ohm coaxial cable to connect the...
... batteries. ❏ Press FUNCTION until the TV indicator lights up when operating your LCD projection TV may need service. If you have additional questions related to the use of your Sony television, please call our Customer Information Services Center at least 3-4 feet away from fluorescent lights..../cable connections. It is connected securely to the wall outlet. ❏ Locate the LCD projection TV at 1-800-222-SONY (7669) (U.S. Problem Possible Remedies No picture (screen not lit), no sound ❏ Press MUTING so that are not using a 75-ohm coaxial cable to connect the...
Operating Instructions
Page 93
Index A Activating a Twin View screen 51 Adding channels to the channel list 73 Adjusting audio, Steady Sound 69 ANT button 45 Antenna, connecting 25 Audio menu 66, 69 Audio receiver, connecting 36 Audio/Video cable 24 Auto Program (channel setup) 44, 73 ...
Index A Activating a Twin View screen 51 Adding channels to the channel list 73 Adjusting audio, Steady Sound 69 ANT button 45 Antenna, connecting 25 Audio menu 66, 69 Audio receiver, connecting 36 Audio/Video cable 24 Auto Program (channel setup) 44, 73 ...
Operating Instructions
Page 94
... of the projection TV 25-43 J JUMP button 45 Jump, using 47 L Label Channels 74 video inputs 80 Lamp, replacing 13-16 M Memory Stick Index 62 indicator (LED) 22 inserting 60 insertion slot ...46 Presetting channels 44 Problems, troubleshooting 87-90 R Ratings setting 76 viewing blocked programs 76 Rear panel controls and connections 23 Remote control Function of buttons 47 inserting batteries 17 programming 82-83...channels 44 Setup menu 66, 79 Sharpness, adjusting 67 Specifications 91-92 Steady Sound adjusting 69 Surround sound 69 T Timer set current 81 Timer menu 81 Timer setting 81 Treble, adjusting...
... of the projection TV 25-43 J JUMP button 45 Jump, using 47 L Label Channels 74 video inputs 80 Lamp, replacing 13-16 M Memory Stick Index 62 indicator (LED) 22 inserting 60 insertion slot ...46 Presetting channels 44 Problems, troubleshooting 87-90 R Ratings setting 76 viewing blocked programs 76 Rear panel controls and connections 23 Remote control Function of buttons 47 inserting batteries 17 programming 82-83...channels 44 Setup menu 66, 79 Sharpness, adjusting 67 Specifications 91-92 Steady Sound adjusting 69 Surround sound 69 T Timer set current 81 Timer menu 81 Timer setting 81 Treble, adjusting...
The Sony Guide to Home Theater
Page 2
Contents What is Home Theater Page 3 Why Sony Page 4 What You'll Need: Sources, Sight & Sound Page 6 Home Theater Sources DVD Players Page 7 About Progressive Scan Page 9 Super Audio CD Playback Page 10 Digital Satellite Receivers Page 11 About High Definition ... Aspect Ratio Page 17 Choosing a Screen Size Page 18 Choosing a Screen Type Page 19 Features to Look For Page 25 Home Theater Sound About Surround Sound Page 28 Surround Sound Formats Page 29 A/V Receivers Page 30 Speaker Consistency Page 33 Types of Speakers Page 34 Bringing it All Back Home Before You Buy...
Contents What is Home Theater Page 3 Why Sony Page 4 What You'll Need: Sources, Sight & Sound Page 6 Home Theater Sources DVD Players Page 7 About Progressive Scan Page 9 Super Audio CD Playback Page 10 Digital Satellite Receivers Page 11 About High Definition ... Aspect Ratio Page 17 Choosing a Screen Size Page 18 Choosing a Screen Type Page 19 Features to Look For Page 25 Home Theater Sound About Surround Sound Page 28 Surround Sound Formats Page 29 A/V Receivers Page 30 Speaker Consistency Page 33 Types of Speakers Page 34 Bringing it All Back Home Before You Buy...
The Sony Guide to Home Theater
Page 3
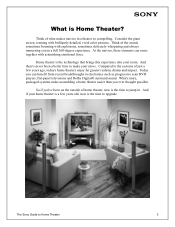
... recent breakthroughs in . The Sony Guide to upgrade. Consider the giant screen, teeming with astonishing emotional force. And there's never been a better time to jump in electronics such as progressive scan DVD players, flat-panel televisions and Dolby Digital® surround sound. And if your move....Home Theater? Think of home theater, now is the time to Home Theater 3 Today you 've been on the outside of the sound, sometimes booming with explosions, sometimes delicately whispering and always immersing you ever thought possible. Think of just a few years old, now...
... recent breakthroughs in . The Sony Guide to upgrade. Consider the giant screen, teeming with astonishing emotional force. And there's never been a better time to jump in electronics such as progressive scan DVD players, flat-panel televisions and Dolby Digital® surround sound. And if your move....Home Theater? Think of home theater, now is the time to Home Theater 3 Today you 've been on the outside of the sound, sometimes booming with explosions, sometimes delicately whispering and always immersing you ever thought possible. Think of just a few years old, now...
The Sony Guide to Home Theater
Page 4
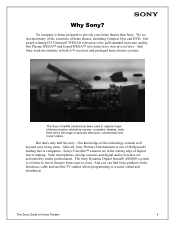
...; cameras are acclaimed by studio professionals. No company is created, edited and distributed. Our Plasma WEGA™ and Grand WEGA™ televisions have won rave reviews. The Sony Dynamic Digital Sound® (SDDS®) system is a fixture in both A/V receivers and packaged home theater systems. The Sony CineAlta camera has been used to provide your living room...
...; cameras are acclaimed by studio professionals. No company is created, edited and distributed. Our Plasma WEGA™ and Grand WEGA™ televisions have won rave reviews. The Sony Dynamic Digital Sound® (SDDS®) system is a fixture in both A/V receivers and packaged home theater systems. The Sony CineAlta camera has been used to provide your living room...


