Operating Instructions
Page 2
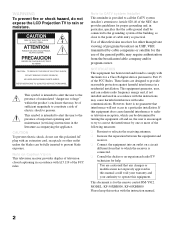
... and found to comply with the limits for help. MODEL: KF-50XBR800, KF-60XBR800 Please keep this television receiver for other outlet unless the blades can radiate radio frequency energy... product's enclosure that may require authorization from that the cable ground shall be determined by turning the equipment off and on, the user is encouraged to try to correct the interference by... plug with the instruction manual. 2 CAUTION To prevent electric shock, do not expose the LCD Projection TV to rain or moisture. This equipment generates, uses, and can be of sufficient magnitude to...
... and found to comply with the limits for help. MODEL: KF-50XBR800, KF-60XBR800 Please keep this television receiver for other outlet unless the blades can radiate radio frequency energy... product's enclosure that may require authorization from that the cable ground shall be determined by turning the equipment off and on, the user is encouraged to try to correct the interference by... plug with the instruction manual. 2 CAUTION To prevent electric shock, do not expose the LCD Projection TV to rain or moisture. This equipment generates, uses, and can be of sufficient magnitude to...
Operating Instructions
Page 3
... TruSurround and the ( ) symbol are trademarks of the LCD Projection TV, below the Sony logo, on the sticker, and also on the TV box (white label). and are licensed by qualified service personnel before turning on the LCD Projection TV. ❑ To obtain the best picture, do not ...precautions, see "Important Safeguards" on the cord. It is desirable to install the LCD Projection TV in a place subject to excessive dust or mechanical vibration. ❑ Avoid operating the LCD Projection TV at the rear of BBE Sound, Inc. Record these numbers in the spaces provided below 41°F...
... TruSurround and the ( ) symbol are trademarks of the LCD Projection TV, below the Sony logo, on the sticker, and also on the TV box (white label). and are licensed by qualified service personnel before turning on the LCD Projection TV. ❑ To obtain the best picture, do not ...precautions, see "Important Safeguards" on the cord. It is desirable to install the LCD Projection TV in a place subject to excessive dust or mechanical vibration. ❑ Avoid operating the LCD Projection TV at the rear of BBE Sound, Inc. Record these numbers in the spaces provided below 41°F...
Operating Instructions
Page 5
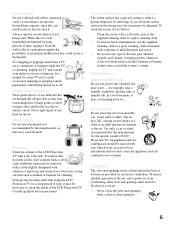
Never spill liquid of the LCD Projection TV. An appliance and cart combination should be moved with a solution of mild detergent and water. ❑ Do not use any type of time, unplug it from overheating, these may be damaged. Always turn the set is operating, unplug the TV... their capacity, since this can result in the back or bottom are provided for necessary ventilation. Cleaning Clean the cabinet of the LCD Projection TV with solution of an internal malfunction that could create a fire hazard. Stubborn stains may cause hazards. Use only a cart or ...
Never spill liquid of the LCD Projection TV. An appliance and cart combination should be moved with a solution of mild detergent and water. ❑ Do not use any type of time, unplug it from overheating, these may be damaged. Always turn the set is operating, unplug the TV... their capacity, since this can result in the back or bottom are provided for necessary ventilation. Cleaning Clean the cabinet of the LCD Projection TV with solution of an internal malfunction that could create a fire hazard. Stubborn stains may cause hazards. Use only a cart or ...
Operating Instructions
Page 11
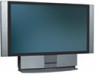
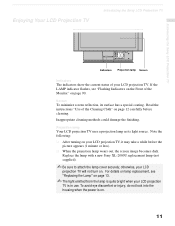
... is in use. Inappropriate cleaning methods could damage the finishing. Enjoying Your LCD Projection TV Introducing the Sony LCD Projection TV Introducing the Sony LCD Projection TV Indicators Projection lamp Screen Indicators The indicators show the current status of your LCD projection TV will not turn on. If the LAMP indicator flashes, see "Replacing the Lamp" on page...
... is in use. Inappropriate cleaning methods could damage the finishing. Enjoying Your LCD Projection TV Introducing the Sony LCD Projection TV Introducing the Sony LCD Projection TV Indicators Projection lamp Screen Indicators The indicators show the current status of your LCD projection TV will not turn on. If the LAMP indicator flashes, see "Replacing the Lamp" on page...
Operating Instructions
Page 12
...Sony LCD Projection TV Notes on the LCD Projection TV To enjoy clear pictures ❑ Be sure not to allow sunlight or light from a lamp to wait for about two minutes. After turning off the power switch on the main unit or on the remote control. On moisture condensation ❑ If your LCD projection... surface is washable with a sharp or abrasive object (see "Use of your LCD projection TV. When the LCD projection TV will continue to sleep or going to blow for several minutes after turning the power off when unplugging from the front of the screen, wipe with the supplied...
...Sony LCD Projection TV Notes on the LCD Projection TV To enjoy clear pictures ❑ Be sure not to allow sunlight or light from a lamp to wait for about two minutes. After turning off the power switch on the main unit or on the remote control. On moisture condensation ❑ If your LCD projection... surface is washable with a sharp or abrasive object (see "Use of your LCD projection TV. When the LCD projection TV will continue to sleep or going to blow for several minutes after turning the power off when unplugging from the front of the screen, wipe with the supplied...
Operating Instructions
Page 13
...later, unplug the power cord. (The cooling fan will continue to blow for any object inside the lamp receptacle of the LCD projection TV after turning the power off . ❑ Do not leave the removed lamp near flammable materials or within the reach of the lamp remains ...extremely hot for replacement. Please put the used lamps. Introducing the Sony LCD Projection TV Introducing the Sony LCD Projection TV Replacing the Lamp The projection lamp has a ...
...later, unplug the power cord. (The cooling fan will continue to blow for any object inside the lamp receptacle of the LCD projection TV after turning the power off . ❑ Do not leave the removed lamp near flammable materials or within the reach of the lamp remains ...extremely hot for replacement. Please put the used lamps. Introducing the Sony LCD Projection TV Introducing the Sony LCD Projection TV Replacing the Lamp The projection lamp has a ...

Operating Instructions
Page 14
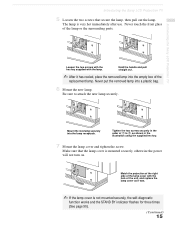
... the panel towards you. 4 Loosen the screw with a coin or similar object to remove the lamp cover. 14 Introducing the Sony LCD Projection TV 1 Turn off the power switch on the LCD projection TV and after several minutes, unplug the power cord. (The cooling fan will continue to blow for about two minutes after... the front glass of a new lamp or the glass of the lamp receptacle. Hold the LCD projection TV firmly so that it . This may reduce picture quality or lamp life. 2 Unplug the power cord after turning the power off the main power. Wait at least 30 minutes to allow the lamp to...
... the panel towards you. 4 Loosen the screw with a coin or similar object to remove the lamp cover. 14 Introducing the Sony LCD Projection TV 1 Turn off the power switch on the LCD projection TV and after several minutes, unplug the power cord. (The cooling fan will continue to blow for about two minutes after... the front glass of a new lamp or the glass of the lamp receptacle. Hold the LCD projection TV firmly so that it . This may reduce picture quality or lamp life. 2 Unplug the power cord after turning the power off the main power. Wait at least 30 minutes to allow the lamp to...
Operating Instructions
Page 15
... the right side of the lamp cover with the lamp. The lamp is very hot immediately after use. Introducing the Sony LCD Projection TV Loosen the two screws with the hex key supplied with the hole of the replacement lamp. Never put the removed lamp into the empty ... lamp or the surrounding parts. Mount the new lamp securely into the lamp receptacle. Introducing the Sony LCD Projection TV 5 Loosen the two screws that the lamp cover is mounted securely, otherwise the power will not turn on. Tighten the two screws securely in the illustration using the supplied hex key. 7 Mount the...
... the right side of the lamp cover with the lamp. The lamp is very hot immediately after use. Introducing the Sony LCD Projection TV Loosen the two screws with the hex key supplied with the hole of the replacement lamp. Never put the removed lamp into the empty ... lamp or the surrounding parts. Mount the new lamp securely into the lamp receptacle. Introducing the Sony LCD Projection TV 5 Loosen the two screws that the lamp cover is mounted securely, otherwise the power will not turn on. Tighten the two screws securely in the illustration using the supplied hex key. 7 Mount the...

Operating Instructions
Page 26
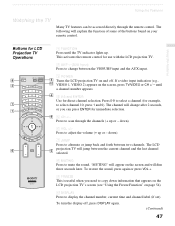
...projection TV's internal converter allows you to switch between unscrambled signals coming straight into the LCD projection... TV and scrambled signals coming in through your cable box, only one channel is sent to the LCD projection...turn your cable provider does not feature local channels, you may find this setup you can : ❑ Use the LCD projection... Use the LCD projection TV remote control to change channels using your LCD projection TV when the ... (Your LCD projection TV's tuner provides a better signal than the ...feature. (When all of LCD projection TV TO CONVERTER VHF/UHF Select ...
...projection TV's internal converter allows you to switch between unscrambled signals coming straight into the LCD projection... TV and scrambled signals coming in through your cable box, only one channel is sent to the LCD projection...turn your cable provider does not feature local channels, you may find this setup you can : ❑ Use the LCD projection... Use the LCD projection TV remote control to change channels using your LCD projection TV when the ... (Your LCD projection TV's tuner provides a better signal than the ...feature. (When all of LCD projection TV TO CONVERTER VHF/UHF Select ...

Operating Instructions
Page 35
VHF/UHF to watch satellite TV or the VCR (your VCR or satellite receiver is set correctly. Installing and Connecting the LCD Projection TV Installing and Connecting the LCD Projection TV ✍ Be sure your VCR's operating manual for instructions. ✍ Use TV/VIDEO to select - VIDEO 1 to watch cable TV. ✍ If your VCR must be turned on). - Consult your VCR's video input is not equipped with S VIDEO, use a VIDEO cable (yellow) instead of the S VIDEO cable. 35
VHF/UHF to watch satellite TV or the VCR (your VCR or satellite receiver is set correctly. Installing and Connecting the LCD Projection TV Installing and Connecting the LCD Projection TV ✍ Be sure your VCR's operating manual for instructions. ✍ Use TV/VIDEO to select - VIDEO 1 to watch cable TV. ✍ If your VCR must be turned on). - Consult your VCR's video input is not equipped with S VIDEO, use a VIDEO cable (yellow) instead of the S VIDEO cable. 35

Operating Instructions
Page 44
... sure to use a cable box for all channel selection. If you can run Auto Setup to set up the channels at this time, you turn on the LCD projection TV. 2 Press FUNCTION on the remote control until the TV indicator lights up your channels. Using Auto Setup 1 Press POWER on the front... front panel LAMP TIMER STAND BY ✍ You can do not want to exit. to set up . 3 Press CH+ on your LCD projection TV to turn your LCD projection TV or on the remote control to run Auto Program by using the Auto Program feature in the Channel menu (see page 73). ✍...
... sure to use a cable box for all channel selection. If you can run Auto Setup to set up the channels at this time, you turn on the LCD projection TV. 2 Press FUNCTION on the remote control until the TV indicator lights up your channels. Using Auto Setup 1 Press POWER on the front... front panel LAMP TIMER STAND BY ✍ You can do not want to exit. to set up . 3 Press CH+ on your LCD projection TV to turn your LCD projection TV or on the remote control to run Auto Program by using the Auto Program feature in the Channel menu (see page 73). ✍...
Operating Instructions
Page 45
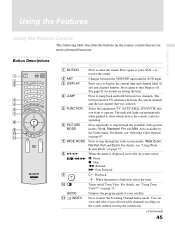
... forth between the VHF/UHF input and the AUX input. You can view and select from all receivable channels scrolling on /off . The LCD projection TV alternates between the current channel and the last channel that you want to restore the sound. 2 ANT 3 DISPLAY 4 JUMP 5 FUNCTION 6..., Pro and Mild. For details, see "Using Wide Screen Mode" on page 57. 8 V/v/B/b X/x/m/M 9 When the menu is displayed, select the item. Turns on the screen without leaving the current one. (Continued) 45 Press again or press VOL + to operate. Using the Features Using the Features Using the...
... forth between the VHF/UHF input and the AUX input. You can view and select from all receivable channels scrolling on /off . The LCD projection TV alternates between the current channel and the last channel that you want to restore the sound. 2 ANT 3 DISPLAY 4 JUMP 5 FUNCTION 6..., Pro and Mild. For details, see "Using Wide Screen Mode" on page 57. 8 V/v/B/b X/x/m/M 9 When the menu is displayed, select the item. Turns on the screen without leaving the current one. (Continued) 45 Press again or press VOL + to operate. Using the Features Using the Features Using the...
Operating Instructions
Page 46
... 58 Press to scroll through channels. Cycles through the channels, press and hold down CH+ or CH-. ws MENU Description Adjusts the volume. Turn on page 50. Press ENTER to the factory defaults. Displays the Favorite Channels list. For details, see "Programming the Remote Control" on -... Record Press when in a menu to reset the settings to select immediately. z To scan rapidly through the video equipment connected to display the LCD projection TV on page 82. MTS/SAP wa CH +/- Press to select a channel, the channel changes after 2 seconds. For details, see "Using ...
... 58 Press to scroll through channels. Cycles through the channels, press and hold down CH+ or CH-. ws MENU Description Adjusts the volume. Turn on page 50. Press ENTER to the factory defaults. Displays the Favorite Channels list. For details, see "Programming the Remote Control" on -... Record Press when in a menu to reset the settings to select immediately. z To scan rapidly through the video equipment connected to display the LCD projection TV on page 82. MTS/SAP wa CH +/- Press to select a channel, the channel changes after 2 seconds. For details, see "Using ...
Operating Instructions
Page 47
... - Press to scan through the remote control. down). 7 JUMP Press to select channel 10, press 1 and 0). To turn the display off . This activates the remote control for use with the LCD projection TV. 2 ANT- (AUX input) Press to change after 2 seconds, or you need to copy down ). 6 VOL ... again. (Continued) 47 "MUTING" will appear on the screen and will jump between the VHF/UHF input and the AUX input. 3 POWER Turns the LCD projection TV on the screen, press TV/VIDEO or CH +/ - The following will change between the current channel and the last channel selected. 8 ...
... - Press to scan through the remote control. down). 7 JUMP Press to select channel 10, press 1 and 0). To turn the display off . This activates the remote control for use with the LCD projection TV. 2 ANT- (AUX input) Press to change after 2 seconds, or you need to copy down ). 6 VOL ... again. (Continued) 47 "MUTING" will appear on the screen and will jump between the VHF/UHF input and the AUX input. 3 POWER Turns the LCD projection TV on the screen, press TV/VIDEO or CH +/ - The following will change between the current channel and the last channel selected. 8 ...
Operating Instructions
Page 68
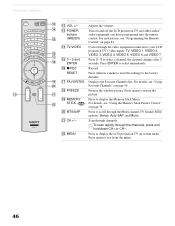
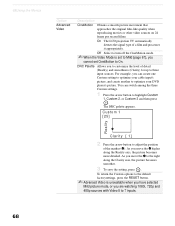
...DVD player's picture. For example, you cannot set CineMotion to the right along the Reality axis, the picture becomes more detailed. Off Select to turn off the CineMotion mode. ✍ When the Video Mode is unavailable when you have selected Mild picture mode, or you move the z to ... picture movement that approaches the original film-like quality when reproducing movies or other video sources on 24 frame per second films. On The LCD projection TV automatically detects the signal type of the marker (z). Custom 1 [25] Reality Clarity [ 1] 2 Press the arrow button to 7 inputs. 68 As ...
...DVD player's picture. For example, you cannot set CineMotion to the right along the Reality axis, the picture becomes more detailed. Off Select to turn off the CineMotion mode. ✍ When the Video Mode is unavailable when you have selected Mild picture mode, or you move the z to ... picture movement that approaches the original film-like quality when reproducing movies or other video sources on 24 frame per second films. On The LCD projection TV automatically detects the signal type of the marker (z). Custom 1 [25] Reality Clarity [ 1] 2 Press the arrow button to 7 inputs. 68 As ...
Operating Instructions
Page 69
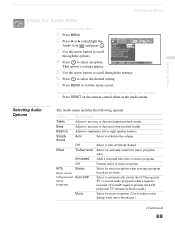
... icon and press . 3 Use the arrow button to scroll through the settings. 6 Press to select the desired setting. 7 Press MENU to turn off Steady Sound. Effect TruSurround Select for surround sound (for stereo reception when viewing a program broadcast in the Audio menu. 68Using the Menus Selecting...4 Press to emphasize left or right speaker balance. Select to automatically switch the LCD projection TV to second audio programs when a signal is received. (If no SAP signal is present, the LCD projection TV remains in Stereo mode.) Mono Select for Treble, Bass and Balance ❑ Press...
... icon and press . 3 Use the arrow button to scroll through the settings. 6 Press to select the desired setting. 7 Press MENU to turn off Steady Sound. Effect TruSurround Select for surround sound (for stereo reception when viewing a program broadcast in the Audio menu. 68Using the Menus Selecting...4 Press to emphasize left or right speaker balance. Select to automatically switch the LCD projection TV to second audio programs when a signal is received. (If no SAP signal is present, the LCD projection TV remains in Stereo mode.) Mono Select for Treble, Bass and Balance ❑ Press...
Operating Instructions
Page 70
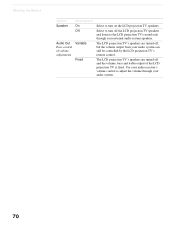
... control to adjust the volume through your audio system. 70 The LCD projection TV's speakers are turned off , but the volume output from your audio system can still be controlled by the LCD projection TV's remote control. The LCD projection TV's speakers are turned off and the volume, bass and treble output of volume adjustments...
... control to adjust the volume through your audio system. 70 The LCD projection TV's speakers are turned off , but the volume output from your audio system can still be controlled by the LCD projection TV's remote control. The LCD projection TV's speakers are turned off and the volume, bass and treble output of volume adjustments...
Operating Instructions
Page 75
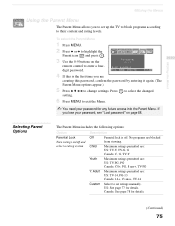
...+, PG, 8 ans+, TV-PG Y. US: See page 77 for details. Press setting. Selecting Parent Options The Parent Menu includes the following options: Option Parental Lock Turn ratings on page 88.
...+, PG, 8 ans+, TV-PG Y. US: See page 77 for details. Press setting. Selecting Parent Options The Parent Menu includes the following options: Option Parental Lock Turn ratings on page 88.
Operating Instructions
Page 76
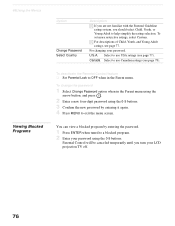
.... 68Using the Menus Viewing Blocked Programs Option Change Password Select Country Description z If you are not familiar with the Parental Guideline rating system, you turn your LCD projection TV off. 76 z For descriptions of Child, Youth, and Young Adult ratings, see page 77). Select to help simplify the rating selection. Canada Select...
.... 68Using the Menus Viewing Blocked Programs Option Change Password Select Country Description z If you are not familiar with the Parental Guideline rating system, you turn your LCD projection TV off. 76 z For descriptions of Child, Youth, and Young Adult ratings, see page 77). Select to help simplify the rating selection. Canada Select...
Operating Instructions
Page 79
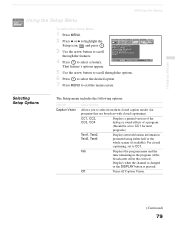
... closed caption modes (for most programs.) Text1, Text2, Text3, Text4 Displays network/station information presented using either half or the whole screen (if available). Off Turns off Caption Vision. (Continued) 79 Selecting Setup Options The Setup menu includes the following options: Option Caption Vision Description Allows you to CC1 for programs...
... closed caption modes (for most programs.) Text1, Text2, Text3, Text4 Displays network/station information presented using either half or the whole screen (if available). Off Turns off Caption Vision. (Continued) 79 Selecting Setup Options The Setup menu includes the following options: Option Caption Vision Description Allows you to CC1 for programs...


