Operating Instructions
Page 5
...a VCR.... 12 Connecting an Audio Receiver 13 Connecting a DVD Player with Component Video Connectors 14 Connecting a DVD Player with A/V Connectors 15 Connecting a Digital Satellite Receiver ......... 16 Connecting a Digital TV Receiver 17 Connecting a Sub Woofer 18 Connecting an RGB Equipment 19 Setting the ...Mode automatically 29 Changing the Wide Screen Mode manually 30 Changing the Wide Setup 30 Setting the Video Inputs 32 Operating Video Equipment with Your TV Remote Control 33 Programming the remote control 33 Operating optional equipment 35 Using Favorite Channels 36 ...
...a VCR.... 12 Connecting an Audio Receiver 13 Connecting a DVD Player with Component Video Connectors 14 Connecting a DVD Player with A/V Connectors 15 Connecting a Digital Satellite Receiver ......... 16 Connecting a Digital TV Receiver 17 Connecting a Sub Woofer 18 Connecting an RGB Equipment 19 Setting the ...Mode automatically 29 Changing the Wide Screen Mode manually 30 Changing the Wide Setup 30 Setting the Video Inputs 32 Operating Video Equipment with Your TV Remote Control 33 Programming the remote control 33 Operating optional equipment 35 Using Favorite Channels 36 ...
Operating Instructions
Page 6
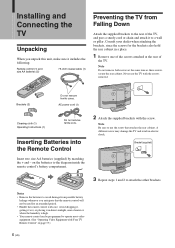
..., or placing it to a wall or pillar. Never use the screw that the remote control will not be programmed to operate most video equipment. (See "Operating Video Equipment with Your TV Remote Control" on the batteries to the diagram inside the remote control's battery compartment. 2 Attach the supplied brackets with the screw. Consult...
..., or placing it to a wall or pillar. Never use the screw that the remote control will not be programmed to operate most video equipment. (See "Operating Video Equipment with Your TV Remote Control" on the batteries to the diagram inside the remote control's battery compartment. 2 Attach the supplied brackets with the screw. Consult...
Operating Instructions
Page 7
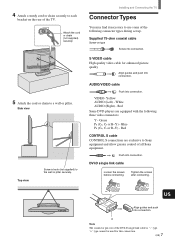
Supplied 75-ohm coaxial cable Screw-on the rear of all Sony equipment. Green PB (CB, Cb or B-Y) - Red Some DVD players are exclusive to Sony equipment and allow greater control of the TV. Red CONTROL S cable CONTROL S connections are equipped with the following ...screws after connecting. A Note The connector pin (A) of the following three video connectors: Y - "+" type cannot be used for enhanced picture quality Align guides and push into connection. AUDIO/VIDEO cable Push into connection. VIDEO- Side view Top view Screw a hook (not supplied) to each bracket...
Supplied 75-ohm coaxial cable Screw-on the rear of all Sony equipment. Green PB (CB, Cb or B-Y) - Red Some DVD players are exclusive to Sony equipment and allow greater control of the TV. Red CONTROL S cable CONTROL S connections are equipped with the following ...screws after connecting. A Note The connector pin (A) of the following three video connectors: Y - "+" type cannot be used for enhanced picture quality Align guides and push into connection. AUDIO/VIDEO cable Push into connection. VIDEO- Side view Top view Screw a hook (not supplied) to each bracket...
Operating Instructions
Page 8
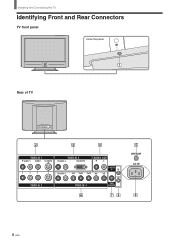
Installing and Connecting the TV Identifying Front and Rear Connectors TV front panel Under the panel Rear of TV VIDEO IN 1 R AUDIO L VIDEO S VIDEO VIDEO IN 3 R AUDIO L DVI-HDTV AUDIO OUT R L R AUDIO L Y/G PB/B PR/R HD CONTROL S IN VD OUT VIDEO IN 2 VIDEO IN 4 SUB WOOFER VHF/UHF AC IN 8 (US)
Installing and Connecting the TV Identifying Front and Rear Connectors TV front panel Under the panel Rear of TV VIDEO IN 1 R AUDIO L VIDEO S VIDEO VIDEO IN 3 R AUDIO L DVI-HDTV AUDIO OUT R L R AUDIO L Y/G PB/B PR/R HD CONTROL S IN VD OUT VIDEO IN 2 VIDEO IN 4 SUB WOOFER VHF/UHF AC IN 8 (US)
Operating Instructions
Page 9
... 1, 2 (pages 10 - 12, 15) Connects to the output jacks of your VCR or other video equipment. 3 VIDEO IN 3 (DVI-HDTV connector and AUDIO (R/L) jacks) (page 16) Accommodates a copy-protected digital connection (HDCP*) to other Sony equipment with the TV's remote control,** connect the CONTROL S IN jack of the equipment to the CONTROL S OUT jack...
... 1, 2 (pages 10 - 12, 15) Connects to the output jacks of your VCR or other video equipment. 3 VIDEO IN 3 (DVI-HDTV connector and AUDIO (R/L) jacks) (page 16) Accommodates a copy-protected digital connection (HDCP*) to other Sony equipment with the TV's remote control,** connect the CONTROL S IN jack of the equipment to the CONTROL S OUT jack...
Operating Instructions
Page 10
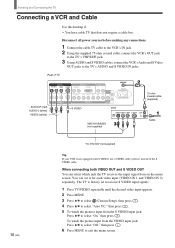
... not equipped with S VIDEO, use a VIDEO cable (yellow) instead of TV AUDIO-R (red) AUDIO-L (white) VIDEO (yellow) VIDEO IN 1 R AUDIO L VIDEO S VIDEO VIDEO IN 3 R AUDIO L DVI-HDTV AUDIO OUT R L R AUDIO L Y/G PB/B PR/R HD CONTROL S IN VD OUT VIDEO IN 2 VIDEO IN 4 SUB WOOFER S VIDEO VCR VHF/UHF AC IN VMC-810S/820S (not supplied) 75-ohm coaxial cable (supplied) Cable 10...
... not equipped with S VIDEO, use a VIDEO cable (yellow) instead of TV AUDIO-R (red) AUDIO-L (white) VIDEO (yellow) VIDEO IN 1 R AUDIO L VIDEO S VIDEO VIDEO IN 3 R AUDIO L DVI-HDTV AUDIO OUT R L R AUDIO L Y/G PB/B PR/R HD CONTROL S IN VD OUT VIDEO IN 2 VIDEO IN 4 SUB WOOFER S VIDEO VCR VHF/UHF AC IN VMC-810S/820S (not supplied) 75-ohm coaxial cable (supplied) Cable 10...
Operating Instructions
Page 11
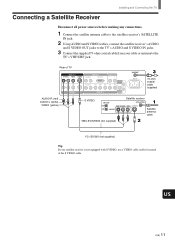
..., connect the satellite receiver's AUDIO and S VIDEO OUT jacks to the TV's AUDIO and S VIDEO IN jacks. 3 Connect the supplied 75-ohm coaxial cable from your satellite receiver is not equipped with S VIDEO, use a VIDEO cable (yellow) instead of the S VIDEO cable. US (US) 11 Rear of TV VIDEO IN 1 R AUDIO L VIDEO S VIDEO VIDEO IN 2 VIDEO IN 3 R AUDIO L DVI-HDTV AUDIO OUT...
..., connect the satellite receiver's AUDIO and S VIDEO OUT jacks to the TV's AUDIO and S VIDEO IN jacks. 3 Connect the supplied 75-ohm coaxial cable from your satellite receiver is not equipped with S VIDEO, use a VIDEO cable (yellow) instead of the S VIDEO cable. US (US) 11 Rear of TV VIDEO IN 1 R AUDIO L VIDEO S VIDEO VIDEO IN 2 VIDEO IN 3 R AUDIO L DVI-HDTV AUDIO OUT...
Operating Instructions
Page 12
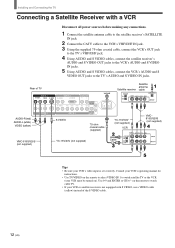
... +/- Consult your VCR's operating manual for instructions. • Use TV/VIDEO on ). Installing and Connecting the TV Connecting a Satellite Receiver with S VIDEO, use a VIDEO cable (yellow) instead of TV VIDEO IN 1 R AUDIO L VIDEO S VIDEO VIDEO IN 2 VIDEO IN 3 R AUDIO L DVI-HDTV AUDIO OUT R L R AUDIO L Y/G PB/B PR/R HD CONTROL S IN VD OUT VIDEO IN 4 SUB WOOFER VHF/UHF AC IN AUDIO-R (red) AUDIO...
... +/- Consult your VCR's operating manual for instructions. • Use TV/VIDEO on ). Installing and Connecting the TV Connecting a Satellite Receiver with S VIDEO, use a VIDEO cable (yellow) instead of TV VIDEO IN 1 R AUDIO L VIDEO S VIDEO VIDEO IN 2 VIDEO IN 3 R AUDIO L DVI-HDTV AUDIO OUT R L R AUDIO L Y/G PB/B PR/R HD CONTROL S IN VD OUT VIDEO IN 4 SUB WOOFER VHF/UHF AC IN AUDIO-R (red) AUDIO...
Operating Instructions
Page 13
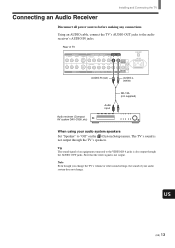
..." to "Off" on the (Custom Setup) menu. US (US) 13 Rear of TV VIDEO IN 1 R AUDIO L VIDEO S VIDEO VIDEO IN 2 COMPONENT VIDEO IN 1 AUDIO OUT R AUDIO L Y PB PR R L R AUDIO L Y/G PB/B PR/R HD CONTROL S IN VD OUT COMPONENT VIDEO IN 2 / RGB IN SUB WOOFER VHF/UHF AC IN AUDIO-R (red) AUDIO-L ... Even though you change . Connecting an Audio Receiver Installing and Connecting the TV Disconnect all power sources before making any connections. Using an AUDIO cable, connect the TV's AUDIO OUT jacks to the VIDEO IN 4 jacks is not output through the AUDIO OUT jacks. Note that...
..." to "Off" on the (Custom Setup) menu. US (US) 13 Rear of TV VIDEO IN 1 R AUDIO L VIDEO S VIDEO VIDEO IN 2 COMPONENT VIDEO IN 1 AUDIO OUT R AUDIO L Y PB PR R L R AUDIO L Y/G PB/B PR/R HD CONTROL S IN VD OUT COMPONENT VIDEO IN 2 / RGB IN SUB WOOFER VHF/UHF AC IN AUDIO-R (red) AUDIO-L ... Even though you change . Connecting an Audio Receiver Installing and Connecting the TV Disconnect all power sources before making any connections. Using an AUDIO cable, connect the TV's AUDIO OUT jacks to the VIDEO IN 4 jacks is not output through the AUDIO OUT jacks. Note that...

Operating Instructions
Page 14
... matching colors. 2 Using an AUDIO cable, connect the DVD player's AUDIO OUT jacks to "Y/PB/ PR" in the (Initial Setup) menu (see page 32). Use the VIDEO IN 4 connections. Tip The Y, B-Y and R-Y jacks on your DVD player are equipped with the three component video connectorsP:...sure to use if: • Your DVD player has component (Y, B-Y, R-Y) jacks. Rear of TV VIDEO IN 1 R AUDIO L VIDEO S VIDEO VIDEO IN 3 R AUDIO L DVI-HDTV AUDIO OUT R L R AUDIO L Y/G PB/B PR/R HD CONTROL S IN VD OUT VIDEO IN 2 VIDEO IN 4 SUB WOOFER AUDIO-R (red) AUDIO-L (white) PR/R PB/B Y/G VHF/UHF AC...
... matching colors. 2 Using an AUDIO cable, connect the DVD player's AUDIO OUT jacks to "Y/PB/ PR" in the (Initial Setup) menu (see page 32). Use the VIDEO IN 4 connections. Tip The Y, B-Y and R-Y jacks on your DVD player are equipped with the three component video connectorsP:...sure to use if: • Your DVD player has component (Y, B-Y, R-Y) jacks. Rear of TV VIDEO IN 1 R AUDIO L VIDEO S VIDEO VIDEO IN 3 R AUDIO L DVI-HDTV AUDIO OUT R L R AUDIO L Y/G PB/B PR/R HD CONTROL S IN VD OUT VIDEO IN 2 VIDEO IN 4 SUB WOOFER AUDIO-R (red) AUDIO-L (white) PR/R PB/B Y/G VHF/UHF AC...

Operating Instructions
Page 15
... an AUDIO cable, connect the DVD player's AUDIO OUT jacks to the TV's AUDIO IN jacks. 2 Using an S VIDEO cable, connect the DVD player's S VIDEO jack to 16:9 on page 14. Rear of TV AUDIO-R (red) AUDIO-L (white) VIDEO IN 1 R AUDIO L VIDEO S VIDEO VIDEO IN 2 VIDEO IN 3 R AUDIO L DVI-HDTV AUDIO OUT R L R AUDIO ...VCR and DVD player inputs. on the remote to watch the pictures input from the S VIDEO input jack, set the TV's aspect ratio to the TV's S VIDEO jack. Installing and Connecting the TV Connecting a DVD Player with A/V Connectors Use this hookup if: • Your DVD player...
... an AUDIO cable, connect the DVD player's AUDIO OUT jacks to the TV's AUDIO IN jacks. 2 Using an S VIDEO cable, connect the DVD player's S VIDEO jack to 16:9 on page 14. Rear of TV AUDIO-R (red) AUDIO-L (white) VIDEO IN 1 R AUDIO L VIDEO S VIDEO VIDEO IN 2 VIDEO IN 3 R AUDIO L DVI-HDTV AUDIO OUT R L R AUDIO ...VCR and DVD player inputs. on the remote to watch the pictures input from the S VIDEO input jack, set the TV's aspect ratio to the TV's S VIDEO jack. Installing and Connecting the TV Connecting a DVD Player with A/V Connectors Use this hookup if: • Your DVD player...
Operating Instructions
Page 16
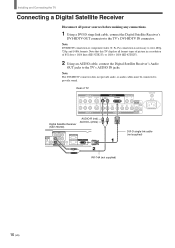
... 852 dots × 1024 lines (KE-32TS2U), or 1024 × 1024 (KE-42TS2U). 2 Using an AUDIO cable, connect the Digital Satellite Receiver's Audio OUT jacks to the TV's DVI-HDTV IN connector. Note DVI-HDTV connection or component video (Y, PB, PR) connection is necessary...single link cable (not supplied) RK-74A (not supplied) 16 (US) Installing and Connecting the TV Connecting a Digital Satellite Receiver Disconnect all format types of picture in a resolution of TV VIDEO IN 1 R AUDIO L VIDEO S VIDEO VIDEO IN 2 VIDEO IN 3 R AUDIO L DVI-HDTV AUDIO OUT R L R AUDIO L Y/G PB/B PR/R ...
... 852 dots × 1024 lines (KE-32TS2U), or 1024 × 1024 (KE-42TS2U). 2 Using an AUDIO cable, connect the Digital Satellite Receiver's Audio OUT jacks to the TV's DVI-HDTV IN connector. Note DVI-HDTV connection or component video (Y, PB, PR) connection is necessary...single link cable (not supplied) RK-74A (not supplied) 16 (US) Installing and Connecting the TV Connecting a Digital Satellite Receiver Disconnect all format types of picture in a resolution of TV VIDEO IN 1 R AUDIO L VIDEO S VIDEO VIDEO IN 2 VIDEO IN 3 R AUDIO L DVI-HDTV AUDIO OUT R L R AUDIO L Y/G PB/B PR/R ...
Operating Instructions
Page 17
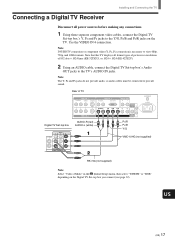
... formats. Note DVI-HDTV connection or component video (Y, PB, PR) connection is necessary to provide sound. Connecting a Digital TV Receiver Installing and Connecting the TV Disconnect all format types of 852 dots × 1024 lines (KE-32TS2U), or 1024 × 1024 (KE-42TS2U). 2 Using an AUDIO cable, connect the Digital TV Set-top box's Audio OUT jacks...
... formats. Note DVI-HDTV connection or component video (Y, PB, PR) connection is necessary to provide sound. Connecting a Digital TV Receiver Installing and Connecting the TV Disconnect all format types of 852 dots × 1024 lines (KE-32TS2U), or 1024 × 1024 (KE-42TS2U). 2 Using an AUDIO cable, connect the Digital TV Set-top box's Audio OUT jacks...
Operating Instructions
Page 18
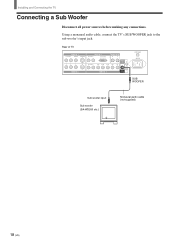
Using a monaural audio cable, connect the TV's SUB WOOFER jack to the sub woofer's input jack. Rear of TV VIDEO IN 1 R AUDIO L VIDEO S VIDEO VIDEO IN 2 VIDEO IN 3 R AUDIO L DVI-HDTV AUDIO OUT R L R AUDIO L Y/G PB/B PR/R HD CONTROL S IN VD OUT VIDEO IN 4 SUB WOOFER VHF/UHF AC IN SUB WOOFER Sub woofer input Sub woofer (SA-WD200 etc.) Monaural audio cable (not supplied) 18 (US) Installing and Connecting the TV Connecting a Sub Woofer Disconnect all power sources before making any connections.
Using a monaural audio cable, connect the TV's SUB WOOFER jack to the sub woofer's input jack. Rear of TV VIDEO IN 1 R AUDIO L VIDEO S VIDEO VIDEO IN 2 VIDEO IN 3 R AUDIO L DVI-HDTV AUDIO OUT R L R AUDIO L Y/G PB/B PR/R HD CONTROL S IN VD OUT VIDEO IN 4 SUB WOOFER VHF/UHF AC IN SUB WOOFER Sub woofer input Sub woofer (SA-WD200 etc.) Monaural audio cable (not supplied) 18 (US) Installing and Connecting the TV Connecting a Sub Woofer Disconnect all power sources before making any connections.

Operating Instructions
Page 19
...connect the RGB equipment's video/synchronized signal output terminal to the TV's AUDIO IN jacks. Be sure to use the same row of TV VIDEO IN 1 R AUDIO L VIDEO S VIDEO VIDEO IN 2 VIDEO IN 3 R AUDIO L DVI-HDTV AUDIO OUT R L R AUDIO L Y/G PB/B PR/R HD CONTROL S IN VD OUT VIDEO IN 4 SUB WOOFER RGB... equipment VHF/UHF AC IN Note Set "Video 4 Mode" to "RGB" in the (...
...connect the RGB equipment's video/synchronized signal output terminal to the TV's AUDIO IN jacks. Be sure to use the same row of TV VIDEO IN 1 R AUDIO L VIDEO S VIDEO VIDEO IN 2 VIDEO IN 3 R AUDIO L DVI-HDTV AUDIO OUT R L R AUDIO L Y/G PB/B PR/R HD CONTROL S IN VD OUT VIDEO IN 4 SUB WOOFER RGB... equipment VHF/UHF AC IN Note Set "Video 4 Mode" to "RGB" in the (...
Operating Instructions
Page 20
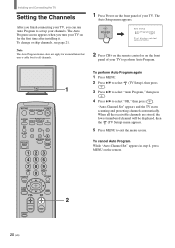
..." appears in step 4, press MENU on the front panel of your TV to perform Auto Program. 1 MUTING POWER VCR/DVD SAT/CABLE TV SYSTEM FUNCTION OFF VCR/DVD SAT/CABLE TV SLEEP PICTURE MODE WIDE MODE DISPLAY TV/VIDEO 123 456 7 JUMP FAVORITES 89 ENTER 0 MTS/SAP TV/SAT GUIDE POWER SAVING MENU VOL CH 2 To perform...
..." appears in step 4, press MENU on the front panel of your TV to perform Auto Program. 1 MUTING POWER VCR/DVD SAT/CABLE TV SYSTEM FUNCTION OFF VCR/DVD SAT/CABLE TV SLEEP PICTURE MODE WIDE MODE DISPLAY TV/VIDEO 123 456 7 JUMP FAVORITES 89 ENTER 0 MTS/SAP TV/SAT GUIDE POWER SAVING MENU VOL CH 2 To perform...
Operating Instructions
Page 22
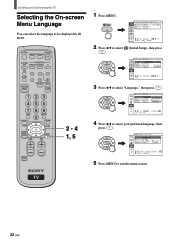
... . , Réglage ini t ial L ang ue :Francais Sy st. MUTING POWER VCR/DVD SAT/CABLE TV SYSTEM FUNCTION OFF VCR/DVD SAT/CABLE TV SLEEP PICTURE MODE WIDE MODE DISPLAY TV/VIDEO 123 456 7 JUMP FAVORITES 89 ENTER 0 MTS/SAP TV/SAT GUIDE POWER SAVING VOL MENU CH 2 - 4 1, 5 CODE SET 1 Press MENU. menu (Initial Setup...
... . , Réglage ini t ial L ang ue :Francais Sy st. MUTING POWER VCR/DVD SAT/CABLE TV SYSTEM FUNCTION OFF VCR/DVD SAT/CABLE TV SLEEP PICTURE MODE WIDE MODE DISPLAY TV/VIDEO 123 456 7 JUMP FAVORITES 89 ENTER 0 MTS/SAP TV/SAT GUIDE POWER SAVING VOL MENU CH 2 - 4 1, 5 CODE SET 1 Press MENU. menu (Initial Setup...
Operating Instructions
Page 23
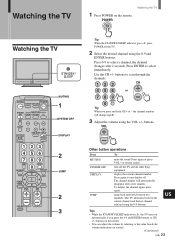
...ENTER buttons. Press again or press VOL + to select immediately. turn display off the TV and all other Sony equipment. Press again to select a channel, the channel changes after a few minutes. display the current channel ...number. Watching the TV Watching the TV STANDBY/ SLEEP MUTING POWER VCR/DVD SAT/CABLE TV SYSTEM FUNCTION OFF VCR/DVD SAT/CABLE TV SLEEP PICTURE MODE WIDE MODE DISPLAY TV/VIDEO 123 456 7 JUMP FAVORITES 89 ENTER 0 MTS/SAP TV...
...ENTER buttons. Press again or press VOL + to select immediately. turn display off the TV and all other Sony equipment. Press again to select a channel, the channel changes after a few minutes. display the current channel ...number. Watching the TV Watching the TV STANDBY/ SLEEP MUTING POWER VCR/DVD SAT/CABLE TV SYSTEM FUNCTION OFF VCR/DVD SAT/CABLE TV SLEEP PICTURE MODE WIDE MODE DISPLAY TV/VIDEO 123 456 7 JUMP FAVORITES 89 ENTER 0 MTS/SAP TV...
Operating Instructions
Page 24
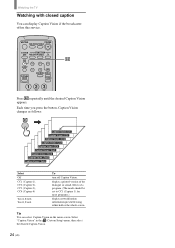
Watching the TV Watching with closed caption You can select Caption Vision on the menu screen. Tip You can display Caption Vision if the broadcaster offers this service. ... (Capture 3), CC4 (Capture 4) Text1, Text2, Text3, Text4 To turn off Caption Vision. MUTING POWER VCR/DVD SAT/CABLE TV SYSTEM FUNCTION OFF VCR/DVD SAT/CABLE TV SLEEP PICTURE MODE WIDE MODE DISPLAY TV/VIDEO 123 Press repeatedly until the desired Caption Vision appears. Select "Caption Vision" in the (Custom Setup) menu, then select...
Watching the TV Watching with closed caption You can select Caption Vision on the menu screen. Tip You can display Caption Vision if the broadcaster offers this service. ... (Capture 3), CC4 (Capture 4) Text1, Text2, Text3, Text4 To turn off Caption Vision. MUTING POWER VCR/DVD SAT/CABLE TV SYSTEM FUNCTION OFF VCR/DVD SAT/CABLE TV SLEEP PICTURE MODE WIDE MODE DISPLAY TV/VIDEO 123 Press repeatedly until the desired Caption Vision appears. Select "Caption Vision" in the (Custom Setup) menu, then select...
Operating Instructions
Page 25
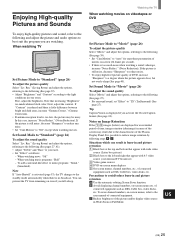
... picture is too low, the picture may result due to the characteristics of the Plasma Display Panel. Set Sound Mode to "Movie" (page 26) To adjust the sound quality Select "Movie...and picture retention 1 Black bars at the top and bottom that appear with 4:3 video source (conventional TV broadcast) 3 Video game sources 4 DVD on-screen menu displays 5 On-screen menus, channel numbers, etc...movies on screen (24 frame per second). • If there is too much whitens black color. Set Sound Mode to reduce image retention by following steps A-C. B Avoid displaying channel numbers...
... picture is too low, the picture may result due to the characteristics of the Plasma Display Panel. Set Sound Mode to "Movie" (page 26) To adjust the sound quality Select "Movie...and picture retention 1 Black bars at the top and bottom that appear with 4:3 video source (conventional TV broadcast) 3 Video game sources 4 DVD on-screen menu displays 5 On-screen menus, channel numbers, etc...movies on screen (24 frame per second). • If there is too much whitens black color. Set Sound Mode to reduce image retention by following steps A-C. B Avoid displaying channel numbers...

