
Operating Instructions
Page 3
...for BRAVIA Theatre Sync 17 4. Setting Up the Channel List - Initial Setup 18 Using the TV Features Remote Control and TV Controls/ Indicators 19 Inserting Batteries into the Remote Control 19 Remote Control and TV Controls 19 Indicators 24 Programming the Remote Control 25 Operating Sony ... Video Options Settings 37 Audio Options Settings 38 Channel Settings 39 CC Closed Captions (CC) Settings 40 Parental Lock Settings 40 External Inputs Settings 42 HDMI Settings 43 General Settings 43 Initial Setup 43 Other Information Replacing the Lamp 44 How to Full HD Experience: Set...
...for BRAVIA Theatre Sync 17 4. Setting Up the Channel List - Initial Setup 18 Using the TV Features Remote Control and TV Controls/ Indicators 19 Inserting Batteries into the Remote Control 19 Remote Control and TV Controls 19 Indicators 24 Programming the Remote Control 25 Operating Sony ... Video Options Settings 37 Audio Options Settings 38 Channel Settings 39 CC Closed Captions (CC) Settings 40 Parental Lock Settings 40 External Inputs Settings 42 HDMI Settings 43 General Settings 43 Initial Setup 43 Other Information Replacing the Lamp 44 How to Full HD Experience: Set...
Operating Instructions
Page 7
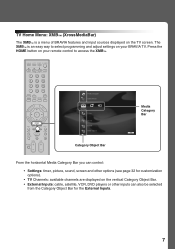
The XMB™ is a menu of BRAVIA features and input sources displayed on the TV screen. Press the HOME button on the vertical Category Object Bar. • External Inputs: cable, satellite, VCR, DVD players or other inputs can also be selected from the Category Object Bar for ...customization options). • TV Channels: available channels are displayed on your BRAVIA TV. Product Support Clock/Timers Settings Sound...
The XMB™ is a menu of BRAVIA features and input sources displayed on the TV screen. Press the HOME button on the vertical Category Object Bar. • External Inputs: cable, satellite, VCR, DVD players or other inputs can also be selected from the Category Object Bar for ...customization options). • TV Channels: available channels are displayed on your BRAVIA TV. Product Support Clock/Timers Settings Sound...

Operating Instructions
Page 11
Locating Inputs and Outputs Left Side Getting Started 0 1 2 3 VHF/UHF/CABLE S VIDEO 1 DMex/ SERVICE VIDEO IN 2 3 COMPONENT IN (1080p/1080i/720p/480p/480i) 1 2 Y VIDEO (MONO) L AUDIO R PB ... (OPTICAL) AUDIO OUT (VAR/FIX) AUDIO L R AUDIO 1 2 3 RGB PC IN 56 7 8 9 Item 1 VHF/UHF/CABLE 2 VIDEO IN 1 S VIDEO 3 VIDEO IN 1/2/3 VIDEO/ L(MONO)AUDIO-R Description RF input that has S VIDEO. Connects to your A/V equipment such as a VCR or other video equipment that connects to the composite video and audio output jacks on...
Locating Inputs and Outputs Left Side Getting Started 0 1 2 3 VHF/UHF/CABLE S VIDEO 1 DMex/ SERVICE VIDEO IN 2 3 COMPONENT IN (1080p/1080i/720p/480p/480i) 1 2 Y VIDEO (MONO) L AUDIO R PB ... (OPTICAL) AUDIO OUT (VAR/FIX) AUDIO L R AUDIO 1 2 3 RGB PC IN 56 7 8 9 Item 1 VHF/UHF/CABLE 2 VIDEO IN 1 S VIDEO 3 VIDEO IN 1/2/3 VIDEO/ L(MONO)AUDIO-R Description RF input that has S VIDEO. Connects to your A/V equipment such as a VCR or other video equipment that connects to the composite video and audio output jacks on...
Operating Instructions
Page 12
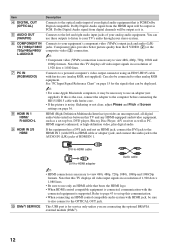
... of Screen settings on page 15 for service only unless you are connecting the optional BRAVIA external module (DMex). 12 HDMI (High-Definition Multimedia Interface) provides an uncompressed, all video input signals in a resolution of 1,920 dots × 1,080 lines. Dolby Digital Audio...480i)/ L-AUDIO-R 7 PC IN (RGB/AUDIO) 8 HDMI IN 1 HDMI/ R-AUDIO-L 9 HDMI IN 2/3 HDMI Description Connects to the optical audio input of your digital audio equipment that bears the HDMI logo. • When HDMI control compatible equipment is connected, communication with the connected equipment is supported...
... of Screen settings on page 15 for service only unless you are connecting the optional BRAVIA external module (DMex). 12 HDMI (High-Definition Multimedia Interface) provides an uncompressed, all video input signals in a resolution of 1,920 dots × 1,080 lines. Dolby Digital Audio...480i)/ L-AUDIO-R 7 PC IN (RGB/AUDIO) 8 HDMI IN 1 HDMI/ R-AUDIO-L 9 HDMI IN 2/3 HDMI Description Connects to the optical audio input of your digital audio equipment that bears the HDMI logo. • When HDMI control compatible equipment is connected, communication with the connected equipment is supported...
Operating Instructions
Page 13
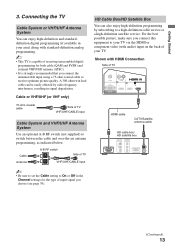
... subscribing to switch between the cable and over-the-air antenna programming, as indicated below. Shown with HDMI Connection Side of TV VHF/UHF/CABLE input Cable System and VHF/UHF Antenna System Use an optional A-B RF switch (not supplied) to a high-definition cable service or a high-definition satellite... back of your TV via the HDMI or component video (with standard-definition analog programming. ~ • This TV is capable of input signal you connect this equipment to receive optimum picture quality. Connecting the TV Cable System or VHF/UHF Antenna System You can enjoy high...
... subscribing to switch between the cable and over-the-air antenna programming, as indicated below. Shown with HDMI Connection Side of TV VHF/UHF/CABLE input Cable System and VHF/UHF Antenna System Use an optional A-B RF switch (not supplied) to a high-definition cable service or a high-definition satellite... back of your TV via the HDMI or component video (with standard-definition analog programming. ~ • This TV is capable of input signal you connect this equipment to receive optimum picture quality. Connecting the TV Cable System or VHF/UHF Antenna System You can enjoy high...
Operating Instructions
Page 15
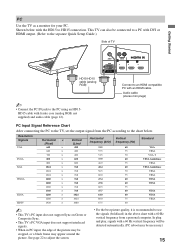
... can also be connected to a PC with ferrite core (analog RGB, not supplied) and audio cable (page 12). Resolution Signals VGA SVGA XGA WXGA SXGA HDTV Horizontal × (Pixel) 640 × 640 × 720 × 800 × 800 × 1024 × 1024 × 1024 × 1280 ×... a black frame may be detected automatically. (PC reboot may appear around the picture. In plug and play, signals with an HDMI cable. PC Input Signal Reference Chart After connecting the PC to the TV, set the output signal from a personal computer. Audio cable (stereo mini plugs) ~ ...
... can also be connected to a PC with ferrite core (analog RGB, not supplied) and audio cable (page 12). Resolution Signals VGA SVGA XGA WXGA SXGA HDTV Horizontal × (Pixel) 640 × 640 × 720 × 800 × 800 × 1024 × 1024 × 1024 × 1280 ×... a black frame may be detected automatically. (PC reboot may appear around the picture. In plug and play, signals with an HDMI cable. PC Input Signal Reference Chart After connecting the PC to the TV, set the output signal from a personal computer. Audio cable (stereo mini plugs) ~ ...
Operating Instructions
Page 17
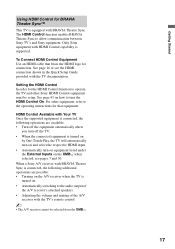
...Use an HDMI cable that equipment. See page 43 on how to allow communication between Sony TV's and Sony equipment. HDMI Control Available with the TV documentation. When a Sony A/V receiver with BRAVIA Theatre Sync is connected, the following operations are possible: • Turning on the ...A/V receiver with the TV's remote control. ~ • The A/V receiver cannot be setup. The HDMI Control function enables BRAVIA Theatre Sync to turn on equipment listed under the External Inputs on . • Automatically switching to the operating instructions for that bears the HDMI logo for...
...Use an HDMI cable that equipment. See page 43 on how to allow communication between Sony TV's and Sony equipment. HDMI Control Available with the TV documentation. When a Sony A/V receiver with BRAVIA Theatre Sync is connected, the following operations are possible: • Turning on the ...A/V receiver with the TV's remote control. ~ • The A/V receiver cannot be setup. The HDMI Control function enables BRAVIA Theatre Sync to turn on equipment listed under the External Inputs on . • Automatically switching to the operating instructions for that bears the HDMI logo for...
Operating Instructions
Page 18
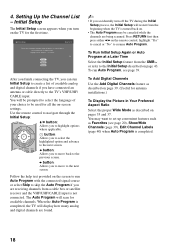
...Wide Mode as Favorites (see page 39. Initial Setup The Initial Setup screen appears when you to move to the TV's VHF/UHF/ CABLE input. English Español Français After you finish connecting the TV, you can run Initial Setup to create a list of available .... 18 4. The Auto Program will be canceled while the channels are receiving channels from a cable box or satellite receiver and the VHF/UHF/CABLE input is not connected. Highlight a choice and press to highlight options where applicable. Use the remote control to navigate through the Initial Setup: V/v button:...
...Wide Mode as Favorites (see page 39. Initial Setup The Initial Setup screen appears when you to move to the TV's VHF/UHF/ CABLE input. English Español Français After you finish connecting the TV, you can run Initial Setup to create a list of available .... 18 4. The Auto Program will be canceled while the channels are receiving channels from a cable box or satellite receiver and the VHF/UHF/CABLE input is not connected. Highlight a choice and press to highlight options where applicable. Use the remote control to navigate through the Initial Setup: V/v button:...

Operating Instructions
Page 19
Use them as these buttons 1 on the remote control. 2 3 POWER CHANNEL VOLUME INPUT HOME ~ • The 5, PLAY and CH + buttons have a tactile dot. To cancel Sleep Timer, press SLEEP repeatedly until the TV displays the time in a few ...
Use them as these buttons 1 on the remote control. 2 3 POWER CHANNEL VOLUME INPUT HOME ~ • The 5, PLAY and CH + buttons have a tactile dot. To cancel Sleep Timer, press SLEEP repeatedly until the TV displays the time in a few ...
Operating Instructions
Page 22
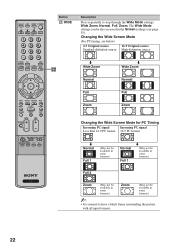
... through the Wide Mode settings: Wide Zoom, Normal, Full, Zoom. Button ws WIDE Description Press repeatedly to have a black frame surrounding the picture with all input formats. 22
... through the Wide Mode settings: Wide Zoom, Normal, Full, Zoom. Button ws WIDE Description Press repeatedly to have a black frame surrounding the picture with all input formats. 22

Operating Instructions
Page 23
... CH +/- Press to display a list of convenient functions and menu wf shortcuts. wg V/v/B/b Press V/v/B/b to scan through the inputs. ~ • Inputs can only be set for the current input. • When Digital Rating is displayed. • See page 42 on -screen cursor. The OPTIONS menu items vary based...Custom. (Available options depend on the current mode.) The picture modes can also be changed by pressing V/v and while the list of External Inputs is selected, an icon appears to Favorites/ Remove from Favorites See page 20 MTS See page 38 wk Alternate Audio See page 39 Digital...
... CH +/- Press to display a list of convenient functions and menu wf shortcuts. wg V/v/B/b Press V/v/B/b to scan through the inputs. ~ • Inputs can only be set for the current input. • When Digital Rating is displayed. • See page 42 on -screen cursor. The OPTIONS menu items vary based...Custom. (Available options depend on the current mode.) The picture modes can also be changed by pressing V/v and while the list of External Inputs is selected, an icon appears to Favorites/ Remove from Favorites See page 20 MTS See page 38 wk Alternate Audio See page 39 Digital...

Operating Instructions
Page 27
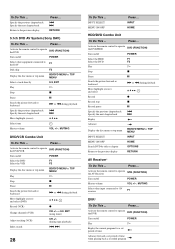
...a channel 0-9, ENT Change channels CH +/- Press ... Activate the remote control to operate the cable box STB (FUNCTION) Turn on /off POWER INPUT SELECT INPUT Select a channel 0-9, ENT Change channels CH +/- Record z Play H To Do This ... Activate the remote control to operate the Blu-ray Disc...on the remote control (page 25). Press ... Press ... Stop Fast forward Rewind the tape Pause Press ... Press INPUT repeatedly until you see the video input on the screen for your connected equipment if a function cannot be activated by the suggested button if it has ...
...a channel 0-9, ENT Change channels CH +/- Press ... Activate the remote control to operate the cable box STB (FUNCTION) Turn on /off POWER INPUT SELECT INPUT Select a channel 0-9, ENT Change channels CH +/- Record z Play H To Do This ... Activate the remote control to operate the Blu-ray Disc...on the remote control (page 25). Press ... Press ... Stop Fast forward Rewind the tape Pause Press ... Press INPUT repeatedly until you see the video input on the screen for your connected equipment if a function cannot be activated by the suggested button if it has ...
Operating Instructions
Page 28
...track Specify the next chapter/track . > Replay Advance Display the disc menu or top menu BD/DVD MENU or TOP MENU INPUT SELECT INPUT MENU ON/OFF HOME Search DVD by title or chapter OPTIONS Return to AV receiver F1 DVR* To Do This ... Specify ... Advance forward a set period of time when playing back a recorded program Activate the remote control to the previous display Press ... . > RETURN 5.1ch DVD AV System (Sony DAV) To Do This ... Press ... or 0-9, ENT (using tuner) Adjust tracking (VCR) CH +/- (during playback Move highlight (cursor) and select (DVD) V v ...
...track Specify the next chapter/track . > Replay Advance Display the disc menu or top menu BD/DVD MENU or TOP MENU INPUT SELECT INPUT MENU ON/OFF HOME Search DVD by title or chapter OPTIONS Return to AV receiver F1 DVR* To Do This ... Specify ... Advance forward a set period of time when playing back a recorded program Activate the remote control to the previous display Press ... . > RETURN 5.1ch DVD AV System (Sony DAV) To Do This ... Press ... or 0-9, ENT (using tuner) Adjust tracking (VCR) CH +/- (during playback Move highlight (cursor) and select (DVD) V v ...
Operating Instructions
Page 30
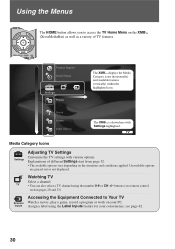
buttons (see page 42. 30 TV • You can also select a TV channel using the Label Inputs feature for your PC. Inputs Assign a label using the number 0-9 or CH +/- Sound Screen Video Options The XMB™ is shown here with various options. Unavailable options are grayed out ...
buttons (see page 42. 30 TV • You can also select a TV channel using the Label Inputs feature for your PC. Inputs Assign a label using the number 0-9 or CH +/- Sound Screen Video Options The XMB™ is shown here with various options. Unavailable options are grayed out ...
Operating Instructions
Page 31
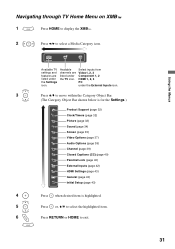
...TV Home Menu on XMB™ 1 Press HOME to display the XMB™. 2 Press B/b to exit. 31 Select inputs from Video1, 2, 3 Component 1, 2 HDMI 1, 2, 3 PC under the External Inputs icon. 3 Press V/v to move within the Category Object Bar. (The Category Object Bar shown below is for the Settings... 35) Video Options (page 37) Audio Options (page 38) Channel (page 39) CC Closed Captions (CC) (page 40) Parental Lock (page 40) External Inputs (page 42) HDMI Settings (page 43) General (page 43) Initial Setup (page 43) 4 Press when desired item is highlighted. 5 Press or, V/v to...
...TV Home Menu on XMB™ 1 Press HOME to display the XMB™. 2 Press B/b to exit. 31 Select inputs from Video1, 2, 3 Component 1, 2 HDMI 1, 2, 3 PC under the External Inputs icon. 3 Press V/v to move within the Category Object Bar. (The Category Object Bar shown below is for the Settings... 35) Video Options (page 37) Audio Options (page 38) Channel (page 39) CC Closed Captions (CC) (page 40) Parental Lock (page 40) External Inputs (page 42) HDMI Settings (page 43) General (page 43) Initial Setup (page 43) 4 Press when desired item is highlighted. 5 Press or, V/v to...

Operating Instructions
Page 33
... about the standard level. Min With this option, the screen has a high level of connected equipment, and the VHF/UHF/CABLE input. Using the Menus Reset Advanced Iris Picture Brightness Color Hue Color Temperature White adjustment Sharpness Noise Reduction MPEG Noise Reduction DRC Mode ~ ...• Picture Mode for all inputs can obtain the best brightness and contrast suited for your TV viewing. Sharpens or softens the picture. Progressive Recommended for DVDs ...
... about the standard level. Min With this option, the screen has a high level of connected equipment, and the VHF/UHF/CABLE input. Using the Menus Reset Advanced Iris Picture Brightness Color Hue Color Temperature White adjustment Sharpness Noise Reduction MPEG Noise Reduction DRC Mode ~ ...• Picture Mode for all inputs can obtain the best brightness and contrast suited for your TV viewing. Sharpens or softens the picture. Progressive Recommended for DVDs ...
Operating Instructions
Page 34
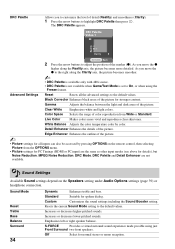
... balance between the light and dark areas of color reproduction from the OPTIONS menu. • Picture settings for PC Timings (HDMI or PC input) are not available. Standard Suitable for normal stereo or mono reception. Increases or decreases lower-pitched sounds. Off Select for spoken dialog. DRC... of the picture for details), but Noise Reduction, MPEG Noise Reduction, DRC Mode, DRC Palette and Detail Enhancer are the same as other input modes (see above for stronger contrast. The DRC Palette appears. As you move the z to the right along the Reality axis, the ...
... balance between the light and dark areas of color reproduction from the OPTIONS menu. • Picture settings for PC Timings (HDMI or PC input) are not available. Standard Suitable for normal stereo or mono reception. Increases or decreases lower-pitched sounds. Off Select for spoken dialog. DRC... of the picture for details), but Noise Reduction, MPEG Noise Reduction, DRC Mode, DRC Palette and Detail Enhancer are the same as other input modes (see above for stronger contrast. The DRC Palette appears. As you move the z to the right along the Reality axis, the ...
Operating Instructions
Page 35
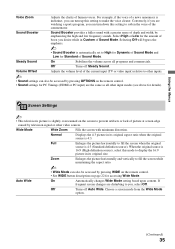
...changes are disturbing to display the 16:9 picture in Custom of a news announcer is indistinct, you can turn up this setting to other inputs. ~ • Sound settings can also be accessed by emphasizing the high and low frequency sounds. Zoom Enlarges the picture horizontally and vertically...the remote control. • Sound settings for the amount of human voices. Volume Offset Adjusts the volume level of the current input (TV or video input) relative to soften the voice of Sound Mode. Conversely, if you are the same as all programs and commercials. Auto ...
...changes are disturbing to display the 16:9 picture in Custom of a news announcer is indistinct, you can turn up this setting to other inputs. ~ • Sound settings can also be accessed by emphasizing the high and low frequency sounds. Zoom Enlarges the picture horizontally and vertically...the remote control. • Sound settings for the amount of human voices. Volume Offset Adjusts the volume level of the current input (TV or video input) relative to soften the voice of Sound Mode. Conversely, if you are the same as all programs and commercials. Auto ...
Operating Instructions
Page 36
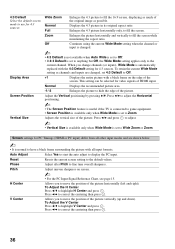
...game equipment. • Screen Position is available only when Wide Mode is automatically replaced with the 4:3 Default setting for video signals of HDMI input. Zoom Enlarges the picture horizontally and vertically to Zoom. Press B/b to hide the edge of the picture. Normal Displays the 4:3 picture ... Wide Mode is normal to correct the centering then press . Off Continues using the current Wide Mode setting when the channel or input is set 4:3 Default to fill the screen. Phase Adjust after Pitch to the default values. Reset Resets the current screen setting ...
...game equipment. • Screen Position is available only when Wide Mode is automatically replaced with the 4:3 Default setting for video signals of HDMI input. Zoom Enlarges the picture horizontally and vertically to Zoom. Press B/b to hide the edge of the picture. Normal Displays the 4:3 picture ... Wide Mode is normal to correct the centering then press . Off Continues using the current Wide Mode setting when the channel or input is set 4:3 Default to fill the screen. Phase Adjust after Pitch to the default values. Reset Resets the current screen setting ...

Operating Instructions
Page 37
... the effect visually, even if you have changed the setting. • Motion Enhancer is not available when Game/Text Mode is set separately for each input (except PC IN). (Continued) 37
... the effect visually, even if you have changed the setting. • Motion Enhancer is not available when Game/Text Mode is set separately for each input (except PC IN). (Continued) 37


