
Operating Instructions
Page 3
...Antenna System 13 HD Cable Box/HD Satellite Box 13 PC 15 Other Equipment 16 Using HDMI Control for BRAVIA Theatre Sync 17 4. Setting Up the Channel List - Initial Setup 18 Using the TV Features Remote Control and TV Controls/ Indicators ...Sony Video Equipment 25 Using Other Equipment with Your Remote Control 27 Using the Menus Adjusting TV Settings 30 Watching TV 30 Accessing the Equipment Connected to Your TV 30 Navigating through TV Home Menu on XMB 31 TV Setting Description 32 Product Support 32 Clock/Timers Settings 32 Picture Settings 32 Sound Settings 34 Screen Settings...
...Antenna System 13 HD Cable Box/HD Satellite Box 13 PC 15 Other Equipment 16 Using HDMI Control for BRAVIA Theatre Sync 17 4. Setting Up the Channel List - Initial Setup 18 Using the TV Features Remote Control and TV Controls/ Indicators ...Sony Video Equipment 25 Using Other Equipment with Your Remote Control 27 Using the Menus Adjusting TV Settings 30 Watching TV 30 Accessing the Equipment Connected to Your TV 30 Navigating through TV Home Menu on XMB 31 TV Setting Description 32 Product Support 32 Clock/Timers Settings 32 Picture Settings 32 Sound Settings 34 Screen Settings...
Operating Instructions
Page 5
... from the wall outlet and refer servicing to dangerous voltage or other hazards. s The picture quality may pop inside the lamp unit, but the lamp unit is made with a ... please contact your footing while installing the TV. If you to qualified service personnel. Unplug the set by your TV according to replace the lamp with a dry soft cloth. s Carry the TV...unplug the AC power cord from the screen, wipe it may be necessary to environmental considerations. KDS-50A3000 KDS-55A3000/ KDS-60A3000 Cleaning s Clean the rear cover area of the TV with a new one (not...
... from the wall outlet and refer servicing to dangerous voltage or other hazards. s The picture quality may pop inside the lamp unit, but the lamp unit is made with a ... please contact your footing while installing the TV. If you to qualified service personnel. Unplug the set by your TV according to replace the lamp with a dry soft cloth. s Carry the TV...unplug the AC power cord from the screen, wipe it may be necessary to environmental considerations. KDS-50A3000 KDS-55A3000/ KDS-60A3000 Cleaning s Clean the rear cover area of the TV with a new one (not...
Operating Instructions
Page 6
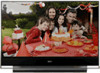
... of BRAVIA™ Thank you for information on your BRAVIA TV is displayed on an HDTV, you will see black bars on the sides. The 16:9 fills your new BRAVIA TV, you need access to a standard analog signal, you will notice a big difference. Picture Quality ...and Aspect Ratio You can use the Wide Mode function of HD programming and proper setup connections. The 1080 HD signals provide more about HDTV, visit: http://www.sony.com/HDTV The Four Steps to Full HD Experience: Set...
... of BRAVIA™ Thank you for information on your BRAVIA TV is displayed on an HDTV, you will see black bars on the sides. The 16:9 fills your new BRAVIA TV, you need access to a standard analog signal, you will notice a big difference. Picture Quality ...and Aspect Ratio You can use the Wide Mode function of HD programming and proper setup connections. The 1080 HD signals provide more about HDTV, visit: http://www.sony.com/HDTV The Four Steps to Full HD Experience: Set...
Operating Instructions
Page 7
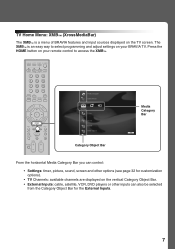
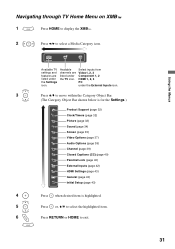
... Screen Video Options Category Object Bar Media Category Bar TV From the horizontal Media Category Bar you can control: • Settings: timer, picture, sound, screen and other options (see page 32 for the External Inputs. 7 Press the HOME button on the vertical Category Object Bar...the Category Object Bar for customization options). • TV Channels: available channels are displayed on your remote control to select programming and adjust settings on your BRAVIA TV. TV Home Menu: XMB™ (XrossMediaBar) The XMB™ is an easy way to access the XMB™. The XMB™...
... Screen Video Options Category Object Bar Media Category Bar TV From the horizontal Media Category Bar you can control: • Settings: timer, picture, sound, screen and other options (see page 32 for the External Inputs. 7 Press the HOME button on the vertical Category Object Bar...the Category Object Bar for customization options). • TV Channels: available channels are displayed on your remote control to select programming and adjust settings on your BRAVIA TV. TV Home Menu: XMB™ (XrossMediaBar) The XMB™ is an easy way to access the XMB™. The XMB™...
Operating Instructions
Page 10
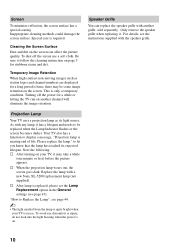
... non-moving images such as its expected lifespan. Speaker Grille You can affect the picture quality. As with a new Sony XL-5200 replacement lamp (not supplied). Please replace the lamp." s After lamp is replaced, please set the Lamp Replacement option in use a soft cloth. To avoid eye discomfort or injury... when the power is on your TV is in the General settings (see page 44. ~ • The light emitted from the lamp is nearing end of time, there may take a while (one minute or less) before the picture appears. This is required. For details, see the instructions supplied...
... non-moving images such as its expected lifespan. Speaker Grille You can affect the picture quality. As with a new Sony XL-5200 replacement lamp (not supplied). Please replace the lamp." s After lamp is replaced, please set the Lamp Replacement option in use a soft cloth. To avoid eye discomfort or injury... when the power is on your TV is in the General settings (see page 44. ~ • The light emitted from the lamp is nearing end of time, there may take a while (one minute or less) before the picture appears. This is required. For details, see the instructions supplied...
Operating Instructions
Page 12
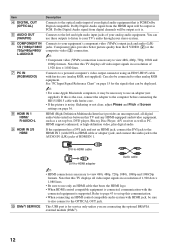
...IN 1. If this is the case, connect the adapter to the computer before connecting the HD15-HD15 cable with ferrite core. • If the picture is for the signals that this communication. • When connecting an HDMI control compatible audio system with HDMI jack, be necessary to use an ...215; 1,080 lines. This USB port is noisy, flickering or not clear, adjust Phase and Pitch of Screen settings on page 15 for service only unless you are connecting the optional BRAVIA external module (DMex). 12 Note that can use only an HDMI cable that is PCM/Dolby Digital compatible. Refer...
...IN 1. If this is the case, connect the adapter to the computer before connecting the HD15-HD15 cable with ferrite core. • If the picture is for the signals that this communication. • When connecting an HDMI control compatible audio system with HDMI jack, be necessary to use an ...215; 1,080 lines. This USB port is noisy, flickering or not clear, adjust Phase and Pitch of Screen settings on page 15 for service only unless you are connecting the optional BRAVIA external module (DMex). 12 Note that can use only an HDMI cable that is PCM/Dolby Digital compatible. Refer...
Operating Instructions
Page 13
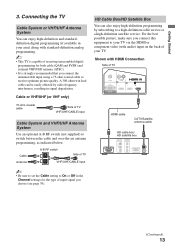
... (if available in your TV. Cable Antenna A-B RF switch A Side of TV B VHF/UHF/CABLE input ~ • Be sure to set the Cable setting to a high-definition cable service or a high-definition satellite service. HD Cable Box/HD Satellite Box You can be easily affected by subscribing to... R AUDIO 1 2 3 RGB PC IN HDMI cable CATV/Satellite antenna cable HD cable box/ HD satellite box (Continued) 13 For the best possible picture, make sure you connect the antenna/cable input using a 75-ohm coaxial cable to your TV via the HDMI or component video (with audio) input...
... (if available in your TV. Cable Antenna A-B RF switch A Side of TV B VHF/UHF/CABLE input ~ • Be sure to set the Cable setting to a high-definition cable service or a high-definition satellite service. HD Cable Box/HD Satellite Box You can be easily affected by subscribing to... R AUDIO 1 2 3 RGB PC IN HDMI cable CATV/Satellite antenna cable HD cable box/ HD satellite box (Continued) 13 For the best possible picture, make sure you connect the antenna/cable input using a 75-ohm coaxial cable to your TV via the HDMI or component video (with audio) input...
Operating Instructions
Page 15
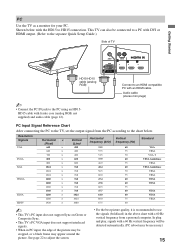
PC Input Signal Reference Chart After connecting the PC to the TV, set the output signal from a personal computer. This TV can also be ...the separate Quick Setup Guide.) Side of the picture may be cropped, or a black frame may appear around the picture. PC Use the TV as a monitor for your PC. Resolution Signals VGA SVGA XGA WXGA SXGA HDTV Horizontal × (Pixel) 640 ×...supplied) and audio cable (page 12). See page 22 to adjust the screen. • For the best picture quality, it is recommended to the chart below with the HD15 to the PC using an HD15HD15 cable with ...
PC Input Signal Reference Chart After connecting the PC to the TV, set the output signal from a personal computer. This TV can also be ...the separate Quick Setup Guide.) Side of the picture may be cropped, or a black frame may appear around the picture. PC Use the TV as a monitor for your PC. Resolution Signals VGA SVGA XGA WXGA SXGA HDTV Horizontal × (Pixel) 640 ×...supplied) and audio cable (page 12). See page 22 to adjust the screen. • For the best picture quality, it is recommended to the chart below with the HD15 to the PC using an HD15HD15 cable with ...
Operating Instructions
Page 18
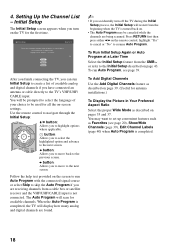
... channels. Press RETURN first then press either B/b on page 43. Initial Setup Step 1 of your choice to highlight options where applicable. Language settings will apply to the next screen. You will display how many analog and digital channels are receiving channels from a cable box or satellite receiver... as well as described on page 39. (Useful for antenna installations.) To Display the Picture in Your Preferred Aspect Ratio Select the proper Wide Mode as default audio for all the on-screen settings. To Run Initial Setup Again or Auto Program at a Later Time Select the Initial...
... channels. Press RETURN first then press either B/b on page 43. Initial Setup Step 1 of your choice to highlight options where applicable. Language settings will apply to the next screen. You will display how many analog and digital channels are receiving channels from a cable box or satellite receiver... as well as described on page 39. (Useful for antenna installations.) To Display the Picture in Your Preferred Aspect Ratio Select the proper Wide Mode as default audio for all the on-screen settings. To Run Initial Setup Again or Auto Program at a Later Time Select the Initial...
Operating Instructions
Page 20
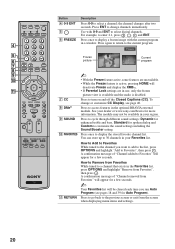
..."Remove from Favorites While tuned to the current program. 4 Freeze 5 Frozen Current 6 picture program 7 8 9 ~ 0 • With the Freeze feature active, some features are in use, only the frozen picture view is available and the audio is active, pressing HOME will deactivate Freeze and display ...your dealer or www.sony.com/bravia for Auto Program). Press to Favorites", then press . How to Add to Favorites While tuned to the channel you run Auto Program (see page 40. See your region. 9 SOUND Press to cycle through different sound settings: Dynamic for enhanced...
..."Remove from Favorites While tuned to the current program. 4 Freeze 5 Frozen Current 6 picture program 7 8 9 ~ 0 • With the Freeze feature active, some features are in use, only the frozen picture view is available and the audio is active, pressing HOME will deactivate Freeze and display ...your dealer or www.sony.com/bravia for Auto Program). Press to Favorites", then press . How to Add to Favorites While tuned to the channel you run Auto Program (see page 40. See your region. 9 SOUND Press to cycle through different sound settings: Dynamic for enhanced...
Operating Instructions
Page 21
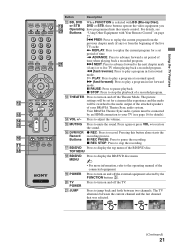
... of time when playing back a recorded program. ADVANCE: Press to advance forward a set period of time. H PLAY: Press to play a program in fast forward mode. qd THEATER Press to turn on and off the TV. MENU ~ • For ... a cinema-like experience and the audio qs will be switched to the audio output of the attached speakers of your BRAVIA Theatre Sync audio system. The picture settings will be set for details). Your BRAVIA Theatre Sync audio system must be connected qd by the FUNCTION buttons 3. wa M& NEXT: Press to advance forward to the...
... of time when playing back a recorded program. ADVANCE: Press to advance forward a set period of time. H PLAY: Press to play a program in fast forward mode. qd THEATER Press to turn on and off the TV. MENU ~ • For ... a cinema-like experience and the audio qs will be switched to the audio output of the attached speakers of your BRAVIA Theatre Sync audio system. The picture settings will be set for details). Your BRAVIA Theatre Sync audio system must be connected qd by the FUNCTION buttons 3. wa M& NEXT: Press to advance forward to the...
Operating Instructions
Page 22
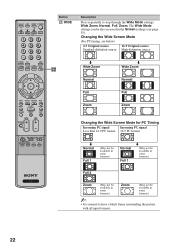
...formats.) Normal Full 1 m (May not be available in some formats.) Full 2 Zoom (May not be available in the Screen settings (see page 35). The Wide Mode settings can be available in some formats.) Zoom (May not be also accessed in some formats.) ~ • It is normal to step... through the Wide Mode settings: Wide Zoom, Normal, Full, Zoom. Button ws WIDE Description Press repeatedly to have a black frame surrounding the picture with all ...
...formats.) Normal Full 1 m (May not be available in some formats.) Full 2 Zoom (May not be available in the Screen settings (see page 35). The Wide Mode settings can be available in some formats.) Zoom (May not be also accessed in some formats.) ~ • It is normal to step... through the Wide Mode settings: Wide Zoom, Normal, Full, Zoom. Button ws WIDE Description Press repeatedly to have a black frame surrounding the picture with all ...

Operating Instructions
Page 23
...see "Using Other Equipment with Your Remote Control" on the current mode.) The picture modes can also be accessed in the Picture settings. Product Support Clock/Timers wk CH +/- Press repeatedly to toggle through the available picture modes: Vivid, Standard, Cinema, Photo, Custom. (Available options depend on ... on -screen cursor. To scan quickly through channels. For details, see Picture settings on input and content. wl F1/F2 Sound Screen Video Options TV Press HOME again to move the on setting up the External Inputs labels, including the Skip feature. Press to select ...
...see "Using Other Equipment with Your Remote Control" on the current mode.) The picture modes can also be accessed in the Picture settings. Product Support Clock/Timers wk CH +/- Press repeatedly to toggle through the available picture modes: Vivid, Standard, Cinema, Photo, Custom. (Available options depend on ... on -screen cursor. To scan quickly through channels. For details, see Picture settings on input and content. wl F1/F2 Sound Screen Video Options TV Press HOME again to move the on setting up the External Inputs labels, including the Skip feature. Press to select ...
Operating Instructions
Page 28
...or TOP MENU Play H Stop x Pause X Search the picture forward or backward M or m during tape playback) Index ... F1 Select the DVD F2 Play H Stop x Pause X Search the picture forward or backward M or m during playback Move highlight (cursor) and ...Select a track directly 0-9, ENT Play H Stop x Pause X Search the picture forward or backward M or m during playback Specify the previous chapter/track Specify...control to the previous display Press ... . > RETURN 5.1ch DVD AV System (Sony DAV) To Do This ... To Do This ... Specify the previous chapter/track Specify...
...or TOP MENU Play H Stop x Pause X Search the picture forward or backward M or m during tape playback) Index ... F1 Select the DVD F2 Play H Stop x Pause X Search the picture forward or backward M or m during playback Move highlight (cursor) and ...Select a track directly 0-9, ENT Play H Stop x Pause X Search the picture forward or backward M or m during playback Specify the previous chapter/track Specify...control to the previous display Press ... . > RETURN 5.1ch DVD AV System (Sony DAV) To Do This ... To Do This ... Specify the previous chapter/track Specify...
Operating Instructions
Page 31
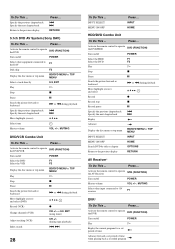
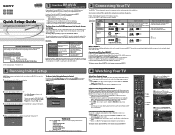
... Inputs icon. 3 Press V/v to move within the Category Object Bar. (The Category Object Bar shown below is for the Settings.) Product Support (page 32) Clock/Timers (page 32) Picture (page 32) Sound (page 34) Screen (page 35) Video Options (page 37) Audio Options (page 38) Channel (page... 39) CC Closed Captions (CC) (page 40) Parental Lock (page 40) External Inputs (page 42) HDMI Settings (page 43) General (page 43) Initial...
... Inputs icon. 3 Press V/v to move within the Category Object Bar. (The Category Object Bar shown below is for the Settings.) Product Support (page 32) Clock/Timers (page 32) Picture (page 32) Sound (page 34) Screen (page 35) Video Options (page 37) Audio Options (page 38) Channel (page... 39) CC Closed Captions (CC) (page 40) Parental Lock (page 40) External Inputs (page 42) HDMI Settings (page 43) General (page 43) Initial...
Operating Instructions
Page 32
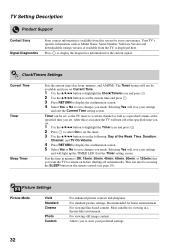
...off automatically. After this screen for your preferred settings. 32 Picture Settings Picture Mode Vivid Standard Cinema Photo Custom For enhanced picture contrast and sharpness. Recommended for the current signal. Clock/Timers Settings Current Time Timer Sleep Timer Sets the current time (day, hour, minutes, and... to remain on before shutting off at the specified time you set using the SLEEP button on the remote control (see page 19). TV Setting Description Product Support Contact Sony Signal Diagnostics Sony contact information is available from the TV, is displayed here....
...off automatically. After this screen for your preferred settings. 32 Picture Settings Picture Mode Vivid Standard Cinema Photo Custom For enhanced picture contrast and sharpness. Recommended for the current signal. Clock/Timers Settings Current Time Timer Sleep Timer Sets the current time (day, hour, minutes, and... to remain on before shutting off at the specified time you set using the SLEEP button on the remote control (see page 19). TV Setting Description Product Support Contact Sony Signal Diagnostics Sony contact information is available from the TV, is displayed here....

Operating Instructions
Page 33
...Reduces the noise level of brightness. Useful for still pictures. Resets the current Picture Mode setting to directly toggle the modes. • The options for Picture Mode may differ depending on the Video/Photo Optimizer setting (see page 38). Auto 2:Recommended option for viewing...video. High Density Creates a high-resolution picture with 4 x density, for viewing programs that often change between bright scenes and low light setting scenes. Auto 1, 2 Automatically detects the brightness of the screen. Brightens or darkens the picture. Neutral Gives the white colors a neutral...
...Reduces the noise level of brightness. Useful for still pictures. Resets the current Picture Mode setting to directly toggle the modes. • The options for Picture Mode may differ depending on the Video/Photo Optimizer setting (see page 38). Auto 2:Recommended option for viewing...video. High Density Creates a high-resolution picture with 4 x density, for viewing programs that often change between bright scenes and low light setting scenes. Auto 1, 2 Automatically detects the brightness of the screen. Brightens or darkens the picture. Neutral Gives the white colors a neutral...
Operating Instructions
Page 34
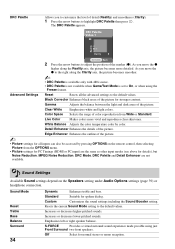
.... Standard Suitable for normal stereo or mono reception. Black Corrector Enhances black areas of the picture. Edge Enhancer Enhances the outline of the picture. ~ • Picture settings for all the advanced settings to the default values. Increases or decreases lower-pitched sounds. The DRC Palette appears. S-... DRC Palette then press . DRC Palette Allows you to customize the level of color reproduction from the OPTIONS menu. • Picture settings for PC Timings (HDMI or PC input) are the same as other input modes (see above for details), but Noise Reduction...
.... Standard Suitable for normal stereo or mono reception. Black Corrector Enhances black areas of the picture. Edge Enhancer Enhances the outline of the picture. ~ • Picture settings for all the advanced settings to the default values. Increases or decreases lower-pitched sounds. The DRC Palette appears. S-... DRC Palette then press . DRC Palette Allows you to customize the level of color reproduction from the OPTIONS menu. • Picture settings for PC Timings (HDMI or PC input) are the same as other input modes (see above for details), but Noise Reduction...
Operating Instructions
Page 47
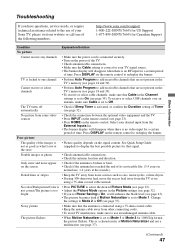
... following numbers: http://www.sony.com/tvsupport 1-800-222-SONY(7669) for US Support 1-877-899-SONY(7669) for Canadian Support Condition Explanation/Solution No picture Cannot receive any channels • Make sure the power cord is connected securely. • Turn on the screen • Check if the antenna is set to Mode 1. TV is...
... following numbers: http://www.sony.com/tvsupport 1-800-222-SONY(7669) for US Support 1-877-899-SONY(7669) for Canadian Support Condition Explanation/Solution No picture Cannot receive any channels • Make sure the power cord is connected securely. • Turn on the screen • Check if the antenna is set to Mode 1. TV is...
Quick Setup Guide
Page 1
...Set Clock Set Closed Captions (CC) Set Parental Lock Show/Hide Channels Label Inputs (skip inputs) Speakers On/Off For details, refer to your BRAVIA™ Operating Instruction Manual for more about HDTV, visit www.sony.com/HDTV...to watch an old classic movie in U.S.A. 1 BRAVIA Your New ™ SXRD Projection HDTV Congratulations! This chart shows the different signal types and...Picture or Sound. In this guide for more . OR ■ Press INPUT repeatedly until connection setup is highlighted on-screen. The 16:9 aspect ratio looks perfect on your TV. KDS-50A3000 KDS-55A3000 KDS...
...Set Clock Set Closed Captions (CC) Set Parental Lock Show/Hide Channels Label Inputs (skip inputs) Speakers On/Off For details, refer to your BRAVIA™ Operating Instruction Manual for more about HDTV, visit www.sony.com/HDTV...to watch an old classic movie in U.S.A. 1 BRAVIA Your New ™ SXRD Projection HDTV Congratulations! This chart shows the different signal types and...Picture or Sound. In this guide for more . OR ■ Press INPUT repeatedly until connection setup is highlighted on-screen. The 16:9 aspect ratio looks perfect on your TV. KDS-50A3000 KDS-55A3000 KDS...


