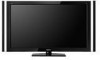
Operating Instructions
Page 2
... television reception, which the receiver is no event shall Gemstar-TV Guide International, Inc. KDL- HDMI, the HDMI logo and High-Definition Multimedia Interface are trademarks or registered trademarks of Conformity Trade Name: SONY Model: KDL-40XBR7/KDL-70XBR7/ KDL-46XBR8/KDL-55XBR8 Responsible Party: Sony Electronics Inc. Owner's Record The model and serial numbers are located at the rear of the FCC rules. Record these materials may cause undesired operation...
... television reception, which the receiver is no event shall Gemstar-TV Guide International, Inc. KDL- HDMI, the HDMI logo and High-Definition Multimedia Interface are trademarks or registered trademarks of Conformity Trade Name: SONY Model: KDL-40XBR7/KDL-70XBR7/ KDL-46XBR8/KDL-55XBR8 Responsible Party: Sony Electronics Inc. Owner's Record The model and serial numbers are located at the rear of the FCC rules. Record these materials may cause undesired operation...
Operating Instructions
Page 3
... http://productregistration.sony.com Canada http://www.sonystyle.ca/registration 3 Installing the TV 6 Carrying the TV 6 Preparation for Table-Top Stand 6 Preparation for Wall-Mount Bracket 7 When Installing the TV Against a Wall or Enclosed Area 7 Securing the TV 8 Bundling the Connecting Cables 9 Connecting the AC Power Cord for HDMI ....36 Using DIGITAL MEDIA PORT Adapter 36 Using P&P and PIP Features 37 To Enter P&P and PIP 37 To Change Inputs or Channels (P&P) ..........37 To Change Channels (PIP 37 To Exit from P&P and PIP 37 Using TV Settings Media Category...
... http://productregistration.sony.com Canada http://www.sonystyle.ca/registration 3 Installing the TV 6 Carrying the TV 6 Preparation for Table-Top Stand 6 Preparation for Wall-Mount Bracket 7 When Installing the TV Against a Wall or Enclosed Area 7 Securing the TV 8 Bundling the Connecting Cables 9 Connecting the AC Power Cord for HDMI ....36 Using DIGITAL MEDIA PORT Adapter 36 Using P&P and PIP Features 37 To Enter P&P and PIP 37 To Change Inputs or Channels (P&P) ..........37 To Change Channels (PIP 37 To Exit from P&P and PIP 37 Using TV Settings Media Category...
Operating Instructions
Page 5
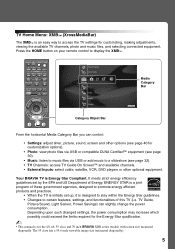
... horizontal Media Category Bar you can slightly change the power consumption. TV Guide, Picture/Sound, Light Sensor, Power Savings) can control: • Settings: adjust timer, picture, sound, screen and other options (see page 32). • TV Channels: access TV Guide On Screen™ and available channels. • External Inputs: select cable, satellite, VCR, DVD players or other optional equipment. The 55 class has a 54.6 inch viewable image size (measured diagonally). 5 Your BRAVIA TV is for customization options). • Photo: view photo files via USB or compatible DLNA...
... horizontal Media Category Bar you can slightly change the power consumption. TV Guide, Picture/Sound, Light Sensor, Power Savings) can control: • Settings: adjust timer, picture, sound, screen and other options (see page 32). • TV Channels: access TV Guide On Screen™ and available channels. • External Inputs: select cable, satellite, VCR, DVD players or other optional equipment. The 55 class has a 54.6 inch viewable image size (measured diagonally). 5 Your BRAVIA TV is for customization options). • Photo: view photo files via USB or compatible DLNA...
Operating Instructions
Page 8
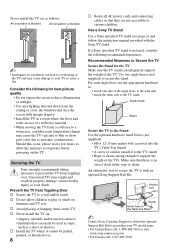
... all AC power cords and connecting cables so that can easily be pulled, pushed, or knocked over . Use two angle braces (not supplied) to obtain the optional Support Belt Kit by providing your TV or cause a fire. Anchor bolt Screw Screw hole on furniture and TV sets. Consider the following recommended measures. Use a Sony TV Stand Use a Sony specified TV stand (see page 2) and follow the instruction manual provided with an optional Sony Support Belt...
... all AC power cords and connecting cables so that can easily be pulled, pushed, or knocked over . Use two angle braces (not supplied) to obtain the optional Support Belt Kit by providing your TV or cause a fire. Anchor bolt Screw Screw hole on furniture and TV sets. Consider the following recommended measures. Use a Sony TV Stand Use a Sony specified TV stand (see page 2) and follow the instruction manual provided with an optional Sony Support Belt...
Operating Instructions
Page 11
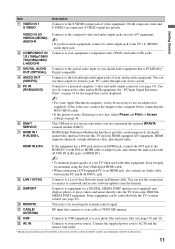
... high-definition video, plus digital audio. Dolby and the double-D symbol are trademarks of your TV when used with DVI-to-HDMI cable or adapter) jack, and connect the audio jack to the AUDIO IN (L/R) jacks of HDMI IN 1. ~ • To maintain picture quality of Dolby Laboratories. 11 Connects to the optical audio input of Screen settings on page 46. This USB port is for the signals that is for receiving the external control signal. HDMI IN...
... high-definition video, plus digital audio. Dolby and the double-D symbol are trademarks of your TV when used with DVI-to-HDMI cable or adapter) jack, and connect the audio jack to the AUDIO IN (L/R) jacks of HDMI IN 1. ~ • To maintain picture quality of Dolby Laboratories. 11 Connects to the optical audio input of Screen settings on page 46. This USB port is for the signals that is for receiving the external control signal. HDMI IN...
Operating Instructions
Page 14
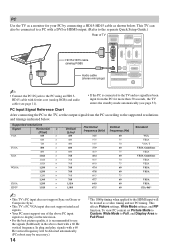
... the supported resolutions and timings indicated below . In plug and play, signals with a 60 Hz vertical frequency. PC Use the TV as a monitor for more than 30 seconds, the TV enters the standby mode automatically (see page 53). This TV can also be connected to a PC with a DVI or HDMI output. (Refer to the separate Quick Setup Guide.) Rear of the above PC input signals to display on the television. • For the best picture quality...
... the supported resolutions and timings indicated below . In plug and play, signals with a 60 Hz vertical frequency. PC Use the TV as a monitor for more than 30 seconds, the TV enters the standby mode automatically (see page 53). This TV can also be connected to a PC with a DVI or HDMI output. (Refer to the separate Quick Setup Guide.) Rear of the above PC input signals to display on the television. • For the best picture quality...
Operating Instructions
Page 16
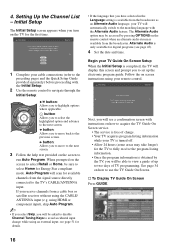
... the next screen. 3 Follow the help text provided on how to run Auto Program. Setting Up the Channel List - Highlight a choice and press to the TV's CABLE/ANTENNA input. B button: Allows you will scan for the TV to fully receive the program listing information. • Once the program information is available from the signal source directly connected to continue. Alternate Audio is free of 7 Please select a language. When prompted on the remote control when an...
... the next screen. 3 Follow the help text provided on how to run Auto Program. Setting Up the Channel List - Highlight a choice and press to the TV's CABLE/ANTENNA input. B button: Allows you will scan for the TV to fully receive the program listing information. • Once the program information is available from the signal source directly connected to continue. Alternate Audio is free of 7 Please select a language. When prompted on the remote control when an...

Operating Instructions
Page 19
... picture settings will be accessed in blue (see page 51). The sound modes can operate video equipment programmed to turn on all Control for details). Button 1 DISPLAY 2 LIGHT 3 FUNCTION Buttons 4 Equipment Control/ BRAVIA Sync 5 SOUND 6 DMex Description Press once to the audio output of the attached speakers of the live TV when playing back a recorded program. You must be connected by an HDMI connection to control the connected equipment with channel/program information you are watching. N PLAY: Press to show which external...
... picture settings will be accessed in blue (see page 51). The sound modes can operate video equipment programmed to turn on all Control for details). Button 1 DISPLAY 2 LIGHT 3 FUNCTION Buttons 4 Equipment Control/ BRAVIA Sync 5 SOUND 6 DMex Description Press once to the audio output of the attached speakers of the live TV when playing back a recorded program. You must be connected by an HDMI connection to control the connected equipment with channel/program information you are watching. N PLAY: Press to show which external...

Operating Instructions
Page 22
... setting up the External Inputs labels. Press to display the list of convenient functions and menu shortcuts. Press to Favorites/ Remove from Favorites MTS Alternate Audio Digital Rating Background TV Motion Enhancer Device Control Device Control (Menu) for Closed Captions (CC): On, Off, and On with the current program in the currently tuned digital program. 22 Menu Item Picture Adjustments Sound Adjustments P&P or PIP Exit P&P or Exit PIP Speakers Audio Swap Screen Add to display a list of External Inputs and TV mode. Freeze Frozen picture...
... setting up the External Inputs labels. Press to display the list of convenient functions and menu shortcuts. Press to Favorites/ Remove from Favorites MTS Alternate Audio Digital Rating Background TV Motion Enhancer Device Control Device Control (Menu) for Closed Captions (CC): On, Off, and On with the current program in the currently tuned digital program. 22 Menu Item Picture Adjustments Sound Adjustments P&P or PIP Exit P&P or Exit PIP Speakers Audio Swap Screen Add to display a list of External Inputs and TV mode. Freeze Frozen picture...
Operating Instructions
Page 28
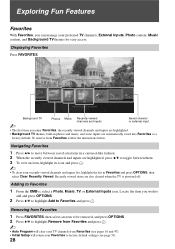
... icon and press . ~ • To clear your preferred TV channels, External Inputs, Photo content, Music content, and Background TV themes for easy access. Background TV Photos Music Recently viewed channels and inputs Saved channel or external input ~ • The first time you enter Favorites, the recently viewed channels and inputs are also cleared when the TV is powered off. Adding to factory default settings (see page 53). 28 Exploring Fun Features Favorites...
... icon and press . ~ • To clear your preferred TV channels, External Inputs, Photo content, Music content, and Background TV themes for easy access. Background TV Photos Music Recently viewed channels and inputs Saved channel or external input ~ • The first time you enter Favorites, the recently viewed channels and inputs are also cleared when the TV is powered off. Adding to factory default settings (see page 53). 28 Exploring Fun Features Favorites...
Operating Instructions
Page 36
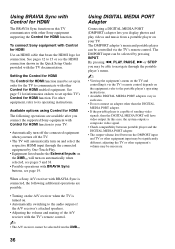
... TV will automatically turn on how to the audio output of the A/V receiver's attached speakers. • Adjusting the volume and muting of sending video signals, then the DIGITAL MEDIA PORT will turn on and select the respective HDMI input through the portable player's menu. ~ • Viewing the equipment's menu on the TV and controlling it via the TV's remote control depends on this case, the system outputs a composite video signal. • Check compatibility between portable player and the DIGITAL MEDIA PORT adapter. • The output volume...
... TV will automatically turn on how to the audio output of the A/V receiver's attached speakers. • Adjusting the volume and muting of sending video signals, then the DIGITAL MEDIA PORT will turn on and select the respective HDMI input through the portable player's menu. ~ • Viewing the equipment's menu on the TV and controlling it via the TV's remote control depends on this case, the system outputs a composite video signal. • Check compatibility between portable player and the DIGITAL MEDIA PORT adapter. • The output volume...

Operating Instructions
Page 39
... access under HDMI 1-4 the TV icon. TV Guide On Select inputs from Screen and CTRL: HDMI (Control for HDMI) available Video 1-3 channels are listed under the External Inputs icon. 3 Press V/v to move within the Category Object Bar. (The Category Object Bar shown below is for Settings.) Product Support (page 40) Clock/Timers (page 40) Picture (page 41) Sound (page 44) Screen (page 45) Channel (page 47) CC Closed Captions (CC) (page 48) Parental Lock (page 48) External Inputs...
... access under HDMI 1-4 the TV icon. TV Guide On Select inputs from Screen and CTRL: HDMI (Control for HDMI) available Video 1-3 channels are listed under the External Inputs icon. 3 Press V/v to move within the Category Object Bar. (The Category Object Bar shown below is for Settings.) Product Support (page 40) Clock/Timers (page 40) Picture (page 41) Sound (page 44) Screen (page 45) Channel (page 47) CC Closed Captions (CC) (page 48) Parental Lock (page 48) External Inputs...
Operating Instructions
Page 40
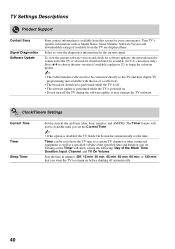
... the software update. ~ • The Cable/Antenna cable needs to be set the Current Time. ~ • If the option is powered on. • Do not turn off the TV during the software update, it may damage the TV software. Timer can be connected directly to the TV and have the TV tune to view the diagnostics information for U.S. Select to a certain TV channel or other connected equipment as well as Model Name, Serial Number, Software Version and downloadable...
... the software update. ~ • The Cable/Antenna cable needs to be set the Current Time. ~ • If the option is powered on. • Do not turn off the TV during the software update, it may damage the TV software. Timer can be connected directly to the TV and have the TV tune to view the diagnostics information for U.S. Select to a certain TV channel or other connected equipment as well as Model Name, Serial Number, Software Version and downloadable...
Operating Instructions
Page 43
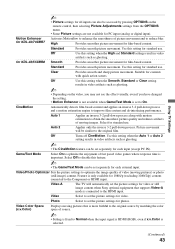
.... Using TV Settings ~ • Picture settings for all inputs can also be accessed by matching the color space of source. ~ • Setting is fixed to Normal when the input signal is HDMI (RGB), even if x.v.Color is selected. (Continued) 43 Standard Provides smooth picture movement. Use this setting when the High and Standard settings result in video artifacts such as ghosting. ~ • Depending on the remote control, then selecting Picture Adjustments settings from the OPTIONS menu...
.... Using TV Settings ~ • Picture settings for all inputs can also be accessed by matching the color space of source. ~ • Setting is fixed to Normal when the input signal is HDMI (RGB), even if x.v.Color is selected. (Continued) 43 Standard Provides smooth picture movement. Use this setting when the High and Standard settings result in video artifacts such as ghosting. ~ • Depending on the remote control, then selecting Picture Adjustments settings from the OPTIONS menu...
Operating Instructions
Page 46
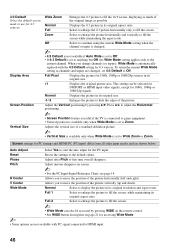
... Mode is automatically replaced with PC signal connected to HDMI input. 46 Phase Adjust after Pitch to fill the screen while maintaining the aspect ratio. Full Select to enlarge the 4:3 picture horizontally only, to display the picture in its original size. -1/-2 Enlarges the picture to start the auto adjust for the PC input. Wide Mode Normal Select to fill the screen. When you change channels (or inputs), Wide Mode is set to Zoom. Screen settings...
... Mode is automatically replaced with PC signal connected to HDMI input. 46 Phase Adjust after Pitch to fill the screen while maintaining the aspect ratio. Full Select to enlarge the 4:3 picture horizontally only, to display the picture in its original size. -1/-2 Enlarges the picture to start the auto adjust for the PC input. Wide Mode Normal Select to fill the screen. When you change channels (or inputs), Wide Mode is set to Zoom. Screen settings...

Operating Instructions
Page 48
... U.S.A. To View Blocked Programs Press ENT when tuned to enter a four-digit password. Password Country Use 0-9 button on the TV. Analog CC For the basic analog (EIA-608) closed caption options. Select from Service 1-6 and CC1-4 (advanced digital closed captions when the TV is also available with Muting directly by entering the Parental Lock setting with Muting Automatically displays closed caption options). Highlight and select Change Password, then enter the new password. ~ • You need your password for...
... U.S.A. To View Blocked Programs Press ENT when tuned to enter a four-digit password. Password Country Use 0-9 button on the TV. Analog CC For the basic analog (EIA-608) closed caption options. Select from Service 1-6 and CC1-4 (advanced digital closed captions when the TV is also available with Muting directly by entering the Parental Lock setting with Muting Automatically displays closed caption options). Highlight and select Change Password, then enter the new password. ~ • You need your password for...
Operating Instructions
Page 51
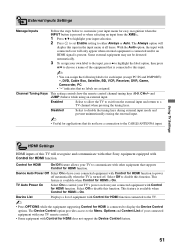
... each input (except PC IN and DMPORT): -, DVD, Cable Box, Satellite, BD, VCR, Receiver, DVR, Game, Camcorder, PC. • "-" indicates that is turned off automatically when the TV is connected to display the Device Control options. Disabled Select to disable the tuning keys during external input mode and prevent unintentionally exiting the external input. ~ • Useful for applications that supports Control for HDMI function. Select Off to the CABLE/ANTENNA input. Select Off to a TV channel when...
... each input (except PC IN and DMPORT): -, DVD, Cable Box, Satellite, BD, VCR, Receiver, DVR, Game, Camcorder, PC. • "-" indicates that is turned off automatically when the TV is connected to display the Device Control options. Disabled Select to disable the tuning keys during external input mode and prevent unintentionally exiting the external input. ~ • Useful for applications that supports Control for HDMI function. Select Off to the CABLE/ANTENNA input. Select Off to a TV channel when...
Operating Instructions
Page 53
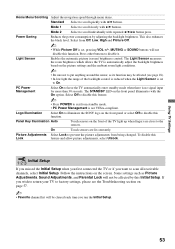
... POWER to put anything around the sensor, as Picture Adjustments, Sound Adjustments, and Parental Lock will not be affected (see the Troubleshooting section on the front panel or select Off to scan all receivable channels, select Initial Setup. If you run the Initial Setup. 53 On Touch sensors are close to disable it. Power Saving Reduces the power consumption by this function. Picture Adjustments Select Lock to On. Mode 1 Select to scroll individually with V/v buttons...
... POWER to put anything around the sensor, as Picture Adjustments, Sound Adjustments, and Parental Lock will not be affected (see the Troubleshooting section on the front panel or select Off to scan all receivable channels, select Initial Setup. If you run the Initial Setup. 53 On Touch sensors are close to disable it. Power Saving Reduces the power consumption by this function. Picture Adjustments Select Lock to On. Mode 1 Select to scroll individually with V/v buttons...

Operating Instructions
Page 55
... LAN cable/ listed under the Photo icon, connection or your network is not output from the screen (see page 20). • Set Speakers to use an undamaged antenna cable. See Network Setup on page 52. If all of the TV's volume control. • When using a 75-ohm coaxial cable. • Keep the antenna cable away from other connecting cords. • To avoid TV interference, make sure to TV Speakers in the Sound settings (see page 22). See Network Setup...
... LAN cable/ listed under the Photo icon, connection or your network is not output from the screen (see page 20). • Set Speakers to use an undamaged antenna cable. See Network Setup on page 52. If all of the TV's volume control. • When using a 75-ohm coaxial cable. • Keep the antenna cable away from other connecting cords. • To avoid TV interference, make sure to TV Speakers in the Sound settings (see page 22). See Network Setup...
Operating Instructions
Page 60
... S S VIDEO jack 11 Screen Position 46 Server Diagnostics 52 Settings Channel 47 Clock/Timers 40 Closed Captions (CC) 48 External Inputs 51 General Setup 52 HDMI Settings 51 Initial Setup 53 Network 52 Parental Lock 48 Picture 41 Product Support 40 Screen 45 Sound 44 Show/Hide Channels 47 Show/Hide Servers 52 Signal Diagnostics 40 Signal Type 47 Sleep Timer 40 Software Update 40 Sound Adjustments 32, 44 SOUND button 19 Speaker 24 Speakers 32, 45 STANDBY LED 24 Start Slideshow 31 button 23 Channel Block 49 Channel...
... S S VIDEO jack 11 Screen Position 46 Server Diagnostics 52 Settings Channel 47 Clock/Timers 40 Closed Captions (CC) 48 External Inputs 51 General Setup 52 HDMI Settings 51 Initial Setup 53 Network 52 Parental Lock 48 Picture 41 Product Support 40 Screen 45 Sound 44 Show/Hide Channels 47 Show/Hide Servers 52 Signal Diagnostics 40 Signal Type 47 Sleep Timer 40 Software Update 40 Sound Adjustments 32, 44 SOUND button 19 Speaker 24 Speakers 32, 45 STANDBY LED 24 Start Slideshow 31 button 23 Channel Block 49 Channel...


