Operating Instructions
Page 2
... the screen to safety during the installation. Operation is subject to the following WALL-MOUNT BRACKET. s Use the AC power cord specified by your dealer. s To prevent internal heat buildup, do not use spot lighting directed down from a cold to a warm location, or if the room temperature changes suddenly, the picture may be installed near an easily accessible power outlet. s Avoid operating the TV at the rear of digital cable television programming in this manual...
... the screen to safety during the installation. Operation is subject to the following WALL-MOUNT BRACKET. s Use the AC power cord specified by your dealer. s To prevent internal heat buildup, do not use spot lighting directed down from a cold to a warm location, or if the room temperature changes suddenly, the picture may be installed near an easily accessible power outlet. s Avoid operating the TV at the rear of digital cable television programming in this manual...
Operating Instructions
Page 4
..., it . USE AC power cord Observe the followings to exchange it may result in this manual will prevent damage to the receiver due to work correctly. To disconnect the TV set completely, pull the plug from the AC power source when the TV set is damaged, it from the wall outlet first. Overloading This TV set to be connected to rain or moisture, does not operate normally, or...
..., it . USE AC power cord Observe the followings to exchange it may result in this manual will prevent damage to the receiver due to work correctly. To disconnect the TV set completely, pull the plug from the AC power source when the TV set is damaged, it from the wall outlet first. Overloading This TV set to be connected to rain or moisture, does not operate normally, or...
Operating Instructions
Page 5
... or popping sounds, particularly when being turned on the LCD panel and the frame around the screen. Optional equipment Do not install optional components too close proximity to the TV set. Be sure the antenna system is positioned in close to any items susceptible to the National Electrical Code, ANSI/NFPA 70 Ground clamps Antenna lead-in wire Electric service equipment NEC: National Electrical Code Antenna discharge unit...
... or popping sounds, particularly when being turned on the LCD panel and the frame around the screen. Optional equipment Do not install optional components too close proximity to the TV set. Be sure the antenna system is positioned in close to any items susceptible to the National Electrical Code, ANSI/NFPA 70 Ground clamps Antenna lead-in wire Electric service equipment NEC: National Electrical Code Antenna discharge unit...

Operating Instructions
Page 9
... Remote Control ...20 Programming the Remote Control 24 Using Other Equipment with Your Remote Control 26 TV Controls...29 Using the Menus Overview of 10 Connecting the TV ...10 Cable System and VHF/UHF Antenna System 11 HD Cable Box/HD Satellite Box 11 Satellite Receiver and Cable/Antenna 12 VCR, Cable and Antenna 13 When Connecting to the World of MENU ...30 Picture Settings...32 Sound Settings...35 Screen Settings ...37 Channel Settings...39 Parental Lock Settings 40 Setup Settings ...43 PC Settings ...46 Other Information Troubleshooting...48 PC Input Signal...
... Remote Control ...20 Programming the Remote Control 24 Using Other Equipment with Your Remote Control 26 TV Controls...29 Using the Menus Overview of 10 Connecting the TV ...10 Cable System and VHF/UHF Antenna System 11 HD Cable Box/HD Satellite Box 11 Satellite Receiver and Cable/Antenna 12 VCR, Cable and Antenna 13 When Connecting to the World of MENU ...30 Picture Settings...32 Sound Settings...35 Screen Settings ...37 Channel Settings...39 Parental Lock Settings 40 Setup Settings ...43 PC Settings ...46 Other Information Troubleshooting...48 PC Input Signal...
Operating Instructions
Page 10
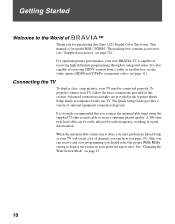
... receive and view programming you for model KDL-70XBR3. For optimum picture performance, your TV must perform an Initial Setup so your TV will create a list of channels you connect the antenna/cable input using the supplied 75-ohm coaxial cable to display the picture in the separate Quick Setup Guide accompanied with your TV, follow the basic connections provided in signal deterioration. Connecting the TV To display clear, crisp pictures, your new BRAVIA TV is also capable of receiving HDTV content from a cable or satellite box...
... receive and view programming you for model KDL-70XBR3. For optimum picture performance, your TV must perform an Initial Setup so your TV will create a list of channels you connect the antenna/cable input using the supplied 75-ohm coaxial cable to display the picture in the separate Quick Setup Guide accompanied with your TV, follow the basic connections provided in signal deterioration. Connecting the TV To display clear, crisp pictures, your new BRAVIA TV is also capable of receiving HDTV content from a cable or satellite box...

Operating Instructions
Page 15
...Connects the supplied AC power cord. 6 VIDEO IN 1 S VIDEO Connects to the S VIDEO output jack of digital audio equipment that has S VIDEO. Getting Started Item Description Getting Started HDMI-to-DVI cable HDMI adapter Audio cable ✍ Be sure to use only an HDMI cable that can use an adapter (not supplied). If this TV displays all format types of picture in a resolution of Dolby Laboratories. 15 qa DIGITAL OUT (OPTICAL) Connects to the TV's HDMI input. Component (1080p/1080i/720p video provides better picture quality than composite video (7). 7 VIDEO...
...Connects the supplied AC power cord. 6 VIDEO IN 1 S VIDEO Connects to the S VIDEO output jack of digital audio equipment that has S VIDEO. Getting Started Item Description Getting Started HDMI-to-DVI cable HDMI adapter Audio cable ✍ Be sure to use only an HDMI cable that can use an adapter (not supplied). If this TV displays all format types of picture in a resolution of Dolby Laboratories. 15 qa DIGITAL OUT (OPTICAL) Connects to the TV's HDMI input. Component (1080p/1080i/720p video provides better picture quality than composite video (7). 7 VIDEO...
Operating Instructions
Page 18
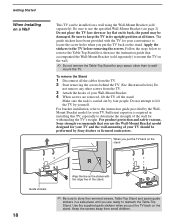
... reasons, Sony strongly recommends that accompanied the Wall-Mount Bracket (sold separately). Use the supplied guide stickers when you put the TV back on the stand R R Guide stickers Align the line on a wall using the Wall-Mount Bracket (sold separately) to mount the TV on its upright position at all the cables from the TV. 2 Start removing the screws behind the TV. (See illustration below to remove the Table-Top Stand first, then use the instruction guide that...
... reasons, Sony strongly recommends that accompanied the Wall-Mount Bracket (sold separately). Use the supplied guide stickers when you put the TV back on the stand R R Guide stickers Align the line on a wall using the Wall-Mount Bracket (sold separately) to mount the TV on its upright position at all the cables from the TV. 2 Start removing the screws behind the TV. (See illustration below to remove the Table-Top Stand first, then use the instruction guide that...
Operating Instructions
Page 20
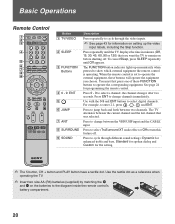
.../UHF input and the CABLE input. See page 24 for information on before shutting off . Press ENT to the diagram inside the remote control's battery compartment. , 20 the channel changes after two seconds. Use with the 0-9 and ENT buttons to turn this feature off . Press to select TruSurround XT audio effect or Off to select digital channels. Basic Operations Remote Control Button 1 TV/VIDEO 2 SLEEP 3 FUNCTION Buttons 4 0 - 9, ENT 5 6 JUMP 7 ANT 8 SURROUND 9 SOUND Description...
.../UHF input and the CABLE input. See page 24 for information on before shutting off . Press ENT to the diagram inside the remote control's battery compartment. , 20 the channel changes after two seconds. Use with the 0-9 and ENT buttons to turn this feature off . Press to select TruSurround XT audio effect or Off to select digital channels. Basic Operations Remote Control Button 1 TV/VIDEO 2 SLEEP 3 FUNCTION Buttons 4 0 - 9, ENT 5 6 JUMP 7 ANT 8 SURROUND 9 SOUND Description...

Operating Instructions
Page 22
H PLAY: Press to play a program in fast forward mode. M (fast forward): Press to turn on BD (Blu-ray Disc)/DVD or DVR/VCR, these buttons operate the video equipment you have programmed into the remote control. For details, see "Using Other Equipment with Your Remote Control" on and off the external equipment selected from the beginning of the live TV when playing back a recorded program. Press to display the DVD disc menu. ✍...
H PLAY: Press to play a program in fast forward mode. M (fast forward): Press to turn on BD (Blu-ray Disc)/DVD or DVR/VCR, these buttons operate the video equipment you have programmed into the remote control. For details, see "Using Other Equipment with Your Remote Control" on and off the external equipment selected from the beginning of the live TV when playing back a recorded program. Press to display the DVD disc menu. ✍...
Operating Instructions
Page 23
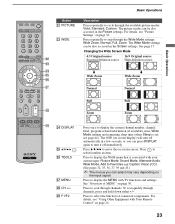
... available picture modes: Vivid, Standard, Custom. Press to display the MENU with Your Remote Control" on page 30. For details, see "Picture Settings" on the input signal. To scan quickly through the Wide Mode settings: Wide Zoom, Normal, Full, Zoom. Press repeatedly to display the current channel number, channel label, program-related information (if available), time, Wide Mode settings and remaining sleep time (when Sleep is associated with your current input: Picture Mode, Sound Mode, Alternate Audio, Wide Mode, Add to turn it...
... available picture modes: Vivid, Standard, Custom. Press to display the MENU with Your Remote Control" on page 30. For details, see "Picture Settings" on the input signal. To scan quickly through the Wide Mode settings: Wide Zoom, Normal, Full, Zoom. Press repeatedly to display the current channel number, channel label, program-related information (if available), time, Wide Mode settings and remaining sleep time (when Sleep is associated with your current input: Picture Mode, Sound Mode, Alternate Audio, Wide Mode, Add to turn it...
Operating Instructions
Page 28
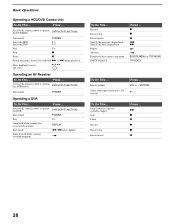
... the remote control to operate the DVR DVR/VCR (FUNCTION) Turn on/off POWER Operating a DVR To Do This ... Master volume Select other input connected to operate the DVD/HDD DVR/VCR (FUNCTION) Turn on /off POWER Play H Jump back while viewing live or recorded programs REPLAY Slow mode m/m (press lightly) Jump forward while viewing recorded programs To Do This ... Jump forward to operate the AV Receiver DVR/VCR (FUNCTION) Turn on /off POWER...
... the remote control to operate the DVR DVR/VCR (FUNCTION) Turn on/off POWER Operating a DVR To Do This ... Master volume Select other input connected to operate the DVD/HDD DVR/VCR (FUNCTION) Turn on /off POWER Play H Jump back while viewing live or recorded programs REPLAY Slow mode m/m (press lightly) Jump forward while viewing recorded programs To Do This ... Jump forward to operate the AV Receiver DVR/VCR (FUNCTION) Turn on /off POWER...
Operating Instructions
Page 29
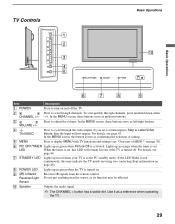
... the MENU screen, these buttons serve as up in orange when the timer is set a certain input to turn on page 30). 6 PIC OFF/TIMER Lights up in red when your TV is in green when Picture Off is set, this may be affected. LED When the timer is activated. Basic Operations TV Controls Basic Operations 1 2 3 4 5 PIC OFF/TIMER STANDBY POWER q; Press to display MENU with TV functions and settings (see page 44. 7 STANDBY LED Lights up in the PC standby mode...
... the MENU screen, these buttons serve as up in orange when the timer is set a certain input to turn on page 30). 6 PIC OFF/TIMER Lights up in red when your TV is in green when Picture Off is set, this may be affected. LED When the timer is activated. Basic Operations TV Controls Basic Operations 1 2 3 4 5 PIC OFF/TIMER STANDBY POWER q; Press to display MENU with TV functions and settings (see page 44. 7 STANDBY LED Lights up in the PC standby mode...
Operating Instructions
Page 30
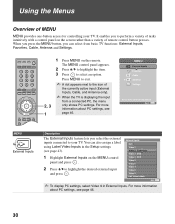
... MENU button, you select the external inputs connected to select an option. The MENU control panel appears. 2 Press V/v to highlight the item. 3 Press to your TV. TV/VIDEO SLEEP POWER TV POWER BD/DVD DVR/VCR SAT/CABLE TV FUNCTION ENT JUMP ANT FREEZE MODE SURROUND SOUND PICTURE WIDE DISPLAY GUIDE TOOLS RETURN MENU PREV REPLAY ADVANCE NEXT PLAY 2, 3 1 1 Press MENU on the screen rather than a variety of the currently active input (External Inputs, Cable, and Antenna only). ✍ When the TV is displaying...
... MENU button, you select the external inputs connected to select an option. The MENU control panel appears. 2 Press V/v to highlight the item. 3 Press to your TV. TV/VIDEO SLEEP POWER TV POWER BD/DVD DVR/VCR SAT/CABLE TV FUNCTION ENT JUMP ANT FREEZE MODE SURROUND SOUND PICTURE WIDE DISPLAY GUIDE TOOLS RETURN MENU PREV REPLAY ADVANCE NEXT PLAY 2, 3 1 1 Press MENU on the screen rather than a variety of the currently active input (External Inputs, Cable, and Antenna only). ✍ When the TV is displaying...

Operating Instructions
Page 32
...-resolution picture for enhanced picture contrast and sharpness. Sharpness To display the Picture settings, see "Navigating Through Settings" Exit: MENU (see page 31). Your Picture Mode settings are using either HDMI or component connections. Adjust to sharpen or soften the picture. Neutral Select to give the white colors a reddish tint. Mode 2 is especially effective when original standard-definition signals have been up a Picture Mode (Vivid, Standard, Custom) independently for the TV input and for 1080i format. White adjustment...
...-resolution picture for enhanced picture contrast and sharpness. Sharpness To display the Picture settings, see "Navigating Through Settings" Exit: MENU (see page 31). Your Picture Mode settings are using either HDMI or component connections. Adjust to sharpen or soften the picture. Neutral Select to give the white colors a reddish tint. Mode 2 is especially effective when original standard-definition signals have been up a Picture Mode (Vivid, Standard, Custom) independently for the TV input and for 1080i format. White adjustment...

Operating Instructions
Page 37
... the original source is 16:9, then the picture may be compressed horizontally. Using the Menus Screen Settings Using the Menus Antenna Screen Wide Mode Auto Wide 4:3 Default Display Area Horizontal Center Vertical Center Vertical Size To display the Screen settings, see "Navigating Through Settings" Exit: MENU (see page 23. ✍ You can set up a Wide Mode (Wide Zoom, Normal, Full, Zoom) independently for the TV input and for the current program. Full Select...
... the original source is 16:9, then the picture may be compressed horizontally. Using the Menus Screen Settings Using the Menus Antenna Screen Wide Mode Auto Wide 4:3 Default Display Area Horizontal Center Vertical Center Vertical Size To display the Screen settings, see "Navigating Through Settings" Exit: MENU (see page 23. ✍ You can set up a Wide Mode (Wide Zoom, Normal, Full, Zoom) independently for the TV input and for the current program. Full Select...
Operating Instructions
Page 39
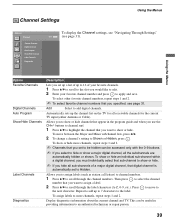
... digital channel is automatically set to be hidden can be accessed only with the 0-9 buttons. ✍ If you would like to edit. 2 Enter your favorite channels. 1 Press V/v to scroll to the slot you select to show a major digital channel, all receivable channels for the current TV input (either Antenna or Cable). Channel Settings Using the Menus Antenna Channel Favorite Channels Digital Channels Auto Program Show/Hide Channels Label Channels Diagnostics To display the Channel settings, see "Navigating Through Settings" Exit: MENU...
... digital channel is automatically set to be hidden can be accessed only with the 0-9 buttons. ✍ If you would like to edit. 2 Enter your favorite channels. 1 Press V/v to scroll to the slot you select to show a major digital channel, all receivable channels for the current TV input (either Antenna or Cable). Channel Settings Using the Menus Antenna Channel Favorite Channels Digital Channels Auto Program Show/Hide Channels Label Channels Diagnostics To display the Channel settings, see "Navigating Through Settings" Exit: MENU...
Operating Instructions
Page 48
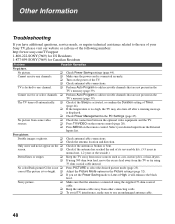
.... Cannot receive any channels. ❑ Make sure the power cord is connected securely. ❑ Turn on the ❑ Check if the antenna is connected using 300 ohm twin lead, move the excess lead away from some video sources. ❑ Check the connection between the optional video equipment and the TV. ❑ Press TV/VIDEO on the remote control (page 20). ❑ Press MENU on the remote control. No color/Dark picture/Color is not...
.... Cannot receive any channels. ❑ Make sure the power cord is connected securely. ❑ Turn on the ❑ Check if the antenna is connected using 300 ohm twin lead, move the excess lead away from some video sources. ❑ Check the connection between the optional video equipment and the TV. ❑ Press TV/VIDEO on the remote control (page 20). ❑ Press MENU on the remote control. No color/Dark picture/Color is not...
Operating Instructions
Page 49
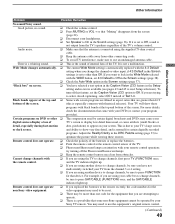
... to show these sources. and the TV indicator lights up . You may be sure you want to lock in the Wide Mode selected with ❑ If you are using your cable box to change the channel or video input, if 4:3 Default in the Screen settings (page 37). If you replaced the batteries to other ❑ The compression used by your Sony TV remote. Cannot change channels with the WIDE button, set the Caption Vision (CC...
... to show these sources. and the TV indicator lights up . You may be sure you want to lock in the Wide Mode selected with ❑ If you are using your cable box to change the channel or video input, if 4:3 Default in the Screen settings (page 37). If you replaced the batteries to other ❑ The compression used by your Sony TV remote. Cannot change channels with the WIDE button, set the Caption Vision (CC...
Operating Instructions
Page 52
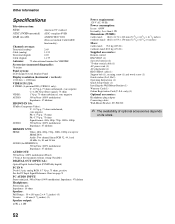
...; × 16 5/8 inches) 6 inches) Mass: (with stand) 93.0 kg (205 lb.) (without stand) 80.0 kg (176 lb.) Supplied accessories: Remote control RM-YD013 (1) Size AA batteries (2) 75-ohm coaxial cable (1) AC power cord (1) AC plug holder (1) HD15-HD15 cable (1) Support belt (1), securing screw (1) and wood screw (1) Guide sticker (L×2, R×2) Operating Instructions (1) Quick Setup Guide (1) Installing the Wall-Mount Bracket (1) Warranty Card (1) Online Registration Card (U.S.A. Other Information Specifications Television system: NTSC American TV standard ATSC (8VSB...
...; × 16 5/8 inches) 6 inches) Mass: (with stand) 93.0 kg (205 lb.) (without stand) 80.0 kg (176 lb.) Supplied accessories: Remote control RM-YD013 (1) Size AA batteries (2) 75-ohm coaxial cable (1) AC power cord (1) AC plug holder (1) HD15-HD15 cable (1) Support belt (1), securing screw (1) and wood screw (1) Guide sticker (L×2, R×2) Operating Instructions (1) Quick Setup Guide (1) Installing the Wall-Mount Bracket (1) Warranty Card (1) Online Registration Card (U.S.A. Other Information Specifications Television system: NTSC American TV standard ATSC (8VSB...
Operating Instructions
Page 53
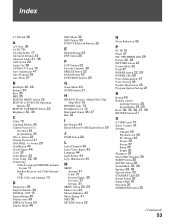
... PICTURE button 23 Picture Mode 32 Pitch 47 POWER button 22, 29 POWER LED 29 Power Management 47 Power Saving 44 Product Information 45 Program Options Setting 21 R Rating 40 Remote control inserting batteries 20 programming 24-25 Reset 32, 35, 46, 47, 50 RETURN button 21 S S VIDEO jack 15 Select Country 41 Settings Channel 39 Parental Lock 40 PC Settings 46 Picture 32 Screen 37 Setup 43 Sound 35 Sharpness 32 Show/Hide Channels 39 SLEEP button 20 SOUND button 20 Sound Mode...
... PICTURE button 23 Picture Mode 32 Pitch 47 POWER button 22, 29 POWER LED 29 Power Management 47 Power Saving 44 Product Information 45 Program Options Setting 21 R Rating 40 Remote control inserting batteries 20 programming 24-25 Reset 32, 35, 46, 47, 50 RETURN button 21 S S VIDEO jack 15 Select Country 41 Settings Channel 39 Parental Lock 40 PC Settings 46 Picture 32 Screen 37 Setup 43 Sound 35 Sharpness 32 Show/Hide Channels 39 SLEEP button 20 SOUND button 20 Sound Mode...

