
Operating Instructions
Page 3
...the World of BRAVIA™ The Four Steps to Your TV 32 Navigating through TV Home Menu on XMB 33 TV Setting Description 34 Product Support 34 Clock/Timers Settings 34 Picture Settings 34 Sound Settings 36 Screen Settings 37 Video Options Settings 39 Audio Options Settings 40 Channel... Control 20 Remote Control and TV Controls 20 Indicators 25 Programming the Remote Control 26 Operating Sony Brand Video Equipment......26 Programming Non-Sony Video Equipment ....26 Using Other Equipment with Your Remote Control 28 Using P&P and PIP Features 31 To Display the Sub Window 31 To ...
...the World of BRAVIA™ The Four Steps to Your TV 32 Navigating through TV Home Menu on XMB 33 TV Setting Description 34 Product Support 34 Clock/Timers Settings 34 Picture Settings 34 Sound Settings 36 Screen Settings 37 Video Options Settings 39 Audio Options Settings 40 Channel... Control 20 Remote Control and TV Controls 20 Indicators 25 Programming the Remote Control 26 Operating Sony Brand Video Equipment......26 Programming Non-Sony Video Equipment ....26 Using Other Equipment with Your Remote Control 28 Using P&P and PIP Features 31 To Display the Sub Window 31 To ...
Operating Instructions
Page 7
... liquid leakage may occur, or scattered broken glass may cause a fire or damage the TV. Replacement parts When replacement parts are displayed continuously. s Ghosting may expose you might bump your head on the LCD screen. If the surface of the TV. Ask a qualified service technician to direct sunlight. For Customers in the United States Lamp...
... liquid leakage may occur, or scattered broken glass may cause a fire or damage the TV. Replacement parts When replacement parts are displayed continuously. s Ghosting may expose you might bump your head on the LCD screen. If the surface of the TV. Ask a qualified service technician to direct sunlight. For Customers in the United States Lamp...

Operating Instructions
Page 8
...www.sony.com/HDTV The Four Steps to Full HD Experience: Set, Sound, Source, and Setup Along with HD sources. ~ • You can use the Wide Mode function of your BRAVIA TV is displayed on upgrading to a standard analog signal, you will notice a big difference. HDTV uses a wider screen ...than twice the vertical resolution of HD programming and proper setup connections. The quality of the image you see on your new BRAVIA TV, you for information...
...www.sony.com/HDTV The Four Steps to Full HD Experience: Set, Sound, Source, and Setup Along with HD sources. ~ • You can use the Wide Mode function of your BRAVIA TV is displayed on upgrading to a standard analog signal, you will notice a big difference. HDTV uses a wider screen ...than twice the vertical resolution of HD programming and proper setup connections. The quality of the image you see on your new BRAVIA TV, you for information...
Operating Instructions
Page 9
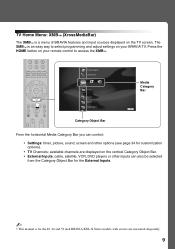
...TV Channels: available channels are displayed on your remote control to select programming and adjust settings on the vertical Category Object Bar. • External Inputs: cable, satellite, VCR, DVD players or other inputs can also be selected from the Category Object Bar for the 40, 46 and 52 inch BRAVIA KDL-X Series models with screen... size measured diagonally. 9 Press the HOME button on the TV screen. The XMB™ is for the External Inputs. ~ • This ...
...TV Channels: available channels are displayed on your remote control to select programming and adjust settings on the vertical Category Object Bar. • External Inputs: cable, satellite, VCR, DVD players or other inputs can also be selected from the Category Object Bar for the 40, 46 and 52 inch BRAVIA KDL-X Series models with screen... size measured diagonally. 9 Press the HOME button on the TV screen. The XMB™ is for the External Inputs. ~ • This ...
Operating Instructions
Page 12
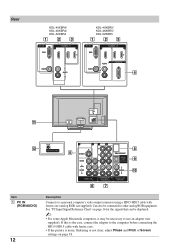
..., connect the adapter to the computer before connecting the HD15-HD15 cable with ferrite core (analog RGB, not supplied). Rear KDL-40XBR4/ KDL-46XBR4/ KDL-52XBR4 1 23 PC IN 1 RGB IN 3 KDL-40XBR5/ KDL-46XBR5/ KDL-52XBR5 1 23 PC IN 1 RGB IN 3 AUDIO L AUDIO R AUDIO AUDIO L R REMOTE 4 qa qs VHF/UHF/CABLE 5 1 31 2 Y...ferrite core. • If the picture is noisy, flickering or not clear, adjust Phase and Pitch of Screen settings on page 16 for the signals that can be displayed. ~ • For some Apple Macintosh computers, it may be connected to other analog RGB equipment. Can...
..., connect the adapter to the computer before connecting the HD15-HD15 cable with ferrite core (analog RGB, not supplied). Rear KDL-40XBR4/ KDL-46XBR4/ KDL-52XBR4 1 23 PC IN 1 RGB IN 3 KDL-40XBR5/ KDL-46XBR5/ KDL-52XBR5 1 23 PC IN 1 RGB IN 3 AUDIO L AUDIO R AUDIO AUDIO L R REMOTE 4 qa qs VHF/UHF/CABLE 5 1 31 2 Y...ferrite core. • If the picture is noisy, flickering or not clear, adjust Phase and Pitch of Screen settings on page 16 for the signals that can be displayed. ~ • For some Apple Macintosh computers, it may be connected to other analog RGB equipment. Can...
Operating Instructions
Page 19
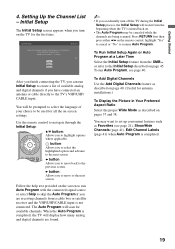
...analog and digital channels if you turn off the TV during the Initial Setup process, the Initial Setup will scan for antenna installations.) To Display the Picture in Your Preferred Aspect Ratio Select the proper Wide Mode as described on screen display as well as default audio for digital channels. ...receiver and the VHF/UHF/CABLE input is completed, the TV will be used for the first time. Initial Setup The Initial Setup screen appears when you have connected an antenna or cable directly to the next screen. You will display how many analog and digital channels are found. ~ ...
...analog and digital channels if you turn off the TV during the Initial Setup process, the Initial Setup will scan for antenna installations.) To Display the Picture in Your Preferred Aspect Ratio Select the proper Wide Mode as described on screen display as well as default audio for digital channels. ...receiver and the VHF/UHF/CABLE input is completed, the TV will be used for the first time. Initial Setup The Initial Setup screen appears when you have connected an antenna or cable directly to the next screen. You will display how many analog and digital channels are found. ~ ...
Operating Instructions
Page 20
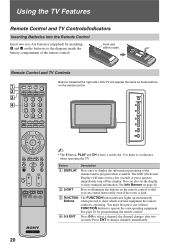
.... 2 LIGHT Press to illuminate the buttons on the remote control so that you can also set the display to change channels immediately. 20 The OSD (On Screen Display) will operate the same as a reference when operating the TV. Press ENT to show which external equipment the remote control is dark. 3 FUNCTION The FUNCTION button...
.... 2 LIGHT Press to illuminate the buttons on the remote control so that you can also set the display to change channels immediately. 20 The OSD (On Screen Display) will operate the same as a reference when operating the TV. Press ENT to show which external equipment the remote control is dark. 3 FUNCTION The FUNCTION button...
Operating Instructions
Page 21
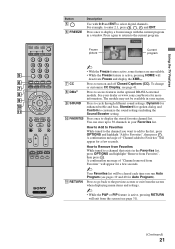
...message of "Channel removed from Favorites", then press . Using the TV Features Button 5 6 FREEZE Description Use with the current program in a window. Press once to display a frozen image with 0-9 and ENT to the previous screen or exit from Favorites While tuned to the current program. See ...your dealer or www.sony.com/bravia for a few seconds. ~ Your Favorites list will appear for...
...message of "Channel removed from Favorites", then press . Using the TV Features Button 5 6 FREEZE Description Use with the current program in a window. Press once to display a frozen image with 0-9 and ENT to the previous screen or exit from Favorites While tuned to the current program. See ...your dealer or www.sony.com/bravia for a few seconds. ~ Your Favorites list will appear for...
Operating Instructions
Page 24
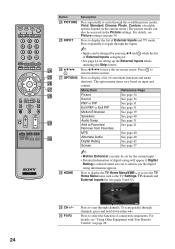
... Remote Control" on page 34. For details, see Picture settings on page 28. 24 wg wj OPTIONS Press to display a list of connected components. Press to display the TV Home Menu/XMB™ to cycle through the inputs. ~ • Inputs can be changed by pressing V/v and ...while the list of External Inputs and TV mode. Press to toggle through the available picture modes: Vivid, Standard, Cinema, Photo, Custom. (Available options depend on -screen cursor...
... Remote Control" on page 34. For details, see Picture settings on page 28. 24 wg wj OPTIONS Press to display a list of connected components. Press to display the TV Home Menu/XMB™ to cycle through the inputs. ~ • Inputs can be changed by pressing V/v and ...while the list of External Inputs and TV mode. Press to toggle through the available picture modes: Vivid, Standard, Cinema, Photo, Custom. (Available options depend on -screen cursor...
Operating Instructions
Page 28
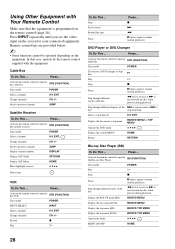
... depending on the screen for your connected equipment. Press ... Activate the remote control to disc step backward Select a track directly 0-9, ENT Display the disc menu or top menu BD/DVD MENU or TOP MENU Operate the DVD menu V v B b, Display the system MENU HOME...Changer To Do This ... Stop Fast forward Rewind the tape Pause Press ... x M m X (press again to previous channel JUMP Display channel number DISPLAY Display SAT Guide OPTIONS Display SAT Menu HOME Move highlight (cursor) V v B b Select item VCR To Do This ... Press ... Activate the remote control to...
... depending on the screen for your connected equipment. Press ... Activate the remote control to disc step backward Select a track directly 0-9, ENT Display the disc menu or top menu BD/DVD MENU or TOP MENU Operate the DVD menu V v B b, Display the system MENU HOME...Changer To Do This ... Stop Fast forward Rewind the tape Pause Press ... x M m X (press again to previous channel JUMP Display channel number DISPLAY Display SAT Guide OPTIONS Display SAT Menu HOME Move highlight (cursor) V v B b Select item VCR To Do This ... Press ... Activate the remote control to...

Operating Instructions
Page 30
Press ... Open the RECORDINGS List TOP MENU 30 CH+/- To Do This ... Replay the current program for a set period of time Advance forward a set period of time when playing back a recorded program Specify the previous chapter mark Specify the next chapter mark . > Stop x Pause X Record z Open the Favorites List FAVORITES Open the Guide OPTIONS Open Main menu HOME Move highlight (cursor) V v B b Select item Close on-screen display RETURN Page +/-
Press ... Open the RECORDINGS List TOP MENU 30 CH+/- To Do This ... Replay the current program for a set period of time Advance forward a set period of time when playing back a recorded program Specify the previous chapter mark Specify the next chapter mark . > Stop x Pause X Record z Open the Favorites List FAVORITES Open the Guide OPTIONS Open Main menu HOME Move highlight (cursor) V v B b Select item Close on-screen display RETURN Page +/-

Operating Instructions
Page 32
...the XMB™ (XrossMediaBar) as well as a variety of TV features. Accessing the Equipment Connected to access the TV Home Menu on the situations and conditions applied. Product Support Clock/Timers Settings The XMB™ displays the Media Category icons (horizontally) and available features (vertically)... allows you to Your TV External Watch a movie, play a game, record a program or work on your convenience, see remote control section pages 20 and 24). Unavailable options are grayed out or not displayed. buttons (see page 44. 32 Sound Screen Video Options The XMB™...
...the XMB™ (XrossMediaBar) as well as a variety of TV features. Accessing the Equipment Connected to access the TV Home Menu on the situations and conditions applied. Product Support Clock/Timers Settings The XMB™ displays the Media Category icons (horizontally) and available features (vertically)... allows you to Your TV External Watch a movie, play a game, record a program or work on your convenience, see remote control section pages 20 and 24). Unavailable options are grayed out or not displayed. buttons (see page 44. 32 Sound Screen Video Options The XMB™...
Operating Instructions
Page 33
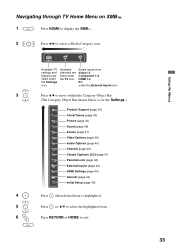
... icon. Using the Menus Navigating through TV Home Menu on XMB™ 1 Press HOME to display the XMB™. 2 Press B/b to exit. 33 Select inputs from Video1-3 Component 1-2 HDMI 1-3 PC under the TV icon. Settings Available TV settings and features are listed under the... External Inputs icon. 3 Press V/v to move within the Category Object Bar. (The Category Object Bar shown below is for the Settings.) Product Support (page 34) Clock/Timers (page 34) Picture (page 34) Sound (page 36) Screen...
... icon. Using the Menus Navigating through TV Home Menu on XMB™ 1 Press HOME to display the XMB™. 2 Press B/b to exit. 33 Select inputs from Video1-3 Component 1-2 HDMI 1-3 PC under the TV icon. Settings Available TV settings and features are listed under the... External Inputs icon. 3 Press V/v to move within the Category Object Bar. (The Category Object Bar shown below is for the Settings.) Product Support (page 34) Clock/Timers (page 34) Picture (page 34) Sound (page 36) Screen...
Operating Instructions
Page 34
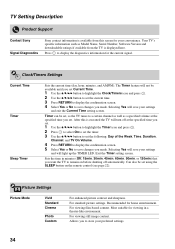
... Product Support Contact Sony Signal Diagnostics Sony contact information is available from the TV is executed the TV will turn off automatically. Your TV's specific information such as a specified volume at the specified time you set. 1 Use the V/v/B/b button to highlight the Timer icon and ...set the timer. 3 Use the V/v/B/b button to set the following: Day of the Week, Time, Duration, Channel, and TV On Volume. 4 Press RETURN to display the confirmation screen. 5 Select Yes or No to save changes you made . For viewing film-based content. Clock/Timers Settings Current Time ...
... Product Support Contact Sony Signal Diagnostics Sony contact information is available from the TV is executed the TV will turn off automatically. Your TV's specific information such as a specified volume at the specified time you set. 1 Use the V/v/B/b button to highlight the Timer icon and ...set the timer. 3 Use the V/v/B/b button to set the following: Day of the Week, Time, Duration, Channel, and TV On Volume. 4 Press RETURN to display the confirmation screen. 5 Select Yes or No to save changes you made . For viewing film-based content. Clock/Timers Settings Current Time ...

Operating Instructions
Page 37
...desire while in its original aspect ratio when the original source is 4:3 (Standard-definition source). Normal Displays the 4:3 picture in Custom of Sound Mode. Full Enlarges the picture horizontally to other input modes ...16:9 (High-definition source), select this mode to fill the 16:9 screen, displaying as all programs and commercials. On Automatically changes Wide Mode setting based upon content. Wide Zoom Enlarges ...input) are disturbing to the current channel. If frequent screen changes are same as much of the current input (TV or video input) relative to fill the...
...desire while in its original aspect ratio when the original source is 4:3 (Standard-definition source). Normal Displays the 4:3 picture in Custom of Sound Mode. Full Enlarges the picture horizontally to other input modes ...16:9 (High-definition source), select this mode to fill the 16:9 screen, displaying as all programs and commercials. On Automatically changes Wide Mode setting based upon content. Wide Zoom Enlarges ...input) are disturbing to the current channel. If frequent screen changes are same as much of the current input (TV or video input) relative to fill the...
Operating Instructions
Page 38
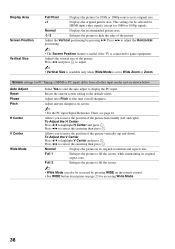
...auto adjust to fine tune overall sharpness. Adjust after Pitch to display the PC input. Normal Displays the picture in its original size. +1 Displays the original picture area. Press B/b to fill the screen. ~ • Wide Mode can be accessed by pressing ...V/v. Full 2 Enlarges the picture to correct the centering then press . Press B/b to adjust the Horizontal positioning. ~ • The Screen Position feature is useful if the TV...
...auto adjust to fine tune overall sharpness. Adjust after Pitch to display the PC input. Normal Displays the picture in its original size. +1 Displays the original picture area. Press B/b to fill the screen. ~ • Wide Mode can be accessed by pressing ...V/v. Full 2 Enlarges the picture to correct the centering then press . Press B/b to adjust the Horizontal positioning. ~ • The Screen Position feature is useful if the TV...

Operating Instructions
Page 39
...only when the luminance tone of picture movement and to reduce blur. Standard Provides smooth picture movement. Provides the optimum screen for the sharp display of Auto or Custom. Using the Menus Video Options Settings Motion Enhancer CineMotion Game/Text Mode Video/Photo Optimizer Video Color... (RGB), even if sYCC is selected. Auto Automatically optimize based on the input source, video data or photograph data when directly connecting Sony HDMI outputcapable equipment that supports x.v.Color. ~ • Setting is fixed to Normal when the input signal is HDMI (RGB), even ...
...only when the luminance tone of picture movement and to reduce blur. Standard Provides smooth picture movement. Provides the optimum screen for the sharp display of Auto or Custom. Using the Menus Video Options Settings Motion Enhancer CineMotion Game/Text Mode Video/Photo Optimizer Video Color... (RGB), even if sYCC is selected. Auto Automatically optimize based on the input source, video data or photograph data when directly connecting Sony HDMI outputcapable equipment that supports x.v.Color. ~ • Setting is fixed to Normal when the input signal is HDMI (RGB), even ...
Operating Instructions
Page 40
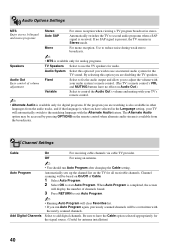
...matching language with your audio system's remote control. (The TV's remote control's VOL and MUTING buttons have selected in stereo. Channel scanning will clear Favorites list. • If you are watching is completed, the screen will display the number of volume adjustment Fixed Select to fix the... audio output and allow you wish to exit Auto Program. ~ • Running Auto Program will be accessed by pressing OPTIONS on the TV for the TV sound. Audio Out Easy ...
...matching language with your audio system's remote control. (The TV's remote control's VOL and MUTING buttons have selected in stereo. Channel scanning will clear Favorites list. • If you are watching is completed, the screen will display the number of volume adjustment Fixed Select to fix the... audio output and allow you wish to exit Auto Program. ~ • Running Auto Program will be accessed by pressing OPTIONS on the TV for the TV sound. Audio Out Easy ...
Operating Instructions
Page 41
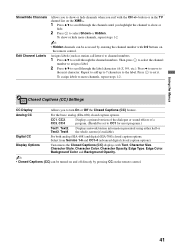
... up to 7 characters to select Shown or Hidden. Select from Service 1-6 and CC1-4 (advanced digital closed caption options. button or in the TV channel list on the XMB™. 1 Press V/v to scroll through the channel numbers. Assigns labels (such as station call letters) to channel ...the Closed Captions (CC) feature. CC Closed Captions (CC) Settings CC Display Allows you to CC1 for most programs.) Text1, Text2, Text3, Text4 Displays network/station information presented using either half or the whole screen (if available). Analog CC For the basic analog (EIA-608) closed ...
... up to 7 characters to select Shown or Hidden. Select from Service 1-6 and CC1-4 (advanced digital closed caption options. button or in the TV channel list on the XMB™. 1 Press V/v to scroll through the channel numbers. Assigns labels (such as station call letters) to channel ...the Closed Captions (CC) feature. CC Closed Captions (CC) Settings CC Display Allows you to CC1 for most programs.) Text1, Text2, Text3, Text4 Displays network/station information presented using either half or the whole screen (if available). Analog CC For the basic analog (EIA-608) closed ...
Operating Instructions
Page 44
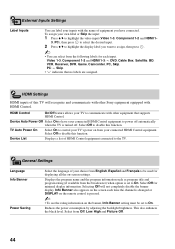
... from English, Español and Français to communicate with other Sony equipment equipped with HDMI Control. Select Off for displaying all the on the remote control is turned off automatically when the TV is pressed. ~ • To see the rating information on from Off,.... 44 Reduces the power consumption by adjusting the backlight brightness. Select Off to disable this TV will not completely disable the banner display. Info Banner also appears on the screen each input. TV Auto Power On Select On to control your connected HDMI Control equipment to On. Device List...
... from English, Español and Français to communicate with other Sony equipment equipped with HDMI Control. Select Off for displaying all the on the remote control is turned off automatically when the TV is pressed. ~ • To see the rating information on from Off,.... 44 Reduces the power consumption by adjusting the backlight brightness. Select Off to disable this TV will not completely disable the banner display. Info Banner also appears on the screen each input. TV Auto Power On Select On to control your connected HDMI Control equipment to On. Device List...


