
Operating Instructions
Page 2
... regulations, you to receive unscrambled digital cable television programming via subscription service to a warm location, or if the room temperature changes suddenly, the picture may cause instability and possibly result in a place subject to constitute a risk of the following WALL-MOUNT BRACKET or TV-stand. s Do not install the TV in a hot or humid place, or in injury. KDL-40XBR4/5 KDL-46XBR4/5 KDL-52XBR4/5 Sony Wall-Mount Bracket Mode No. Installing s The TV should allow you...
... regulations, you to receive unscrambled digital cable television programming via subscription service to a warm location, or if the room temperature changes suddenly, the picture may cause instability and possibly result in a place subject to constitute a risk of the following WALL-MOUNT BRACKET or TV-stand. s Do not install the TV in a hot or humid place, or in injury. KDL-40XBR4/5 KDL-46XBR4/5 KDL-52XBR4/5 Sony Wall-Mount Bracket Mode No. Installing s The TV should allow you...
Operating Instructions
Page 3
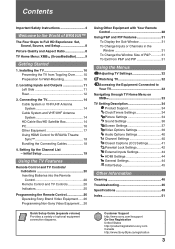
... Instructions 4 Welcome to the World of BRAVIA™ The Four Steps to Your TV 32 Navigating through TV Home Menu on XMB 33 TV Setting Description 34 Product Support 34 Clock/Timers Settings 34 Picture Settings 34 Sound Settings 36 Screen Settings 37 Video Options Settings 39 Audio Options Settings 40 Channel Settings 40 CC Closed Captions (CC) Settings 41 Parental Lock Settings 42 External Inputs Settings 44 HDMI Settings 44 General Settings 44 Initial Setup 45 Other Information Cleaning 46 Troubleshooting 46 Specifications 49 Index 51 Quick Setup Guide...
... Instructions 4 Welcome to the World of BRAVIA™ The Four Steps to Your TV 32 Navigating through TV Home Menu on XMB 33 TV Setting Description 34 Product Support 34 Clock/Timers Settings 34 Picture Settings 34 Sound Settings 36 Screen Settings 37 Video Options Settings 39 Audio Options Settings 40 Channel Settings 40 CC Closed Captions (CC) Settings 41 Parental Lock Settings 42 External Inputs Settings 44 HDMI Settings 44 General Settings 44 Initial Setup 45 Other Information Cleaning 46 Troubleshooting 46 Specifications 49 Index 51 Quick Setup Guide...
Operating Instructions
Page 4
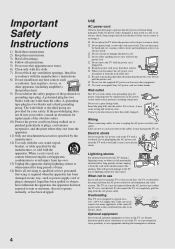
... noisy sound may cause arcing and result in close to grasp the plug when disconnecting the power cord. USE AC power cord Observe the followings to prevent the AC power cord from the AC power outlet. s Do not place the TV where the power cord is positioned in a fire. s Do not use attachments/accessories specified by the manufacturer. 12) Use only with the cart, stand, tripod, bracket, or table specified...
... noisy sound may cause arcing and result in close to grasp the plug when disconnecting the power cord. USE AC power cord Observe the followings to prevent the AC power cord from the AC power outlet. s Do not place the TV where the power cord is positioned in a fire. s Do not use attachments/accessories specified by the manufacturer. 12) Use only with the cart, stand, tripod, bracket, or table specified...

Operating Instructions
Page 5
... AC power plug and clean it may be sure to follow the instruction provided on the LCD panel and the frame around the screen. Be sure the antenna system is operating, unplug the TV and consult your palm directly under the panel. (Continued) 5 If not, it regularly. Place your dealer or service technician. CARRYING THE TV Carry the TV in electric shock. Never use...
... AC power plug and clean it may be sure to follow the instruction provided on the LCD panel and the frame around the screen. Be sure the antenna system is operating, unplug the TV and consult your palm directly under the panel. (Continued) 5 If not, it regularly. Place your dealer or service technician. CARRYING THE TV Carry the TV in electric shock. Never use...
Operating Instructions
Page 7
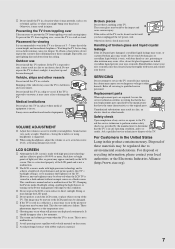
... pixels of 99.99% or more, black dots or bright points of these materials may be sure the service technician certifies in writing that he/she has used in a cold place, a smear may occur in a dark ambient without an input source or a blank screen. Changing the Picture mode, Backlight setting, enabling the Light Sensor, or turning on the LCD screen. Doing so may result. s The...
... pixels of 99.99% or more, black dots or bright points of these materials may be sure the service technician certifies in writing that he/she has used in a cold place, a smear may occur in a dark ambient without an input source or a blank screen. Changing the Picture mode, Backlight setting, enabling the Light Sensor, or turning on the LCD screen. Doing so may result. s The...
Operating Instructions
Page 10
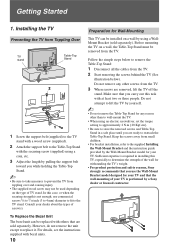
...; Do not remove the Table-Top Stand for any other than to wall-mount the TV. • When using an electric screwdriver, set the torque setting to approximately 2 N·m {20 Kgf·cm}. • Be sure to store the removed screws and Table-Top Stand in installing this TV, especially to the supplied Installing the Wall-Mount Bracket and the instruction guide provided by the Wall-Mount Bracket model for your TV and that the wall-mounting of screw(s). Follow...
...; Do not remove the Table-Top Stand for any other than to wall-mount the TV. • When using an electric screwdriver, set the torque setting to approximately 2 N·m {20 Kgf·cm}. • Be sure to store the removed screws and Table-Top Stand in installing this TV, especially to the supplied Installing the Wall-Mount Bracket and the instruction guide provided by the Wall-Mount Bracket model for your TV and that the wall-mounting of screw(s). Follow...
Operating Instructions
Page 11
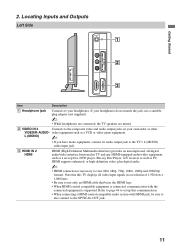
...-digital audio/video interface between this TV displays all video input signals in a resolution of 1,920 dots × 1,080 lines. • Be sure to use a suitable plug adapter (not supplied). ~ • While headphones are connected, the TV speakers are muted. 2 VIDEO IN 2 Connects to the OPTICAL OUT jack. 11 Note that bears the HDMI logo. • When HDMI control compatible equipment is connected, communication with HDMI jack, be sure to also connect to the composite video and audio output...
...-digital audio/video interface between this TV displays all video input signals in a resolution of 1,920 dots × 1,080 lines. • Be sure to use a suitable plug adapter (not supplied). ~ • While headphones are connected, the TV speakers are muted. 2 VIDEO IN 2 Connects to the OPTICAL OUT jack. 11 Note that bears the HDMI logo. • When HDMI control compatible equipment is connected, communication with HDMI jack, be sure to also connect to the composite video and audio output...
Operating Instructions
Page 13
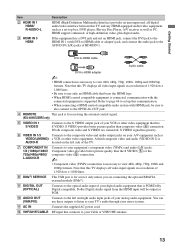
... adapter) jack, and connect the audio jack to set -top box, DVD player, Blu-ray Disc Player, A/V receiver as well as VIDEO/L(MONO)- qa AC IN Connects the supplied AC power cord. HDMI supports enhanced, or high-definition video, plus digital audio. DVI-to-HDMI cable Audio cable DVI-to view 480i, 480p, 720p, 1080i, 1080p and 1080/24p formats. A third composite video and audio (VIDEO IN 2) is necessary to -HDMI adapter ~ • HDMI connection is AUDIO-R located on your analog audio equipment. Dolby Digital Audio signal from the HDMI input...
... adapter) jack, and connect the audio jack to set -top box, DVD player, Blu-ray Disc Player, A/V receiver as well as VIDEO/L(MONO)- qa AC IN Connects the supplied AC power cord. HDMI supports enhanced, or high-definition video, plus digital audio. DVI-to-HDMI cable Audio cable DVI-to view 480i, 480p, 720p, 1080i, 1080p and 1080/24p formats. A third composite video and audio (VIDEO IN 2) is necessary to -HDMI adapter ~ • HDMI connection is AUDIO-R located on your analog audio equipment. Dolby Digital Audio signal from the HDMI input...
Operating Instructions
Page 18
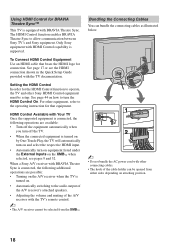
... AC power cord with other Sony HDMI Control equipment must be setup. The HDMI Control function enables BRAVIA Theatre Sync to turn off the equipment automatically when you turn the HDMI Control On. Setting the HDMI Control In order for the HDMI Control function to operate, the TV and other connecting cables. • The hook of the A/V receiver with the TV's remote control. ~ • The A/V receiver cannot be selected from either sides depending on attaching position. 18 Using HDMI Control for BRAVIA...
... AC power cord with other Sony HDMI Control equipment must be setup. The HDMI Control function enables BRAVIA Theatre Sync to turn off the equipment automatically when you turn the HDMI Control On. Setting the HDMI Control In order for the HDMI Control function to operate, the TV and other connecting cables. • The hook of the A/V receiver with the TV's remote control. ~ • The A/V receiver cannot be selected from either sides depending on attaching position. 18 Using HDMI Control for BRAVIA...
Operating Instructions
Page 19
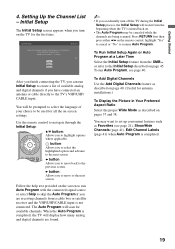
.... Use the remote control to navigate through the Initial Setup: V/v button: Allows you to select the highlighted option and advance to the TV's VHF/UHF/ CABLE input. Follow the help text provided on the TV for digital channels. Initial Setup The Initial Setup screen appears when you have connected an antenna or cable directly to the next screen. The Auto Program will apply to create a list of available analog and digital channels if you turn off...
.... Use the remote control to navigate through the Initial Setup: V/v button: Allows you to select the highlighted option and advance to the TV's VHF/UHF/ CABLE input. Follow the help text provided on the TV for digital channels. Initial Setup The Initial Setup screen appears when you have connected an antenna or cable directly to the next screen. The Auto Program will apply to create a list of available analog and digital channels if you turn off...

Operating Instructions
Page 22
... an HDMI connection to the audio output of the attached speakers of the BD/DVD disc. w; &m PREV: Press to replay the current program from the FUNCTION buttons 3. x STOP: Press to the operating manual of a recorded program. Button Description qs BD, DVD When FUNCTION is switched on before shutting off the external equipment selected from the previous chapter mark (if any ) or to play a program in fast rewind mode. MENU...
... an HDMI connection to the audio output of the attached speakers of the BD/DVD disc. w; &m PREV: Press to replay the current program from the FUNCTION buttons 3. x STOP: Press to the operating manual of a recorded program. Button Description qs BD, DVD When FUNCTION is switched on before shutting off the external equipment selected from the previous chapter mark (if any ) or to play a program in fast rewind mode. MENU...
Operating Instructions
Page 24
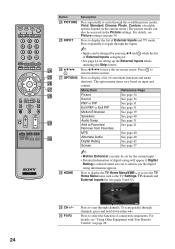
.... (Available options depend on the current mode.) The picture modes can also be set for the current input. • Detailed information of External Inputs is selected when an icon to access the TV Home Menu items such as the TV Settings, TV channels and External Inputs list (see "Using Other Equipment with Your Remote Control" on -screen cursor. Alternate Audio See page 40 Digital Rating See page 42 Screen See page 37 wk HOME...
.... (Available options depend on the current mode.) The picture modes can also be set for the current input. • Detailed information of External Inputs is selected when an icon to access the TV Home Menu items such as the TV Settings, TV channels and External Inputs list (see "Using Other Equipment with Your Remote Control" on -screen cursor. Alternate Audio See page 40 Digital Rating See page 42 Screen See page 37 wk HOME...

Operating Instructions
Page 31
... TV channels. ~ • The VHF/UHF/CABLE input must be connected to use the B/b button to swap the highlight between the main window and sub window. • To swap audio in the list of the following inputs: TV channels, Video, Component, HDMI or PC. 2 Press V/v to highlight P&P or PIP, and press to the PC Input Reference Chart (see page 44 for External Inputs settings). PIP (picture in P&P mode. • For compatible PC Timings, refer to display...
... TV channels. ~ • The VHF/UHF/CABLE input must be connected to use the B/b button to swap the highlight between the main window and sub window. • To swap audio in the list of the following inputs: TV channels, Video, Component, HDMI or PC. 2 Press V/v to highlight P&P or PIP, and press to the PC Input Reference Chart (see page 44 for External Inputs settings). PIP (picture in P&P mode. • For compatible PC Timings, refer to display...
Operating Instructions
Page 33
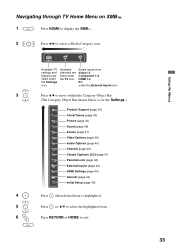
... Category Object Bar shown below is for the Settings.) Product Support (page 34) Clock/Timers (page 34) Picture (page 34) Sound (page 36) Screen (page 37) Video Options (page 39) Audio Options (page 40) Channel (page 40) CC Closed Captions (CC) (page 41) Parental Lock (page 42) External Inputs (page 44) HDMI Settings (page 44) General (page 44) Initial Setup (page 45) 4 Press when desired item is highlighted...
... Category Object Bar shown below is for the Settings.) Product Support (page 34) Clock/Timers (page 34) Picture (page 34) Sound (page 36) Screen (page 37) Video Options (page 39) Audio Options (page 40) Channel (page 40) CC Closed Captions (CC) (page 41) Parental Lock (page 42) External Inputs (page 44) HDMI Settings (page 44) General (page 44) Initial Setup (page 45) 4 Press when desired item is highlighted...
Operating Instructions
Page 34
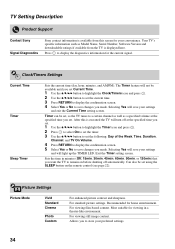
... be set, so the TV tunes to a certain channel as well as Model Name, Serial Number, Software Version and downloadable ratings if available from this is displayed here. For viewing film-based content. Clock/Timers Settings Current Time Timer Sleep Timer Sets the current time (day, hour, minutes, and AM/PM). Selecting Yes will save changes you set Current Time. 1 Use the V/v/B/b button to highlight the Clock/Timers icon and press . 2 Use the V/v/B/b button to set using the SLEEP button on...
... be set, so the TV tunes to a certain channel as well as Model Name, Serial Number, Software Version and downloadable ratings if available from this is displayed here. For viewing film-based content. Clock/Timers Settings Current Time Timer Sleep Timer Sets the current time (day, hour, minutes, and AM/PM). Selecting Yes will save changes you set Current Time. 1 Use the V/v/B/b button to highlight the Clock/Timers icon and press . 2 Use the V/v/B/b button to set using the SLEEP button on...

Operating Instructions
Page 39
... of the display is set to Video when the HDMI input signal is 1080/24p, or when Video-A mode is not supported on the connected equipment, even if Video-A is selected. Off Use this at the factory default setting. Select Off to the HDMI or component input jacks. Video-A Sets suitable image quality, depending on signal. Selects the option to match the output color space within the output signal from the equipment connected to disable the detection...
... of the display is set to Video when the HDMI input signal is 1080/24p, or when Video-A mode is not supported on the connected equipment, even if Video-A is selected. Off Use this at the factory default setting. Select Off to the HDMI or component input jacks. Video-A Sets suitable image quality, depending on signal. Selects the option to match the output color space within the output signal from the equipment connected to disable the detection...
Operating Instructions
Page 40
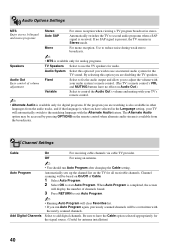
... for the signal source. (Useful for antenna installation) 40 Be sure to add digital channels. Automatically switches the TV to start Auto Program. Audio Options Settings MTS Enjoy stereo, bilingual and mono programs Stereo Auto SAP For stereo reception when viewing a TV program broadcast in Stereo mode. Channel Settings Cable Auto Program Add Digital Channels On For receiving cable channels via cable TV provider. Off For using an antenna. ~ • You should run Auto Program again, previously scanned channels will be based on the remote control when alternate...
... for the signal source. (Useful for antenna installation) 40 Be sure to add digital channels. Automatically switches the TV to start Auto Program. Audio Options Settings MTS Enjoy stereo, bilingual and mono programs Stereo Auto SAP For stereo reception when viewing a TV program broadcast in Stereo mode. Channel Settings Cable Auto Program Add Digital Channels On For receiving cable channels via cable TV provider. Off For using an antenna. ~ • You should run Auto Program again, previously scanned channels will be based on the remote control when alternate...
Operating Instructions
Page 42
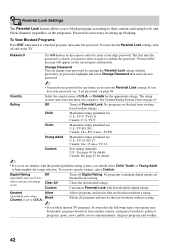
..., news, public service announcements, religious programs and weather. 42 To set password, highlight and select Change Password then enter the new password. ~ • You need your password by entering the Parental Lock setting with the previously set more specific ratings, select Custom. Clears the downloaded ratings. "Password Set" message will appear on page 43. Password Use 0-9 buttons on the TV. where advanced ratings exist) Off Clear All Custom Turns off Parental Lock. U.S.: See page...
..., news, public service announcements, religious programs and weather. 42 To set password, highlight and select Change Password then enter the new password. ~ • You need your password by entering the Parental Lock setting with the previously set more specific ratings, select Custom. Clears the downloaded ratings. "Password Set" message will appear on page 43. Password Use 0-9 buttons on the TV. where advanced ratings exist) Off Clear All Custom Turns off Parental Lock. U.S.: See page...
Operating Instructions
Page 47
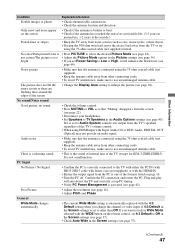
... lock in Wide Mode selected with Super Audio CD or DVD-Audio, DIGITAL OUT (Optical) may not provide an audio signal. not correct/The picture is the sound of internal fans of the screen • Change the Display Area setting to use an undamaged antenna cable. Audio noise • Make sure that the antenna is broken or bent. • Check if the antenna has reached the end of the TV's volume control. • When using...
... lock in Wide Mode selected with Super Audio CD or DVD-Audio, DIGITAL OUT (Optical) may not provide an audio signal. not correct/The picture is the sound of internal fans of the screen • Change the Display Area setting to use an undamaged antenna cable. Audio noise • Make sure that the antenna is broken or bent. • Check if the antenna has reached the end of the TV's volume control. • When using...
Operating Instructions
Page 51
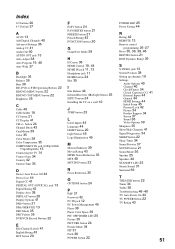
.../TIMER LED 25 Picture 35 Settings Audio Options 40 Channel 40 Clock/Timers 34 Closed Captions (CC) 41 External Inputs 44 General 44 HDMI Settings 44 Initial Setup 45 Parental Lock 42 Picture 34 Product Support 34 Screen 37 Sound 36 Video Options 39 Sharpness 35 Show/Hide Channels 41 Signal Diagnostics 34 SLEEP button 22 Sleep Timer 34 Sound Booster 37 SOUND button 21 Sound Mode 36 Speaker 25 Speakers 40 STANDBY LED 25 Steady Sound 37 Surround 36 T THEATER button 22 Timer 34 Treble 36 Troubleshooting 46-48 TV Auto Power...
.../TIMER LED 25 Picture 35 Settings Audio Options 40 Channel 40 Clock/Timers 34 Closed Captions (CC) 41 External Inputs 44 General 44 HDMI Settings 44 Initial Setup 45 Parental Lock 42 Picture 34 Product Support 34 Screen 37 Sound 36 Video Options 39 Sharpness 35 Show/Hide Channels 41 Signal Diagnostics 34 SLEEP button 22 Sleep Timer 34 Sound Booster 37 SOUND button 21 Sound Mode 36 Speaker 25 Speakers 40 STANDBY LED 25 Steady Sound 37 Surround 36 T THEATER button 22 Timer 34 Treble 36 Troubleshooting 46-48 TV Auto Power...


