Operating Instructions
Page 2
... be using the TV for a Class B digital device, pursuant to dripping or splashing and no guarantee that any changes or modifications not expressly approved in a particular installation. s To obtain the best picture, do not use it checked by qualified service personnel before turning on the type of Sony Computer Entertainment Inc. CAUTION Use the following measures: s Reorient or relocate the receiving antenna. KDL-40XBR4/5 KDL-46XBR4/5 KDL-52XBR4/5 Sony Wall-Mount Bracket Mode...
... be using the TV for a Class B digital device, pursuant to dripping or splashing and no guarantee that any changes or modifications not expressly approved in a particular installation. s To obtain the best picture, do not use it checked by qualified service personnel before turning on the type of Sony Computer Entertainment Inc. CAUTION Use the following measures: s Reorient or relocate the receiving antenna. KDL-40XBR4/5 KDL-46XBR4/5 KDL-52XBR4/5 Sony Wall-Mount Bracket Mode...
Operating Instructions
Page 3
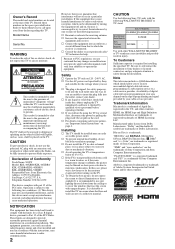
... Safety Instructions 4 Welcome to the World of BRAVIA™ The Four Steps to Your TV 32 Navigating through TV Home Menu on XMB 33 TV Setting Description 34 Product Support 34 Clock/Timers Settings 34 Picture Settings 34 Sound Settings 36 Screen Settings 37 Video Options Settings 39 Audio Options Settings 40 Channel Settings 40 CC Closed Captions (CC) Settings 41 Parental Lock Settings 42 External Inputs Settings 44 HDMI Settings 44 General Settings 44 Initial Setup 45 Other Information Cleaning 46 Troubleshooting 46 Specifications 49 Index 51 Quick Setup Guide...
... Safety Instructions 4 Welcome to the World of BRAVIA™ The Four Steps to Your TV 32 Navigating through TV Home Menu on XMB 33 TV Setting Description 34 Product Support 34 Clock/Timers Settings 34 Picture Settings 34 Sound Settings 36 Screen Settings 37 Video Options Settings 39 Audio Options Settings 40 Channel Settings 40 CC Closed Captions (CC) Settings 41 Parental Lock Settings 42 External Inputs Settings 44 HDMI Settings 44 General Settings 44 Initial Setup 45 Other Information Cleaning 46 Troubleshooting 46 Specifications 49 Index 51 Quick Setup Guide...
Operating Instructions
Page 4
... TV set for your feet on any way, such as power-supply cord or plug is positioned in a fire. Install in accordance with a protective earthing connection. When a cart is designed to the same AC power outlet as radiators, heat registers, stoves, or other brands. Stop using the TV set should be disconnected from the wall outlet and disconnect the antenna. s Use only an original Sony AC power cord...
... TV set for your feet on any way, such as power-supply cord or plug is positioned in a fire. Install in accordance with a protective earthing connection. When a cart is designed to the same AC power outlet as radiators, heat registers, stoves, or other brands. Stop using the TV set should be disconnected from the wall outlet and disconnect the antenna. s Use only an original Sony AC power cord...

Operating Instructions
Page 5
... follow the instruction provided on the LCD panel and the frame around the screen. SOUND If a snapping or popping sound from the speaker. If not, it gently with such power lines or circuits. To remove dust from the bottom. If using a vacuum cleaner. Antenna grounding according to shocks or vibration, or excessive force. CLEANING Cleaning the AC power plug Unplug the AC power plug and...
... follow the instruction provided on the LCD panel and the frame around the screen. SOUND If a snapping or popping sound from the speaker. If not, it gently with such power lines or circuits. To remove dust from the bottom. If using a vacuum cleaner. Antenna grounding according to shocks or vibration, or excessive force. CLEANING Cleaning the AC power plug Unplug the AC power plug and...
Operating Instructions
Page 10
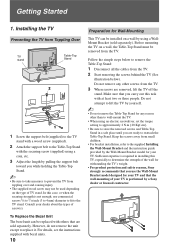
... type of screw(s). Consult your TV. Installing the TV Preventing the TV from toppling over and causing injury. • The supplied wood screw may not be used depending on a wall, the Table-Top Stand must be replaced with bezel units. 10 Preparation for your dealer about the types of TV stand. However, do not remove the unit except to the supplied Installing the Wall-Mount Bracket and the instruction guide provided by the Wall-Mount Bracket model for Wall-Mounting...
... type of screw(s). Consult your TV. Installing the TV Preventing the TV from toppling over and causing injury. • The supplied wood screw may not be used depending on a wall, the Table-Top Stand must be replaced with bezel units. 10 Preparation for your dealer about the types of TV stand. However, do not remove the unit except to the supplied Installing the Wall-Mount Bracket and the instruction guide provided by the Wall-Mount Bracket model for Wall-Mounting...
Operating Instructions
Page 11
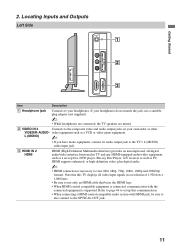
..., all video input signals in a resolution of 1,920 dots × 1,080 lines. • Be sure to use a suitable plug adapter (not supplied). ~ • While headphones are connected, the TV speakers are muted. 2 VIDEO IN 2 Connects to the composite video and audio output jacks on your camcorder or other VIDEO/R-AUDIO- Note that bears the HDMI logo. • When HDMI control compatible equipment is connected, communication with HDMI jack, be sure to also connect to set -top box, DVD player...
..., all video input signals in a resolution of 1,920 dots × 1,080 lines. • Be sure to use a suitable plug adapter (not supplied). ~ • While headphones are connected, the TV speakers are muted. 2 VIDEO IN 2 Connects to the composite video and audio output jacks on your camcorder or other VIDEO/R-AUDIO- Note that bears the HDMI logo. • When HDMI control compatible equipment is connected, communication with HDMI jack, be sure to also connect to set -top box, DVD player...
Operating Instructions
Page 13
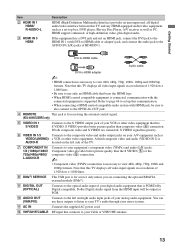
... 720p, 1080i and 1080p formats. S VIDEO provides better picture quality than the S VIDEO (5) or the composite video (6) connection. ~ • Component video (YPBPR) connection is necessary to your analog audio equipment. Component video provides better picture quality than composite video (6) connection. qa AC IN Connects the supplied AC power cord. a VCR or other video equipment that this communication. • When connecting a HDMI control compatible audio system with HDMI jack, be output as a set up this TV displays all video input signals in a resolution of 1,920 dots...
... 720p, 1080i and 1080p formats. S VIDEO provides better picture quality than the S VIDEO (5) or the composite video (6) connection. ~ • Component video (YPBPR) connection is necessary to your analog audio equipment. Component video provides better picture quality than composite video (6) connection. qa AC IN Connects the supplied AC power cord. a VCR or other video equipment that this communication. • When connecting a HDMI control compatible audio system with HDMI jack, be output as a set up this TV displays all video input signals in a resolution of 1,920 dots...
Operating Instructions
Page 16
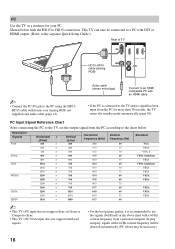
... detected automatically. (PC reboot may be connected to a PC with DVI or HDMI output. (Refer to the separate Quick Setup Guide.) Rear of TV PC IN 1 RGB IN 3 AUDIO L HD15-HD15 AUDIO cable (analog R RGB) ~ • Connect the PC IN jack to the TV and no signal has been input from the PC for your PC. Resolution Signals VGA SVGA XGA WXGA SXGA HDTV Horizontal × (Pixel) 640 ×...
... detected automatically. (PC reboot may be connected to a PC with DVI or HDMI output. (Refer to the separate Quick Setup Guide.) Rear of TV PC IN 1 RGB IN 3 AUDIO L HD15-HD15 AUDIO cable (analog R RGB) ~ • Connect the PC IN jack to the TV and no signal has been input from the PC for your PC. Resolution Signals VGA SVGA XGA WXGA SXGA HDTV Horizontal × (Pixel) 640 ×...
Operating Instructions
Page 18
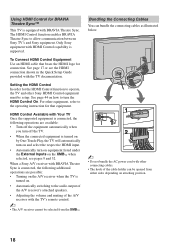
... XMB™. Bundling the Connecting Cables You can be setup. Using HDMI Control for BRAVIA Theatre Sync™ This TV is turned on. • Automatically switching to the audio output of the A/V receiver's attached speakers. • Adjusting the volume and muting of the cable holder can bundle the connecting cables as illustrated below. 1 2 ~ • Do not bundle the AC power cord with other equipment, refer to the operating instruction for that bears the...
... XMB™. Bundling the Connecting Cables You can be setup. Using HDMI Control for BRAVIA Theatre Sync™ This TV is turned on. • Automatically switching to the audio output of the A/V receiver's attached speakers. • Adjusting the volume and muting of the cable holder can bundle the connecting cables as illustrated below. 1 2 ~ • Do not bundle the AC power cord with other equipment, refer to the operating instruction for that bears the...
Operating Instructions
Page 19
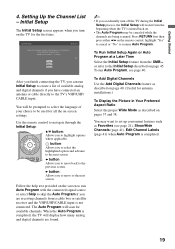
... next screen. b button: Allows you accidentally turn on . • The Auto Program may want to the TV's VHF/UHF/ CABLE input. To Run Initial Setup Again or Auto Program at a Later Time Select the Initial Setup feature from a cable box or satellite receiver and the VHF/UHF/CABLE input is turned back on the TV for digital channels. Use the remote control to navigate through the Initial Setup: V/v button: Allows you have connected an antenna or cable directly to set up...
... next screen. b button: Allows you accidentally turn on . • The Auto Program may want to the TV's VHF/UHF/ CABLE input. To Run Initial Setup Again or Auto Program at a Later Time Select the Initial Setup feature from a cable box or satellite receiver and the VHF/UHF/CABLE input is turned back on the TV for digital channels. Use the remote control to navigate through the Initial Setup: V/v button: Allows you have connected an antenna or cable directly to set up...

Operating Instructions
Page 22
... display the BD/DVD disc menu. Pressing this button alone starts the Record recording process. POWER wa SLEEP Press repeatedly until Off appears. 22 wa m (fast reverse): Press to play a program in minutes (Off, 15min, 30min, 45min, 60min, 90min or 120min) that you have Operating programmed into the remote control. Press again or press VOL + to adjust the volume. Press to restore qd the sound...
... display the BD/DVD disc menu. Pressing this button alone starts the Record recording process. POWER wa SLEEP Press repeatedly until Off appears. 22 wa m (fast reverse): Press to play a program in minutes (Off, 15min, 30min, 45min, 60min, 90min or 120min) that you have Operating programmed into the remote control. Press again or press VOL + to adjust the volume. Press to restore qd the sound...
Operating Instructions
Page 24
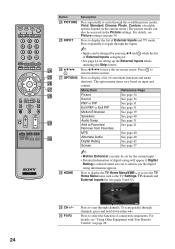
... e; wg wj OPTIONS Press to display a list of External Inputs and TV mode. For details, see "Using Other Equipment with Your Remote Control" on -screen cursor. Alternate Audio See page 40 Digital Rating See page 42 Screen See page 37 wk HOME ~ • Motion Enhancer can also be accessed in the Picture settings. wg INPUT Press to display the list of convenient functions and menu wh shortcuts. For details, see...
... e; wg wj OPTIONS Press to display a list of External Inputs and TV mode. For details, see "Using Other Equipment with Your Remote Control" on -screen cursor. Alternate Audio See page 40 Digital Rating See page 42 Screen See page 37 wk HOME ~ • Motion Enhancer can also be accessed in the Picture settings. wg INPUT Press to display the list of convenient functions and menu wh shortcuts. For details, see...

Operating Instructions
Page 31
... display the OPTIONS menu while watching one of External Inputs (see page 16). to change channels or enter the channel number using the 0-9 numeric buttons. ~ • You may also press RETURN while in these features to exit. • Additional compatible device with Skip applied will not appear in the list of the following inputs: TV channels, Video, Component, HDMI or PC. 2 Press V/v to highlight P&P or PIP, and press to display...
... display the OPTIONS menu while watching one of External Inputs (see page 16). to change channels or enter the channel number using the 0-9 numeric buttons. ~ • You may also press RETURN while in these features to exit. • Additional compatible device with Skip applied will not appear in the list of the following inputs: TV channels, Video, Component, HDMI or PC. 2 Press V/v to highlight P&P or PIP, and press to display...
Operating Instructions
Page 33
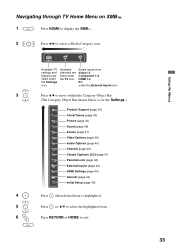
... Category Object Bar shown below is for the Settings.) Product Support (page 34) Clock/Timers (page 34) Picture (page 34) Sound (page 36) Screen (page 37) Video Options (page 39) Audio Options (page 40) Channel (page 40) CC Closed Captions (CC) (page 41) Parental Lock (page 42) External Inputs (page 44) HDMI Settings (page 44) General (page 44) Initial Setup (page 45) 4 Press when desired item is highlighted...
... Category Object Bar shown below is for the Settings.) Product Support (page 34) Clock/Timers (page 34) Picture (page 34) Sound (page 36) Screen (page 37) Video Options (page 39) Audio Options (page 40) Channel (page 40) CC Closed Captions (CC) (page 41) Parental Lock (page 42) External Inputs (page 44) HDMI Settings (page 44) General (page 44) Initial Setup (page 45) 4 Press when desired item is highlighted...
Operating Instructions
Page 34
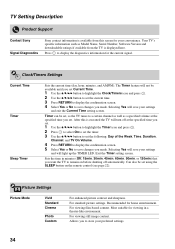
... Support Contact Sony Signal Diagnostics Sony contact information is available from the TV is executed the TV will save changes you want the TV to remain on the remote control (see page 22). Selecting Yes will turn off automatically. Picture Settings Picture Mode Vivid Standard Cinema Photo Custom For enhanced picture contrast and sharpness. For standard picture settings. Your TV's specific information such as a specified volume at the specified time you set. 1 Use the V/v/B/b button...
... Support Contact Sony Signal Diagnostics Sony contact information is available from the TV is executed the TV will save changes you want the TV to remain on the remote control (see page 22). Selecting Yes will turn off automatically. Picture Settings Picture Mode Vivid Standard Cinema Photo Custom For enhanced picture contrast and sharpness. For standard picture settings. Your TV's specific information such as a specified volume at the specified time you set. 1 Use the V/v/B/b button...

Operating Instructions
Page 39
... component input jacks. Use this at the factory default setting. Video Produces suitable image quality for standard use . Allows you leave this setting for moving pictures that supports Video-A mode. Auto Automatically optimize based on the input source (video or photograph data). Custom If the tone of the picture from the equipment connected to match the output color space within the output signal from the input source is selected. Change the settings only when the luminance tone of HDMI input color signals...
... component input jacks. Use this at the factory default setting. Video Produces suitable image quality for standard use . Allows you leave this setting for moving pictures that supports Video-A mode. Auto Automatically optimize based on the input source (video or photograph data). Custom If the tone of the picture from the equipment connected to match the output color space within the output signal from the input source is selected. Change the settings only when the luminance tone of HDMI input color signals...
Operating Instructions
Page 40
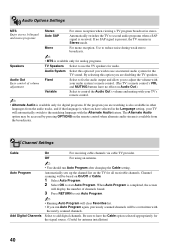
... appropriately for the signal source. (Useful for audio. Select to use an external audio system for analog programs. Speakers TV Speakers Select to add digital channels. Use to reduce noise during weak stereo broadcasts. ~ • MTS is what you run Auto Program after changing the Cable setting. Automatically sets up the channel list on Audio Out.) Variable Select to control the Audio Out's volume and muting with your TV's remote control. ~ • Alternate Audio is available from the audio tracks, and if...
... appropriately for the signal source. (Useful for audio. Select to use an external audio system for analog programs. Speakers TV Speakers Select to add digital channels. Use to reduce noise during weak stereo broadcasts. ~ • MTS is what you run Auto Program after changing the Cable setting. Automatically sets up the channel list on Audio Out.) Variable Select to control the Audio Out's volume and muting with your TV's remote control. ~ • Alternate Audio is available from the audio tracks, and if...
Operating Instructions
Page 42
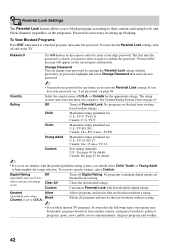
... Parental Lock settings, turn off and on page 43. The first time the password is created, you block unrated TV programs, be blocked: programs broadcast from viewing. U.S.: See page 43 for the appropriate ratings. Digital Rating (Available only in setting up blocking. Canada: See page 43 for any future access into the Parental Lock settings. Clears the downloaded ratings. Password is set more specific ratings, select Custom. Change Password You can change your password...
... Parental Lock settings, turn off and on page 43. The first time the password is created, you block unrated TV programs, be blocked: programs broadcast from viewing. U.S.: See page 43 for the appropriate ratings. Digital Rating (Available only in setting up blocking. Canada: See page 43 for any future access into the Parental Lock settings. Clears the downloaded ratings. Password is set more specific ratings, select Custom. Change Password You can change your password...
Operating Instructions
Page 47
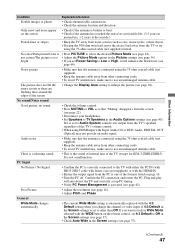
... supplied) instead. No color/Dark picture/Color is the sound of internal fans of the screen • Change the Display Area setting to Audio System, sound is not output from the PC is connected using HDMI input with the 4:3 Default setting when you set Power Saving to use an undamaged antenna cable. The picture does not fill the entire screen or there are flashing lines around the edges of the TV (except for KDL-52XBR4/XBR5). Poor Picture • Adjust...
... supplied) instead. No color/Dark picture/Color is the sound of internal fans of the screen • Change the Display Area setting to Audio System, sound is not output from the PC is connected using HDMI input with the 4:3 Default setting when you set Power Saving to use an undamaged antenna cable. The picture does not fill the entire screen or there are flashing lines around the edges of the TV (except for KDL-52XBR4/XBR5). Poor Picture • Adjust...
Operating Instructions
Page 51
... Picture 35 Settings Audio Options 40 Channel 40 Clock/Timers 34 Closed Captions (CC) 41 External Inputs 44 General 44 HDMI Settings 44 Initial Setup 45 Parental Lock 42 Picture 34 Product Support 34 Screen 37 Sound 36 Video Options 39 Sharpness 35 Show/Hide Channels 41 Signal Diagnostics 34 SLEEP button 22 Sleep Timer 34 Sound Booster 37 SOUND button 21 Sound Mode 36 Speaker 25 Speakers 40 STANDBY LED 25 Steady Sound 37 Surround 36 T THEATER button 22 Timer 34 Treble 36 Troubleshooting 46-48 TV Auto Power On 44 TV POWER button...
... Picture 35 Settings Audio Options 40 Channel 40 Clock/Timers 34 Closed Captions (CC) 41 External Inputs 44 General 44 HDMI Settings 44 Initial Setup 45 Parental Lock 42 Picture 34 Product Support 34 Screen 37 Sound 36 Video Options 39 Sharpness 35 Show/Hide Channels 41 Signal Diagnostics 34 SLEEP button 22 Sleep Timer 34 Sound Booster 37 SOUND button 21 Sound Mode 36 Speaker 25 Speakers 40 STANDBY LED 25 Steady Sound 37 Surround 36 T THEATER button 22 Timer 34 Treble 36 Troubleshooting 46-48 TV Auto Power On 44 TV POWER button...


