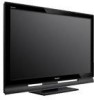
Operating Instructions
Page 2
.... s The plug is connected. s For details concerning safety precautions, see "Important Safety Instructions" on the TV. s Avoid operating the TV at the rear of the following Sony TVs only with an extension cord, receptacle or other WALL-MOUNT BRACKET or TV-stand may cause undesired operation. s To obtain the best picture, do not block the ventilation openings. CAUTION Use the following measures: s Reorient or relocate the receiving antenna. The TV shall not...
.... s The plug is connected. s For details concerning safety precautions, see "Important Safety Instructions" on the TV. s Avoid operating the TV at the rear of the following Sony TVs only with an extension cord, receptacle or other WALL-MOUNT BRACKET or TV-stand may cause undesired operation. s To obtain the best picture, do not block the ventilation openings. CAUTION Use the following measures: s Reorient or relocate the receiving antenna. The TV shall not...

Operating Instructions
Page 3
... a trademark. A grounding type plug has two blades and a third grounding prong. "BRAVIA", and Sony Corporation. are trademarks of these instructions. 3) Heed all warnings. 4) Follow all servicing to a cable service provider. Depending upon such changed settings, the power consumption may increase which should allow you to receive unscrambled digital cable television programming via subscription service to qualified service personnel. ENERGY STAR is a joint program of Dolby Laboratories. HDMI, the HDMI logo and...
... a trademark. A grounding type plug has two blades and a third grounding prong. "BRAVIA", and Sony Corporation. are trademarks of these instructions. 3) Heed all warnings. 4) Follow all servicing to a cable service provider. Depending upon such changed settings, the power consumption may increase which should allow you to receive unscrambled digital cable television programming via subscription service to qualified service personnel. ENERGY STAR is a joint program of Dolby Laboratories. HDMI, the HDMI logo and...
Operating Instructions
Page 6
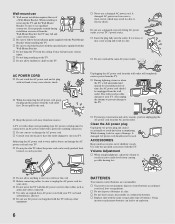
... specified parts supplied with a protective earthing connection. s Consult your safety. s Be sure to your TV; s Use only an original Sony AC power cord with your local laws or regulations. s During lightning storms or when the TV is left unattended and unused for your electrician to have the outlet changed to the TV. Wall-mount use s Wall-mount installation requires the use of batteries in a fire. When installing or removing the TV...
... specified parts supplied with a protective earthing connection. s Consult your safety. s Be sure to your TV; s Use only an original Sony AC power cord with your local laws or regulations. s During lightning storms or when the TV is left unattended and unused for your electrician to have the outlet changed to the TV. Wall-mount use s Wall-mount installation requires the use of batteries in a fire. When installing or removing the TV...
Operating Instructions
Page 7
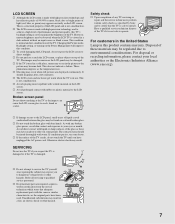
... of light (red, blue, or green) may appear constantly on the Power Management will improve this TV's backlight setting is safe to dangerous voltage levels or other hazards. 7 7 However, uneven brightness may be observed when the LCD TV is normal and not a malfunction of the TV. This condition is viewed in this product contains mercury. Changing the Picture mode, Backlight setting, or turning on the LCD screen...
... of light (red, blue, or green) may appear constantly on the Power Management will improve this TV's backlight setting is safe to dangerous voltage levels or other hazards. 7 7 However, uneven brightness may be observed when the LCD TV is normal and not a malfunction of the TV. This condition is viewed in this product contains mercury. Changing the Picture mode, Backlight setting, or turning on the LCD screen...
Operating Instructions
Page 9
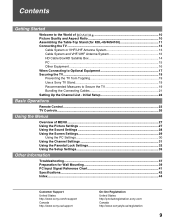
Initial Setup 22 Basic Operations Remote Control ...23 TV Controls...26 Using the Menus Overview of 10 Picture Quality and Aspect Ratio 10 Assembling the Table-Top Stand (for Wall Mounting 39 PC Input Signal Reference Chart 41 Specifications ...42 Index...44 Customer Support United States http://www.sony.com/tvsupport Canada http://www.sony.ca/support On-line Registration United States http://productregistration.sony.com Canada http://www.sonystyle.ca/registration...
Initial Setup 22 Basic Operations Remote Control ...23 TV Controls...26 Using the Menus Overview of 10 Picture Quality and Aspect Ratio 10 Assembling the Table-Top Stand (for Wall Mounting 39 PC Input Signal Reference Chart 41 Specifications ...42 Index...44 Customer Support United States http://www.sony.com/tvsupport Canada http://www.sony.ca/support On-line Registration United States http://productregistration.sony.com Canada http://www.sonystyle.ca/registration...
Operating Instructions
Page 17
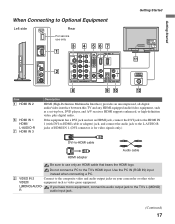
... 2 VIDEO IN 2 VIDEO L (MONO) AUDIO R Rear For service use only an HDMI cable that bears the HDMI logo. Getting Started Getting Started When Connecting to the composite video and audio output jacks on your camcorder or other video VIDEO/ equipment such as a set-top box, DVD player, and A/V receiver. Do not connect a PC to use only 1 3 4 56 7 (1080p/1080i/720p/480p/480i) RGB IN S VIDEO Y 1 3 2 PB VIDEO PR L L (MONO) R R AUDIO 1 1 AUDIO 2 VIDEO IN COMPONENT IN L AUDIO AUDIO R PC IN L AUDIO R DIGITAL (FIX) AUDIO OUT (OPTICAL) AUDIO...
... 2 VIDEO IN 2 VIDEO L (MONO) AUDIO R Rear For service use only an HDMI cable that bears the HDMI logo. Getting Started Getting Started When Connecting to the composite video and audio output jacks on your camcorder or other video VIDEO/ equipment such as a set-top box, DVD player, and A/V receiver. Do not connect a PC to use only 1 3 4 56 7 (1080p/1080i/720p/480p/480i) RGB IN S VIDEO Y 1 3 2 PB VIDEO PR L L (MONO) R R AUDIO 1 1 AUDIO 2 VIDEO IN COMPONENT IN L AUDIO AUDIO R PC IN L AUDIO R DIGITAL (FIX) AUDIO OUT (OPTICAL) AUDIO...
Operating Instructions
Page 18
... right audio input jacks of your audio or video equipment. If this TV displays all picture format types in a resolution of the PC Settings on page 41 for the signals that has S VIDEO. If the picture is PCM/Dolby digital compatible. 0 AUDIO OUT L-AUDIO-R (FIX) Connect to your stereo system. Note that connects to the left side panel of Dolby Laboratories. A second composite video and audio (VIDEO 2) is the case, connect the adapter to your TV's audio through your Cable...
... right audio input jacks of your audio or video equipment. If this TV displays all picture format types in a resolution of the PC Settings on page 41 for the signals that has S VIDEO. If the picture is PCM/Dolby digital compatible. 0 AUDIO OUT L-AUDIO-R (FIX) Connect to your stereo system. Note that connects to the left side panel of Dolby Laboratories. A second composite video and audio (VIDEO 2) is the case, connect the adapter to your TV's audio through your Cable...
Operating Instructions
Page 20
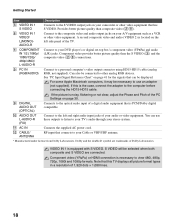
... by providing your TV model name. - For United States call : 1-877-899-7669 3 Anchor the TV to tighten at approximately 2.0 N·m {20 kgf·cm}. 20 mount holes located on the Table-Top Stand Screw Contact Sony Customer Support to support the weight of the TV). Getting Started 2 Secure the TV to the other M6 anchor bolt). Use the optional hardware listed below (not supplied). • Two M6...
... by providing your TV model name. - For United States call : 1-877-899-7669 3 Anchor the TV to tighten at approximately 2.0 N·m {20 kgf·cm}. 20 mount holes located on the Table-Top Stand Screw Contact Sony Customer Support to support the weight of the TV). Getting Started 2 Secure the TV to the other M6 anchor bolt). Use the optional hardware listed below (not supplied). • Two M6...
Operating Instructions
Page 22
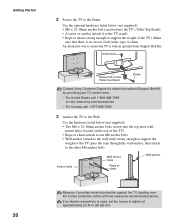
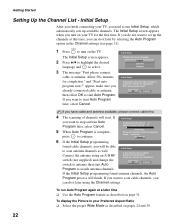
... auto program now?" If the Initial Setup programming found cable channels, you want to scan cable channels, you can do it later using an A-B RF switch (not supplied) and change the switch to set up available channels. To run Auto Program again at this time, you can do it later by selecting the Auto Program option in your TV for the first time. If you want to use air signals, please connect antenna. Getting Started Setting Up the Channel List...
... auto program now?" If the Initial Setup programming found cable channels, you want to scan cable channels, you can do it later using an A-B RF switch (not supplied) and change the switch to set up available channels. To run Auto Program again at this time, you can do it later by selecting the Auto Program option in your TV for the first time. If you want to use air signals, please connect antenna. Getting Started Setting Up the Channel List...

Operating Instructions
Page 23
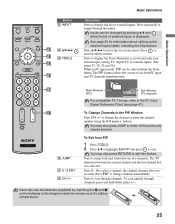
... the TV to the channel you run Auto Program (see page 36. For details, see "Using the Picture Settings" on and off after a few seconds. Your Favorites list will turn on page 27. The picture modes can store up to 8 channels and/or external inputs in the Picture settings. Basic Operations Basic Operations Remote Control 1 2 3 4 5 6 7 8 9 0 Button 1 DISPLAY 2 SLEEP 3 FAVORITES Description Press once to select digital channels. The onscreen display (OSD) will be accessed in your Favorites list. 4 PICTURE 5 RETURN 6 MENU...
... the TV to the channel you run Auto Program (see page 36. For details, see "Using the Picture Settings" on and off after a few seconds. Your Favorites list will turn on page 27. The picture modes can store up to 8 channels and/or external inputs in the Picture settings. Basic Operations Basic Operations Remote Control 1 2 3 4 5 6 7 8 9 0 Button 1 DISPLAY 2 SLEEP 3 FAVORITES Description Press once to select digital channels. The onscreen display (OSD) will be accessed in your Favorites list. 4 PICTURE 5 RETURN 6 MENU...
Operating Instructions
Page 25
... to the previously viewed channel. the channel changes after two seconds. Press ENT to change the channel or enter the channel number using the 0-9 numeric buttons. Basic Operations Button qd INPUT qd qf V/v/B/b qf qg TOOLS qg qh Basic Operations Description Press to display the list of external inputs is associated with your current input: analog TV, digital TV or external inputs. (See pages 27, 28, 32 and 36.) While in the PIP Window Press CH...
... to the previously viewed channel. the channel changes after two seconds. Press ENT to change the channel or enter the channel number using the 0-9 numeric buttons. Basic Operations Button qd INPUT qd qf V/v/B/b qf qg TOOLS qg qh Basic Operations Description Press to display the list of external inputs is associated with your current input: analog TV, digital TV or external inputs. (See pages 27, 28, 32 and 36.) While in the PIP Window Press CH...
Operating Instructions
Page 26
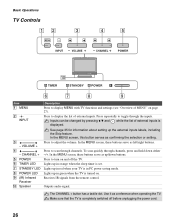
... the list of external inputs is set. In the MENU screen, these buttons serve as a reference when operating the TV. CHANNEL + 5 POWER 6 TIMER LED 7 STANDBY LED Press to adjust the volume. Lights up in red when your TV is in PC power saving mode. 8 POWER LED 9 (IR) Infrared Receiver Lights up in green when the TV is completely switched off the TV. Make sure that the TV is turned on and off before unplugging the power cord. 26 Receives IR signals from the remote control. 0 Speaker Outputs audio signal. In the MENU screen, these buttons...
... the list of external inputs is set. In the MENU screen, these buttons serve as a reference when operating the TV. CHANNEL + 5 POWER 6 TIMER LED 7 STANDBY LED Press to adjust the volume. Lights up in red when your TV is in PC power saving mode. 8 POWER LED 9 (IR) Infrared Receiver Lights up in green when the TV is completely switched off the TV. Make sure that the TV is turned on and off before unplugging the power cord. 26 Receives IR signals from the remote control. 0 Speaker Outputs audio signal. In the MENU screen, these buttons...
Operating Instructions
Page 29
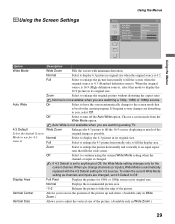
... channel. Using the Screen Settings Using the Menus Screen Wide Mode Auto Wide 4:3 Default Display Area Vertical Center Vertical Size PC Settings TV Wide Zoom On Wide Zoom Normal 0 0 Using the Menus Option Description Wide Mode Wide Zoom Fills the screen with the 4:3 Default setting for the current program. Normal Select to enlarge the original picture without distorting the aspect ratio. Zoom Select to display 4:3 picture in original size when the original source is changed , set...
... channel. Using the Screen Settings Using the Menus Screen Wide Mode Auto Wide 4:3 Default Display Area Vertical Center Vertical Size PC Settings TV Wide Zoom On Wide Zoom Normal 0 0 Using the Menus Option Description Wide Mode Wide Zoom Fills the screen with the 4:3 Default setting for the current program. Normal Select to enlarge the original picture without distorting the aspect ratio. Zoom Select to display 4:3 picture in original size when the original source is changed , set...
Operating Instructions
Page 30
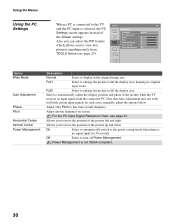
... Settings Settings screen appears instead of the picture up and down. Using the Menus Using the PC Settings When a PC is connected to the TV Screen PC and the PC input is not VESA-compliant. 30 Note that Auto Adjustment may not work well with certain input signals. Off Select to the power saving mode when there is no signal input for 30 seconds. On Select to automatically switch to turn off Power Management. Adjust...
... Settings Settings screen appears instead of the picture up and down. Using the Menus Using the PC Settings When a PC is connected to the TV Screen PC and the PC input is not VESA-compliant. 30 Note that Auto Adjustment may not work well with certain input signals. Off Select to the power saving mode when there is no signal input for 30 seconds. On Select to automatically switch to turn off Power Management. Adjust...

Operating Instructions
Page 35
..., Game, Camcorder, Skip Component 1-2 -, DVD, VCR, Blu-ray, Cable Box, Satellite, DVR, Game, Camcorder, Skip HDMI 1-3 -, DVD, VCR, Blu-ray, Cable Box, Satellite, DVR, Game, Camcorder, Skip PC -, Skip If you select Skip, your language of PC input). Language Sleep Timer You can select from several closed captioning). Displays for a few seconds when the channel is changed or the DISPLAY button is connected. Using the Setup Settings Using the Menus Setup TV Closed Captions (CC) Info Banner Label Video Inputs Language Sleep Timer Power Saving...
..., Game, Camcorder, Skip Component 1-2 -, DVD, VCR, Blu-ray, Cable Box, Satellite, DVR, Game, Camcorder, Skip HDMI 1-3 -, DVD, VCR, Blu-ray, Cable Box, Satellite, DVR, Game, Camcorder, Skip PC -, Skip If you select Skip, your language of PC input). Language Sleep Timer You can select from several closed captioning). Displays for a few seconds when the channel is changed or the DISPLAY button is connected. Using the Setup Settings Using the Menus Setup TV Closed Captions (CC) Info Banner Label Video Inputs Language Sleep Timer Power Saving...
Operating Instructions
Page 37
..., service needs, or required technical assistance related to the use of your desired input from some video sources. ❑ Check the connection between the optional video equipment and the TV. ❑ Press INPUT on the remote control (page 25). ❑ Press MENU on the power of the TV. ❑ Check antenna/cable connections. Cannot receive or select channels. ❑ Perform Auto Program to add receivable channels that the antenna is locked to Off. Select your Sony TV, please...
..., service needs, or required technical assistance related to the use of your desired input from some video sources. ❑ Check the connection between the optional video equipment and the TV. ❑ Press INPUT on the remote control (page 25). ❑ Press MENU on the power of the TV. ❑ Check antenna/cable connections. Cannot receive or select channels. ❑ Perform Auto Program to add receivable channels that the antenna is locked to Off. Select your Sony TV, please...
Operating Instructions
Page 38
... show these programs with black bands at the remote control sensor of the TV's volume control. and ability to Off, sound is due to your customized settings including Parental Lock setting. 38 How to reset the TV to enter a new password (page 33). try turning off , then back on the TV. The master password clears your remote control operation; While holding down the V button on the remote control, press the POWER button on the TV. (The TV will show...
... show these programs with black bands at the remote control sensor of the TV's volume control. and ability to Off, sound is due to your customized settings including Parental Lock setting. 38 How to reset the TV to enter a new password (page 33). try turning off , then back on the TV. The master password clears your remote control operation; While holding down the V button on the remote control, press the POWER button on the TV. (The TV will show...
Operating Instructions
Page 39
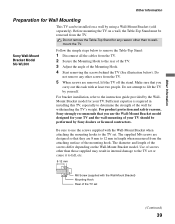
... the TV set (Continued) 39 Other Information Other Information Preparation for Wall Mounting This TV can be installed on a wall by the WallMount Bracket model for your TV. Sufficient expertise is required in installing this task with the Wall-Mount Bracket) Mounting Hook Rear of the wall for withstanding the TV's weight. For product protection and safety reasons, Sony strongly recommends that you carry out this TV, especially to the instruction guide provided by using a Wall-Mount Bracket...
... the TV set (Continued) 39 Other Information Other Information Preparation for Wall Mounting This TV can be installed on a wall by the WallMount Bracket model for your TV. Sufficient expertise is required in installing this task with the Wall-Mount Bracket) Mounting Hook Rear of the wall for withstanding the TV's weight. For product protection and safety reasons, Sony strongly recommends that you carry out this TV, especially to the instruction guide provided by using a Wall-Mount Bracket...
Operating Instructions
Page 42
... (Fixed) DIGITAL AUDIO OUT (OPTICAL): Optical Digital Audio Output (PCM/Dolby Digital) PC IN: Analog RGB (D-sub 15-pin): 0.7 Vp-p, 75 ohms, positive See the PC Input Signal Reference Chart on page 41 AUDIO (Stereo mini jack): 500 mVrms Impedance: 47 kilohms Power Requirement: 120 V-240 V AC, 50/60 Hz Screen size (in inches): 40, 46, 52 Speaker/Full range (2): KDL-40S4100: (in mm) 57.5 × 126 (in inches) 2 3/8 × 5 KDL-46S4100: (in...
... (Fixed) DIGITAL AUDIO OUT (OPTICAL): Optical Digital Audio Output (PCM/Dolby Digital) PC IN: Analog RGB (D-sub 15-pin): 0.7 Vp-p, 75 ohms, positive See the PC Input Signal Reference Chart on page 41 AUDIO (Stereo mini jack): 500 mVrms Impedance: 47 kilohms Power Requirement: 120 V-240 V AC, 50/60 Hz Screen size (in inches): 40, 46, 52 Speaker/Full range (2): KDL-40S4100: (in mm) 57.5 × 126 (in inches) 2 3/8 × 5 KDL-46S4100: (in...

Operating Instructions
Page 44
... Settings Channel 31 Parental Lock 32 PC Settings 30 Picture 27 Screen 29 Setup 35 Sound 28 Sharpness 27 Show/Hide Channels 31 SLEEP button 23 Sleep Timer 35 Sound Mode 28 Speaker 28 STANDBY LED 26 44 T TIMER LED 26 TOOLS button 25 Treble 28 Troubleshooting 37, 38 TV Rating 33 U U.S.A. Rating 34 Unrated 32 V Vertical Center 29, 30 Vertical Size 29 VIDEO/AUDIO (L/R) jacks, described 17, 18 Viewing Blocked Programs 34 VOL+/- button 23, 26 W WIDE button 24 Wide Mode...
... Settings Channel 31 Parental Lock 32 PC Settings 30 Picture 27 Screen 29 Setup 35 Sound 28 Sharpness 27 Show/Hide Channels 31 SLEEP button 23 Sleep Timer 35 Sound Mode 28 Speaker 28 STANDBY LED 26 44 T TIMER LED 26 TOOLS button 25 Treble 28 Troubleshooting 37, 38 TV Rating 33 U U.S.A. Rating 34 Unrated 32 V Vertical Center 29, 30 Vertical Size 29 VIDEO/AUDIO (L/R) jacks, described 17, 18 Viewing Blocked Programs 34 VOL+/- button 23, 26 W WIDE button 24 Wide Mode...


