
Child Safety: It Makes A Difference Where Your TV Stands
Page 1
... a Sector of TVs such as VCRs and remotes that may cause unnecessary injury. As a result, TV sets may fall over . 7 Share our safety message on this hidden hazard of the home with furniture and television sets. 5 Avoid placing any items on top of the Electronic Industries Alliance Child Safety: It Makes A Difference...
... a Sector of TVs such as VCRs and remotes that may cause unnecessary injury. As a result, TV sets may fall over . 7 Share our safety message on this hidden hazard of the home with furniture and television sets. 5 Avoid placing any items on top of the Electronic Industries Alliance Child Safety: It Makes A Difference...
Installing the Wall-Mount Bracket
Page 2
... specified for your TV should be installed on a wall by Sony dealers or licensed contractors. English Français Step 4: Preparing for SU-WL51. Note When using an electric screwdriver, set the torque setting to the Instructions for the installation of the TV Before removing ...bracket installation, refer to determine the strength of the wall for withstanding the TV's weight. For product protection and safety reasons, Sony strongly recommends that you want to the Instructions for the display installation dimensions and determine the location. Refer to install your TV. ...
... specified for your TV should be installed on a wall by Sony dealers or licensed contractors. English Français Step 4: Preparing for SU-WL51. Note When using an electric screwdriver, set the torque setting to the Instructions for the installation of the TV Before removing ...bracket installation, refer to determine the strength of the wall for withstanding the TV's weight. For product protection and safety reasons, Sony strongly recommends that you want to the Instructions for the display installation dimensions and determine the location. Refer to install your TV. ...
Operating Instructions
Page 6
... surface. Never spill liquid of any kind on a bed, sofa, rug or other materials. MOISTURE Moisture and flammable objects s Do not use power-line operated sets near a swimming pool, etc. It may result. Do not place any liquid or solid object does fall through the cabinet slots as illustrated. s Carry the...
... surface. Never spill liquid of any kind on a bed, sofa, rug or other materials. MOISTURE Moisture and flammable objects s Do not use power-line operated sets near a swimming pool, etc. It may result. Do not place any liquid or solid object does fall through the cabinet slots as illustrated. s Carry the...
Operating Instructions
Page 9
... Cables 16 Adjusting the Viewing Angle of MENU ...23 Using the Picture Settings 26 Using the Sound Settings 28 Using the Screen Settings 29 Using the Setup Settings 31 Using the PC Settings...36 Using the Analog Setup Settings 37 Using the Digital Setup Settings 38 Other Information Troubleshooting...41 PC Input Signal Reference Chart 43 Specifications...
... Cables 16 Adjusting the Viewing Angle of MENU ...23 Using the Picture Settings 26 Using the Sound Settings 28 Using the Screen Settings 29 Using the Setup Settings 31 Using the PC Settings...36 Using the Analog Setup Settings 37 Using the Digital Setup Settings 38 Other Information Troubleshooting...41 PC Input Signal Reference Chart 43 Specifications...
Operating Instructions
Page 10
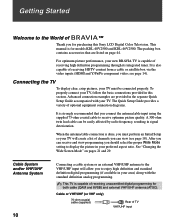
...provided in signal deterioration. Connecting the TV To display clear, crisp pictures, your new BRAVIA TV is done, you must be easily affected by radio frequency, resulting in the...receiving HDTV content from a cable or satellite box via the video inputs (HDMI and Y/PB/PR component video; This manual is capable of receiving unscrambled digital programming for models KDL-40V2500 and KDL-...46V2500. To properly connect your TV, follow the basic connections provided in your TV will allow you to display the picture in this Sony LCD Digital Color ...
...provided in signal deterioration. Connecting the TV To display clear, crisp pictures, your new BRAVIA TV is done, you must be easily affected by radio frequency, resulting in the...receiving HDTV content from a cable or satellite box via the video inputs (HDMI and Y/PB/PR component video; This manual is capable of receiving unscrambled digital programming for models KDL-40V2500 and KDL-...46V2500. To properly connect your TV, follow the basic connections provided in your TV will allow you to display the picture in this Sony LCD Digital Color ...
Operating Instructions
Page 11
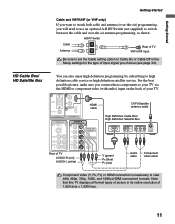
Note that this TV displays all format types of picture in the Setup settings for the type of input signal you choose (see page 34). Getting Started Getting Started Cable and VHF/UHF (or VHF only) If you want ... between the cable and over-the air antenna programming, as shown. A/B RF Switch Cable A Antenna B Rear of TV VHF/UHF input Be sure to set the Cable setting option to high definition cable service or high definition satellite service. HD Cable Box/ HD Satellite Box You can also enjoy high definition programming...
Note that this TV displays all format types of picture in the Setup settings for the type of input signal you choose (see page 34). Getting Started Getting Started Cable and VHF/UHF (or VHF only) If you want ... between the cable and over-the air antenna programming, as shown. A/B RF Switch Cable A Antenna B Rear of TV VHF/UHF input Be sure to set the Cable setting option to high definition cable service or high definition satellite service. HD Cable Box/ HD Satellite Box You can also enjoy high definition programming...
Operating Instructions
Page 13
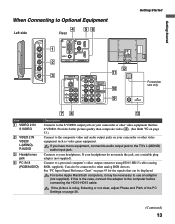
... Connects to the computer before connecting the HD15-HD15 cable. If this is noisy, flickering or not clear, adjust Phase and Pitch of the PC Settings on your headphones.
... Connects to the computer before connecting the HD15-HD15 cable. If this is noisy, flickering or not clear, adjust Phase and Pitch of the PC Settings on your headphones.
Operating Instructions
Page 14
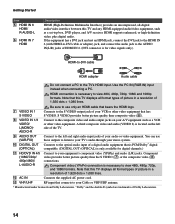
... digital channels.) Connect to your A/V equipment such as a VCR or other video equipment that this TV and any HDMI-equipped audio/video equipment, such as a set-top box, DVD player, and A/V receiver. A third composite video and audio (VIDEO 2) is only available for video signals only.) HDMI-to-DVI cable HDMI adapter...
... digital channels.) Connect to your A/V equipment such as a VCR or other video equipment that this TV and any HDMI-equipped audio/video equipment, such as a set-top box, DVD player, and A/V receiver. A third composite video and audio (VIDEO 2) is only available for video signals only.) HDMI-to-DVI cable HDMI adapter...
Operating Instructions
Page 18
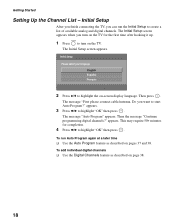
... Program again at a later time ❑ Use the Auto Program feature as described on the TV for completion. 4 Press B/b to start Auto Program?" Getting Started Setting Up the Channel List - This may require 50+ minutes for the first time after hooking it up. Then the message "Continue programming digital channels?"
... Program again at a later time ❑ Use the Auto Program feature as described on the TV for completion. 4 Press B/b to start Auto Program?" Getting Started Setting Up the Channel List - This may require 50+ minutes for the first time after hooking it up. Then the message "Continue programming digital channels?"
Operating Instructions
Page 19
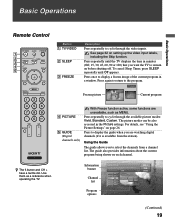
...TV. z The 5 button and CH + have a tactile dot. For details, see "Using the Picture Settings" on each channel. The guide also provides information about the current program being shown on page 26. Series follows the aquatic misadventures of the current program in a window. Press once to select the channels from...See page 32 on before shutting off. To cancel Sleep Timer, press SLEEP repeatedly until the TV displays the time in the Picture settings. Press again to return to cycle through the available picture modes: Vivid, Standard, Custom. Press repeatedly to remain on...
...TV. z The 5 button and CH + have a tactile dot. For details, see "Using the Picture Settings" on each channel. The guide also provides information about the current program being shown on page 26. Series follows the aquatic misadventures of the current program in a window. Press once to select the channels from...See page 32 on before shutting off. To cancel Sleep Timer, press SLEEP repeatedly until the TV displays the time in the Picture settings. Press again to return to cycle through the available picture modes: Vivid, Standard, Custom. Press repeatedly to remain on...
Operating Instructions
Page 20
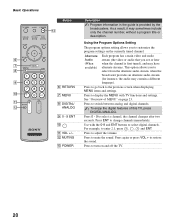
...include only the channel number, without a program title or description. Press again or press VOL + to the previous screen when displaying MENU items and settings. To enjoy the digital features of MENU" on and off the TV. 20 Press ENT to switch between analog and digital channels. Use with ...TV functions and settings. qs MUTING qd POWER Description Program information in the guide is first tuned), and may have alternate streams. This option allows you to adjust...
...include only the channel number, without a program title or description. Press again or press VOL + to the previous screen when displaying MENU items and settings. To enjoy the digital features of MENU" on and off the TV. 20 Press ENT to switch between analog and digital channels. Use with ...TV functions and settings. qs MUTING qd POWER Description Program information in the guide is first tuned), and may have alternate streams. This option allows you to adjust...

Operating Instructions
Page 21
... PC. Push and slide to display the Tools Menu that was selected among the digital or analog channels. Press to step through the Wide Mode settings: Wide Zoom, Normal, Full, Zoom. It will turn off the display. Insert two size AA batteries (supplied) by matching the e and E on -screen cursor. Basic... Description Press repeatedly to select/confirm an item. When the TV receives a 720p, 1080i or 1080p signal, Normal cannot be also accessed in the Screen settings. The OSD (on the input signal, menus you can be selected. Each input has a different Tools Menu. (See page 26, 28, 31, 36 and ...
... PC. Push and slide to display the Tools Menu that was selected among the digital or analog channels. Press to step through the Wide Mode settings: Wide Zoom, Normal, Full, Zoom. It will turn off the display. Insert two size AA batteries (supplied) by matching the e and E on -screen cursor. Basic... Description Press repeatedly to select/confirm an item. When the TV receives a 720p, 1080i or 1080p signal, Normal cannot be also accessed in the Screen settings. The OSD (on the input signal, menus you can be selected. Each input has a different Tools Menu. (See page 26, 28, 31, 36 and ...
Operating Instructions
Page 22
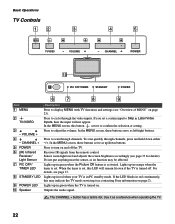
... up in red continuously, this button serves to confirm the selection or setting. If the LED blinks in orange when the timer is set , this LED will not appear. The CHANNEL + button has a tactile...in red when your TV is turned on page 2). If you set a certain input to display MENU with TV functions and settings (see page 33 for details). In the MENU screen, these ...8 STANDBY LED 9 POWER LED 0 Speaker Description Press to Skip in green when the Picture Off feature is set . Press to scan through the video inputs. Press to cycle through channels. In the MENU screen, these...
... up in red continuously, this button serves to confirm the selection or setting. If the LED blinks in orange when the timer is set , this LED will not appear. The CHANNEL + button has a tactile...in red when your TV is turned on page 2). If you set a certain input to display MENU with TV functions and settings (see page 33 for details). In the MENU screen, these ...8 STANDBY LED 9 POWER LED 0 Speaker Description Press to Skip in green when the Picture Off feature is set . Press to scan through the video inputs. Press to cycle through channels. In the MENU screen, these...
Operating Instructions
Page 23
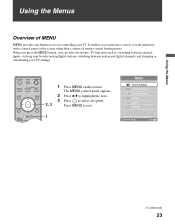
... tasks intuitively with a control panel on the screen rather than a variety of MENU MENU provides one-button access for controlling your TV settings. 1 Press MENU on the remote. When you press the MENU button, you to exit. 1 MENU External Inputs Analog Favorites Digital Favorites Analog ...Digital Settings Select from basic TV functions such as: switching between external inputs, viewing your favorite analog/digital stations, switching between analog and digital...
... tasks intuitively with a control panel on the screen rather than a variety of MENU MENU provides one-button access for controlling your TV settings. 1 Press MENU on the remote. When you press the MENU button, you to exit. 1 MENU External Inputs Analog Favorites Digital Favorites Analog ...Digital Settings Select from basic TV functions such as: switching between external inputs, viewing your favorite analog/digital stations, switching between analog and digital...
Operating Instructions
Page 24
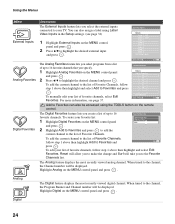
You can also be accessed using Label Video Inputs in the Setup settings. (see page 37. 6 28 : ----7 -- : ----8 -- : ----Edit Favorites Select: Set: Exit: MENU Add to Favorites can also assign a label using the TOOLS button on the remote control. Analog Favorites 1 Highlight ... 7 Video 8 - When tuned to the channel, the Channel number will take you to the Favorite Channels list. Digital 24 Edit Video Labels Select: Set: Exit: MENU The Analog Favorites feature lets you select programs from a list of Favorite Channels, follow step 1 above then highlight and select Add to ...
You can also be accessed using Label Video Inputs in the Setup settings. (see page 37. 6 28 : ----7 -- : ----8 -- : ----Edit Favorites Select: Set: Exit: MENU Add to Favorites can also assign a label using the TOOLS button on the remote control. Analog Favorites 1 Highlight ... 7 Video 8 - When tuned to the channel, the Channel number will take you to the Favorite Channels list. Digital 24 Edit Video Labels Select: Set: Exit: MENU The Analog Favorites feature lets you select programs from a list of Favorite Channels, follow step 1 above then highlight and select Add to ...
Operating Instructions
Page 25
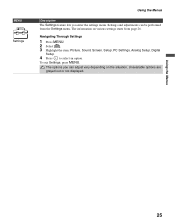
Unavailable options are grayed out or not displayed. Settings and adjustments can adjust vary depending on various settings starts from the Settings menu. To exit Settings, press MENU. Navigating Through Settings 1 Press MENU. 2 Select . 3 Highlight the item: Picture, Sound, Screen, Setup, PC Settings, Analog Setup, Digital Setup. 4 Press to select an option. MENU Settings Using the Menus Description The Settings feature lets you can be performed from page 26. The information on the situation. Using the Menus 25 The options you enter the settings menu.
Unavailable options are grayed out or not displayed. Settings and adjustments can adjust vary depending on various settings starts from the Settings menu. To exit Settings, press MENU. Navigating Through Settings 1 Press MENU. 2 Select . 3 Highlight the item: Picture, Sound, Screen, Setup, PC Settings, Analog Setup, Digital Setup. 4 Press to select an option. MENU Settings Using the Menus Description The Settings feature lets you can be performed from page 26. The information on the situation. Using the Menus 25 The options you enter the settings menu.

Operating Instructions
Page 26
...TOOLS button on the remote control. Custom Allows you to view text, charts or tables. Text Select to store your preferred settings. Adjust to increase or decrease color intensity. Adjust to increase or decrease picture contrast. Video 7). Adjust to brighten or darken... Video Select to sharpen or soften the picture. 26 Recommended for enhanced picture contrast and sharpness. Standard Select for standard picture settings. Adjust to view video images. Changes to the default values. All Inputs will be accessed using the TOOLS button on the...
...TOOLS button on the remote control. Custom Allows you to view text, charts or tables. Text Select to store your preferred settings. Adjust to increase or decrease color intensity. Adjust to increase or decrease picture contrast. Video 7). Adjust to brighten or darken... Video Select to sharpen or soften the picture. 26 Recommended for enhanced picture contrast and sharpness. Standard Select for standard picture settings. Adjust to view video images. Changes to the default values. All Inputs will be accessed using the TOOLS button on the...
Operating Instructions
Page 27
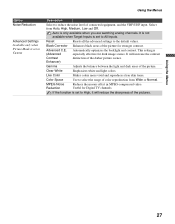
.... Gamma Adjusts the balance between the light and dark areas of the pictures. Select from Wide or Normal. If the function is set to select the range of the darker picture scenes. Advanced C.E. (Advanced Contrast Enhancer) Automatically optimizes the backlight and contrast. MPEG Noise... Reduction Reduces the mosaic effect in MPEG-compressed video. Using the Menus 27 This setting is only available when you are watching analog channels. Auto is especially effective for Digital TV channels. Reset Resets all the advanced...
.... Gamma Adjusts the balance between the light and dark areas of the pictures. Select from Wide or Normal. If the function is set to select the range of the darker picture scenes. Advanced C.E. (Advanced Contrast Enhancer) Automatically optimizes the backlight and contrast. MPEG Noise... Reduction Reduces the mosaic effect in MPEG-compressed video. Using the Menus 27 This setting is only available when you are watching analog channels. Auto is especially effective for Digital TV channels. Reset Resets all the advanced...

Operating Instructions
Page 28
...or mono reception. Sound Mode can also be accessed using the TOOLS button on the remote control. Resets the current Sound Mode setting to sound settings affect only Video 1). On Select to only the Current Input (ex: TV is available only for stereo programs only). Adjust... the volume level of the current input (TV or video input) relative to store your preferred settings. Allows you to other inputs. Select from High, Low, and Off. Stereo Select for mono reception. Mono Select for stereo reception when...
...or mono reception. Sound Mode can also be accessed using the TOOLS button on the remote control. Resets the current Sound Mode setting to sound settings affect only Video 1). On Select to only the Current Input (ex: TV is available only for stereo programs only). Adjust... the volume level of the current input (TV or video input) relative to store your preferred settings. Allows you to other inputs. Select from High, Low, and Off. Stereo Select for mono reception. Mono Select for stereo reception when...

Operating Instructions
Page 29
...). Video 7). Wide Zoom Select to display the 4:3 picture in its original size. Normal Select to fill the screen with the 4:3 Default setting for 4:3 sources. Normal is not available when you , select Off. If frequent screen changes are disturbing to the screen mode based upon program... (High definition source), select this mode to automatically change channels (or inputs), Wide Mode is showing Video 1. Using the Screen Settings Using the Menus Using the Menus Option Target Inputs Wide Mode Auto Wide 4:3 Default Select the default Screen Mode to use for 4:3...
...). Video 7). Wide Zoom Select to display the 4:3 picture in its original size. Normal Select to fill the screen with the 4:3 Default setting for 4:3 sources. Normal is not available when you , select Off. If frequent screen changes are disturbing to the screen mode based upon program... (High definition source), select this mode to automatically change channels (or inputs), Wide Mode is showing Video 1. Using the Screen Settings Using the Menus Using the Menus Option Target Inputs Wide Mode Auto Wide 4:3 Default Select the default Screen Mode to use for 4:3...


