Safety and Regulatory Booklet
Page 1
... not use a damaged AC power cord. Changing the Picture mode, Backlight setting, enabling the Light Sensor (if applicable), or turning on the Power Management will improve this condition. ☐ To avoid damaging the LCD panel, do not expose the LCD screen to ensure reliable operation of this TV in wire Antenna discharge unit (NEC Section 810-20) Grounding conductors (NEC section 810-21) Ground clamps Power service grounding electrode...
... not use a damaged AC power cord. Changing the Picture mode, Backlight setting, enabling the Light Sensor (if applicable), or turning on the Power Management will improve this condition. ☐ To avoid damaging the LCD panel, do not expose the LCD screen to ensure reliable operation of this TV in wire Antenna discharge unit (NEC Section 810-20) Grounding conductors (NEC section 810-21) Ground clamps Power service grounding electrode...

Limited Warranty (U.S. Only)
Page 1
..., freight prepaid, in the color and/or cosmetic design from the original end user purchase is transferable. Any replacement product provided under this Limited Warranty. For specific instructions on obtaining warranty service for your product, Visit SONY's Web Site: www.sony.com/support Or call the Sony Customer Information Service Center 1-800-222-SONY (7669) For an accessory or part not available from original date...
..., freight prepaid, in the color and/or cosmetic design from the original end user purchase is transferable. Any replacement product provided under this Limited Warranty. For specific instructions on obtaining warranty service for your product, Visit SONY's Web Site: www.sony.com/support Or call the Sony Customer Information Service Center 1-800-222-SONY (7669) For an accessory or part not available from original date...
Operating Instructions
Page 3
... Operating the TV Using the Remote Control 19 Remote Control Button Description 20 TV Controls and Indicators 24 Using Features BRAVIA® SyncTM with Control for HDMI . . .25 Using PIP Feature 26 Favorites 27 Wide Mode 27 Wide Mode with PC 28 Inputs 28 Playing back Photo/Music/Video via USB. . . 29 Using the Menus Navigating through TV Menus 30 Using the Picture Settings 31 Using the Sound Settings 33 Using the Screen Settings 35 Using the Channel Settings 37 Using the Parental Lock Settings 38 Using the Setup Settings...
... Operating the TV Using the Remote Control 19 Remote Control Button Description 20 TV Controls and Indicators 24 Using Features BRAVIA® SyncTM with Control for HDMI . . .25 Using PIP Feature 26 Favorites 27 Wide Mode 27 Wide Mode with PC 28 Inputs 28 Playing back Photo/Music/Video via USB. . . 29 Using the Menus Navigating through TV Menus 30 Using the Picture Settings 31 Using the Sound Settings 33 Using the Screen Settings 35 Using the Channel Settings 37 Using the Parental Lock Settings 38 Using the Setup Settings...

Operating Instructions
Page 4
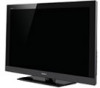
.... Quick Setup Guide Provides TV setup information with sample connection diagrams. Experiencing Stunning HD with Your BRAVIA The quality of your new BRAVIA TV, you need access to keep you and your TV safe. Use the documentations listed below to operate your TV. To experience the stunning detail of the image you for information on your cable, satellite or HD service provider for choosing this Sony BRAVIA...
.... Quick Setup Guide Provides TV setup information with sample connection diagrams. Experiencing Stunning HD with Your BRAVIA The quality of your new BRAVIA TV, you need access to keep you and your TV safe. Use the documentations listed below to operate your TV. To experience the stunning detail of the image you for information on your cable, satellite or HD service provider for choosing this Sony BRAVIA...
Operating Instructions
Page 5
... from 1080 HD signals as shown here. You can work on your PC and watch your favorite TV program simultaneously (page 26). ➢ Favorites: Your favorite channels and inputs are at your finger tips for easy access (page 27). ➢ Auto Wide Mode: Set your TV to the most suitable picture and sound settings based on the remote control to fill the screen. If black bars appear...
... from 1080 HD signals as shown here. You can work on your PC and watch your favorite TV program simultaneously (page 26). ➢ Favorites: Your favorite channels and inputs are at your finger tips for easy access (page 27). ➢ Auto Wide Mode: Set your TV to the most suitable picture and sound settings based on the remote control to fill the screen. If black bars appear...
Operating Instructions
Page 8
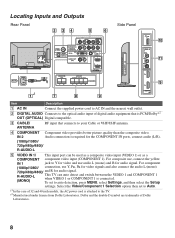
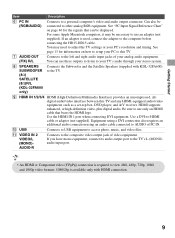
... This input port can auto detect and switch between the VIDEO 1 and COMPONENT 1 when VIDEO 1 or COMPONENT 1 is PCM/Dolby*2 OUT (OPTICAL) Digital compatible. 3 CABLE/ ANTENNA RF input that is connected. Dolby and the double-D symbol are trademarks of 32 and 40 inch models, the AC power cord is required for audio signal. For component (1080p/1080i/ connection, use audio L (mono) and R for audio signal. R-AUDIO-L (MONO) This TV can be used as a composite video input (VIDEO 1) or as a COMPONENT component video input (COMPONENT 1). Locating Inputs and Outputs Rear Panel 2 34...
... This input port can auto detect and switch between the VIDEO 1 and COMPONENT 1 when VIDEO 1 or COMPONENT 1 is PCM/Dolby*2 OUT (OPTICAL) Digital compatible. 3 CABLE/ ANTENNA RF input that is connected. Dolby and the double-D symbol are trademarks of 32 and 40 inch models, the AC power cord is required for audio signal. For component (1080p/1080i/ connection, use audio L (mono) and R for audio signal. R-AUDIO-L (MONO) This TV can be used as a composite video input (VIDEO 1) or as a COMPONENT component video input (COMPONENT 1). Locating Inputs and Outputs Rear Panel 2 34...
Operating Instructions
Page 9
... may need to use an adapter (not supplied). Getting Started Item Description 6 PC IN (RGB/AUDIO) Connects to -HDMI cable or adapter (not supplied). Can also be displayed. See "PC Input Signal Reference Chart" on page 46 for information on how to other analog RGB equipment. You can be connected to setup your analog audio equipment. HDMI supports enhanced, or high-definition video, plus digital audio. If you have mono equipment, connect its audio output port to...
... may need to use an adapter (not supplied). Getting Started Item Description 6 PC IN (RGB/AUDIO) Connects to -HDMI cable or adapter (not supplied). Can also be displayed. See "PC Input Signal Reference Chart" on page 46 for information on how to other analog RGB equipment. You can be connected to setup your analog audio equipment. HDMI supports enhanced, or high-definition video, plus digital audio. If you have mono equipment, connect its audio output port to...
Operating Instructions
Page 24
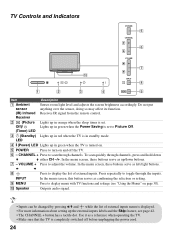
... in standby mode. To scan quickly through the inputs. VOLUME + Press to scan through channels. Receives IR signal from the remote control. 2 (Picture Lights up the external inputs labels and the Skip feature, see "Using the Menus" on page 30). CHANNEL + Press to adjust the volume. LED 4 " (Power) LED Lights up in green when the TV is displayed. • For more information about setting up in green when the Power Saving is completely switched off the TV. 6 - In the menu screen, these buttons...
... in standby mode. To scan quickly through the inputs. VOLUME + Press to scan through channels. Receives IR signal from the remote control. 2 (Picture Lights up the external inputs labels and the Skip feature, see "Using the Menus" on page 30). CHANNEL + Press to adjust the volume. LED 4 " (Power) LED Lights up in green when the TV is displayed. • For more information about setting up in green when the Power Saving is completely switched off the TV. 6 - In the menu screen, these buttons...

Operating Instructions
Page 25
... HDMI function, BRAVIA Sync helps to On. For settings on the connected equipment, refer to their instruction manuals. • When specific Sony equipment compatible with Control for HDMI (BRAVIA Sync) is connected, BRAVIA sync is compatible with Control for HDMI. • The Control for HDMI settings must be set to communicate with BRAVIA Sync-compatible equipment using the remote control, press SYNC MENU and select the desired equipment from the Sync Menu. • Automatically turns the TV on and switches the input...
... HDMI function, BRAVIA Sync helps to On. For settings on the connected equipment, refer to their instruction manuals. • When specific Sony equipment compatible with Control for HDMI (BRAVIA Sync) is connected, BRAVIA sync is compatible with Control for HDMI. • The Control for HDMI settings must be set to communicate with BRAVIA Sync-compatible equipment using the remote control, press SYNC MENU and select the desired equipment from the Sync Menu. • Automatically turns the TV on and switches the input...
Operating Instructions
Page 29
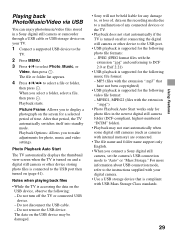
... information about USB connection mode, refer to the instructions supplied with your TV. 1 Connect a supported USB device to the TV. 2 Press MENU. 3 Press V/v to the USB port then turned on (page 41). When you to display a photograph on the screen for photo, music and video settings. After that period, the TV automatically switches itself into standby mode. Do not turn off the TV or connected USB device. - Do not remove the USB device. MP3...
... information about USB connection mode, refer to the instructions supplied with your TV. 1 Connect a supported USB device to the TV. 2 Press MENU. 3 Press V/v to the USB port then turned on (page 41). When you to display a photograph on the screen for photo, music and video settings. After that period, the TV automatically switches itself into standby mode. Do not turn off the TV or connected USB device. - Do not remove the USB device. MP3...
Operating Instructions
Page 30
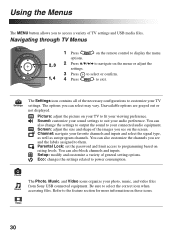
... these icons. Sound: customize your sound settings to suit your TV settings. You can also block channels and inputs. Video 30 Channel: navigate your connected audio equipment. Screen: adjust the size and shape of the images you to access a variety of general setting options. Picture: adjust the picture on rating levels. Parental Lock: set the password and limit access to programming based on your TV to fit your photo, music, and video files from Sony USB connected equipment. Setup: modify...
... these icons. Sound: customize your sound settings to suit your TV settings. You can also block channels and inputs. Video 30 Channel: navigate your connected audio equipment. Screen: adjust the size and shape of the images you to access a variety of general setting options. Picture: adjust the picture on rating levels. Parental Lock: set the password and limit access to programming based on your TV to fit your photo, music, and video files from Sony USB connected equipment. Setup: modify...
Operating Instructions
Page 47
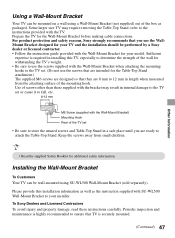
... licensed contractor. • Follow the instruction guide provided with the Wall-Mount Bracket) Mounting Hook Rear of the mounting hook. Some larger size TV may result in internal damage to the TV set • Be sure to store the unused screws and Table-Top Stand in a safe place until you use the screws that are intended for the Table-Top Stand attachment.) The supplied M6 screws are designed so that TV...
... licensed contractor. • Follow the instruction guide provided with the Wall-Mount Bracket) Mounting Hook Rear of the mounting hook. Some larger size TV may result in internal damage to the TV set • Be sure to store the unused screws and Table-Top Stand in a safe place until you use the screws that are intended for the Table-Top Stand attachment.) The supplied M6 screws are designed so that TV...
Operating Instructions
Page 52
... this operating instructions manual, contact the following: For US Support: http://www.sony.com/tvsupport or call 1-800-222-SONY (7669) For Canadian Support: http://www.sony.ca/support or call 1-877-899-SONY (7669) Things to Cable (see pages 18 and 37). If you to the Quick Setup Guide provided for your TV signal source. This password clears your customized settings including the Parental Lock setting. IMPORTANT: The factory reset will turn itself...
... this operating instructions manual, contact the following: For US Support: http://www.sony.com/tvsupport or call 1-800-222-SONY (7669) For Canadian Support: http://www.sony.ca/support or call 1-877-899-SONY (7669) Things to Cable (see pages 18 and 37). If you to the Quick Setup Guide provided for your TV signal source. This password clears your customized settings including the Parental Lock setting. IMPORTANT: The factory reset will turn itself...
Operating Instructions
Page 53
... sure that the antenna is connected using HDMI input with Super Audio CD or DVD-Audio, DIGITAL AUDIO OUT (OPTICAL) may not provide an audio signal. • When tuned to Auto. (Continued) 53 Press TOOLS, highlight and select Alternate Audio, and change in the Sound settings (see page 34). See Quick Setup Guide (supplied) to display the best possible picture for that "Muting" disappears from the screen (page 22). • Set Speakers to TV Speakers in the Sound settings (see page...
... sure that the antenna is connected using HDMI input with Super Audio CD or DVD-Audio, DIGITAL AUDIO OUT (OPTICAL) may not provide an audio signal. • When tuned to Auto. (Continued) 53 Press TOOLS, highlight and select Alternate Audio, and change in the Sound settings (see page 34). See Quick Setup Guide (supplied) to display the best possible picture for that "Muting" disappears from the screen (page 22). • Set Speakers to TV Speakers in the Sound settings (see page...
Operating Instructions
Page 55
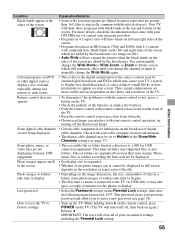
...; Auto Wide will not expand the picture when the black bands on the sides of the screen are populated based on their time stamps. While holding down V on the remote control, press POWER on the TV. (The TV will clear all of your customized settings including the Parental Lock setting. 55 This limit includes non-supported files or just folders. You can manually change the Wide Mode...
...; Auto Wide will not expand the picture when the black bands on the sides of the screen are populated based on their time stamps. While holding down V on the remote control, press POWER on the TV. (The TV will clear all of your customized settings including the Parental Lock setting. 55 This limit includes non-supported files or just folders. You can manually change the Wide Mode...
Operating Instructions
Page 58
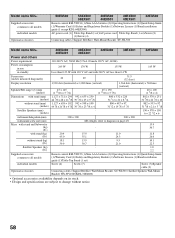
...Supplied accessories common to all models individual models Optional accessories 60EX500 55EX500 55EX501 46EX500 46EX501 40EX500 40EX501 32EX500 Remote control RM-YD034 (1)/Size AAA batteries (2)/Operating Instructions (1)/Quick Setup Guide (1)/Warranty Card (1)/Safety and Regulatory Booklet (1)/Software License (1)/Stand installation guide (1 except KDL-60EX500) AC power cord (1) Table-Top Stand (1 set)/AC power cord Table-Top Stand (1 set ) Screw (4) Screw (7) Screw (7)/Speaker cable (3) Connecting cables / Support Belt Kit / Wall-Mount Bracket: SU-WL500 / Satellite Speakers Wall...
...Supplied accessories common to all models individual models Optional accessories 60EX500 55EX500 55EX501 46EX500 46EX501 40EX500 40EX501 32EX500 Remote control RM-YD034 (1)/Size AAA batteries (2)/Operating Instructions (1)/Quick Setup Guide (1)/Warranty Card (1)/Safety and Regulatory Booklet (1)/Software License (1)/Stand installation guide (1 except KDL-60EX500) AC power cord (1) Table-Top Stand (1 set)/AC power cord Table-Top Stand (1 set ) Screw (4) Screw (7) Screw (7)/Speaker cable (3) Connecting cables / Support Belt Kit / Wall-Mount Bracket: SU-WL500 / Satellite Speakers Wall...
Operating Instructions
Page 59
... 29 Picture 31 Picture Adjustments Lock 43 Picture Frame 29 Picture Mode 31 Picture Off ( ) LED 24 PIP 26 Pitch 36 POWER ("/1) button 22, 23 POWER (") LED 24 POWER button 24 Power Saving 45 Product Support 43 R Rating 38 Reset 31, 33, 55 RETURN button 21 S SATELLITE jack 9 SCENE button 21 Settings Channel 37 Eco 45 Parental Lock 38 Picture 31 Screen 35 Setup 41 Sound 33 Sharpness 31 Show/Hide Channels 37 Signal Type 37 Sleep Timer 42 Sound Mode 33 Speaker 24 Speakers 34 Standby (1) LED 24 Steady Sound...
... 29 Picture 31 Picture Adjustments Lock 43 Picture Frame 29 Picture Mode 31 Picture Off ( ) LED 24 PIP 26 Pitch 36 POWER ("/1) button 22, 23 POWER (") LED 24 POWER button 24 Power Saving 45 Product Support 43 R Rating 38 Reset 31, 33, 55 RETURN button 21 S SATELLITE jack 9 SCENE button 21 Settings Channel 37 Eco 45 Parental Lock 38 Picture 31 Screen 35 Setup 41 Sound 33 Sharpness 31 Show/Hide Channels 37 Signal Type 37 Sleep Timer 42 Sound Mode 33 Speaker 24 Speakers 34 Standby (1) LED 24 Steady Sound...

Quick Setup Guide
Page 1
.... ■ Install 2 AAA batteries (supplied separately) in U.S.A. This guide will be adjusted to fill the screen. ■ Press the WIDE button on the Table-Top Stand. Allow 50+ minutes for completion. Please take these items: Set Closed Captions (CC) Label Video Inputs Set Parental Lock Set Speaker Show/Hide Channels For details, refer to -height ratio of the image). Start auto program now? Customize Sound and Picture Quality You can search antenna channels as well...
.... ■ Install 2 AAA batteries (supplied separately) in U.S.A. This guide will be adjusted to fill the screen. ■ Press the WIDE button on the Table-Top Stand. Allow 50+ minutes for completion. Please take these items: Set Closed Captions (CC) Label Video Inputs Set Parental Lock Set Speaker Show/Hide Channels For details, refer to -height ratio of the image). Start auto program now? Customize Sound and Picture Quality You can search antenna channels as well...
Quick Setup Guide
Page 2
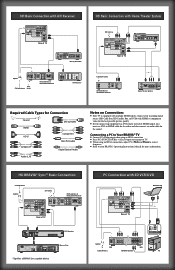
... AUDIO OUT (OPTICAL) AUDIO AUDIO OUT (FIX) R L VIDEO IN 1 PB Y AUDIO PC/HDMI 1 AUDIO IN 1 4 IN Rear of TV Blu-ray Disc/DVD Cable/SAT (dish) SD Cable Box or SD Satellite Receiver or Home Theater System Required Cable Types for more information. connect your incoming signal source (HD Cable Box, HD Satellite Box, or DVD) with HDMI or component video for the best possible picture quality. ■ If your connecting equipment has DVI output instead of HDMI output, you must use DVI-to-HDMI cable...
... AUDIO OUT (OPTICAL) AUDIO AUDIO OUT (FIX) R L VIDEO IN 1 PB Y AUDIO PC/HDMI 1 AUDIO IN 1 4 IN Rear of TV Blu-ray Disc/DVD Cable/SAT (dish) SD Cable Box or SD Satellite Receiver or Home Theater System Required Cable Types for more information. connect your incoming signal source (HD Cable Box, HD Satellite Box, or DVD) with HDMI or component video for the best possible picture quality. ■ If your connecting equipment has DVI output instead of HDMI output, you must use DVI-to-HDMI cable...
Marketing Specifications
Page 2
... Sleep Timer: Yes Input Skip: Manual Channel Surf: Yes Channel Block (with password): Yes Edit Channel Labels: Yes Label Inputs: Yes ID-1 Detection: Yes USB Application(s): Photo Viewer (jpeg), Music Player (mp3), Video Player (mpeg1), Video Player (mpeg2 TS) Theatre Mode (Theatre Button): Yes Show/Hide Channels: Yes Auto Shut-off: Yes BRAVIA® Sync™ : Yes Parental Control: Yes BRAVIA® Sync™ Menu Button: Yes (on Remote Control) On-Screen Display for External Input: Yes PIP (Picture in Picture): PC Input(HD15/HDMI) & TV Channel...
... Sleep Timer: Yes Input Skip: Manual Channel Surf: Yes Channel Block (with password): Yes Edit Channel Labels: Yes Label Inputs: Yes ID-1 Detection: Yes USB Application(s): Photo Viewer (jpeg), Music Player (mp3), Video Player (mpeg1), Video Player (mpeg2 TS) Theatre Mode (Theatre Button): Yes Show/Hide Channels: Yes Auto Shut-off: Yes BRAVIA® Sync™ : Yes Parental Control: Yes BRAVIA® Sync™ Menu Button: Yes (on Remote Control) On-Screen Display for External Input: Yes PIP (Picture in Picture): PC Input(HD15/HDMI) & TV Channel...


