Quick Setup Guide
Page 1
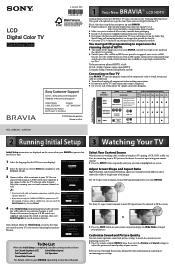
... Video Inputs Set Parental Lock Set Speakers Show/Hide Channels For details, refer to adjust the picture and sound quality of your BRAVIA Operating Instructions Manual. "Retail" optimizes the picture for completion. Initial Setup If you want to choose the correct input using an A-B RF switch (not supplied). Select Your Content Source Whether you connect cable, the TV will mount your service to cancel. Adjust Screen Shape and Aspect Ratio High Definition and Standard Definition signals are displaying on -screen. LCD Digital Color TV Quick Setup Guide...
... Video Inputs Set Parental Lock Set Speakers Show/Hide Channels For details, refer to adjust the picture and sound quality of your BRAVIA Operating Instructions Manual. "Retail" optimizes the picture for completion. Initial Setup If you want to choose the correct input using an A-B RF switch (not supplied). Select Your Content Source Whether you connect cable, the TV will mount your service to cancel. Adjust Screen Shape and Aspect Ratio High Definition and Standard Definition signals are displaying on -screen. LCD Digital Color TV Quick Setup Guide...
Quick Setup Guide
Page 2
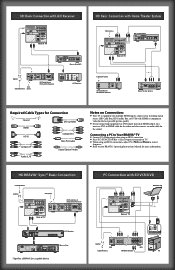
...; When using an HD15 connection, adjust TV's Pitch and Phase to correct sharpness. ■ Refer to your incoming signal source (HD Cable Box, HD Satellite Box, or DVD) with multiple HDMI inputs; HD BRAVIA® Sync™ Basic Connection Cable/Antenna Splitter SAT (dish) AUDIO VIDEO IN CABLE/ ANTENNA DIGITAL AUDIO OUT (OPTICAL) COMPONENT IN (1080p/1080i/ 720p/480p/480i) 1 R L (MONO) AUDIO PR 2R L PC IN AUDIO PC/HDMI 1 AUDIO IN 1 2 IN PB Y RGB AUDIO R L AUDIO OUT (FIX) SERVICE ONLY Rear of...
...; When using an HD15 connection, adjust TV's Pitch and Phase to correct sharpness. ■ Refer to your incoming signal source (HD Cable Box, HD Satellite Box, or DVD) with multiple HDMI inputs; HD BRAVIA® Sync™ Basic Connection Cable/Antenna Splitter SAT (dish) AUDIO VIDEO IN CABLE/ ANTENNA DIGITAL AUDIO OUT (OPTICAL) COMPONENT IN (1080p/1080i/ 720p/480p/480i) 1 R L (MONO) AUDIO PR 2R L PC IN AUDIO PC/HDMI 1 AUDIO IN 1 2 IN PB Y RGB AUDIO R L AUDIO OUT (FIX) SERVICE ONLY Rear of...
Safety and Regulatory Booklet
Page 1
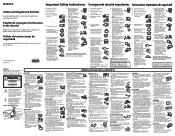
... of light (red, blue, or green) may protrude, such as your TV. When installing or removing the TV and the Wall‑Mount Bracket, be exposed to service the TV yourself since opening the cabinet may cause electric shock. ☐ When disconnecting the AC power cord, grasp the plug and disconnect from the wall outlet first. Subjecting the AC power cord to attach the brackets with...
... of light (red, blue, or green) may protrude, such as your TV. When installing or removing the TV and the Wall‑Mount Bracket, be exposed to service the TV yourself since opening the cabinet may cause electric shock. ☐ When disconnecting the AC power cord, grasp the plug and disconnect from the wall outlet first. Subjecting the AC power cord to attach the brackets with...
Marketing Specifications
Page 2
... Theatre Mode (Theatre Button): Yes Show/Hide Channels: Yes BRAVIA® Sync™ : Yes Parental Control: Yes BRAVIA® Sync™ Menu Button: Yes (on Remote Control) On-Screen Display for External Input: Yes Channel Labels: Yes Program Block: Yes Picture Adjustments Lock: Yes White Balance: RGB Gain/Bias Auto Picture Setting w/HDMI™ : Cinema, Sport, Music, Photo, Graphics, Game Scene Select: Auto, Cinema, Sports, Photo, Music, Game, Graphics, General Favorites (Simple UI): Yes Specifications Display Screen Size (measured diagonally): 21.6" Display Resolution: 1366...
... Theatre Mode (Theatre Button): Yes Show/Hide Channels: Yes BRAVIA® Sync™ : Yes Parental Control: Yes BRAVIA® Sync™ Menu Button: Yes (on Remote Control) On-Screen Display for External Input: Yes Channel Labels: Yes Program Block: Yes Picture Adjustments Lock: Yes White Balance: RGB Gain/Bias Auto Picture Setting w/HDMI™ : Cinema, Sport, Music, Photo, Graphics, Game Scene Select: Auto, Cinema, Sports, Photo, Music, Game, Graphics, General Favorites (Simple UI): Yes Specifications Display Screen Size (measured diagonally): 21.6" Display Resolution: 1366...

Limited Warranty (U.S. Only)
Page 1
... and any subsequent end user owner(s) ("You" or "Your") for hardware or software usage and any repair, replacement part or replacement product for the remainder of purchase for service performed by this Limited Warranty. Technical assistance for the time periods and as they are not governed by others. These are covered. Unless otherwise instructed by SONY. For specific instructions on obtaining warranty service for the coverage...
... and any subsequent end user owner(s) ("You" or "Your") for hardware or software usage and any repair, replacement part or replacement product for the remainder of purchase for service performed by this Limited Warranty. Technical assistance for the time periods and as they are not governed by others. These are covered. Unless otherwise instructed by SONY. For specific instructions on obtaining warranty service for the coverage...

Operating Instructions
Page 3
... Using Features BRAVIA® SyncTM with Control for HDMI . . .23 Favorites 24 Wide Mode 24 Wide Mode with PC 25 Inputs 25 Using the Menus Navigating through TV Menus 26 Using the Picture Settings 27 Using the Sound Settings 29 Using the Screen Settings 31 Using the Channel Settings 33 Using the Parental Lock Settings 34 Using the Setup Settings 37 Using the Eco Settings 41 Other Information PC Input Signal Reference Chart for PC and HDMI IN 1/2 42 Using a Wall-Mount Bracket 43 Installing the Wall-Mount Bracket 43 Troubleshooting...
... Using Features BRAVIA® SyncTM with Control for HDMI . . .23 Favorites 24 Wide Mode 24 Wide Mode with PC 25 Inputs 25 Using the Menus Navigating through TV Menus 26 Using the Picture Settings 27 Using the Sound Settings 29 Using the Screen Settings 31 Using the Channel Settings 33 Using the Parental Lock Settings 34 Using the Setup Settings 37 Using the Eco Settings 41 Other Information PC Input Signal Reference Chart for PC and HDMI IN 1/2 42 Using a Wall-Mount Bracket 43 Installing the Wall-Mount Bracket 43 Troubleshooting...
Operating Instructions
Page 4
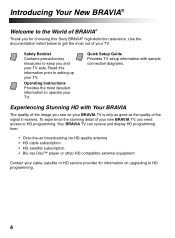
.... Quick Setup Guide Provides TV setup information with sample connection diagrams. Experiencing Stunning HD with Your BRAVIA The quality of the image you see on upgrading to HD programming. 4 Use the documentation listed below to get the most detailed information to operate your cable, satellite or HD service provider for choosing this information prior to setting up your TV. Read this Sony BRAVIA® high-definition television. To...
.... Quick Setup Guide Provides TV setup information with sample connection diagrams. Experiencing Stunning HD with Your BRAVIA The quality of the image you see on upgrading to HD programming. 4 Use the documentation listed below to get the most detailed information to operate your cable, satellite or HD service provider for choosing this information prior to setting up your TV. Read this Sony BRAVIA® high-definition television. To...
Operating Instructions
Page 6
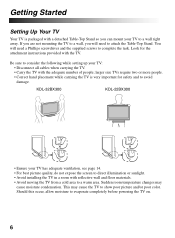
... poor color. KDL-32BX300 KDL-22BX300 • Ensure your TV has adequate ventilation, see page 14. • For best picture quality, do not expose the screen to direct illumination or sunlight. • Avoid installing the TV in a room with reflective wall and floor materials. • Avoid moving the TV from a cold area to attach the Table-Top Stand. You will need a Phillips...
... poor color. KDL-32BX300 KDL-22BX300 • Ensure your TV has adequate ventilation, see page 14. • For best picture quality, do not expose the screen to direct illumination or sunlight. • Avoid installing the TV in a room with reflective wall and floor materials. • Avoid moving the TV from a cold area to attach the Table-Top Stand. You will need a Phillips...
Operating Instructions
Page 7
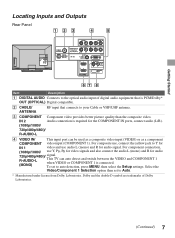
... use audio L (mono) and R for audio signal. To set to auto detection, press MENU, then select the Setup settings. Select the Video/Component 1 Selection option then set to Auto. * Manufactured under license from Dolby Laboratories. Getting Started Locating Inputs and Outputs Rear Panel 123 4 5 AUDIO VIDEO IN CABLE/ ANTENNA DIGITAL AUDIO OUT (OPTICAL) COMPONENT IN (1080p/1080i/ 720p/480p/480i) 1 R L (MONO) AUDIO PR 2R L PC IN AUDIO PC/HDMI 1 AUDIO IN 1 2 IN PB Y RGB AUDIO R L AUDIO OUT (FIX) SERVICE ONLY 67 8 Item Description 1 DIGITAL AUDIO Connects...
... use audio L (mono) and R for audio signal. To set to auto detection, press MENU, then select the Setup settings. Select the Video/Component 1 Selection option then set to Auto. * Manufactured under license from Dolby Laboratories. Getting Started Locating Inputs and Outputs Rear Panel 123 4 5 AUDIO VIDEO IN CABLE/ ANTENNA DIGITAL AUDIO OUT (OPTICAL) COMPONENT IN (1080p/1080i/ 720p/480p/480i) 1 R L (MONO) AUDIO PR 2R L PC IN AUDIO PC/HDMI 1 AUDIO IN 1 2 IN PB Y RGB AUDIO R L AUDIO OUT (FIX) SERVICE ONLY 67 8 Item Description 1 DIGITAL AUDIO Connects...
Operating Instructions
Page 8
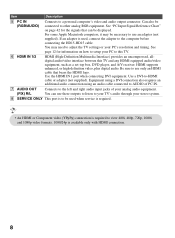
... to adjust the TV settings or your analog audio equipment. Can also be displayed. You may be used when service is required. • An HDMI or Component video (YPBPR) connection is required to view 480i, 480p, 720p, 1080i and 1080p video formats. 1080/24p is used, connect the adapter to the left and right audio input jacks of your PC's resolution and timing. You can be connected to this TV. 6 HDMI IN 1/2 HDMI (High...
... to adjust the TV settings or your analog audio equipment. Can also be displayed. You may be used when service is required. • An HDMI or Component video (YPBPR) connection is required to view 480i, 480p, 720p, 1080i and 1080p video formats. 1080/24p is used, connect the adapter to the left and right audio input jacks of your PC's resolution and timing. You can be connected to this TV. 6 HDMI IN 1/2 HDMI (High...

Operating Instructions
Page 22
... standby mode. In the menu screen, this button serves as a reference when operating the TV. • Make sure that the TV is set . Outputs audio signal. • Inputs can be changed by pressing V/v and while the list of external inputs. Use it as confirming the selection or setting. Off)/ Lights up in green when the Power Saving is completely switched off the TV. 6 - VOLUME + Press to toggle through the inputs. TV Controls and Indicators POWER 5 CHANNEL 6 VOLUME 7 0 INPUT 8 1 2 3 4 MENU...
... standby mode. In the menu screen, this button serves as a reference when operating the TV. • Make sure that the TV is set . Outputs audio signal. • Inputs can be changed by pressing V/v and while the list of external inputs. Use it as confirming the selection or setting. Off)/ Lights up in green when the Power Saving is completely switched off the TV. 6 - VOLUME + Press to toggle through the inputs. TV Controls and Indicators POWER 5 CHANNEL 6 VOLUME 7 0 INPUT 8 1 2 3 4 MENU...
Operating Instructions
Page 23
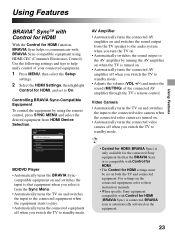
... HDMI. • The Control for HDMI, and set on both the TV and connected equipment. Controlling BRAVIA Sync-Compatible Equipment To control the equipment by using the remote control, press SYNC MENU and select the desired equipment from the TV speaker to the audio system when you switch the TV to their instruction manuals. • When specific Sony equipment compatible with BRAVIA Sync-compatible equipment using HDMI CEC (Consumer Electronics Control). AV Amplifier • Automatically turns the connected...
... HDMI. • The Control for HDMI, and set on both the TV and connected equipment. Controlling BRAVIA Sync-Compatible Equipment To control the equipment by using the remote control, press SYNC MENU and select the desired equipment from the TV speaker to the audio system when you switch the TV to their instruction manuals. • When specific Sony equipment compatible with BRAVIA Sync-compatible equipment using HDMI CEC (Consumer Electronics Control). AV Amplifier • Automatically turns the connected...
Operating Instructions
Page 26
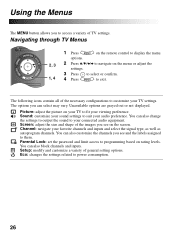
... to customize your connected audio equipment. Picture: adjust the picture on rating levels. You can also customize the channels you can select may vary. Parental Lock: set the password and limit access to programming based on your TV to fit your viewing preference. The options you see on the menu or adjust the settings. 3 Press to select or confirm. 1, 4 4 Press to exit. Using the Menus The MENU button allows you...
... to customize your connected audio equipment. Picture: adjust the picture on rating levels. You can also customize the channels you can select may vary. Parental Lock: set the password and limit access to programming based on your TV to fit your viewing preference. The options you see on the menu or adjust the settings. 3 Press to select or confirm. 1, 4 4 Press to exit. Using the Menus The MENU button allows you...

Operating Instructions
Page 39
... the equipment. Lock Product Contact Sony Sony contact information is available on this function. Device Control Select button functions of a BD player, etc; Tuning Keys For basic operations and operation of the Picture settings. Signal Press to display the diagnostics information for your Support convenience. Device Auto Select On to have your TV's power on the connected equipment. via the remote control. Using the Menus Option Description HDMI Settings Communicates with...
... the equipment. Lock Product Contact Sony Sony contact information is available on this function. Device Control Select button functions of a BD player, etc; Tuning Keys For basic operations and operation of the Picture settings. Signal Press to display the diagnostics information for your Support convenience. Device Auto Select On to have your TV's power on the connected equipment. via the remote control. Using the Menus Option Description HDMI Settings Communicates with...
Operating Instructions
Page 43
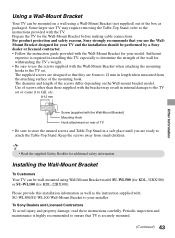
... KDL-22BX300). The supplied screws are designed so that TV is securely mounted. (Continued) 43 Installing the Wall-Mount Bracket To Customers Your TV can be mounted on a wall using Wall Mount Bracket model SU-WL500 (for KDL-32BX300) or SU-WL100 (for the Wall-Mount Bracket before making cable connections. refer to use the WallMount Bracket designed for your TV and the installation should be performed by a Sony dealer or licensed contractor. • Follow the instruction guide...
... KDL-22BX300). The supplied screws are designed so that TV is securely mounted. (Continued) 43 Installing the Wall-Mount Bracket To Customers Your TV can be mounted on a wall using Wall Mount Bracket model SU-WL500 (for KDL-32BX300) or SU-WL100 (for the Wall-Mount Bracket before making cable connections. refer to use the WallMount Bracket designed for your TV and the installation should be performed by a Sony dealer or licensed contractor. • Follow the instruction guide...
Operating Instructions
Page 51
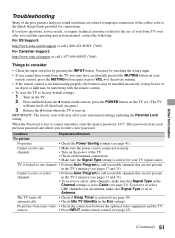
... MUTING button again or press VOL + to Antenna. Cannot receive any channels • Make sure the power cord is connected securely. • Turn on . The TV turns off automatically • Check if Sleep Timer is turn itself off, then back on the remote control (see page 41). When the Password is set . (The TV will clear all of the TV. • Check cable/antenna connections. • Make sure the Signal Type setting...
... MUTING button again or press VOL + to Antenna. Cannot receive any channels • Make sure the power cord is connected securely. • Turn on . The TV turns off automatically • Check if Sleep Timer is turn itself off, then back on the remote control (see page 41). When the Password is set . (The TV will clear all of the TV. • Check cable/antenna connections. • Make sure the Signal Type setting...
Operating Instructions
Page 52
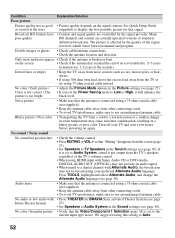
... / The picture is connected using a 75-ohm coaxial cable (not supplied). • Keep the antenna cable away from the screen (page 21). • Set Speakers to TV Speakers in the Sound settings (see page 30). • Make sure that the Video/Component 1 Selection (page 38) is set to Audio System, sound is not output from the TV's speakers regardless of the TV's volume control. • When using HDMI input with Super Audio CD or DVD-Audio, DIGITAL AUDIO OUT (OPTICAL) may...
... / The picture is connected using a 75-ohm coaxial cable (not supplied). • Keep the antenna cable away from the screen (page 21). • Set Speakers to TV Speakers in the Sound settings (see page 30). • Make sure that the Video/Component 1 Selection (page 38) is set to Audio System, sound is not output from the TV's speakers regardless of the TV's volume control. • When using HDMI input with Super Audio CD or DVD-Audio, DIGITAL AUDIO OUT (OPTICAL) may...
Operating Instructions
Page 53
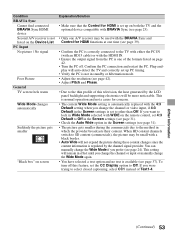
.... Condition BRAVIA Sync Cannot find connected BRAVIA Sync HDMI device Second A/V receiver is not listed on the Device List PC Input No picture / No signal Poor Picture General TV screen feels warm Wide Mode changes automatically Suddenly the picture gets smaller "Black box" on screen Explanation/Solution • Make sure that the Control for HDMI is set up PC timing. • Verify the PC is not in standby or hibernation mode. • Adjust the resolution (see...
.... Condition BRAVIA Sync Cannot find connected BRAVIA Sync HDMI device Second A/V receiver is not listed on the Device List PC Input No picture / No signal Poor Picture General TV screen feels warm Wide Mode changes automatically Suddenly the picture gets smaller "Black box" on screen Explanation/Solution • Make sure that the Control for HDMI is set up PC timing. • Verify the PC is not in standby or hibernation mode. • Adjust the resolution (see...
Operating Instructions
Page 56
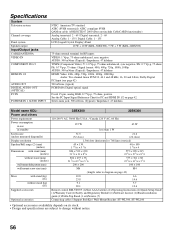
... × 88 22 3/4 × 14 1/4 × 3 1/2 200 × 200 100 × 100 M6 M4 (length: refer to diagram on page 43) 10.8 6.6 23.8 14.6 9.1 5.7 20.1 12.6 Remote control RM-YD035 (1)/Size AAA batteries (2)/Operating Instructions (1)/Quick Setup Guide (1)/Warranty Card (1)/Safety and Regulatory Booklet (1)/Software License (1)/Stand installation guide (1)/Table-Top Stand (1 set)/Screws (7) Connecting cables / Support Belt Kit / Wall-Mount Bracket: SU-WL500, SU-WL100 • Optional accessories availability depends on page 42.
... × 88 22 3/4 × 14 1/4 × 3 1/2 200 × 200 100 × 100 M6 M4 (length: refer to diagram on page 43) 10.8 6.6 23.8 14.6 9.1 5.7 20.1 12.6 Remote control RM-YD035 (1)/Size AAA batteries (2)/Operating Instructions (1)/Quick Setup Guide (1)/Warranty Card (1)/Safety and Regulatory Booklet (1)/Software License (1)/Stand installation guide (1)/Table-Top Stand (1 set)/Screws (7) Connecting cables / Support Belt Kit / Wall-Mount Bracket: SU-WL500, SU-WL100 • Optional accessories availability depends on page 42.
Operating Instructions
Page 57
... MTS Audio 30 MUTING button 21 N Noise Reduction 27 P PC IN 8 PC Settings 32 Phase 32 Picture 27 Picture Adjustments Lock 39 Picture Mode 27 Picture Off ( ) LED 22 Pitch 32 POWER ("/1) button 21 POWER (") LED 22 POWER button 22 Power Saving 41 Product Support 39 R Rating 34 Reset 27, 29, 54 RETURN button 20 S SCENE button 20 SERVICE ONLY 8 Sharpness 27 Show/Hide Channels 33 Signal Type 33 Sleep Timer 38 Sound Mode 29 Speakers 22, 30 Standby (1) LED 22 Steady Sound 29...
... MTS Audio 30 MUTING button 21 N Noise Reduction 27 P PC IN 8 PC Settings 32 Phase 32 Picture 27 Picture Adjustments Lock 39 Picture Mode 27 Picture Off ( ) LED 22 Pitch 32 POWER ("/1) button 21 POWER (") LED 22 POWER button 22 Power Saving 41 Product Support 39 R Rating 34 Reset 27, 29, 54 RETURN button 20 S SCENE button 20 SERVICE ONLY 8 Sharpness 27 Show/Hide Channels 33 Signal Type 33 Sleep Timer 38 Sound Mode 29 Speakers 22, 30 Standby (1) LED 22 Steady Sound 29...


