Operating Instructions
Page 8
...Projection lamp ❑ Your LCD projection TV uses a projection lamp as vases, shall be affected by the manufacturer, or sold with highprecision technology, black dots may appear or bright points of light (red, blue, or green) may appear constantly on the LCD screen. The noise may be more noticeable during lightning storms or when unused for KDF-55WF655...instructions. 8) Do not install near water. 6) Clean only with one (not supplied) when: • the lamp replacement indicator on the front panel blinks in accordance with the cart, stand, tripod, bracket, or table specified by ...
...Projection lamp ❑ Your LCD projection TV uses a projection lamp as vases, shall be affected by the manufacturer, or sold with highprecision technology, black dots may appear or bright points of light (red, blue, or green) may appear constantly on the LCD screen. The noise may be more noticeable during lightning storms or when unused for KDF-55WF655...instructions. 8) Do not install near water. 6) Clean only with one (not supplied) when: • the lamp replacement indicator on the front panel blinks in accordance with the cart, stand, tripod, bracket, or table specified by ...
Operating Instructions
Page 9
...Sony LCD Projection TV Presenting the Sony LCD Projection TV 11 Package Contents 11 Using This Manual 11 Features 12 Enjoying Your LCD Projection TV 14 Notes on the LCD Projection TV 15 Cleaning the Screen Surface 15 Replacing the Lamp 16 Setting Up the LCD Projection TV Overview 23 LCD Projection TV Front Panel and Connectors ..24 Front Panel 24 Front and Rear... Connector 54 Using the CONTROL S Feature 55 Using CableCARD 56 About Using CableCARD 56 Activating CableCARD Service 56 Removing the CableCARD 57 Setting Up the LCD Projection TV Channel List..58 Using Initial Setup 58 ...
...Sony LCD Projection TV Presenting the Sony LCD Projection TV 11 Package Contents 11 Using This Manual 11 Features 12 Enjoying Your LCD Projection TV 14 Notes on the LCD Projection TV 15 Cleaning the Screen Surface 15 Replacing the Lamp 16 Setting Up the LCD Projection TV Overview 23 LCD Projection TV Front Panel and Connectors ..24 Front Panel 24 Front and Rear... Connector 54 Using the CONTROL S Feature 55 Using CableCARD 56 About Using CableCARD 56 Activating CableCARD Service 56 Removing the CableCARD 57 Setting Up the LCD Projection TV Channel List..58 Using Initial Setup 58 ...
Operating Instructions
Page 14
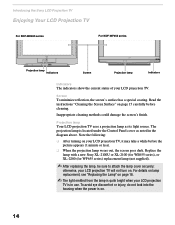
... bright when your LCD projection TV. For details on lamp replacement, see "Replacing the Lamp" on . Screen To minimize reflection, the screen's surface has a special coating. Replace the lamp with a new Sony XL-2100U or XL-2100 (for WE655 series), or XL-2200 (for WF655 series) replacement lamp (not supplied). ✍ After replacing the lamp, be sure to attach the lamp cover securely; To...
... bright when your LCD projection TV. For details on lamp replacement, see "Replacing the Lamp" on . Screen To minimize reflection, the screen's surface has a special coating. Replace the lamp with a new Sony XL-2100U or XL-2100 (for WE655 series), or XL-2200 (for WF655 series) replacement lamp (not supplied). ✍ After replacing the lamp, be sure to attach the lamp cover securely; To...
Operating Instructions
Page 16
... high temperature, resulting in the United States. Doing so may cause injury or fire. ❑ Before replacing the lamp, turn the power off on the front of the LCD projection TV flashes, it . Introducing the Sony LCD Projection TV Replacing the Lamp The projection lamp, which illuminates the picture, has a limited life. Wait several minutes, then unplug the power cord. (The...
... high temperature, resulting in the United States. Doing so may cause injury or fire. ❑ Before replacing the lamp, turn the power off on the front of the LCD projection TV flashes, it . Introducing the Sony LCD Projection TV Replacing the Lamp The projection lamp, which illuminates the picture, has a limited life. Wait several minutes, then unplug the power cord. (The...
Operating Instructions
Page 17
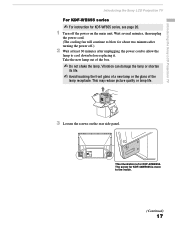
... screw for about two minutes after unplugging the power cord to allow the lamp to cool down before replacing it. This may reduce picture quality or lamp life. 3 Loosen the screws on the main unit. Wait several minutes, then unplug the power cord. (The cooling fan will ...to blow for KDF-42WE655 is for KDF-WF655 series, see page 20. 1 Turn off .) 2 Wait at least 30 minutes after turning the power off the power on the rear side panel. Take the new lamp out of the lamp receptacle. Introducing the Sony LCD Projection TV Introducing the Sony LCD Projection TV For KDF-WE655 series ...
... screw for about two minutes after unplugging the power cord to allow the lamp to cool down before replacing it. This may reduce picture quality or lamp life. 3 Loosen the screws on the main unit. Wait several minutes, then unplug the power cord. (The cooling fan will ...to blow for KDF-42WE655 is for KDF-WF655 series, see page 20. 1 Turn off .) 2 Wait at least 30 minutes after turning the power off the power on the rear side panel. Take the new lamp out of the lamp receptacle. Introducing the Sony LCD Projection TV Introducing the Sony LCD Projection TV For KDF-WE655 series ...
Operating Instructions
Page 18
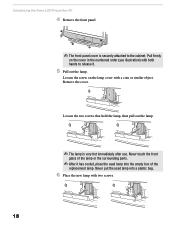
.... 18 Never touch the front glass of the replacement lamp. Loosen the two screws that hold the lamp, then pull out the lamp. ✍ The lamp is securely attached to release it has cooled, place the used lamp into the empty box of the lamp or the surrounding parts. ✍ After it .... 5 Pull out the lamp. Loosen the screw on the cover in the numbered order (see illustration) with a coin or similar object. Introducing the Sony LCD Projection TV 4 Remove the front panel....
.... 18 Never touch the front glass of the replacement lamp. Loosen the two screws that hold the lamp, then pull out the lamp. ✍ The lamp is securely attached to release it has cooled, place the used lamp into the empty box of the lamp or the surrounding parts. ✍ After it .... 5 Pull out the lamp. Loosen the screw on the cover in the numbered order (see illustration) with a coin or similar object. Introducing the Sony LCD Projection TV 4 Remove the front panel....
Operating Instructions
Page 19
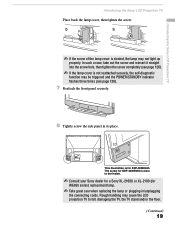
... the screw of the lamp cover is for KDF-50WE655. The screw for KDF-42WE655 is not reattached securely, the self-diagnostic function may cause the LCD projection TV to the inside. ✍ Consult your Sony dealer for a Sony XL-2100U or XL-2100 (for WE655 series) replacement lamp. ✍ Take great care when replacing the lamp or plugging in its...
... the screw of the lamp cover is for KDF-50WE655. The screw for KDF-42WE655 is not reattached securely, the self-diagnostic function may cause the LCD projection TV to the inside. ✍ Consult your Sony dealer for a Sony XL-2100U or XL-2100 (for WE655 series) replacement lamp. ✍ Take great care when replacing the lamp or plugging in its...
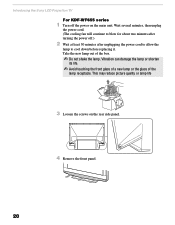
Operating Instructions
Page 20
...on the rear side panel. 20 4 Remove the front panel. Vibration can damage the lamp or shorten its life. ✍ Avoid touching the front glass of a new lamp or the glass of the box. ✍ Do not shake the lamp. Introducing the Sony LCD Projection TV For KDF-WF655 ...series 1 Turn off .) 2 Wait at least 30 minutes after unplugging the power cord to allow the lamp to cool down before replacing...
...on the rear side panel. 20 4 Remove the front panel. Vibration can damage the lamp or shorten its life. ✍ Avoid touching the front glass of a new lamp or the glass of the box. ✍ Do not shake the lamp. Introducing the Sony LCD Projection TV For KDF-WF655 ...series 1 Turn off .) 2 Wait at least 30 minutes after unplugging the power cord to allow the lamp to cool down before replacing...
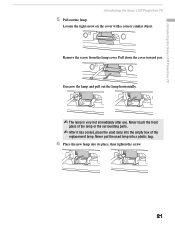
Operating Instructions
Page 21
... replacement lamp. Never put the used lamp into its place, then tighten the screw. 21 Loosen the right screw on the cover with a coin or similar object. Unscrew the lamp and pull out the lamp horizontally. ✍ The lamp is very hot immediately after use. Remove the screw from the lamp cover. Introducing the Sony LCD Projection TV Introducing the Sony...
... replacement lamp. Never put the used lamp into its place, then tighten the screw. 21 Loosen the right screw on the cover with a coin or similar object. Unscrew the lamp and pull out the lamp horizontally. ✍ The lamp is very hot immediately after use. Remove the screw from the lamp cover. Introducing the Sony LCD Projection TV Introducing the Sony...
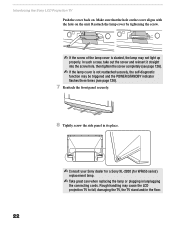
Operating Instructions
Page 22
... is slanted, the lamp may cause the LCD projection TV to fall, damaging the TV, the TV stand and/or the floor. 22 STD/DUO PRO POWER 8 Tightly screw the side panel in its place. ✍ Consult your Sony dealer for a Sony XL-2200 (for WF655 series) replacement lamp. ✍ Take great care when replacing the lamp or plugging in/unplugging...
... is slanted, the lamp may cause the LCD projection TV to fall, damaging the TV, the TV stand and/or the floor. 22 STD/DUO PRO POWER 8 Tightly screw the side panel in its place. ✍ Consult your Sony dealer for a Sony XL-2200 (for WF655 series) replacement lamp. ✍ Take great care when replacing the lamp or plugging in/unplugging...

Operating Instructions
Page 25
... may indicate the display unit needs servicing (see "Contacting Sony" on page 119). 5 TIMER LED When lit, indicates one of the timers is set is set, this LED will remain lit even if the TV set . For details, see page 116. 6 LAMP LED Lights up in red. Press to view on page... 16. 7 (IR) Infrared Receiver Receives IR signals from the remote control. 8 CHANNEL +/- For details, see "Replacing the Lamp" on your LCD projection TV. When in standby mode, the LED lights up in green when the TV set is turned off. The LED does not light up in red when the...
... may indicate the display unit needs servicing (see "Contacting Sony" on page 119). 5 TIMER LED When lit, indicates one of the timers is set is set, this LED will remain lit even if the TV set . For details, see page 116. 6 LAMP LED Lights up in red. Press to view on page... 16. 7 (IR) Infrared Receiver Receives IR signals from the remote control. 8 CHANNEL +/- For details, see "Replacing the Lamp" on your LCD projection TV. When in standby mode, the LED lights up in green when the TV set is turned off. The LED does not light up in red when the...
Operating Instructions
Page 125
...with your previous password; to VCR The replacement lamp does not ❏ The screw of the lamp cover may be recorded to your cable provider for KDF-WF655 series). Other Information 125 Lost password ❏ In the password screen (see page 113). TV makes "popping" sound ❏ This... , then shuts off . Cannot record digital channels ❏ Only analog channels can be slanted. to factory settings How to the LCD projection TV Cannot operate Menu ❏ If a menu option appears in temperature, causing the cabinet to Skip (see page 108), enter the following ...
...with your previous password; to VCR The replacement lamp does not ❏ The screw of the lamp cover may be recorded to your cable provider for KDF-WF655 series). Other Information 125 Lost password ❏ In the password screen (see page 113). TV makes "popping" sound ❏ This... , then shuts off . Cannot record digital channels ❏ Only analog channels can be slanted. to factory settings How to the LCD projection TV Cannot operate Menu ❏ If a menu option appears in temperature, causing the cabinet to Skip (see page 108), enter the following ...
Operating Instructions
Page 126
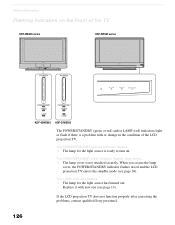
... Sony personnel. 126 Replace it with or change in red and the LCD projection TV enters the standby mode (see page 16). The POWER/STANDBY (green) indicator flashes. ❑ The lamp for the light source has burned out. When you secure the lamp cover, the POWER/STANDBY indicator flashes in the condition of the TV KDF-WE655 series KDF...
... Sony personnel. 126 Replace it with or change in red and the LCD projection TV enters the standby mode (see page 16). The POWER/STANDBY (green) indicator flashes. ❑ The lamp for the light source has burned out. When you secure the lamp cover, the POWER/STANDBY indicator flashes in the condition of the TV KDF-WE655 series KDF...
Operating Instructions
Page 130
...E Enlarging pictures, in remote 59 Bilingual audio 103 Brightness, adjusting 98 C Cable connecting 32 with VCR, connecting 39 Cable box connecting with TV remote control 64 CableCARD 56 Camcorder, connecting 48 Caption Vision 112 CATV. Index Numerics 0-9 buttons 60 A Activating a Twin View screen 72 Adding...GUIDE button 68 Guide menu 69 H Hue, adjusting 98 I Inputs, labeling 113 Installation of the projection TV 31-55 interlaced 118 J JUMP button 61, 67 L Label Channels 58, 107 video inputs 113 Lamp, replacing 16-22 M Memory Stick Duo 83 features 79 Index 85 indicator (LED) 25 insertion slot ...
...E Enlarging pictures, in remote 59 Bilingual audio 103 Brightness, adjusting 98 C Cable connecting 32 with VCR, connecting 39 Cable box connecting with TV remote control 64 CableCARD 56 Camcorder, connecting 48 Caption Vision 112 CATV. Index Numerics 0-9 buttons 60 A Activating a Twin View screen 72 Adding...GUIDE button 68 Guide menu 69 H Hue, adjusting 98 I Inputs, labeling 113 Installation of the projection TV 31-55 interlaced 118 J JUMP button 61, 67 L Label Channels 58, 107 video inputs 113 Lamp, replacing 16-22 M Memory Stick Duo 83 features 79 Index 85 indicator (LED) 25 insertion slot ...


