
Operating Instructions
Page 7
... Using the Channel Settings 32 Using the Favorite Channels Guide 32 SETUP SETUP Using the Menu Overview ...33 Navigating Through Menu 33 Using the Menu 34 Using the Picture Settings 35 Selecting Picture Options 35 Using the Sound Settings 37 Selecting Sound Options 37 ... 44 Using the Setup Settings 45 Selecting Setup Options 45 Programming Caption Vision 46 Using the Applications Settings 47 Selecting Applications Options 47 SETUP SETUP Other Information Glossary ...49 Contacting Sony 50 Troubleshooting 50 Remote Control 50 Channels 50 Sound 51 Picture 51 General 52 ...
... Using the Channel Settings 32 Using the Favorite Channels Guide 32 SETUP SETUP Using the Menu Overview ...33 Navigating Through Menu 33 Using the Menu 34 Using the Picture Settings 35 Selecting Picture Options 35 Using the Sound Settings 37 Selecting Sound Options 37 ... 44 Using the Setup Settings 45 Selecting Setup Options 45 Programming Caption Vision 46 Using the Applications Settings 47 Selecting Applications Options 47 SETUP SETUP Other Information Glossary ...49 Contacting Sony 50 Troubleshooting 50 Remote Control 50 Channels 50 Sound 51 Picture 51 General 52 ...

Operating Instructions
Page 9
...; CineMotion™: Inverse 3-2 pulldown processing provides optimal picture quality for phase effects in 24 frames-per-second format). ❑ Parental Control: V-Chip technology allows parents to compensate for film-based sources (media originally shot in speakers. 2 SETUP SETUP Introducing SETUP Welcome SETUP SETUP ❑ ClearEdge VM™ Velocity Modulation: Sharpens picture definition by enhancing vertical lines. ❑ Steady...
...; CineMotion™: Inverse 3-2 pulldown processing provides optimal picture quality for phase effects in 24 frames-per-second format). ❑ Parental Control: V-Chip technology allows parents to compensate for film-based sources (media originally shot in speakers. 2 SETUP SETUP Introducing SETUP Welcome SETUP SETUP ❑ ClearEdge VM™ Velocity Modulation: Sharpens picture definition by enhancing vertical lines. ❑ Steady...

Operating Instructions
Page 11
...connects to your VHF/UHF antenna or cable box. * Dolby and the double-D symbol are trademarks of Dolby Laboratories. Component video provides better picture quality than either composite video (2) or VHF/UHF (7) connections. 2 VIDEO IN 1/3 VIDEO/L(MONO) -AUDIO-R Connect to the composite A/V... front panel of the TV. HDMI supports enhanced, or high-definition video, plus two-channel digital audio. 7 VHF/UHF RF input that has S VIDEO. SETUP Setup SETUP Rear Panel 1 2 3 4 DIGITAL AUDIO OUT PCM/ DOLBY DIGITAL 7 5 6 Jack Description 1 S VIDEO IN 1/3 Connects to the S VIDEO OUT...
...connects to your VHF/UHF antenna or cable box. * Dolby and the double-D symbol are trademarks of Dolby Laboratories. Component video provides better picture quality than either composite video (2) or VHF/UHF (7) connections. 2 VIDEO IN 1/3 VIDEO/L(MONO) -AUDIO-R Connect to the composite A/V... front panel of the TV. HDMI supports enhanced, or high-definition video, plus two-channel digital audio. 7 VHF/UHF RF input that has S VIDEO. SETUP Setup SETUP Rear Panel 1 2 3 4 DIGITAL AUDIO OUT PCM/ DOLBY DIGITAL 7 5 6 Jack Description 1 S VIDEO IN 1/3 Connects to the S VIDEO OUT...
Operating Instructions
Page 14
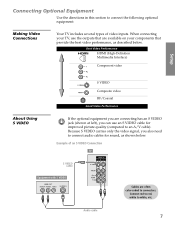
...components that provide the best video performance, as shown below . Connect red to red, white to an A/V cable). SETUP Connecting Optional Equipment Use the directions in this section to connect the following optional equipment: Making Video Connections Your TV includes...connecting your TV, use an S VIDEO cable for sound, as described below . Audio cable 7 SETUP SETUP Best Video Performance HDMI (High-Definition Multimedia Interface) Component video Setup SETUP SETUP About Using S VIDEO S VIDEO Composite video RF/Coaxial Good Video Performance If the optional equipment you...
...components that provide the best video performance, as shown below . Connect red to red, white to an A/V cable). SETUP Connecting Optional Equipment Use the directions in this section to connect the following optional equipment: Making Video Connections Your TV includes...connecting your TV, use an S VIDEO cable for sound, as described below . Audio cable 7 SETUP SETUP Best Video Performance HDMI (High-Definition Multimedia Interface) Component video Setup SETUP SETUP About Using S VIDEO S VIDEO Composite video RF/Coaxial Good Video Performance If the optional equipment you...

Operating Instructions
Page 27
...feature as described on page 40. You can choose a correction between +7 and -7. Auto Program automatically creates a list of the picture. When Auto Program is finished, the lowest numbered channel is being created. To reset the TV to factory settings 1 Press POWER to the... more details on using Tilt Correction and Vertical Correction, see pages 45-46. When finished, press . 3 The Vertical Correction screen appears. SETUP SETUP SETUP 20 When finished, press . 4 The next screen instructs you 've connected your signal source correctly. Using the remote control, move the ...
...feature as described on page 40. You can choose a correction between +7 and -7. Auto Program automatically creates a list of the picture. When Auto Program is finished, the lowest numbered channel is being created. To reset the TV to factory settings 1 Press POWER to the... more details on using Tilt Correction and Vertical Correction, see pages 45-46. When finished, press . 3 The Vertical Correction screen appears. SETUP SETUP SETUP 20 When finished, press . 4 The next screen instructs you 've connected your signal source correctly. Using the remote control, move the ...

Operating Instructions
Page 29
... VCR (or 5 qf DVD/VCR combination unit). 6 qg Transport m Rewind 7 qh Buttons N Play qj z Record (press together with older Sony 2 qs equipment. RM-YD007 cancel press until the TV displays the time in 9 wa minutes (15, 30, 45, 60, 90 or 120... to display the remaining time. 6 PICTURE MODE Press repeatedly to the factory defaults. For details, see "Programming the Remote Control" on page 24. SAT/CABLE: Press to mute the sound. SETUP SETUP SETUP 22 The TV alternates between two channels. SETUP SETUP Remote Control Button Descriptions Button Description ...
... VCR (or 5 qf DVD/VCR combination unit). 6 qg Transport m Rewind 7 qh Buttons N Play qj z Record (press together with older Sony 2 qs equipment. RM-YD007 cancel press until the TV displays the time in 9 wa minutes (15, 30, 45, 60, 90 or 120... to display the remaining time. 6 PICTURE MODE Press repeatedly to the factory defaults. For details, see "Programming the Remote Control" on page 24. SAT/CABLE: Press to mute the sound. SETUP SETUP SETUP 22 The TV alternates between two channels. SETUP SETUP Remote Control Button Descriptions Button Description ...
Operating Instructions
Page 33
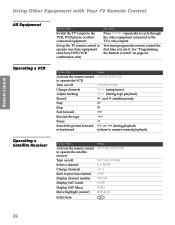
...See "Programming the Remote Control" on /off Change channels Adjust tracking Record Play Stop Fast forward Rewind the tape Pause Search the picture forward or backward Press VCR/DVD FUNCTION VCR/DVD POWER CH +/- (using tuner) CH +/- (during tape playback) N and ...0-9, ENTER CH +/JUMP DISPLAY GUIDE Display SAT Menu MENU Move highlight (cursor) V v B b Select item SETUP SETUP SETUP 26 To Do This ... Switch the TV's input to the VCR, DVD player, or other connected equipment Set... video equipment connected to operate non-Sony equipment (and Sony DVD/VCR combination unit) Do This ...
...See "Programming the Remote Control" on /off Change channels Adjust tracking Record Play Stop Fast forward Rewind the tape Pause Search the picture forward or backward Press VCR/DVD FUNCTION VCR/DVD POWER CH +/- (using tuner) CH +/- (during tape playback) N and ...0-9, ENTER CH +/JUMP DISPLAY GUIDE Display SAT Menu MENU Move highlight (cursor) V v B b Select item SETUP SETUP SETUP 26 To Do This ... Switch the TV's input to the VCR, DVD player, or other connected equipment Set... video equipment connected to operate non-Sony equipment (and Sony DVD/VCR combination unit) Do This ...

Operating Instructions
Page 34
... z When the VCR is not playing, TV/VCR/DVD switches between the DVD player and VCR Display the DVD menu Play Stop Pause Search the picture forward or backward Move highlight (cursor) and select (DVD) Record (VCR) Change channels (VCR) Adjust tracking (VCR) VCR/DVD POWER TV/VCR/DVD MENU N x X M or...
... z When the VCR is not playing, TV/VCR/DVD switches between the DVD player and VCR Display the DVD menu Play Stop Pause Search the picture forward or backward Move highlight (cursor) and select (DVD) Record (VCR) Change channels (VCR) Adjust tracking (VCR) VCR/DVD POWER TV/VCR/DVD MENU N x X M or...

Operating Instructions
Page 37
...set to fill the 16:9 screen. For details, see page 39. Normal m SCREEN Full stretches the 4:3 picture horizontally, to Off in the Screen Settings. Features SETUP SETUP 30 Zoom When you change channels or inputs, the Screen Mode settings revert to the 4:3 Default setting if ...For details, see page 39. ❑ Press SCREEN MODE repeatedly to fill the 16:9 screen. SETUP SETUP SETUP Using Screen Mode The Screen Mode feature lets you change the picture size for watching Letterbox movies. To retain the current Screen Mode setting as channels and inputs are...
...set to fill the 16:9 screen. For details, see page 39. Normal m SCREEN Full stretches the 4:3 picture horizontally, to Off in the Screen Settings. Features SETUP SETUP 30 Zoom When you change channels or inputs, the Screen Mode settings revert to the 4:3 Default setting if ...For details, see page 39. ❑ Press SCREEN MODE repeatedly to fill the 16:9 screen. SETUP SETUP SETUP Using Screen Mode The Screen Mode feature lets you change the picture size for watching Letterbox movies. To retain the current Screen Mode setting as channels and inputs are...

Operating Instructions
Page 38
... occur. Some clipping may occur. Horizontal Expand m SCREEN Vertical Expand stretches the picture vertically. Vertical Expand SETUP Features SETUP SETUP 31 Full (native 16:9) If the source is a 16:9 high-definition (720p/1080i) signal, the picture fills the screen. Some clipping may occur. SETUP SETUP Using Screen Mode with High-Definition (720p/1080i) Sources Example Description SCREEN...
... occur. Some clipping may occur. Horizontal Expand m SCREEN Vertical Expand stretches the picture vertically. Vertical Expand SETUP Features SETUP SETUP 31 Full (native 16:9) If the source is a 16:9 high-definition (720p/1080i) signal, the picture fills the screen. Some clipping may occur. SETUP SETUP Using Screen Mode with High-Definition (720p/1080i) Sources Example Description SCREEN...
Operating Instructions
Page 42
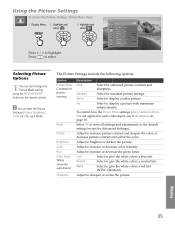
... 40 High Exit: MENU Selecting Picture Options You can alter the Picture Settings (Picture, Brightness, Color, etc.) for enhanced picture contrast and sharpness. Adjust to display a softer picture. Menus SETUP SETUP Using the Picture Settings To access the Picture Settings, follow these steps: 1. The Picture Settings include the following options: Option Picture Mode Customized picture viewing Reset Picture Brightness Color Hue Color Temp...
... 40 High Exit: MENU Selecting Picture Options You can alter the Picture Settings (Picture, Brightness, Color, etc.) for enhanced picture contrast and sharpness. Adjust to display a softer picture. Menus SETUP SETUP Using the Picture Settings To access the Picture Settings, follow these steps: 1. The Picture Settings include the following options: Option Picture Mode Customized picture viewing Reset Picture Brightness Color Hue Color Temp...

Operating Instructions
Page 43
... On to TV viewing and each video input. Off Set to Off to apply the same Picture Mode settings to choose among the Advanced Settings options. SETUP SETUP Menus Menus 36 Menus SETUP You can also change the Picture Mode setting. Interlaced Recommended for high quality sources (i.e., DVD player, satellite receiver). Default Emphasizes red tones...
... On to TV viewing and each video input. Off Set to Off to apply the same Picture Mode settings to choose among the Advanced Settings options. SETUP SETUP Menus Menus 36 Menus SETUP You can also change the Picture Mode setting. Interlaced Recommended for high quality sources (i.e., DVD player, satellite receiver). Default Emphasizes red tones...

Operating Instructions
Page 46
... Size Description Enables you to choose a correction between 39 Menus Menus To select a Screen Mode to have the screen automatically change the picture size for 4:3 sources. If frequent screen changes are changed , select Off. For details, see page 52. On Select to use for.... Highlight and select Antenna Screen Exit: MENU Screen Mode Audo Wide 4:3 Default Vertical Center Vertical Size Wide Zoom On Off 0 0 SETUP SETUP SETUP Press V / v to On. For 480i/480p sources Select from : Full, Zoom, Horizontal Expand, sources Vertical Expand.
... Size Description Enables you to choose a correction between 39 Menus Menus To select a Screen Mode to have the screen automatically change the picture size for 4:3 sources. If frequent screen changes are changed , select Off. For details, see page 52. On Select to use for.... Highlight and select Antenna Screen Exit: MENU Screen Mode Audo Wide 4:3 Default Vertical Center Vertical Size Wide Zoom On Off 0 0 SETUP SETUP SETUP Press V / v to On. For 480i/480p sources Select from : Full, Zoom, Horizontal Expand, sources Vertical Expand.

Operating Instructions
Page 53
... Small Text Large Text Custom ... CC1, CC2, CC3, CC4 Displays a printed version of the dialog or sound effects of the picture. Allows you to make additional settings for the on the unit and after the unit is moved to choose a correction between +5 ... Select to choose a correction between +7 and -7 and press . Menus Menus SETUP SETUP SETUP Menus z Normally, Tilt Correction and Vertical Correction only need to be adjusted the first time you to make a vertical correction to the picture. Press B or b to a new location. Allows you to customize the following...
... Small Text Large Text Custom ... CC1, CC2, CC3, CC4 Displays a printed version of the dialog or sound effects of the picture. Allows you to make additional settings for the on the unit and after the unit is moved to choose a correction between +5 ... Select to choose a correction between +7 and -7 and press . Menus Menus SETUP SETUP SETUP Menus z Normally, Tilt Correction and Vertical Correction only need to be adjusted the first time you to make a vertical correction to the picture. Press B or b to a new location. Allows you to customize the following...

Operating Instructions
Page 58
.... Sound seems weak or ❏ The TV's audio might be set to Hide in the Picture Settings (see page 38). If already set the MTS setting to Stereo. Call your local Sony Service Center. ❏ Make sure the power cord is plugged in. ❏ Press the ... more information. ❏ Some optional digital cable broadcast formats may be better set insufficient to Stereo. Cannot raise the volume on the broadcast of digital are not being displayed cable channels. it could be supported. SETUP SETUP Picture Problem No picture (screen not lit), no sound Dark, poor or no...
.... Sound seems weak or ❏ The TV's audio might be set to Hide in the Picture Settings (see page 38). If already set the MTS setting to Stereo. Call your local Sony Service Center. ❏ Make sure the power cord is plugged in. ❏ Press the ... more information. ❏ Some optional digital cable broadcast formats may be better set insufficient to Stereo. Cannot raise the volume on the broadcast of digital are not being displayed cable channels. it could be supported. SETUP SETUP Picture Problem No picture (screen not lit), no sound Dark, poor or no...

Operating Instructions
Page 59
... following master password: 4357. Cannot record digital ❏ Only analog channels can be used to factory settings (see page 37). How to restore Picture ❏ Press the RESET button on . The master password clears your VCR. channels to ❏ Turn on , then shuts off this indicates... is not set the Caption Vision option to factory settings (see page 35). General Problem Possible Remedies How to reset TV to VCR SETUP SETUP Other Info 52 Lost password ❏ In the password screen (see page 45). Digital cable box does not ❏ If you ...
... following master password: 4357. Cannot record digital ❏ Only analog channels can be used to factory settings (see page 37). How to restore Picture ❏ Press the RESET button on . The master password clears your VCR. channels to ❏ Turn on , then shuts off this indicates... is not set the Caption Vision option to factory settings (see page 35). General Problem Possible Remedies How to reset TV to VCR SETUP SETUP Other Info 52 Lost password ❏ In the password screen (see page 45). Digital cable box does not ❏ If you ...

Operating Instructions
Page 60
...TV Stand Description Audio/Video Audio Component Video SU-34XBR4 Model Number VMC-810/820/830 HG RKC-515HG VMC-10/30 HG SETUP SETUP Other Info 53 PB: 0.7 Vp-p, 75 ohms PR: 0.7 Vp-p, 75 ohms More than 408 mVrms at the maximum ...specifications are subject to change without notice. Other Info Other SETUP Specifications Picture Tube FD Trinitron® tube Antenna 75 ohm external terminal for remote control Visible Screen Size 34 in (863.6 mm) (picture measured diagonally) Actual CRT Size 36 in (914.4 mm) (picture measured diagonally) Speaker Output 10 W x 2 Dimensions (W...
...TV Stand Description Audio/Video Audio Component Video SU-34XBR4 Model Number VMC-810/820/830 HG RKC-515HG VMC-10/30 HG SETUP SETUP Other Info 53 PB: 0.7 Vp-p, 75 ohms PR: 0.7 Vp-p, 75 ohms More than 408 mVrms at the maximum ...specifications are subject to change without notice. Other Info Other SETUP Specifications Picture Tube FD Trinitron® tube Antenna 75 ohm external terminal for remote control Visible Screen Size 34 in (863.6 mm) (picture measured diagonally) Actual CRT Size 36 in (914.4 mm) (picture measured diagonally) Speaker Output 10 W x 2 Dimensions (W...
Operating Instructions
Page 62
Welcome Index SETUP Picture modes, selecting 35 Picture Settings 35 picture, adjusting 35 Play button 22 POWER button 3 power cord, removing ... buttons 22 remote control inserting batteries 21 programming 24-25 removing, Favorite Channels 32 RESET button 22 resetting Picture options 35 Sound options 37 Rewind button 22 S S VIDEO jack, described 3, 4 SAT/CABLE FUNCTION button... 30 Screen Settings 39 Settings Applications 47 Channel 40 Parental Lock 42 Picture 35 Screen 39 Setup 45 Sound 37 Settings, MENU 34 Setup Settings 45 sharpness, adjusting 35 Simulated, Effect 37 SLEEP button 22 Sound...
Welcome Index SETUP Picture modes, selecting 35 Picture Settings 35 picture, adjusting 35 Play button 22 POWER button 3 power cord, removing ... buttons 22 remote control inserting batteries 21 programming 24-25 removing, Favorite Channels 32 RESET button 22 resetting Picture options 35 Sound options 37 Rewind button 22 S S VIDEO jack, described 3, 4 SAT/CABLE FUNCTION button... 30 Screen Settings 39 Settings Applications 47 Channel 40 Parental Lock 42 Picture 35 Screen 39 Setup 45 Sound 37 Settings, MENU 34 Setup Settings 45 sharpness, adjusting 35 Simulated, Effect 37 SLEEP button 22 Sound...


