Warranty Card
Page 1
..., to any part of 90 days from your authorized dealer, call: 1-800-488-SONY (7669) Printed in the United States. ACCESSORIES: Parts and labor for 19" (measured diagonally), or larger screen size through a Sony authorized service facility. This warranty does not cover damage due to improper operation or maintenance, connection to improper voltage supply, or attempted repair by Sony to any authorized Sony service facility.
..., to any part of 90 days from your authorized dealer, call: 1-800-488-SONY (7669) Printed in the United States. ACCESSORIES: Parts and labor for 19" (measured diagonally), or larger screen size through a Sony authorized service facility. This warranty does not cover damage due to improper operation or maintenance, connection to improper voltage supply, or attempted repair by Sony to any authorized Sony service facility.
Operating Instructions
Page 3
... risk of important operating and maintenance (servicing) instructions in the literature accompanying the appliance. This symbol is wider than private viewing of programs broadcast on Caption Vision This television receiver provides display of television closed captioning in accordance with § 15.119 of electric shock to constitute a risk of the FCC rules. If you to receive unscrambled digital cable television programming via subscription service to operate this television for other...
... risk of important operating and maintenance (servicing) instructions in the literature accompanying the appliance. This symbol is wider than private viewing of programs broadcast on Caption Vision This television receiver provides display of television closed captioning in accordance with § 15.119 of electric shock to constitute a risk of the FCC rules. If you to receive unscrambled digital cable television programming via subscription service to operate this television for other...
Operating Instructions
Page 4
..., stand, tripod, bracket, table, or shelf. Do not defeat the safety purpose of the polarized plug. When the set is not to improve. Do not disconnect the antenna or the power cord during a heavy storm. Lightning may be operated only from battery power, refer to insert the plug fully into a grounding-type power outlet. Turn off . Object and Liquid Entry Never push objects of power source...
..., stand, tripod, bracket, table, or shelf. Do not defeat the safety purpose of the polarized plug. When the set is not to improve. Do not disconnect the antenna or the power cord during a heavy storm. Lightning may be operated only from battery power, refer to insert the plug fully into a grounding-type power outlet. Turn off . Object and Liquid Entry Never push objects of power source...
Operating Instructions
Page 5
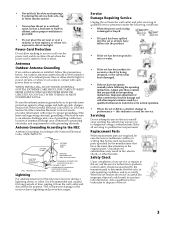
... Electrical Code in Canada provides information with such power lines or circuits. GROUND CLAMP ANTENNA LEAD IN WIRE ELECTRIC SERVICE EQUIPMENT NEC - Service Damage Requiring Service Unplug the set from the wall outlet and disconnect the antenna. this television receiver during a lightning storm, or when it from the wall outlet and refer servicing to qualified service personnel under the following the operating instructions. Ask a qualified service technician...
... Electrical Code in Canada provides information with such power lines or circuits. GROUND CLAMP ANTENNA LEAD IN WIRE ELECTRIC SERVICE EQUIPMENT NEC - Service Damage Requiring Service Unplug the set from the wall outlet and disconnect the antenna. this television receiver during a lightning storm, or when it from the wall outlet and refer servicing to qualified service personnel under the following the operating instructions. Ask a qualified service technician...
Operating Instructions
Page 7
... Equipment 13 Connecting Your TV TV Rear Panel 15 Basic Connections 16 Connecting Additional Equipment 17 Setting Up the TV 27 Using the Digital Features Overview 29 Tuning to a Digital Channel 29 Using the Digital Program Guide 30 Using the Screen Mode Feature 32 Using Digital Favorite Channels 33 Using the Analog Menus Overview 35 Menu Descriptions 35 Using the Remote Control to Navigate the On-Screen Analog Menus 37 Using the Video Menu 38 Using the Audio Menu 39 Using the Channel Setup Menu 41 Using the Parental Control Menu 43 Parental Control 44...
... Equipment 13 Connecting Your TV TV Rear Panel 15 Basic Connections 16 Connecting Additional Equipment 17 Setting Up the TV 27 Using the Digital Features Overview 29 Tuning to a Digital Channel 29 Using the Digital Program Guide 30 Using the Screen Mode Feature 32 Using Digital Favorite Channels 33 Using the Analog Menus Overview 35 Menu Descriptions 35 Using the Remote Control to Navigate the On-Screen Analog Menus 37 Using the Video Menu 38 Using the Audio Menu 39 Using the Channel Setup Menu 41 Using the Parental Control Menu 43 Parental Control 44...
Operating Instructions
Page 9
.... ❏ Favorite Channels - Operates your cable provider for analog and digital channels. ❏ Digital Program Guide - Built-in tuners allow you quickly connect video games, camcorders, or stereo/mono equipment. 7 Helps parents monitor what their original widescreen format, or zoom to compensate for energy efficiency. ❏ Front Panel Controls - Introducing the FD Trinitron WEGA Features Some of the Sony FD Trinitron WEGA®. Enables you will enjoy include: ❏ FD Trinitron Flat CRT - Watch digital 16:9 (widescreen) broadcasts in speakers. ❏ SRS...
.... ❏ Favorite Channels - Operates your cable provider for analog and digital channels. ❏ Digital Program Guide - Built-in tuners allow you quickly connect video games, camcorders, or stereo/mono equipment. 7 Helps parents monitor what their original widescreen format, or zoom to compensate for energy efficiency. ❏ Front Panel Controls - Introducing the FD Trinitron WEGA Features Some of the Sony FD Trinitron WEGA®. Enables you will enjoy include: ❏ FD Trinitron Flat CRT - Watch digital 16:9 (widescreen) broadcasts in speakers. ❏ SRS...
Operating Instructions
Page 11
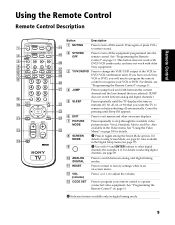
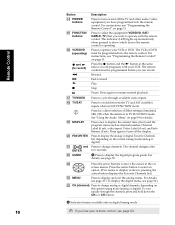
... selecting digital channels, see page 29. 0 ANALOG /DIGITAL qa RESET Press to change the VHF/UHF output of the VCR (or ql DVD/VCR combination unit). See "Programming the Remote Control" on using Screen Mode, see page 32. For details, see "Programming the Remote Control" on page 11. qs VOL (volume) Press (+) or (-) to toggle among the Screen Mode options. For details on -screen menu. qj qk 3 TV/VCR/DVD Press to switch between analog and digital channels.) 5 SLEEP...
... selecting digital channels, see page 29. 0 ANALOG /DIGITAL qa RESET Press to change the VHF/UHF output of the VCR (or ql DVD/VCR combination unit). See "Programming the Remote Control" on using Screen Mode, see page 32. For details, see "Programming the Remote Control" on page 11. qs VOL (volume) Press (+) or (-) to toggle among the Screen Mode options. For details on -screen menu. qj qk 3 TV/VCR/DVD Press to switch between analog and digital channels.) 5 SLEEP...
Operating Instructions
Page 12
... in digital tuning mode. 10 ✍ If you have programmed into the remote control. Pause. button. For details, see page 35. (To display the digital menu, see page 54.) wg CH (channel) Press to change analog or digital channels, depending on the current tuning mode (analog or digital). Press to change channels. Remote Control Button qf POWER buttons qg FUNCTION buttons qh VCR/DVD (operating) and (to record) m M x X Description Press to turn off the TV and other audio/video equipment...
... in digital tuning mode. 10 ✍ If you have programmed into the remote control. Pause. button. For details, see page 35. (To display the digital menu, see page 54.) wg CH (channel) Press to change analog or digital channels, depending on the current tuning mode (analog or digital). Press to change channels. Remote Control Button qf POWER buttons qg FUNCTION buttons qh VCR/DVD (operating) and (to record) m M x X Description Press to turn off the TV and other audio/video equipment...
Operating Instructions
Page 13
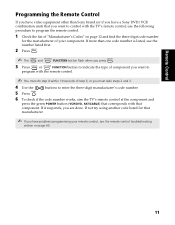
... three-digit manufacturer's code number. 5 Press . 6 To check if the code number works, aim the TV's remote control at the component and press the green POWER button (VCR/DVD, SAT/CABLE) that corresponds with the TV's remote control, use the number listed first. 2 Press . ✍ The and FUNCTION button flash when you press . 3 Press or FUNCTION button to indicate the type of component you want to program the remote control. 1 Check the list of your remote control, see the remote control troubleshooting section...
... three-digit manufacturer's code number. 5 Press . 6 To check if the code number works, aim the TV's remote control at the component and press the green POWER button (VCR/DVD, SAT/CABLE) that corresponds with the TV's remote control, use the number listed first. 2 Press . ✍ The and FUNCTION button flash when you press . 3 Press or FUNCTION button to indicate the type of component you want to program the remote control. 1 Check the list of your remote control, see the remote control troubleshooting section...
Operating Instructions
Page 17
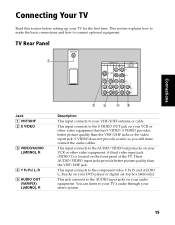
... the component video Y PB PR and AUDIO L, R jacks on your VCR or other video equipment. You can listen to the AUDIO input jacks on your DVD player or digital set-top box (480i only). This input connects to your TV for the first time. Connecting Your TV Read this section before setting up your VHF/UHF antenna or cable. TV Rear Panel 1 Connections Jack 1 VHF/UHF 2 S VIDEO 3 VIDEO/AUDIO L(MONO), R 4 Y PB PR/ L, R 5 AUDIO OUT (VAR/FIX...
... the component video Y PB PR and AUDIO L, R jacks on your VCR or other video equipment. You can listen to the AUDIO input jacks on your DVD player or digital set-top box (480i only). This input connects to your TV for the first time. Connecting Your TV Read this section before setting up your VHF/UHF antenna or cable. TV Rear Panel 1 Connections Jack 1 VHF/UHF 2 S VIDEO 3 VIDEO/AUDIO L(MONO), R 4 Y PB PR/ L, R 5 AUDIO OUT (VAR/FIX...
Operating Instructions
Page 21
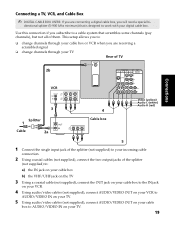
Use this connection if you subscribe to a cable system that is designed to work with your digital cable box. Connecting a TV, VCR, and Cable Box ✍ DIGITAL CABLE BOX USERS: If you are receiving a scrambled signal ❏ change channels through your TV Rear of TV 2b Connections VCR LINE IN VIDEO AUDIO L AUDIO R LINE OUT 3 Splitter 1 Cable 2a 4 Cable box VIDEO AUDIO L AUDIO R LINE OUT Video (yellow) Audio L (white) Audio R (red) 5 1 Connect the single input jack of the splitter (not supplied) to your TV. 19 directional splitter (5-900...
Use this connection if you subscribe to a cable system that is designed to work with your digital cable box. Connecting a TV, VCR, and Cable Box ✍ DIGITAL CABLE BOX USERS: If you are receiving a scrambled signal ❏ change channels through your TV Rear of TV 2b Connections VCR LINE IN VIDEO AUDIO L AUDIO R LINE OUT 3 Splitter 1 Cable 2a 4 Cable box VIDEO AUDIO L AUDIO R LINE OUT Video (yellow) Audio L (white) Audio R (red) 5 1 Connect the single input jack of the splitter (not supplied) to your TV. 19 directional splitter (5-900...

Operating Instructions
Page 26
...PB PR outputs on your TV. If so, connect the cables to the DVD player's input (VIDEO input). 24 Rear of TV Rear of the yellow video cable. Rear of DVD Player Rear of TV Connections Optional connection Audio R (red) Audio L (white) Video (yellow) Optional connection ❏ For better picture quality, use S VIDEO instead of DVD Player PPRB (red) (blue) Y (green) 2 1 Audio L (white) Audio R (red) 1 Make sure your DVD player is set up (see "Programming the Remote Control" on page 11). ❏ To activate your remote, press the FUNCTION button to operate your DVD...
...PB PR outputs on your TV. If so, connect the cables to the DVD player's input (VIDEO input). 24 Rear of TV Rear of the yellow video cable. Rear of DVD Player Rear of TV Connections Optional connection Audio R (red) Audio L (white) Video (yellow) Optional connection ❏ For better picture quality, use S VIDEO instead of DVD Player PPRB (red) (blue) Y (green) 2 1 Audio L (white) Audio R (red) 1 Make sure your DVD player is set up (see "Programming the Remote Control" on page 11). ❏ To activate your remote, press the FUNCTION button to operate your DVD...
Operating Instructions
Page 37
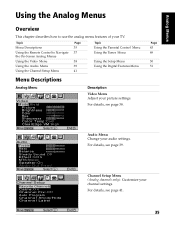
... Using the Video Menu Using the Audio Menu Using the Channel Setup Menu Page 35 37 38 39 41 Topic Using the Parental Control Menu Using the Timer Menu Using the Setup Menu Using the Digital Features Menu Page 43 49 50 51 Menu Descriptions Analog Menu Video Mode:Vivid Picture Brightness Color Hue Sharpness Color Temp:Cool ClearEdge VM:High Move Select End Audio Treble Bass Balance Steady Sound:Off Effect:SRS MTS:Stereo Speaker:On Audio Out:Fixed Move Select End Channel Setup Favorite Channels Cable:On Channel Fix:Off Auto Program Channel...
... Using the Video Menu Using the Audio Menu Using the Channel Setup Menu Page 35 37 38 39 41 Topic Using the Parental Control Menu Using the Timer Menu Using the Setup Menu Using the Digital Features Menu Page 43 49 50 51 Menu Descriptions Analog Menu Video Mode:Vivid Picture Brightness Color Hue Sharpness Color Temp:Cool ClearEdge VM:High Move Select End Audio Treble Bass Balance Steady Sound:Off Effect:SRS MTS:Stereo Speaker:On Audio Out:Fixed Move Select End Channel Setup Favorite Channels Cable:On Channel Fix:Off Auto Program Channel...
Operating Instructions
Page 38
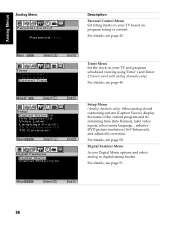
...menu language, , enhance DVD picture resolution (16:9 Enhanced), and adjust tilt correction. Move Select End Timer Timer 1:Set Timer 2:Set Current Time Move Select End Setup Caption Vision:Off Info Banner:Off Video Label Language:English 16:9 Enhanced:Off Tilt Correction Move Select End Digital Features Digital Menu Channel Mode:Digital Timer Menu Set the clock on your TV based on your TV and program scheduled viewing using Timer 1 and Timer 2 (timers work with analog channels only). For details, see page 50. Analog Menus Analog Menu Parental Control Password...
...menu language, , enhance DVD picture resolution (16:9 Enhanced), and adjust tilt correction. Move Select End Timer Timer 1:Set Timer 2:Set Current Time Move Select End Setup Caption Vision:Off Info Banner:Off Video Label Language:English 16:9 Enhanced:Off Tilt Correction Move Select End Digital Features Digital Menu Channel Mode:Digital Timer Menu Set the clock on your TV based on your TV and program scheduled viewing using Timer 1 and Timer 2 (timers work with analog channels only). For details, see page 50. Analog Menus Analog Menu Parental Control Password...
Operating Instructions
Page 59
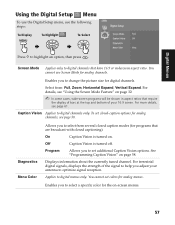
... several closed caption modes (for analog channels. Enables you adjust your 16:9 screen. To set additional Caption Vision options. Screen Mode Applies only to digital channels only. Caption Vision Applies to digital channels that have 16:9 or widescreen aspect ratio. See "Programming Caption Vision" on -screen menus. 57 Enables you to help you to optimize signal reception. For terrestrial digital signals, displays the strength of your antenna to change the picture size for analog menus. On Caption Vision is turned off...
... several closed caption modes (for analog channels. Enables you adjust your 16:9 screen. To set additional Caption Vision options. Screen Mode Applies only to digital channels only. Caption Vision Applies to digital channels that have 16:9 or widescreen aspect ratio. See "Programming Caption Vision" on -screen menus. 57 Enables you to help you to optimize signal reception. For terrestrial digital signals, displays the strength of your antenna to change the picture size for analog menus. On Caption Vision is turned off...
Operating Instructions
Page 60
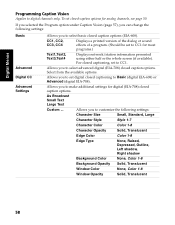
... dialog or sound effects of a program. (Should be set closed-caption options for digital (EIA-708) closed captioning to CC1. Digital Menus Programming Caption Vision Applies to customize the following settings: Basic Advanced Digital CC Advanced Settings Allows you to set to Basic (digital EIA-608) or Advanced (digital EIA-708). If you selected the Program option under Caption Vision (page 57), you can change the following settings: Character Size Small, Standard...
... dialog or sound effects of a program. (Should be set closed-caption options for digital (EIA-708) closed captioning to CC1. Digital Menus Programming Caption Vision Applies to customize the following settings: Basic Advanced Digital CC Advanced Settings Allows you to set to Basic (digital EIA-608) or Advanced (digital EIA-708). If you selected the Program option under Caption Vision (page 57), you can change the following settings: Character Size Small, Standard...
Operating Instructions
Page 61
... digital cable box using a does not work with your remote control or on page 24. 59 Then, connect it to unlock currently blocked channels. There was a blackout ❏ or power outage, and now the TV won't turn on and the timer LED is flashing Press the POWER button on your digital cable box. Disconnect the DVD player and set up , referring to select closed captioning, select CC1-4 instead of this feature, select Off in the Setup menu...
... digital cable box using a does not work with your remote control or on page 24. 59 Then, connect it to unlock currently blocked channels. There was a blackout ❏ or power outage, and now the TV won't turn on and the timer LED is flashing Press the POWER button on your digital cable box. Disconnect the DVD player and set up , referring to select closed captioning, select CC1-4 instead of this feature, select Off in the Setup menu...
Operating Instructions
Page 64
... sure Cable is set to On in the Channel Setup menu (page 41). ❏ Perform Auto Program to analog mode. The number is 1-800-222-SONY (7669) (US residents only) or 1-877-899 SONY (7669) (Canadian residents only). 62 If there are none available, press the / DIGITAL button to switch to add channels that Muting disappears from the screen. Your TV may not have no audio (TV and cable box...
... sure Cable is set to On in the Channel Setup menu (page 41). ❏ Perform Auto Program to analog mode. The number is 1-800-222-SONY (7669) (US residents only) or 1-877-899 SONY (7669) (Canadian residents only). 62 If there are none available, press the / DIGITAL button to switch to add channels that Muting disappears from the screen. Your TV may not have no audio (TV and cable box...
Marketing Specifications
Page 1
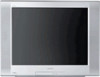
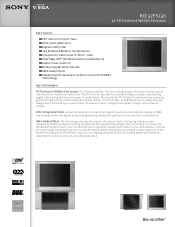
...-to -corner detail. KD-32FS130 32" FD Trinitron® WEGA® Television Key Features FD Trinitron® Picture Tube ATSC/Clear QAM Tuner Digital Comb Filter 16:9 Enhanced Mode (V-Compression) Component Video Input (Y/Pb/Pr - 480i) Clear Edge VM™ (Wideband Velocity Modulation) Audio Power (10W x 2) Dolby® Digital Audio Decode SRS® Audio Effect Steady Sound® Automatic Volume Control With BBE® Technology Key Technologies FD Trinitron® WEGA® Flat Screen FD Trinitron® WEGA® Flat Screen Technology is rendered...
...-to -corner detail. KD-32FS130 32" FD Trinitron® WEGA® Television Key Features FD Trinitron® Picture Tube ATSC/Clear QAM Tuner Digital Comb Filter 16:9 Enhanced Mode (V-Compression) Component Video Input (Y/Pb/Pr - 480i) Clear Edge VM™ (Wideband Velocity Modulation) Audio Power (10W x 2) Dolby® Digital Audio Decode SRS® Audio Effect Steady Sound® Automatic Volume Control With BBE® Technology Key Technologies FD Trinitron® WEGA® Flat Screen FD Trinitron® WEGA® Flat Screen Technology is rendered...
Marketing Specifications
Page 2
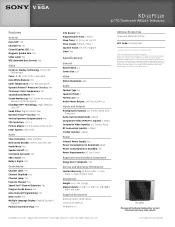
... Yes Program Guide Access: Yes Auto Channel Programming: Yes Menu Color: Yes Multiple Language Display: English, Español, Français Parental Control (V-Chip): Yes Info Banner: Yes Programmable Timer: 2 Event Sleep Timer: 15, 30, 45, 60, 90, Off Timer Events: Timer 1, Timer 2 Caption Vision: On, Off, Program Clock: Yes Specifications General Aspect Ratio: 4:3 Screen Size: 32"1 Video Native Resolution: 480i Audio Speaker Type: NA Speakers (Total): 2 Tweeter Size: NA Audio Power Output: 20W Total (10W x 2) Inputs and Outputs Analog Audio Input(s): 3 (1 Front/2 Rear) with Detection Audio...
... Yes Program Guide Access: Yes Auto Channel Programming: Yes Menu Color: Yes Multiple Language Display: English, Español, Français Parental Control (V-Chip): Yes Info Banner: Yes Programmable Timer: 2 Event Sleep Timer: 15, 30, 45, 60, 90, Off Timer Events: Timer 1, Timer 2 Caption Vision: On, Off, Program Clock: Yes Specifications General Aspect Ratio: 4:3 Screen Size: 32"1 Video Native Resolution: 480i Audio Speaker Type: NA Speakers (Total): 2 Tweeter Size: NA Audio Power Output: 20W Total (10W x 2) Inputs and Outputs Analog Audio Input(s): 3 (1 Front/2 Rear) with Detection Audio...

