Operating Instructions
Page 5
... the Internet via a Bluetooth wireless device (optional) (DCRIP220 only) Accessing the Internet, sending/ receiving your recordings •PROGRAM AE (p. 62) - Landscape •Manual focus (p. 67) •Expanded focus (p. 67) •Spot Focus (p. 69) Functions to your e-mail. For details, refer to the Network Function Operating Instructions supplied with your camcorder. (DCR-IP220 only) (p. 175...
... the Internet via a Bluetooth wireless device (optional) (DCRIP220 only) Accessing the Internet, sending/ receiving your recordings •PROGRAM AE (p. 62) - Landscape •Manual focus (p. 67) •Expanded focus (p. 67) •Spot Focus (p. 69) Functions to your e-mail. For details, refer to the Network Function Operating Instructions supplied with your camcorder. (DCR-IP220 only) (p. 175...
Operating Instructions
Page 7
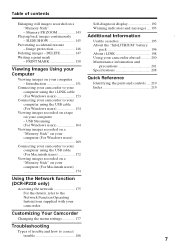
...Viewing images recorded on a "Memory Stick" on your computer (For Windows users 169 Connecting your camcorder to correct trouble 186 7 Customizing Your Camcorder Changing the menu settings 177 Troubleshooting Types of contents Getting Started Enlarging still images recorded on your computer... pack 196 About i.LINK 198 Using your camcorder abroad .......... 200 Maintenance information and precautions 201 Specifications 208 Quick Reference Identifying the parts and controls .... 210 Index 219 Using the Network function (DCR-IP220 only) Accessing the network 175 For the details...
...Viewing images recorded on a "Memory Stick" on your computer (For Windows users 169 Connecting your camcorder to correct trouble 186 7 Customizing Your Camcorder Changing the menu settings 177 Troubleshooting Types of contents Getting Started Enlarging still images recorded on your computer... pack 196 About i.LINK 198 Using your camcorder abroad .......... 200 Maintenance information and precautions 201 Specifications 208 Quick Reference Identifying the parts and controls .... 210 Index 219 Using the Network function (DCR-IP220 only) Accessing the network 175 For the details...
Operating Instructions
Page 8
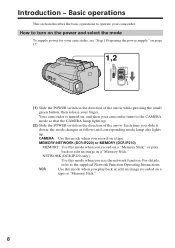
...Your camcorder is turned on a tape or "Memory Stick." 8 Basic operations This section describes the basic operations to the supplied Network Function Operating Instructions. Each time you record on a "Memory Stick," or play back or edit an image recorded on , and then your finger. MEMORY/NETWORK (DCR-IP220) or MEMORY (DCR-...IP210) MEMORY: Use this mode when you use the network function. For details, refer to operate your camcorder.
...Your camcorder is turned on a tape or "Memory Stick." 8 Basic operations This section describes the basic operations to the supplied Network Function Operating Instructions. Each time you record on a "Memory Stick," or play back or edit an image recorded on , and then your finger. MEMORY/NETWORK (DCR-IP220) or MEMORY (DCR-...IP210) MEMORY: Use this mode when you use the network function. For details, refer to operate your camcorder.
Operating Instructions
Page 11
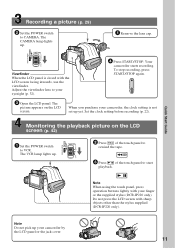
...to VCR. The picture appears on the LCD screen (p. 42) VCR MEMORY/NETWORK 1 Set the POWER switch POWER to your camcorder by the LCD panel or the jack cover. 11 Monitoring the playback picture on the LCD screen. CAMERA (CHG)OFF ON MODE 2 Press of the touch panel to rewind the... recording. The CAMERA lamp lights up yet. When you purchase your finger or the supplied stylus (DCR-IP220 only). Do not press the LCD screen with your camcorder, the clock setting is closed with the LCD screen facing inwards, use the viewfinder. Quick Start Guide Note When using the touch panel, ...
...to VCR. The picture appears on the LCD screen (p. 42) VCR MEMORY/NETWORK 1 Set the POWER switch POWER to your camcorder by the LCD panel or the jack cover. 11 Monitoring the playback picture on the LCD screen. CAMERA (CHG)OFF ON MODE 2 Press of the touch panel to rewind the... recording. The CAMERA lamp lights up yet. When you purchase your finger or the supplied stylus (DCR-IP220 only). Do not press the LCD screen with your camcorder, the clock setting is closed with the LCD screen facing inwards, use the viewfinder. Quick Start Guide Note When using the touch panel, ...
Operating Instructions
Page 14
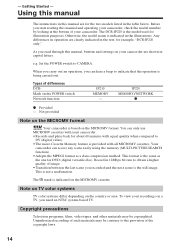
...you need an NTSC system-based TV. IP220 MEMORY/NETWORK z z Provided - Your camcorder can hear a beep to the provision of your recordings on your camcorder. •Records and plays back for example, "DCR-IP220 only." To view your camcorder. Using this manual The instructions in this... manual, buttons and settings on a TV, you recorded and the next scene is indicated on the MICROMV cassette. e.g. Types...
...you need an NTSC system-based TV. IP220 MEMORY/NETWORK z z Provided - Your camcorder can hear a beep to the provision of your recordings on your camcorder. •Records and plays back for example, "DCR-IP220 only." To view your camcorder. Using this manual The instructions in this... manual, buttons and settings on a TV, you recorded and the next scene is indicated on the MICROMV cassette. e.g. Types...
Operating Instructions
Page 16
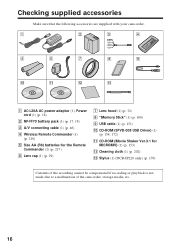
... the following accessories are supplied with your camcorder. 1 2 3 4 5 6 7 8 9 0 qa qs qd 1 AC-L20A AC power adaptor (1), Power cord (1) (p. 18) 2 NP-FF70 battery pack (1) (p. 17, 18) 3 A/V connecting cable (1) (p. 46) 4 Wireless Remote Commander (1) (p. 216) 5 Size AA (R6) batteries for MICROMV) (1) (p. 153) qs Cleaning cloth (1) (p. 202) qd Stylus (1) (DCR-IP220 only) (p. 176) Contents of the recording cannot...
... the following accessories are supplied with your camcorder. 1 2 3 4 5 6 7 8 9 0 qa qs qd 1 AC-L20A AC power adaptor (1), Power cord (1) (p. 18) 2 NP-FF70 battery pack (1) (p. 17, 18) 3 A/V connecting cable (1) (p. 46) 4 Wireless Remote Commander (1) (p. 216) 5 Size AA (R6) batteries for MICROMV) (1) (p. 153) qs Cleaning cloth (1) (p. 202) qd Stylus (1) (DCR-IP220 only) (p. 176) Contents of the recording cannot...
Operating Instructions
Page 27
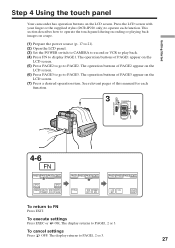
Getting Started Step 4 Using the touch panel Your camcorder has operation buttons on a tape. (1) Prepare the power source (p. 17 to 21). (2) Open the LCD panel. (3) Set the POWER switch to CAMERA to record or ... the LCD screen. (7) Press a desired operation item. The display returns to PAGE1, 2 or 3. 27 Press the LCD screen with your finger or the supplied stylus (DCR-IP220 only) to operate each function. 3 POWER CAMERA (CHG)OFF ON MODE VCR MEMORY/NETWORK 4-6 FN PAGE1 PAGE2 PAGE3 EXIT SPOT FOCUS MENU SELF TIMER SPOT...
Getting Started Step 4 Using the touch panel Your camcorder has operation buttons on a tape. (1) Prepare the power source (p. 17 to 21). (2) Open the LCD panel. (3) Set the POWER switch to CAMERA to record or ... the LCD screen. (7) Press a desired operation item. The display returns to PAGE1, 2 or 3. 27 Press the LCD screen with your finger or the supplied stylus (DCR-IP220 only) to operate each function. 3 POWER CAMERA (CHG)OFF ON MODE VCR MEMORY/NETWORK 4-6 FN PAGE1 PAGE2 PAGE3 EXIT SPOT FOCUS MENU SELF TIMER SPOT...
Operating Instructions
Page 28
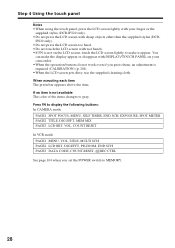
...You can make the display appear or disappear with DISPLAY/TOUCH PANEL on your finger or the supplied stylus (DCR-IP220 only). •Do not press the LCD screen with wet hands. •If FN is not on... Using the touch panel Notes •When using the touch panel, press the LCD screen lightly with your camcorder. •When the operation buttons do not work even if you set the POWER switch to MEMORY. 28... 104 when you press them, an adjustment is not available The color of the items changes to gray. IP220 only). •Do not press the LCD screen too hard. •Do not touch the LCD screen...
...You can make the display appear or disappear with DISPLAY/TOUCH PANEL on your finger or the supplied stylus (DCR-IP220 only). •Do not press the LCD screen with wet hands. •If FN is not on... Using the touch panel Notes •When using the touch panel, press the LCD screen lightly with your camcorder. •When the operation buttons do not work even if you set the POWER switch to MEMORY. 28... 104 when you press them, an adjustment is not available The color of the items changes to gray. IP220 only). •Do not press the LCD screen too hard. •Do not touch the LCD screen...

Operating Instructions
Page 101
...computers do not have a guaranteed compatibility with your camcorder conform with your camcorder, you cannot play back still images recorded on other product names mentioned herein may be the trademarks or registered trademarks of Sony Corporation. •All other equipment (DCR-TRV890E/TRV900/TRV900E or DSC-D700/D770) that...are not mentioned in each case in this manual. Introduction "Memory Stick" formatted by a computer The "Memory Stick" formatted by your camcorder. Furthermore, "TM" and "®" are trademarks of their respective companies. "Memory Stick" Operations 101
...computers do not have a guaranteed compatibility with your camcorder conform with your camcorder, you cannot play back still images recorded on other product names mentioned herein may be the trademarks or registered trademarks of Sony Corporation. •All other equipment (DCR-TRV890E/TRV900/TRV900E or DSC-D700/D770) that...are not mentioned in each case in this manual. Introduction "Memory Stick" formatted by a computer The "Memory Stick" formatted by your camcorder. Furthermore, "TM" and "®" are trademarks of their respective companies. "Memory Stick" Operations 101
Operating Instructions
Page 104
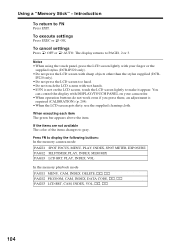
... Stick" - PAGE3 LCD BRT, CAM, INDEX, VOL, + , - 104 You can control the display with DISPLAY/TOUCH PANEL on your finger or the supplied stylus (DCR-IP220 only). •Do not press the LCD screen with wet hands. •If FN is required (CALIBRATION) (p. 204). •When the LCD screen gets dirty...PAGE1, 2 or 3. PAGE2 PB ZOOM, CAM, INDEX, DATA CODE, + , - Notes •When using the touch panel, press the LCD screen lightly with your camcorder. •When operation buttons do not work even if you press them, an adjustment is not on the LCD screen, touch the LCD screen lightly...
... Stick" - PAGE3 LCD BRT, CAM, INDEX, VOL, + , - 104 You can control the display with DISPLAY/TOUCH PANEL on your finger or the supplied stylus (DCR-IP220 only). •Do not press the LCD screen with wet hands. •If FN is required (CALIBRATION) (p. 204). •When the LCD screen gets dirty...PAGE1, 2 or 3. PAGE2 PB ZOOM, CAM, INDEX, DATA CODE, + , - Notes •When using the touch panel, press the LCD screen lightly with your camcorder. •When operation buttons do not work even if you press them, an adjustment is not on the LCD screen, touch the LCD screen lightly...

Operating Instructions
Page 175
Accessing the network - DCR-IP220 only You can view a Web page, send/receive your camcorder. 1 CAMERA POWER (Bluetooth) lamp (CHG)OFF ON MODE VCR MEMORY/NETWORK NETWORK On trademarks •The Bluetooth trademarks are not mentioned in each case in the standby mode with the POWER switch set to... MEMORY/NETWORK. •Do not remove the power source while operating the network functions or your camcorder. Furthermore, "TM" and "®" are owned by Sony Corporation under...
Accessing the network - DCR-IP220 only You can view a Web page, send/receive your camcorder. 1 CAMERA POWER (Bluetooth) lamp (CHG)OFF ON MODE VCR MEMORY/NETWORK NETWORK On trademarks •The Bluetooth trademarks are not mentioned in each case in the standby mode with the POWER switch set to... MEMORY/NETWORK. •Do not remove the power source while operating the network functions or your camcorder. Furthermore, "TM" and "®" are owned by Sony Corporation under...
Operating Instructions
Page 177
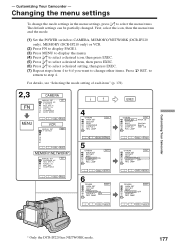
... P EFFECT RED EYE R FLASH LVL WHT BAL SHARPNESS AUTO SHTR r R EXEC RET. Customizing Your Camcorder - First, select the icon, then the menu item and the mode. (1) Set the POWER switch to CAMERA, MEMORY/NETWORK (DCR-IP220 only), MEMORY (DCR-IP210 only) or VCR. (2) Press FN to display PAGE1. (3) Press MENU to display the menu... setting, then press EXEC. (7) Repeat steps from 4 to 6 if you want to change the mode settings in the menu settings, press r/R to step 4. Customizing Your Camcorder * Only the DCR-IP220 has NETWORK mode. 177 -
... P EFFECT RED EYE R FLASH LVL WHT BAL SHARPNESS AUTO SHTR r R EXEC RET. Customizing Your Camcorder - First, select the icon, then the menu item and the mode. (1) Set the POWER switch to CAMERA, MEMORY/NETWORK (DCR-IP220 only), MEMORY (DCR-IP210 only) or VCR. (2) Press FN to display PAGE1. (3) Press MENU to display the menu... setting, then press EXEC. (7) Repeat steps from 4 to 6 if you want to change the mode settings in the menu settings, press r/R to step 4. Customizing Your Camcorder * Only the DCR-IP220 has NETWORK mode. 177 -
Operating Instructions
Page 190
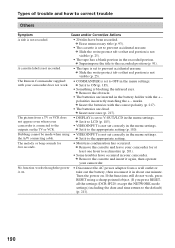
... so that red portion is not set to prevent accidental erasure. polarities incorrectly matching the + - marks. c Remove the cassette and leave your camcorder. c Superimpose the title to the default) (p. 211). 190 The picture from a wall outlet or take out the battery, then reconnect it... • The batteries are dead. Dubbing cannot be made when using a sharp-pointed object. (If you press RESET, all the settings (DCR-IP220: except the NETWORK mode settings) including the date and time return to the recorded position (p. 91). The melody or beep sounds for at least...
... so that red portion is not set to prevent accidental erasure. polarities incorrectly matching the + - marks. c Remove the cassette and leave your camcorder. c Superimpose the title to the default) (p. 211). 190 The picture from a wall outlet or take out the battery, then reconnect it... • The batteries are dead. Dubbing cannot be made when using a sharp-pointed object. (If you press RESET, all the settings (DCR-IP220: except the NETWORK mode settings) including the date and time return to the recorded position (p. 91). The melody or beep sounds for at least...
Operating Instructions
Page 193
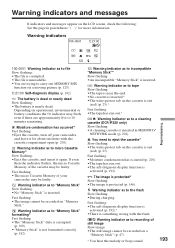
...0001 Warning indicator as to 10 minutes remaining. % Moisture condensation has occurred* Fast flashing: •Eject the cassette, turn off your camcorder may be recorded on a "Memory Stick" (p. 47). * You hear the melody or beep sound. 193 Depending on operational, environmental ... •The image cannot be faulty. If even then the indicator flashes, the micro Cassette Memory of your camcorder, and leave it again. Z You need to a cleaning cassette (DCR-IP220 only) Slow flashing: •A cleaning cassette is not formatted correctly (p. 182). Fast flashing: •Moisture...
...0001 Warning indicator as to 10 minutes remaining. % Moisture condensation has occurred* Fast flashing: •Eject the cassette, turn off your camcorder may be recorded on a "Memory Stick" (p. 47). * You hear the melody or beep sound. 193 Depending on operational, environmental ... •The image cannot be faulty. If even then the indicator flashes, the micro Cassette Memory of your camcorder, and leave it again. Z You need to a cleaning cassette (DCR-IP220 only) Slow flashing: •A cleaning cassette is not formatted correctly (p. 182). Fast flashing: •Moisture...
Operating Instructions
Page 200
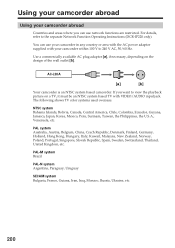
..., Guyana, Jamaica, Japan, Korea, Mexico, Peru, Surinam, Taiwan, the Philippines, the U.S.A., Venezuela, etc. AC-L20A [a] [b] Your camcorder is an NTSC system based camcorder. You can use your camcorder within 100 V to the separate Network Function Operating Instructions (DCR-IP220 only). Use a commercially available AC plug adaptor [a], if necessary, depending on a TV, it must be an...
..., Guyana, Jamaica, Japan, Korea, Mexico, Peru, Surinam, Taiwan, the Philippines, the U.S.A., Venezuela, etc. AC-L20A [a] [b] Your camcorder is an NTSC system based camcorder. You can use your camcorder within 100 V to the separate Network Function Operating Instructions (DCR-IP220 only). Use a commercially available AC plug adaptor [a], if necessary, depending on a TV, it must be an...
Operating Instructions
Page 205
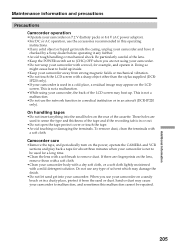
...might cause heat to (CHG) OFF when you use the network function in a medical institution or in an aircraft (DCR-IP220 only). Maintenance information and precautions Precautions Camcorder operation •Operate your camcorder on 7.2 V (battery pack) or 8.4 V (AC power adaptor). •For DC or AC operation, use... the lens, remove them with a soft cloth. If there are not using your camcorder and have it checked by a Sony dealer before operating it . Be particularly careful of the cassette. Camcorder care •Remove the tape, and periodically turn on the power, operate the CAMERA...
...might cause heat to (CHG) OFF when you use the network function in a medical institution or in an aircraft (DCR-IP220 only). Maintenance information and precautions Precautions Camcorder operation •Operate your camcorder on 7.2 V (battery pack) or 8.4 V (AC power adaptor). •For DC or AC operation, use... the lens, remove them with a soft cloth. If there are not using your camcorder and have it checked by a Sony dealer before operating it . Be particularly careful of the cassette. Camcorder care •Remove the tape, and periodically turn on the power, operate the CAMERA...

Operating Instructions
Page 211
...the default. qh i (headphones) jack (green) When you press RESET, all the settings (DCR-IP220: except the NETWORK mode settings) including the date and time return to the video equipment. ..." access lamp (p. 102) qd RESET button If you use headphones, the speaker on your camcorder is used for Local Application Control Bus System. Quick Reference 211 This jack has the same ...function as the jack indicated as CONTROL L or REMOTE. qj i.LINK (MICROMV Interface) (p. 82, 86, 124, 135, 198) The i.LINK (MICROMV Interface) is i.LINK compatible. Identifying the parts and controls qd qf ...
...the default. qh i (headphones) jack (green) When you press RESET, all the settings (DCR-IP220: except the NETWORK mode settings) including the date and time return to the video equipment. ..." access lamp (p. 102) qd RESET button If you use headphones, the speaker on your camcorder is used for Local Application Control Bus System. Quick Reference 211 This jack has the same ...function as the jack indicated as CONTROL L or REMOTE. qj i.LINK (MICROMV Interface) (p. 82, 86, 124, 135, 198) The i.LINK (MICROMV Interface) is i.LINK compatible. Identifying the parts and controls qd qf ...


