
Operating Instructions
Page 2
...Consult the dealer or an experienced radio/TV technician for a Class B digital device, pursuant to the following measures: - Operation is no guarantee that interference will not occur in a particular installation. For "Memory Stick" This device complies with part 15 of the FCC Rules. For the... (2) this equipment. This equipment generates, uses, and can be determined by one or more of Conformity Trade Name: SONY Model: ICD-BM1 Responsible Party: Sony Electronics Inc. Address: 16530 Via Esprillo, San Diego, CA 92127 U.S.A. Telephone Number: 858-942-2230 This device complies...
...Consult the dealer or an experienced radio/TV technician for a Class B digital device, pursuant to the following measures: - Operation is no guarantee that interference will not occur in a particular installation. For "Memory Stick" This device complies with part 15 of the FCC Rules. For the... (2) this equipment. This equipment generates, uses, and can be determined by one or more of Conformity Trade Name: SONY Model: ICD-BM1 Responsible Party: Sony Electronics Inc. Address: 16530 Via Esprillo, San Diego, CA 92127 U.S.A. Telephone Number: 858-942-2230 This device complies...
Operating Instructions
Page 3
... approval from Sony Corporation. Trademarks • "Memory Stick" and are trademarks of Sony Corporation. • "LPEC" and are the registered trademarks of Sony Corporation. • IBM and PC/AT are registered trademarks of International Business Machines Corporation. • Microsoft, Windows and Outlook are trademarks of Microsoft Corporation, registered in the U.S.A. Notice for the IC recorder ICD-BM1A/BM1AVTP...
... approval from Sony Corporation. Trademarks • "Memory Stick" and are trademarks of Sony Corporation. • "LPEC" and are the registered trademarks of Sony Corporation. • IBM and PC/AT are registered trademarks of International Business Machines Corporation. • Microsoft, Windows and Outlook are trademarks of Microsoft Corporation, registered in the U.S.A. Notice for the IC recorder ICD-BM1A/BM1AVTP...
Operating Instructions
Page 4
... 2: Setting the Clock 8 Step 3: Inserting a "Memory Stick" into the IC Recorder 10 Basic Operations Recording Messages 12 Recording as a New Message 15 Adding an Overwrite Recording 15 Using Convenient Functions while Recording 16 Recording with an External Microphone or Other Equipment .... 18 Recording with an External Stereo Microphone 18 Recording from Other Equipment 19 Recording with Other Equipment 19 Playing Back...
... 2: Setting the Clock 8 Step 3: Inserting a "Memory Stick" into the IC Recorder 10 Basic Operations Recording Messages 12 Recording as a New Message 15 Adding an Overwrite Recording 15 Using Convenient Functions while Recording 16 Recording with an External Microphone or Other Equipment .... 18 Recording with an External Stereo Microphone 18 Recording from Other Equipment 19 Recording with Other Equipment 19 Playing Back...
Operating Instructions
Page 5
DPC (Digital Pitch Control 39 Setting the Overwrite Mode 41 Playing Back a Message at a Desired Time with an Alarm 43 Formatting a "Memory Stick 47 Changing the Settings - Other Functions Adjusting the Playback Speed - MENU 49 Using the "Digital Voice Editor" Software 52 Additional Information Precautions 54 Troubleshooting 56 Error messages of the IC Recorder 59 System Limitations 61 Specifications 63 Index to Parts and Controls 64 Using the optional AC power adaptor 66 Index ...67 5GB
DPC (Digital Pitch Control 39 Setting the Overwrite Mode 41 Playing Back a Message at a Desired Time with an Alarm 43 Formatting a "Memory Stick 47 Changing the Settings - Other Functions Adjusting the Playback Speed - MENU 49 Using the "Digital Voice Editor" Software 52 Additional Information Precautions 54 Troubleshooting 56 Error messages of the IC Recorder 59 System Limitations 61 Specifications 63 Index to Parts and Controls 64 Using the optional AC power adaptor 66 Index ...67 5GB
Operating Instructions
Page 9
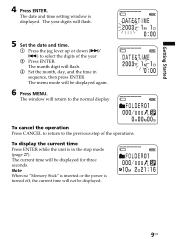
The month digit will return to the normal display. The window will flash. 3 Set the month, day, and the time in the stop mode (page 27). Getting Started 4 ... ENTER. To display the current time Press ENTER while the unit is in sequence, then press ENTER. The year digits will not be displayed again. 6 Press MENU. To cancel the operation Press CANCEL to return to select the digits of the operations. Note When no "Memory Stick" is inserted or the power is displayed.
The month digit will return to the normal display. The window will flash. 3 Set the month, day, and the time in the stop mode (page 27). Getting Started 4 ... ENTER. To display the current time Press ENTER while the unit is in sequence, then press ENTER. The year digits will not be displayed again. 6 Press MENU. To cancel the operation Press CANCEL to return to select the digits of the operations. Note When no "Memory Stick" is inserted or the power is displayed.

Operating Instructions
Page 10
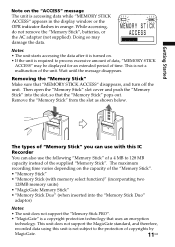
... 3: Inserting a "Memory Stick" into the IC Recorder Notes • Make sure to insert or remove the "Memory Stick" while the unit is turned off. • Never remove the "Memory Stick" while the unit is accessing the "Memory Stick". (The OPR indicator flashes in a different direction. Note Do not insert a "Memory Stick" in orange.) 1 Slide and open the "Memory Stick" slot cover. 2 Insert a "Memory Stick" into...
... 3: Inserting a "Memory Stick" into the IC Recorder Notes • Make sure to insert or remove the "Memory Stick" while the unit is turned off. • Never remove the "Memory Stick" while the unit is accessing the "Memory Stick". (The OPR indicator flashes in a different direction. Note Do not insert a "Memory Stick" in orange.) 1 Slide and open the "Memory Stick" slot cover. 2 Insert a "Memory Stick" into...
Operating Instructions
Page 11
... support the MagicGate standard, and therefore, recorded data using this IC Recorder You can also use the following "Memory Stick" of a 4 MB to 128 MB capacity instead of the "Memory Stick". • "Memory Stick" • "Memory Stick (with memory select function)" (incorporating two 128MB memory units) • "MagicGate Memory Stick" • "Memory Stick Duo" (when inserted into the slot, so that "MEMORY STICK ACCESS" disappears, and turn off...
... support the MagicGate standard, and therefore, recorded data using this IC Recorder You can also use the following "Memory Stick" of a 4 MB to 128 MB capacity instead of the "Memory Stick". • "Memory Stick" • "Memory Stick (with memory select function)" (incorporating two 128MB memory units) • "MagicGate Memory Stick" • "Memory Stick Duo" (when inserted into the slot, so that "MEMORY STICK ACCESS" disappears, and turn off...

Operating Instructions
Page 12
... 10min. 4hr 20min. 8hr 50min. 17hr 45min. Message 1 Message 2 Message 3 Message 1 Starts recording at the end of Message 1 Message 2 Message 3 Added recording (counted as a part of Message 1) Maximum recording time and number of messages for a "Memory Stick" The maximum recording time for the maximum recording time in each (initially named FOLDER01, FOLDER02, and FOLDER03) folder. LP*** 1hr...
... 10min. 4hr 20min. 8hr 50min. 17hr 45min. Message 1 Message 2 Message 3 Message 1 Starts recording at the end of Message 1 Message 2 Message 3 Added recording (counted as a part of Message 1) Maximum recording time and number of messages for a "Memory Stick" The maximum recording time for the maximum recording time in each (initially named FOLDER01, FOLDER02, and FOLDER03) folder. LP*** 1hr...
Operating Instructions
Page 14
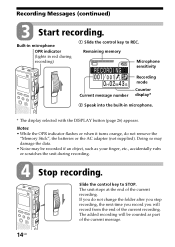
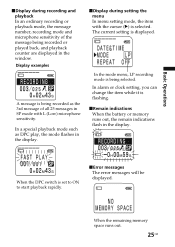
.... * The display selected with the DISPLAY button (page 26) appears. Remaining memory Microphone sensitivity Current message number Recording mode Counter display* 2 Speak into the built-in red during recording. 4 Stop recording. Notes • While the OPR indicator flashes or when it turns orange, do... not change the folder after you stop recording, the next time you record you do not remove the "Memory Stick", the batteries or the AC adaptor...
.... * The display selected with the DISPLAY button (page 26) appears. Remaining memory Microphone sensitivity Current message number Recording mode Counter display* 2 Speak into the built-in red during recording. 4 Stop recording. Notes • While the OPR indicator flashes or when it turns orange, do... not change the folder after you stop recording, the next time you record you do not remove the "Memory Stick", the batteries or the AC adaptor...
Operating Instructions
Page 17
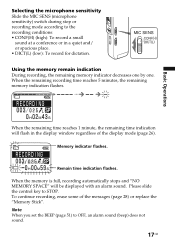
... a conference or in the display window regardless of the messages (page 28) or replace the "Memory Stick". When the memory is full, recording automatically stops and "NO MEMORY SPACE" will flash in a quiet and/ or spacious place. • DICT(L) (low): To record for dictation. Using the memory remain indication During recording, the remaining memory indicator decreases one by one.
... a conference or in the display window regardless of the messages (page 28) or replace the "Memory Stick". When the memory is full, recording automatically stops and "NO MEMORY SPACE" will flash in a quiet and/ or spacious place. • DICT(L) (low): To record for dictation. Using the memory remain indication During recording, the remaining memory indicator decreases one by one.
Operating Instructions
Page 24
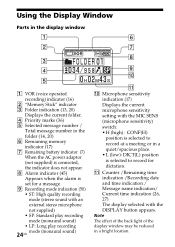
... be reduced in a quiet/spacious place. • L (low): DICT(L) position is set for dictation. Using the Display Window Parts in the display window 1 VOR (voice operated recording) indicator (16) 2 "Memory Stick" indicator 3 Folder indication (13, 20) Displays the current folder. 4 Priority marks (36) 5 Selected message number / Total message number in the folder (14, 20...
... be reduced in a quiet/spacious place. • L (low): DICT(L) position is set for dictation. Using the Display Window Parts in the display window 1 VOR (voice operated recording) indicator (16) 2 "Memory Stick" indicator 3 Folder indication (13, 20) Displays the current folder. 4 Priority marks (36) 5 Selected message number / Total message number in the folder (14, 20...
Operating Instructions
Page 25
When the remaining memory space runs out. 25GB The current setting is selected. In a special playback mode such as the 3rd message of the message being recorded or played back, and playback counter are displayed in SP mode with the cursor (B) is displayed. xDisplay during recording and playback In an ordinary recording or playback mode...
When the remaining memory space runs out. 25GB The current setting is selected. In a special playback mode such as the 3rd message of the message being recorded or played back, and playback counter are displayed in SP mode with the cursor (B) is displayed. xDisplay during recording and playback In an ordinary recording or playback mode...

Operating Instructions
Page 32
Notes • You need a certain amount of space in the memory to both parts of the divided message. • If you divide a message with alarm setting, the alarm setting will remain with priority mark(s), priority mark(s) ...
Notes • You need a certain amount of space in the memory to both parts of the divided message. • If you divide a message with alarm setting, the alarm setting will remain with priority mark(s), priority mark(s) ...
Operating Instructions
Page 34
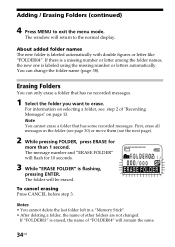
...number and "ERASE FOLDER" will be erased. The folder will flash for more than 1 second. You can only erase a folder that has some recorded messages. Erasing Folders You can change the folder name (page 38). For information on selecting a folder, see the next page). 2 While pressing... If "FOLDER03" is flashing, pressing ENTER. First, erase all messages in a "Memory Stick". • After deleting a folder, the name of "Recording Messages" on page 13. Note You cannot erase a folder that has no recorded messages. 1 Select the folder you want to exit the menu mode. To cancel erasing...
...number and "ERASE FOLDER" will be erased. The folder will flash for more than 1 second. You can only erase a folder that has some recorded messages. Erasing Folders You can change the folder name (page 38). For information on selecting a folder, see the next page). 2 While pressing... If "FOLDER03" is flashing, pressing ENTER. First, erase all messages in a "Memory Stick". • After deleting a folder, the name of "Recording Messages" on page 13. Note You cannot erase a folder that has no recorded messages. 1 Select the folder you want to exit the menu mode. To cancel erasing...

Operating Instructions
Page 47
...the jog lever up or down (>/ .) to format a "Memory Stick" before the first use. Other Functions MENU ENTER CANCEL Jog lever (>/.) 1 Press MENU. Continued 47GB The menu mode will delete all data recorded in the "Memory Stick". The formatting window will be displayed. 2 Press the jog... lever up or down (>/ .) to select "FORMAT". 3 Press ENTER. Because a commercially available "Memory Stick" has already been formatted at the factory, you do...
...the jog lever up or down (>/ .) to format a "Memory Stick" before the first use. Other Functions MENU ENTER CANCEL Jog lever (>/.) 1 Press MENU. Continued 47GB The menu mode will delete all data recorded in the "Memory Stick". The formatting window will be displayed. 2 Press the jog... lever up or down (>/ .) to select "FORMAT". 3 Press ENTER. Because a commercially available "Memory Stick" has already been formatted at the factory, you do...

Operating Instructions
Page 48
..., three folders are automatically made in the "Memory Stick" (This is displayed in the step 4 or press CANCEL while "OK ?" is the same after inserting a "Memory Stick" for the first time.) To cancel formatting Select "NO" in step 5. When formatting a "Memory Stick", use the formatting function of the IC recorder. 48GB will appear in the display window...
..., three folders are automatically made in the "Memory Stick" (This is displayed in the step 4 or press CANCEL while "OK ?" is the same after inserting a "Memory Stick" for the first time.) To cancel formatting Select "NO" in step 5. When formatting a "Memory Stick", use the formatting function of the IC recorder. 48GB will appear in the display window...

Operating Instructions
Page 49
... menu item will be displayed are limited. To go back to exit the menu mode. MENU You can use the menu during stop mode without a "Memory Stick" inserted, the menu items to be displayed. 4 Press the jog lever up or down (>/.) to select the setting that you want to display the menu... and change the IC recorder settings. Follow the procedures below to set, and then press ENTER. You cannot use the menu to the normal display. The menu mode will be...
... menu item will be displayed are limited. To go back to exit the menu mode. MENU You can use the menu during stop mode without a "Memory Stick" inserted, the menu items to be displayed. 4 Press the jog lever up or down (>/.) to select the setting that you want to display the menu... and change the IC recorder settings. Follow the procedures below to set, and then press ENTER. You cannot use the menu to the normal display. The menu mode will be...

Operating Instructions
Page 50
...-MS/Stop/Play** DATE&TIME Displays the window to set the recording mode: ST: You can record with stereo sound with an external stereo microphone (not supplied). (When recording with the built-in each operation mode: NO-MS: stop mode with the "Memory Stick" inserted. OK/OK/- SP*: You can be changed . 50GB Stop: stop...
...-MS/Stop/Play** DATE&TIME Displays the window to set the recording mode: ST: You can record with stereo sound with an external stereo microphone (not supplied). (When recording with the built-in each operation mode: NO-MS: stop mode with the "Memory Stick" inserted. OK/OK/- SP*: You can be changed . 50GB Stop: stop...

Operating Instructions
Page 51
... Displays the window to change a folder NAME name. See page 47. -/OK/- See page 39. See page 33. -/OK/- FOLDER Displays the window to format a "Memory Stick" (YES/NO*). ALARM Displays the window to set the easy search function. Other Functions 51GB EASY-S Displays the window to indicate that operation has been...
... Displays the window to change a folder NAME name. See page 47. -/OK/- See page 39. See page 33. -/OK/- FOLDER Displays the window to format a "Memory Stick" (YES/NO*). ALARM Displays the window to set the easy search function. Other Functions 51GB EASY-S Displays the window to indicate that operation has been...

Operating Instructions
Page 55
... come into contact with the metal parts of a "Memory Stick" Write-protect switch You cannot record or erase data when the write-protect switch on the labeling position. Very humid or subject to the "Memory Stick". • Do not disassemble or modify the "Memory Stick". • Do not let the "Memory Stick" get wet. • Do not use any...
... come into contact with the metal parts of a "Memory Stick" Write-protect switch You cannot record or erase data when the write-protect switch on the labeling position. Very humid or subject to the "Memory Stick". • Do not disassemble or modify the "Memory Stick". • Do not let the "Memory Stick" get wet. • Do not use any...

