
Operating Instructions
Page 2
... green in color) that disables recording or playback if the temperature of your camcorder or battery pack is beyond the safely operable range. In this manual thoroughly, and retain it may cause a fire. • Do not expose your camcorder's viewfinder, lens, or LCD screen to the sun or strong light source...
... green in color) that disables recording or playback if the temperature of your camcorder or battery pack is beyond the safely operable range. In this manual thoroughly, and retain it may cause a fire. • Do not expose your camcorder's viewfinder, lens, or LCD screen to the sun or strong light source...
Operating Instructions
Page 3
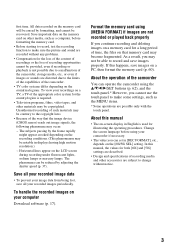
... change without any problems. • Compensation for a long period of the appropriate color system for illustrating the operating procedures. If this manual • The on other accessories are possible only with the touch panel. Save important data on the memory card on -screen display...the LCD screen during recording under fluorescent lights, sodium lamps or mercury lamps. first time. Save all your recorded images periodically. In this manual, the values for both [60i] and [50i] settings are described. • Design and specifications of recording media and other media,...
... change without any problems. • Compensation for a long period of the appropriate color system for illustrating the operating procedures. If this manual • The on other accessories are possible only with the touch panel. Save important data on the memory card on -screen display...the LCD screen during recording under fluorescent lights, sodium lamps or mercury lamps. first time. Save all your recorded images periodically. In this manual, the values for both [60i] and [50i] settings are described. • Design and specifications of recording media and other media,...

Operating Instructions
Page 4
... A and B (Simul Rec) .... 27 Changing the START/STOP button/handle record button setting ...... 27 Adjusting the zoom 28 Adjusting the focus 30 Adjusting the focus manually 30 Adjusting the focus automatically 30 Adjusting the focus while tracking a selected subject (Lock-on AF 32 Focusing using the focus magnifier 33 Focusing by...
... A and B (Simul Rec) .... 27 Changing the START/STOP button/handle record button setting ...... 27 Adjusting the zoom 28 Adjusting the focus 30 Adjusting the focus manually 30 Adjusting the focus automatically 30 Adjusting the focus while tracking a selected subject (Lock-on AF 32 Focusing using the focus magnifier 33 Focusing by...

Operating Instructions
Page 10
Identifying Parts and Controls (Continued) A Manual lens ring (p. 29) B Lens hood C Lens (ZEISS lens) D REC CH SELECT (INPUT1) switch (p. 43) E ATT (INPUT1) switch (p. 43) F INPUT1 (LINE/MIC/MIC+48V) switch (p. 43) G ... (p. 43) M AUDIO LEVEL (CH2) dial (p. 44) 10 N LOW CUT (INPUT2) switch (p. 44) O Internal microphone P ZOOM/FOCUS switch (p. 30) Q AF/MF button (p. 30) R MENU button (p. 62) S MANUAL dial (p. 36)
Identifying Parts and Controls (Continued) A Manual lens ring (p. 29) B Lens hood C Lens (ZEISS lens) D REC CH SELECT (INPUT1) switch (p. 43) E ATT (INPUT1) switch (p. 43) F INPUT1 (LINE/MIC/MIC+48V) switch (p. 43) G ... (p. 43) M AUDIO LEVEL (CH2) dial (p. 44) 10 N LOW CUT (INPUT2) switch (p. 44) O Internal microphone P ZOOM/FOCUS switch (p. 30) Q AF/MF button (p. 30) R MENU button (p. 62) S MANUAL dial (p. 36)

Operating Instructions
Page 13
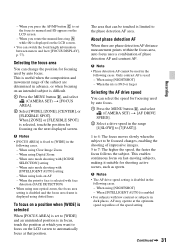
Identifying Parts and Controls A Handle zoom speed switch (p. 28) B Eye sensor C Viewfinder (p. 22) D AUTO/MANUAL switch (p. 36) E ND FILTER switch (p. 38) F Battery slot (p. 18) G i (headphones) jack H SHUTTER SPEED button (p. 37) I ISO/GAIN (ISO sensitivity/gain) button (p. 37) J IRIS button (p. 36) Continued , 13
Identifying Parts and Controls A Handle zoom speed switch (p. 28) B Eye sensor C Viewfinder (p. 22) D AUTO/MANUAL switch (p. 36) E ND FILTER switch (p. 38) F Battery slot (p. 18) G i (headphones) jack H SHUTTER SPEED button (p. 37) I ISO/GAIN (ISO sensitivity/gain) button (p. 37) J IRIS button (p. 36) Continued , 13

Operating Instructions
Page 15
... remaining recording time Recording/playback media Timecode (hour:minute:second: frame) (p. 48) Meaning Face detection [ON] (p. 34) Peaking (p. 75) Zebra (p. 75) Image stabilization ( STEADYSHOT) (p. 66) Manual focus (p. 30) Picture profile (p. 47) Iris (p. 36) ISO sensitivity (p. 37) Gain (p. 37) Shutter speed (p. 37) AVCHD audio format (p. 73) AE shift (p. 66) Auto setting...
... remaining recording time Recording/playback media Timecode (hour:minute:second: frame) (p. 48) Meaning Face detection [ON] (p. 34) Peaking (p. 75) Zebra (p. 75) Image stabilization ( STEADYSHOT) (p. 66) Manual focus (p. 30) Picture profile (p. 47) Iris (p. 36) ISO sensitivity (p. 37) Gain (p. 37) Shutter speed (p. 37) AVCHD audio format (p. 73) AE shift (p. 66) Auto setting...

Operating Instructions
Page 17
... the "Catalyst Browse" application software. Rechargeable battery pack (NP-FV50A) CD-ROM "Manuals for example, combining relayrecorded movies, using the dedicated application software. http://pro.sony.com Canada http://www.sonybiz.ca Latin America http://sonypro-latin.com Europe, Middle East...require from the following items supplied with a PC connection, download any reason, there is used with your Sony dealer. For details, see the supplied brochure. Sony Professional products website: U.S.A. If, for any device drivers, plug-ins, and application software you can work...
... the "Catalyst Browse" application software. Rechargeable battery pack (NP-FV50A) CD-ROM "Manuals for example, combining relayrecorded movies, using the dedicated application software. http://pro.sony.com Canada http://www.sonybiz.ca Latin America http://sonypro-latin.com Europe, Middle East...require from the following items supplied with a PC connection, download any reason, there is used with your Sony dealer. For details, see the supplied brochure. Sony Professional products website: U.S.A. If, for any device drivers, plug-ins, and application software you can work...

Operating Instructions
Page 25
... while recording, the camcorder automatically divides the file and creates a new one. • The menu settings, picture profile settings, and settings made using the AUTO/MANUAL switch are being stored. In this case, select [INT MIC] (p. 43). • If [SIMUL/RELAY REC] is switched to [SIMULTANEOUS REC], then [NIGHTSHOT LIGHT] is...
... while recording, the camcorder automatically divides the file and creates a new one. • The menu settings, picture profile settings, and settings made using the AUTO/MANUAL switch are being stored. In this case, select [INT MIC] (p. 43). • If [SIMUL/RELAY REC] is switched to [SIMULTANEOUS REC], then [NIGHTSHOT LIGHT] is...

Operating Instructions
Page 29
If you can zoom at a moderate speed. b Note • Turn the manual lens ring C at the desired speed by turning the manual lens ring C. Recording Adjusting the zoom with the manual lens ring If you toggle the ZOOM/FOCUS switch to ZOOM, you turn it too fast, the zoom speed may lag behind the manual lens ring rotation speed, or the operation sound of the zoom may also be recorded. 29 Fine adjustment is also possible.
If you can zoom at a moderate speed. b Note • Turn the manual lens ring C at the desired speed by turning the manual lens ring C. Recording Adjusting the zoom with the manual lens ring If you toggle the ZOOM/FOCUS switch to ZOOM, you turn it too fast, the zoom speed may lag behind the manual lens ring rotation speed, or the operation sound of the zoom may also be recorded. 29 Fine adjustment is also possible.

Operating Instructions
Page 30
... is enabled, the focus area frame is displayed green to adjust the focus) appears for when it is in the following cases. If set to manual. 9 appears. 2 Move the ZOOM/FOCUS B switch, and turn green when the image is dark and hard to indicate the in focus; Adjusting the focus... frames Phase detection Focus area frame AF area b Note • Phase detection AF frames are displayed on the screen when [PHASE DETECT. Adjusting the focus manually 1 During recording or standby, press the AF/MF button C to set to [WIDE] or [ZONE]. The position for focusing is indicated by white phase ...
... is enabled, the focus area frame is displayed green to adjust the focus) appears for when it is in the following cases. If set to manual. 9 appears. 2 Move the ZOOM/FOCUS B switch, and turn green when the image is dark and hard to indicate the in focus; Adjusting the focus... frames Phase detection Focus area frame AF area b Note • Phase detection AF frames are displayed on the screen when [PHASE DETECT. Adjusting the focus manually 1 During recording or standby, press the AF/MF button C to set to [WIDE] or [ZONE]. The position for focusing is indicated by white phase ...
Operating Instructions
Page 31
When you rotate the manual lens ring A while 9 is limited to the phase detection AF area. b Note • Phase detection AF cannot be used . - Selecting the focus area You can ... for focusing used by auto focus. When using [NIGHTSHOT] - To focus on a position when [WIDE] is selected When [FOCUS AREA] is set the focus to manual and 9 appears on an intended subject is disabled in the range [1[SLOW]] to [7[FAST]]. 1 to 4: The focus moves slowly when the subject to be touched...
When you rotate the manual lens ring A while 9 is limited to the phase detection AF area. b Note • Phase detection AF cannot be used . - Selecting the focus area You can ... for focusing used by auto focus. When using [NIGHTSHOT] - To focus on a position when [WIDE] is selected When [FOCUS AREA] is set the focus to manual and 9 appears on an intended subject is disabled in the range [1[SLOW]] to [7[FAST]]. 1 to 4: The focus moves slowly when the subject to be touched...

Operating Instructions
Page 33
Scenes with manual focus. When using focus magnification (FOCUS MAGNIFIER) - This is useful when adjusting the focus. [FOCUS MAGNIFIER] is set the enlarged display position back to the ...
Scenes with manual focus. When using focus magnification (FOCUS MAGNIFIER) - This is useful when adjusting the focus. [FOCUS MAGNIFIER] is set the enlarged display position back to the ...

Operating Instructions
Page 36
...iris value disappears, and the iris value is adjusted automatically for as long as you open the aperture (decreasing F value). You cannot adjust them manually. Iris value 36 b Note • When you close the aperture (increasing F value). To adjust automatically Press the IRIS button B while ...brightness by adjusting the iris, ISO sensitivity/gain or shutter speed, or by adjusting the light level with the ND filter E. 3 Turn the MANUAL dial A to AUTO, iris, ISO sensitivity/gain, shutter speed, and white balance are adjusted automatically. The iris is highlighted. To temporarily adjust...
...iris value disappears, and the iris value is adjusted automatically for as long as you open the aperture (decreasing F value). You cannot adjust them manually. Iris value 36 b Note • When you close the aperture (increasing F value). To adjust automatically Press the IRIS button B while ...brightness by adjusting the iris, ISO sensitivity/gain or shutter speed, or by adjusting the light level with the ND filter E. 3 Turn the MANUAL dial A to AUTO, iris, ISO sensitivity/gain, shutter speed, and white balance are adjusted automatically. The iris is highlighted. To temporarily adjust...
Operating Instructions
Page 37
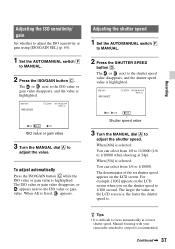
.... When [60i] is selected: You can select from 1/8 to 1/10000 (1/6 to a tripod is recommended. The larger the value on the LCD screen. Manual focusing with your camcorder attached to 1/10000 when shooting at a lower shutter speed. The ISO value or gain value disappears, or appears next to adjust... ISO value or gain value is fixed, appears. The denominator of the set the shutter speed to adjust the shutter speed. The or next to MANUAL. 2 Press the ISO/GAIN button C. Adjusting the ISO sensitivity/ gain Set whether to adjust the ISO sensitivity or gain using [ISO/GAIN SEL] (p. ...
.... When [60i] is selected: You can select from 1/8 to 1/10000 (1/6 to a tripod is recommended. The larger the value on the LCD screen. Manual focusing with your camcorder attached to 1/10000 when shooting at a lower shutter speed. The ISO value or gain value disappears, or appears next to adjust... ISO value or gain value is fixed, appears. The denominator of the set the shutter speed to adjust the shutter speed. The or next to MANUAL. 2 Press the ISO/GAIN button C. Adjusting the ISO sensitivity/ gain Set whether to adjust the ISO sensitivity or gain using [ISO/GAIN SEL] (p. ...

Operating Instructions
Page 38
...noise. The shutter speed value disappears, or appears next to about 1/4, 1/16 and 1/64, respectively. b Note • When you switch to AUTO/MANUAL in a 60 Hz area. • You can set to AUTO. Refer to the following table for the shutter speed levels. If flashes during the ...iris automatic adjustment, set the AUTO/MANUAL switch F to AUTO, or press [EXEC] on the current speed level. Adjusting the brightness (Continued) • When recording under fluorescent lamps, sodium...
...noise. The shutter speed value disappears, or appears next to about 1/4, 1/16 and 1/64, respectively. b Note • When you switch to AUTO/MANUAL in a 60 Hz area. • You can set to AUTO. Refer to the following table for the shutter speed levels. If flashes during the ...iris automatic adjustment, set the AUTO/MANUAL switch F to AUTO, or press [EXEC] on the current speed level. Adjusting the brightness (Continued) • When recording under fluorescent lamps, sodium...

Operating Instructions
Page 39
... ND filter E during the iris automatic adjustment, set correctly. If flashes during recording, the movie and sound may become distorted. • When adjusting the iris manually, the ND filter icon does not flash even if the light level should be adjusted with video cameras). b Notes • If you close the aperture...
... ND filter E during the iris automatic adjustment, set correctly. If flashes during recording, the movie and sound may become distorted. • When adjusting the iris manually, the ND filter icon does not flash even if the light level should be adjusted with video cameras). b Notes • If you close the aperture...

Operating Instructions
Page 40
...desired color temperature between 2300K and 15000K with the white balance setting stored in the (CAMERA SET) menu. 1 Set the AUTO/MANUAL switch B to MANUAL. 2 Press the WHITE BALANCE button A. Adjusting the color tone Adjusting the white balance You can adjust and fix the white ... select a desired setting. To save the adjusted white balance value in memory A or B 1 Set the AUTO/MANUAL switch B to MANUAL. 2 Press the WHITE BALANCE button A to highlight the white balance value. 3 Turn the MANUAL dial to select PRESET, A, or B. 40 x Setting the A/B value Select A or B for recording with...
...desired color temperature between 2300K and 15000K with the white balance setting stored in the (CAMERA SET) menu. 1 Set the AUTO/MANUAL switch B to MANUAL. 2 Press the WHITE BALANCE button A. Adjusting the color tone Adjusting the white balance You can adjust and fix the white ... select a desired setting. To save the adjusted white balance value in memory A or B 1 Set the AUTO/MANUAL switch B to MANUAL. 2 Press the WHITE BALANCE button A to highlight the white balance value. 3 Turn the MANUAL dial to select PRESET, A, or B. 40 x Setting the A/B value Select A or B for recording with...

Operating Instructions
Page 41
... the ASSIGN buttons" (p. 50). 1 Press the ASSIGN button to change settings directly while recording using the v/V/b/ B/SET buttons. You cannot adjust manually. Adjust the subject appropriately and set the AUTO/MANUAL switch B to an ASSIGN button. Direct Menu allows you set the shutter speed to an ASSIGN button, the adjusted value is...
... the ASSIGN buttons" (p. 50). 1 Press the ASSIGN button to change settings directly while recording using the v/V/b/ B/SET buttons. You cannot adjust manually. Adjust the subject appropriately and set the AUTO/MANUAL switch B to an ASSIGN button. Direct Menu allows you set the shutter speed to an ASSIGN button, the adjusted value is...

Operating Instructions
Page 45
... is appropriate. Use headphones or an audio level meter to adjust the audio level. Adjusting the audio level from an external microphone (sold separately). 1 Select [MANUAL] in the [REC LEVEL MODE] menu in [AUDIO REC LEVEL]. 2 During recording or standby, adjust the microphone volume in the...
... is appropriate. Use headphones or an audio level meter to adjust the audio level. Adjusting the audio level from an external microphone (sold separately). 1 Select [MANUAL] in the [REC LEVEL MODE] menu in [AUDIO REC LEVEL]. 2 During recording or standby, adjust the microphone volume in the...
Operating Instructions
Page 46
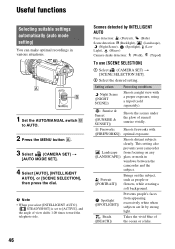
... SELECTION SET]. 2 Select the desired setting. Spotlight ([SPOTLIGHT]) Prevents people's faces from focusing on any ([LANDSCAPE]) glass or mesh in various situations. 1 Set the AUTO/MANUAL switch B to [ACTIVE], and the angle of view shifts 1.08 times toward the telephoto side. Scenes detected by strong light. Shoots distant subjects clearly. Portrait...
... SELECTION SET]. 2 Select the desired setting. Spotlight ([SPOTLIGHT]) Prevents people's faces from focusing on any ([LANDSCAPE]) glass or mesh in various situations. 1 Set the AUTO/MANUAL switch B to [ACTIVE], and the angle of view shifts 1.08 times toward the telephoto side. Scenes detected by strong light. Shoots distant subjects clearly. Portrait...


