Operating Instructions
Page 3
... crooked depending on -screen display in [REC FORMAT], etc., depends on a PC, then format the memory card (p. 60). first time. The subjects passing by formatting, and cannot be notable in displays having high motion resolution.) - The phenomena can operate the camcorder using [MEDIA FORMAT] if images are possible only with the touch panel. Format the memory card using the v/V/b/B/SET buttons (p. 62), and the touch panel.* However, you continue recording and deleting images on a memory card for a long...
... crooked depending on -screen display in [REC FORMAT], etc., depends on a PC, then format the memory card (p. 60). first time. The subjects passing by formatting, and cannot be notable in displays having high motion resolution.) - The phenomena can operate the camcorder using [MEDIA FORMAT] if images are possible only with the touch panel. Format the memory card using the v/V/b/B/SET buttons (p. 62), and the touch panel.* However, you continue recording and deleting images on a memory card for a long...

Operating Instructions
Page 4
... 20 Turning on the camcorder 20 Setting the date and time 20 Step 4: Adjusting the LCD screen and viewfinder 22 Using the LCD screen 22 Adjusting the viewfinder diopter 22 Step 5: Preparing the recording media 23 Supported memory cards 23 Inserting a memory card 24 Recording Recording 25 Recording 25 Continuous recording on the memory cards (Relay Rec 26 Recording movies using both memory card A and B (Simul Rec) .... 27 Changing the START/STOP button/handle record button setting ...... 27 Adjusting the zoom 28 Adjusting the focus 30 Adjusting the focus manually 30 Adjusting the...
... 20 Turning on the camcorder 20 Setting the date and time 20 Step 4: Adjusting the LCD screen and viewfinder 22 Using the LCD screen 22 Adjusting the viewfinder diopter 22 Step 5: Preparing the recording media 23 Supported memory cards 23 Inserting a memory card 24 Recording Recording 25 Recording 25 Continuous recording on the memory cards (Relay Rec 26 Recording movies using both memory card A and B (Simul Rec) .... 27 Changing the START/STOP button/handle record button setting ...... 27 Adjusting the zoom 28 Adjusting the focus 30 Adjusting the focus manually 30 Adjusting the...
Operating Instructions
Page 5
... level from the internal microphone or an external microphone (sold separately 45 Useful functions 46 Selecting suitable settings automatically (auto mode setting 46 Shooting in dimly lit locations (LOW LUX 47 Shooting in dark conditions (NIGHTSHOT 47 Customizing the picture quality (Picture Profile 47 Setting time data 48 Reviewing the most recently recorded scene (Last Scene Review 49 Assigning functions to the ASSIGN buttons 50 Playback Playback 51 Playback 51 Changing/checking the settings in your camcorder 53 Changing the screen display 53 Displaying recording data (Data Code...
... level from the internal microphone or an external microphone (sold separately 45 Useful functions 46 Selecting suitable settings automatically (auto mode setting 46 Shooting in dimly lit locations (LOW LUX 47 Shooting in dark conditions (NIGHTSHOT 47 Customizing the picture quality (Picture Profile 47 Setting time data 48 Reviewing the most recently recorded scene (Last Scene Review 49 Assigning functions to the ASSIGN buttons 50 Playback Playback 51 Playback 51 Changing/checking the settings in your camcorder 53 Changing the screen display 53 Displaying recording data (Data Code...

Operating Instructions
Page 6
... (Continued) Using the Menu Operating the menu 62 Menu items 63 CAMERA SET menu 65 REC/OUT SET menu 70 AUDIO SET menu 73 DISPLAY SET menu 75 TC/UB SET menu 78 OTHERS menu 80 EDIT menu 82 PICTURE PROFILE menu 82 Troubleshooting Troubleshooting 89 Warning indicators and messages 97 Additional Information Recording time 100 Using your camcorder abroad 102 File/folder structure on the recording media 103 Maintenance and precautions 104 About the AVCHD format 104 About memory cards 104 About the "InfoLITHIUM" battery pack...
... (Continued) Using the Menu Operating the menu 62 Menu items 63 CAMERA SET menu 65 REC/OUT SET menu 70 AUDIO SET menu 73 DISPLAY SET menu 75 TC/UB SET menu 78 OTHERS menu 80 EDIT menu 82 PICTURE PROFILE menu 82 Troubleshooting Troubleshooting 89 Warning indicators and messages 97 Additional Information Recording time 100 Using your camcorder abroad 102 File/folder structure on the recording media 103 Maintenance and precautions 104 About the AVCHD format 104 About memory cards 104 About the "InfoLITHIUM" battery pack...
Operating Instructions
Page 24
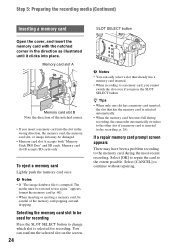
...; Memory card slot A accepts both "Memory Stick PRO Duo" and SD cards. Memory card slot A Memory card slot B Note the direction of the memory card popping out and dropping. If a repair memory card prompt screen appears There may be careful of the notched corner. • If you press the SLOT SELECT button. Memory card slot B accepts SD cards only. b Notes • If "The image database file is inserted (relay recording, p. 26). The media must be used...
...; Memory card slot A accepts both "Memory Stick PRO Duo" and SD cards. Memory card slot A Memory card slot B Note the direction of the memory card popping out and dropping. If a repair memory card prompt screen appears There may be careful of the notched corner. • If you press the SLOT SELECT button. Memory card slot B accepts SD cards only. b Notes • If "The image database file is inserted (relay recording, p. 26). The media must be used...

Operating Instructions
Page 25
... jacks, the internal microphone is not selected and no audio is fixed to stay off the camcorder. The image data may be destroyed. • If a movie file size exceeds 2 GB while recording, the camcorder automatically divides the file and creates a new one. • The menu settings, picture profile settings, and settings made using the AUTO/MANUAL switch are being stored. If you close the LCD screen and turn the power off, and do not turn off ([REC LAMP...
... jacks, the internal microphone is not selected and no audio is fixed to stay off the camcorder. The image data may be destroyed. • If a movie file size exceeds 2 GB while recording, the camcorder automatically divides the file and creates a new one. • The menu settings, picture profile settings, and settings made using the AUTO/MANUAL switch are being stored. If you close the LCD screen and turn the power off, and do not turn off ([REC LAMP...

Operating Instructions
Page 33
... too quickly - During color bar display • If a fixed time has elapsed since a subject being tracked is lost from view, it may not provide optimum results for the following cases. - The setting changes with changing brightness • Lock-on the camcorder. Press the SET button to set to [WIDE] while using lock-on AF may not be focused on the LCD screen. Recording To cancel Lock-on the LCD screen...
... too quickly - During color bar display • If a fixed time has elapsed since a subject being tracked is lost from view, it may not provide optimum results for the following cases. - The setting changes with changing brightness • Lock-on the camcorder. Press the SET button to set to [WIDE] while using lock-on AF may not be focused on the LCD screen. Recording To cancel Lock-on the LCD screen...

Operating Instructions
Page 44
... settings as mixer) LINE Dynamic microphone or microphone with built-in MIC battery +48V powered (phantom power) microphone MIC+48V b Notes • If the switch is set to MIC+48V and you change the ATT switch setting. 3 Select the channel to record. Check the switch before connecting the device. • To prevent unwanted noise when no audio device is set to LINE. Adjust the setting based on the device connected to INPUT1 jack A/INPUT2 jack B. With the REC...
... settings as mixer) LINE Dynamic microphone or microphone with built-in MIC battery +48V powered (phantom power) microphone MIC+48V b Notes • If the switch is set to MIC+48V and you change the ATT switch setting. 3 Select the channel to record. Check the switch before connecting the device. • To prevent unwanted noise when no audio device is set to LINE. Adjust the setting based on the device connected to INPUT1 jack A/INPUT2 jack B. With the REC...

Operating Instructions
Page 48
... settings of pictures recorded on the TV or monitor screen. Setting time data The camcorder records movies accompanied by the picture profile number. z Tip • Connect your camcorder to a TV or monitor, and adjust the picture quality while observing the picture on cinema color negative film Example settings of pictures screened with cinema color print film To change the picture profile You can reset changed picture profile settings by time data, such as timecode and user bits. You cannot reset all picture profile settings...
... settings of pictures recorded on the TV or monitor screen. Setting time data The camcorder records movies accompanied by the picture profile number. z Tip • Connect your camcorder to a TV or monitor, and adjust the picture quality while observing the picture on cinema color negative film Example settings of pictures screened with cinema color print film To change the picture profile You can reset changed picture profile settings by time data, such as timecode and user bits. You cannot reset all picture profile settings...

Operating Instructions
Page 51
Playback A Date and time of recording start B Resolution C Frame rate D Recording mode E Recording time F Timecode of recording start Timecode will continue playback from the previous time. Continued , 51 Playback Playback Playback 1 Insert a memory on thumbnails. Memory card Playback mode Back Next Thumbnails Current movie data (p. 51) • You can turn on or off the date and time display on the thumbnails by pressing the DISPLAY button. • Icons may also be displayed correctly when you play back. Protected (p. 58) icon...
Playback A Date and time of recording start B Resolution C Frame rate D Recording mode E Recording time F Timecode of recording start Timecode will continue playback from the previous time. Continued , 51 Playback Playback Playback 1 Insert a memory on thumbnails. Memory card Playback mode Back Next Thumbnails Current movie data (p. 51) • You can turn on or off the date and time display on the thumbnails by pressing the DISPLAY button. • Icons may also be displayed correctly when you play back. Protected (p. 58) icon...

Operating Instructions
Page 57
HDMI OUT output format (when [50i] is selected) -: Independent of set value Menu item Recording format REC/OUT SET> REC SET> REC FORMAT All recording formats HDMI REC/OUT SET> VIDEO OUT>HDMI 1080p/576i 720p/576i 1080i/576i 576p 576i HDMI OUT output signal format 1080/50p 720/50p 1080/50i 576/50p 576/50i Multi/micro USB jack output format (when [50i] is selected) Output is always 576/50i. Playback 57
HDMI OUT output format (when [50i] is selected) -: Independent of set value Menu item Recording format REC/OUT SET> REC SET> REC FORMAT All recording formats HDMI REC/OUT SET> VIDEO OUT>HDMI 1080p/576i 720p/576i 1080i/576i 576p 576i HDMI OUT output signal format 1080/50p 720/50p 1080/50i 576/50p 576/50i Multi/micro USB jack output format (when [50i] is selected) Output is always 576/50i. Playback 57

Operating Instructions
Page 66
... Image Zoom maintains an image quality that is not active while you adjust the iris, shutter speed, ISO sensitivity/gain all manually. EXTENDER ZOOM SET STEADYSHOT Sub-items/Settings ON/OFF OFF, ON LEVEL -2.0EV to +2.0EV (0EV) OFF, ON ZOOM TYPE OPTICAL ZOOM ONLY, ON[CLEAR IMAGE ZOOM], ON[DIGITAL ZOOM] HANDLE ZOOM 1 to [ON], the operation sound of view shifts 1.08 times toward the telephoto side. You can use 2× magnification when recording...
... Image Zoom maintains an image quality that is not active while you adjust the iris, shutter speed, ISO sensitivity/gain all manually. EXTENDER ZOOM SET STEADYSHOT Sub-items/Settings ON/OFF OFF, ON LEVEL -2.0EV to +2.0EV (0EV) OFF, ON ZOOM TYPE OPTICAL ZOOM ONLY, ON[CLEAR IMAGE ZOOM], ON[DIGITAL ZOOM] HANDLE ZOOM 1 to [ON], the operation sound of view shifts 1.08 times toward the telephoto side. You can use 2× magnification when recording...

Operating Instructions
Page 73
...Using the Menu Continued , 73 AUDIO SET menu AUDIO SET Menu item VOLUME AVCHD AUDIO FORMAT AUDIO REC LEVEL INT MIC WIND Sub-items/Settings LINEAR PCM, DOLBY DIGITAL REC LEVEL MODE NORMAL, HIGH, MANUAL MANUAL REC LEVEL 1 to reduce wind noise. Sets the audio input recording level for the internal microphone and external microphone (sold separately). Turns the wind noise reduction function on/off. It attenuates low tone input sound in the internal microphone to 31 (21) OFF, ON Description Adjusts the volume. LINEAR PCM ( ): Records in Dolby Digital format. MANUAL REC LEVEL: Sets...
...Using the Menu Continued , 73 AUDIO SET menu AUDIO SET Menu item VOLUME AVCHD AUDIO FORMAT AUDIO REC LEVEL INT MIC WIND Sub-items/Settings LINEAR PCM, DOLBY DIGITAL REC LEVEL MODE NORMAL, HIGH, MANUAL MANUAL REC LEVEL 1 to reduce wind noise. Sets the audio input recording level for the internal microphone and external microphone (sold separately). Turns the wind noise reduction function on/off. It attenuates low tone input sound in the internal microphone to 31 (21) OFF, ON Description Adjusts the volume. LINEAR PCM ( ): Records in Dolby Digital format. MANUAL REC LEVEL: Sets...

Operating Instructions
Page 74
... and no audio is recorded. AUTO: The microphone used for recording audio. Selects the timing of priority: External microphone connected to MIC jack (PLUG IN POWER) > Microphone connected to XLR handle unit or Multi Interface Shoe compatible microphone > Internal microphone INT MIC: Records audio using a microphone connected to an external device. 74 Menu items (Continued) AUDIO SET Menu item MIC SELECT AUDIO OUTPUT TIMING Sub-items/Settings AUTO, INT MIC, MI SHOE MIC, STEREO MINI MIC LIVE, LIP SYNC Description Selects the microphone to use for recording audio is automatically...
... and no audio is recorded. AUTO: The microphone used for recording audio. Selects the timing of priority: External microphone connected to MIC jack (PLUG IN POWER) > Microphone connected to XLR handle unit or Multi Interface Shoe compatible microphone > Internal microphone INT MIC: Records audio using a microphone connected to an external device. 74 Menu items (Continued) AUDIO SET Menu item MIC SELECT AUDIO OUTPUT TIMING Sub-items/Settings AUTO, INT MIC, MI SHOE MIC, STEREO MINI MIC LIVE, LIP SYNC Description Selects the microphone to use for recording audio is automatically...

Operating Instructions
Page 89
... operation will reset the date, time, and area settings. 4 Consult your Sony dealer or local authorized Sony service facility. • Power sources/LCD screen (p. 89) • Memory cards (p. 90) • Recording (p. 91) • Playback (p. 94) • Connecting to TV (p. 95) • Copying/Editing/Connecting to other devices (p. 95) • Connecting to a computer (p. 96) Power sources/LCD screen The power does not turn on your camcorder, referring to the items on pages 89 to 96. 2 Disconnect the power...
... operation will reset the date, time, and area settings. 4 Consult your Sony dealer or local authorized Sony service facility. • Power sources/LCD screen (p. 89) • Memory cards (p. 90) • Recording (p. 91) • Playback (p. 94) • Connecting to TV (p. 95) • Copying/Editing/Connecting to other devices (p. 95) • Connecting to a computer (p. 96) Power sources/LCD screen The power does not turn on your camcorder, referring to the items on pages 89 to 96. 2 Disconnect the power...
Operating Instructions
Page 93
... recorded in white, red, blue, or green appear on the recording conditions. Troubleshooting Cannot use (menu disabled) [ON/OFF] of [AE SHIFT] [ZEBRA], [PEAKING] [ON/OFF] of [MARKER] [TC PRESET] [COLOR BAR] Situation All of iris, ISO sensitivity/gain, and shutter speed are being recorded. [FOCUS MAGNIFIER] is set to [ON]. Movies are set manually. [COLOR BAR] is set to [ON]. [FOCUS MAGNIFIER] is set to picture quality automatically change. This is set to AUTO, settings...
... recorded in white, red, blue, or green appear on the recording conditions. Troubleshooting Cannot use (menu disabled) [ON/OFF] of [AE SHIFT] [ZEBRA], [PEAKING] [ON/OFF] of [MARKER] [TC PRESET] [COLOR BAR] Situation All of iris, ISO sensitivity/gain, and shutter speed are being recorded. [FOCUS MAGNIFIER] is set to [ON]. Movies are set manually. [COLOR BAR] is set to [ON]. [FOCUS MAGNIFIER] is set to picture quality automatically change. This is set to AUTO, settings...

Operating Instructions
Page 104
... flashing). - Maintenance and precautions About the AVCHD format Recording and playback on the camcorder Based on the combination of the memory card and memory card compliant product you use. • Damaged or lost image data will not be compensated for, and may occur in the following locations: - This is danger that has been used , visit the home page (http:// www.sony.jp/support/r/handycam/connect/). About memory cards • A memory card formatted...
... flashing). - Maintenance and precautions About the AVCHD format Recording and playback on the camcorder Based on the combination of the memory card and memory card compliant product you use. • Damaged or lost image data will not be compensated for, and may occur in the following locations: - This is danger that has been used , visit the home page (http:// www.sony.jp/support/r/handycam/connect/). About memory cards • A memory card formatted...

Operating Instructions
Page 109
... kHz/Dolby Digital 2-ch, 16-bit, 48 kHz Recording media (movies) Memory Stick PRO Duo™ and SD cards Camera Imaging device 1.0-inch type Exmor RS™ CMOS sensor Total picture elements: Approx. 21,000,000 pixels Effective picture elements (16:9 mode): Approx. 14,200,000 pixels Color temperature Preset (Indoor: 3200K, Outdoor: 5600K ±7 steps, Color temperature set range: 2300 to 15000K), One-push A, B, Auto selectable Minimum illumination...
... kHz/Dolby Digital 2-ch, 16-bit, 48 kHz Recording media (movies) Memory Stick PRO Duo™ and SD cards Camera Imaging device 1.0-inch type Exmor RS™ CMOS sensor Total picture elements: Approx. 21,000,000 pixels Effective picture elements (16:9 mode): Approx. 14,200,000 pixels Color temperature Preset (Indoor: 3200K, Outdoor: 5600K ±7 steps, Color temperature set range: 2300 to 15000K), One-push A, B, Auto selectable Minimum illumination...
Operating Instructions
Page 111
... ASSIGN BUTTON 80 ASSIGN buttons 50 AUDIO LEVEL DISPLAY 77 AUDIO SET menu 73 AUTO BACK LIGHT ..........69 AUTO/MANUAL switch .....46 Auto mode 46 AUTO MODE SET 68 AVCHD 104 AVCHD AUDIO FORMAT 73 B Battery 18 BEEP 80 C CALIBRATION 107 CAMERA DATA DISPLAY 77 CAMERA PROFILE 80 CAMERA SET menu ...........65 CENTER 76 Charging time 19 CHG lamp 18 CLOCK SET 20 COLOR BAR 93 Connect tv or monitor 55 D DATA CODE 53 Date and time............16, 20, 21 DATE REC 80 DELETE 59 Delete 59 Direct Menu 41 DISPLAY button 53 DISPLAY OUTPUT 78 DISPLAY SET menu........... 75...
... ASSIGN BUTTON 80 ASSIGN buttons 50 AUDIO LEVEL DISPLAY 77 AUDIO SET menu 73 AUTO BACK LIGHT ..........69 AUTO/MANUAL switch .....46 Auto mode 46 AUTO MODE SET 68 AVCHD 104 AVCHD AUDIO FORMAT 73 B Battery 18 BEEP 80 C CALIBRATION 107 CAMERA DATA DISPLAY 77 CAMERA PROFILE 80 CAMERA SET menu ...........65 CENTER 76 Charging time 19 CHG lamp 18 CLOCK SET 20 COLOR BAR 93 Connect tv or monitor 55 D DATA CODE 53 Date and time............16, 20, 21 DATE REC 80 DELETE 59 Delete 59 Direct Menu 41 DISPLAY button 53 DISPLAY OUTPUT 78 DISPLAY SET menu........... 75...

Operating Instructions
Page 112
... Picture profile 47 Playback 51 Power cord 18 Power outlet 19 Power zoom lever 28 Pre-installed rechargeable battery 108 PROTECT 58 Protect 58 R REC BUTTON SET 27 REC LAMP 81 REC/OUT SET menu ...........70 REC SET 70 Rechargeable battery pack, see Battery Recording 25 Recording format 35 112 Recording lamp 81 Recording time 100 Relay recording 26 REMOTE CONTROL ......... 81 REPAIR IMAGE DB FILE 61 S SAFETY ZONE 76 SCENE SELECTION SET 46 Screen indicators 15, 53 Self-diagnosis display .......... 97 Shooting 25 SHUTTER button 37 SHUTTER DISPLAY.......... 77 Shutter speed...
... Picture profile 47 Playback 51 Power cord 18 Power outlet 19 Power zoom lever 28 Pre-installed rechargeable battery 108 PROTECT 58 Protect 58 R REC BUTTON SET 27 REC LAMP 81 REC/OUT SET menu ...........70 REC SET 70 Rechargeable battery pack, see Battery Recording 25 Recording format 35 112 Recording lamp 81 Recording time 100 Relay recording 26 REMOTE CONTROL ......... 81 REPAIR IMAGE DB FILE 61 S SAFETY ZONE 76 SCENE SELECTION SET 46 Screen indicators 15, 53 Self-diagnosis display .......... 97 Shooting 25 SHUTTER button 37 SHUTTER DISPLAY.......... 77 Shutter speed...


