Operating Instructions
Page 3
...device pursuant to a malfunction of recordings cannot be copyrighted. Model No.HVRSerial No. z Tip • Your camcorder adopts the HDV1080i specification, which can radiate radio frequency energy and, if not installed and used with the equipment ...is no guarantee that into which is capable of such materials may cause harmful interference to use Your camcorder is adopted in BS (broadcast satellite) digital and terrestrial digital HDTV broadcastings and in accordance with the...interference will not occur in this manual could void your Sony dealer regarding this equipment.
...device pursuant to a malfunction of recordings cannot be copyrighted. Model No.HVRSerial No. z Tip • Your camcorder adopts the HDV1080i specification, which can radiate radio frequency energy and, if not installed and used with the equipment ...is no guarantee that into which is capable of such materials may cause harmful interference to use Your camcorder is adopted in BS (broadcast satellite) digital and terrestrial digital HDTV broadcastings and in accordance with the...interference will not occur in this manual could void your Sony dealer regarding this equipment.
Operating Instructions
Page 4
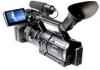
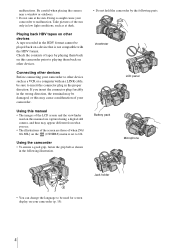
...the proper direction. Be careful when placing the camera near a window or outdoors. • Do not aim at dusk. Take pictures of your camcorder (p. 19). 4 Using the camcorder • To ensure a good grip, fasten the grip belt as a VCR or a computer with the HDV format. Viewfinder LCD panel Battery pack... Microphone Jack holder • You can change the language to be used on this camcorder prior to insert the connector plug in low light conditions, such as at the sun. Connecting other devices Before connecting your...
...the proper direction. Be careful when placing the camera near a window or outdoors. • Do not aim at dusk. Take pictures of your camcorder (p. 19). 4 Using the camcorder • To ensure a good grip, fasten the grip belt as a VCR or a computer with the HDV format. Viewfinder LCD panel Battery pack... Microphone Jack holder • You can change the language to be used on this camcorder prior to insert the connector plug in low light conditions, such as at the sun. Connecting other devices Before connecting your...
Operating Instructions
Page 7
...WORLD TIME, etc 78 Customizing Personal Menu 83 Assigning the functions 86 Troubleshooting Troubleshooting 106 Warning indicators and messages ...111 Additional Information Using your camcorder - Signal conversion function 104 Note on the icons used in this manual Features available for the HDV format only. Features available only when ... a computer 96 Dubbing sound to a recorded tape 98 Setting time values 101 Connecting an analog VCR to the computer via your camcorder abroad ..........113 HDV format and recording/playback 114 Compatibility of the menu is set to [50i].
...WORLD TIME, etc 78 Customizing Personal Menu 83 Assigning the functions 86 Troubleshooting Troubleshooting 106 Warning indicators and messages ...111 Additional Information Using your camcorder - Signal conversion function 104 Note on the icons used in this manual Features available for the HDV format only. Features available only when ... a computer 96 Dubbing sound to a recorded tape 98 Setting time values 101 Connecting an analog VCR to the computer via your camcorder abroad ..........113 HDV format and recording/playback 114 Compatibility of the menu is set to [50i].
Operating Instructions
Page 8
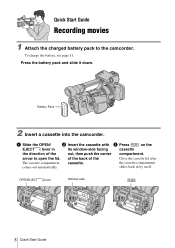
OPEN/EJECT lever Window-side 8 Quick Start Guide To charge the battery, see page 11. Battery Pack 2 Insert a cassette into the camcorder. of the back of the out, then push the center compartment. Press the battery pack and slide it down. a Slide the OPEN/ b ...Insert the cassette with c Press on the EJECT lever in by itself. arrow to the camcorder. the cassette compartment comes out automatically. Quick Start Guide Recording movies 1 Attach the charged battery pack to open the lid. slides back in its window...
OPEN/EJECT lever Window-side 8 Quick Start Guide To charge the battery, see page 11. Battery Pack 2 Insert a cassette into the camcorder. of the back of the out, then push the center compartment. Press the battery pack and slide it down. a Slide the OPEN/ b ...Insert the cassette with c Press on the EJECT lever in by itself. arrow to the camcorder. the cassette compartment comes out automatically. Quick Start Guide Recording movies 1 Attach the charged battery pack to open the lid. slides back in its window...

Operating Instructions
Page 10
...the number of that item supplied. Getting started Lens hood (1) This is attached to your camcorder, see page 126. Cleaning cassette (1) Shoulder strap (1) To attach it to your camcorder, see page 131. The number in the Remote Commander, see page 130. Wireless Remote ... (1) Power cord (1) A/V connecting cable (1) Component video cable (1) Connecting cord (DK-415) (1) Shoe adaptor (1) To attach it to your camcorder. Operating Instructions (This manual) (1) 10 Getting started Step 1: Checking supplied items Make sure you attach an optical filter (optional) or so, ...
...the number of that item supplied. Getting started Lens hood (1) This is attached to your camcorder, see page 126. Cleaning cassette (1) Shoulder strap (1) To attach it to your camcorder, see page 131. The number in the Remote Commander, see page 130. Wireless Remote ... (1) Power cord (1) A/V connecting cable (1) Component video cable (1) Connecting cord (DK-415) (1) Shoe adaptor (1) To attach it to your camcorder. Operating Instructions (This manual) (1) 10 Getting started Step 1: Checking supplied items Make sure you attach an optical filter (optional) or so, ...

Operating Instructions
Page 11
... the CHARGE lamp turns off and FULL appears on the display window will light up and charging starts. To attach the battery pack to the camcorder Press the battery pack and slide it down , slide it in the shape of a full battery ( ) that indicates that the battery has been sufficiently charged...
... the CHARGE lamp turns off and FULL appears on the display window will light up and charging starts. To attach the battery pack to the camcorder Press the battery pack and slide it down , slide it in the shape of a full battery ( ) that indicates that the battery has been sufficiently charged...
Operating Instructions
Page 12
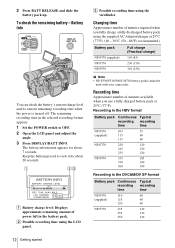
... Full charge (Practical charge) 145 (85) 230 (170) 310 (250) b Note • NP-F330/F530/500/510/710 battery packs cannot be used with your camcorder. B Possible recording time using the viewfinder. Battery Info You can check the battery's current charge level and its current remaining recording time when the power...
... Full charge (Practical charge) 145 (85) 230 (170) 310 (250) b Note • NP-F330/F530/500/510/710 battery packs cannot be used with your camcorder. B Possible recording time using the viewfinder. Battery Info You can check the battery's current charge level and its current remaining recording time when the power...
Operating Instructions
Page 13
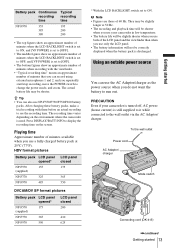
... time varies depending on the screen. The actual battery life may be slightly longer at 25°C (77°F). PRECAUTION Even if your camcorder in low temperature. • The battery life will be slightly shorter when you use both of the LCD panel and the viewfinder than when...discharged. Press DISPLAY/BATT INFO to display the recording time on the environment where the camcorder is used. Using an outside power source You can record using external microphones 1 and 2, and you use your camcorder is turned off, AC power (house current) is still supplied to it while ...
... time varies depending on the screen. The actual battery life may be slightly longer at 25°C (77°F). PRECAUTION Even if your camcorder in low temperature. • The battery life will be slightly shorter when you use both of the LCD panel and the viewfinder than when...discharged. Press DISPLAY/BATT INFO to display the recording time on the environment where the camcorder is used. Using an outside power source You can record using external microphones 1 and 2, and you use your camcorder is turned off, AC power (house current) is still supplied to it while ...
Operating Instructions
Page 14
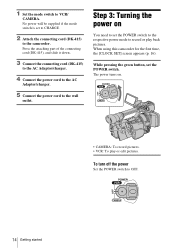
.... The power turns on You need to set to CHARGE. 2 Attach the connecting cord (DK-415) to the camcorder. To turn off the power Set the POWER switch to VCR/ CAMERA. When using this camcorder for the first time, the [CLOCK SET] screen appears (p. 16). No power will be supplied if the...
.... The power turns on You need to set to CHARGE. 2 Attach the connecting cord (DK-415) to the camcorder. To turn off the power Set the POWER switch to VCR/ CAMERA. When using this camcorder for the first time, the [CLOCK SET] screen appears (p. 16). No power will be supplied if the...
Operating Instructions
Page 15
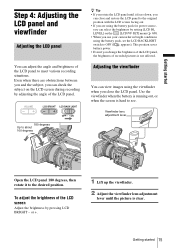
... screen Adjust the brightness by adjusting the angle of the LCD panel. 180 degrees Up to about 100 degrees z Tip • If you use your camcorder in bright conditions using the viewfinder when you change the brightness of the LCD panel, the brightness of the LCD panel to OFF ( appears). Getting...
... screen Adjust the brightness by adjusting the angle of the LCD panel. 180 degrees Up to about 100 degrees z Tip • If you use your camcorder in bright conditions using the viewfinder when you change the brightness of the LCD panel, the brightness of the LCD panel to OFF ( appears). Getting...
Operating Instructions
Page 16
...VF COLOR], then [OFF] (p. 69). Proceed to step 6 when you turn on your camcorder. When the picture in the viewfinder is hard to see the picture in the viewfinder clearly under bright circumstances, ...use your camcorder for the first time. If you do not use the supplied large eyecup. To attach...with the groove of the viewfinder backlight when you cannot see If you are using this camcorder for about 3 months, the built-in rechargeable battery gets discharged and the date and time settings may ...
...VF COLOR], then [OFF] (p. 69). Proceed to step 6 when you turn on your camcorder. When the picture in the viewfinder is hard to see the picture in the viewfinder clearly under bright circumstances, ...use your camcorder for the first time. If you do not use the supplied large eyecup. To attach...with the groove of the viewfinder backlight when you cannot see If you are using this camcorder for about 3 months, the built-in rechargeable battery gets discharged and the date and time settings may ...
Operating Instructions
Page 18
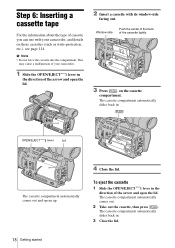
... the direction of the arrow and open the lid. b Note • Do not force the cassette into the compartment. This may cause a malfunction of your camcorder. 1 Slide the OPEN/EJECT lever in the direction of the arrow and open the lid. 2 Insert a cassette with your...
... the direction of the arrow and open the lid. b Note • Do not force the cassette into the compartment. This may cause a malfunction of your camcorder. 1 Slide the OPEN/EJECT lever in the direction of the arrow and open the lid. 2 Insert a cassette with your...
Operating Instructions
Page 19
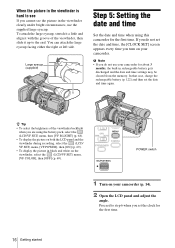
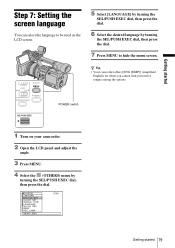
... screen language You can select the language to be used on your native tongue among the options. z Tip • Your camcorder offers [ENG [SIMP]] (simplified English) for when you cannot find your camcorder. 2 Open the LCD panel and adjust the angle. 3 Press MENU. 4 Select the (OTHERS) menu by turning the SEL/PUSH...
... screen language You can select the language to be used on your native tongue among the options. z Tip • Your camcorder offers [ENG [SIMP]] (simplified English) for when you cannot find your camcorder. 2 Open the LCD panel and adjust the angle. 3 Press MENU. 4 Select the (OTHERS) menu by turning the SEL/PUSH...
Operating Instructions
Page 20
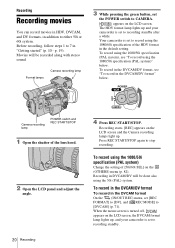
...To record in the DVCAM/DV format" below . Recording starts. [REC] appears on the LCD screen, the DVCAM format lamp lights up, and your camcorder is set to recording standby. Recording in DVCAM/DV will be done also using the 1080/50i specification (PAL system)" below . Before recording, follow ... recording. When the menu screen is turned off, appears on the LCD screen and the Camera recording lamps light up and your camcorder is set to [DVCAM] (p. 71). Your camcorder is set [REC FORMAT] to [DV], and [ REC MODE] to recording standby after a while. To record in the ...
...To record in the DVCAM/DV format" below . Recording starts. [REC] appears on the LCD screen, the DVCAM format lamp lights up, and your camcorder is set to recording standby. Recording in DVCAM/DV will be done also using the 1080/50i specification (PAL system)" below . Before recording, follow ... recording. When the menu screen is turned off, appears on the LCD screen and the Camera recording lamps light up and your camcorder is set to [DVCAM] (p. 71). Your camcorder is set [REC FORMAT] to [DV], and [ REC MODE] to recording standby after a while. To record in the ...
Operating Instructions
Page 21
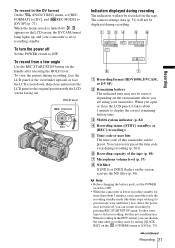
... recording, face the LCD panel or the viewfinder upward, or face the LCD screen down, then close the LCD panel, it takes about 3 minutes, your camcorder is turned off Set the POWER switch to prevent tape wear and battery loss. F Recording capacity of this not a malfunction. b Note • Before changing the...(p. 51) will not be displayed during recording The indicators will not be recorded on the LCD screen, the DVCAM format lamp lights up, and your camcorder exits the recording standby mode (the drum stops rotating) to OFF. When recording in the HDV format, you are using your...
... recording, face the LCD panel or the viewfinder upward, or face the LCD screen down, then close the LCD panel, it takes about 3 minutes, your camcorder is turned off Set the POWER switch to prevent tape wear and battery loss. F Recording capacity of this not a malfunction. b Note • Before changing the...(p. 51) will not be displayed during recording The indicators will not be recorded on the LCD screen, the DVCAM format lamp lights up, and your camcorder exits the recording standby mode (the drum stops rotating) to OFF. When recording in the HDV format, you are using your...
Operating Instructions
Page 22
..., DVCAM, and DV formats mixed: - Press it further for the best results. 1 cm (approx. 1/2 inch)* 80 cm (approx. 2 5/8 feet)* * The minimum distance required between your camcorder and the subject to [DVCAM], the possible recording 22 Recording time will start recording again without being displayed on the tape without an obvious break...
..., DVCAM, and DV formats mixed: - Press it further for the best results. 1 cm (approx. 1/2 inch)* 80 cm (approx. 2 5/8 feet)* * The minimum distance required between your camcorder and the subject to [DVCAM], the possible recording 22 Recording time will start recording again without being displayed on the tape without an obvious break...
Operating Instructions
Page 24
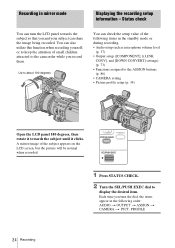
... subject appears on the LCD screen, but the picture will be normal when recorded. 1 Press STATUS CHECK. 2 Turn the SEL/PUSH EXEC dial to the camcorder while you and your subject can also utilize this function when recording yourself, or to keep the attention of the following order: AUDIO t OUTPUT t ASSIGN...
... subject appears on the LCD screen, but the picture will be normal when recorded. 1 Press STATUS CHECK. 2 Turn the SEL/PUSH EXEC dial to the camcorder while you and your subject can also utilize this function when recording yourself, or to keep the attention of the following order: AUDIO t OUTPUT t ASSIGN...
Operating Instructions
Page 27
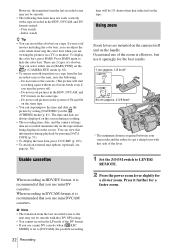
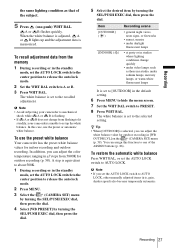
...become temporarily automatic. The white balance is memorized. b Note • If you can assign this case, use the preset white balance Your camcorder has the preset white balance values for outdoor recording (p. 58). Recording the same lighting condition as those in a studio, under video lamps ...Press MENU to hide the menu screen. 7 Set the WHT BAL switch to AUTO LOCK. To recall adjustment data from flashing to lit steadily, your camcorder to mechanical shock while A or B is flashing. • If A or B does not change quickly • under sodium lamps, mercury lamps,...
...become temporarily automatic. The white balance is memorized. b Note • If you can assign this case, use the preset white balance Your camcorder has the preset white balance values for outdoor recording (p. 58). Recording the same lighting condition as those in a studio, under video lamps ...Press MENU to hide the menu screen. 7 Set the WHT BAL switch to AUTO LOCK. To recall adjustment data from flashing to lit steadily, your camcorder to mechanical shock while A or B is flashing. • If A or B does not change quickly • under sodium lamps, mercury lamps,...
Operating Instructions
Page 30
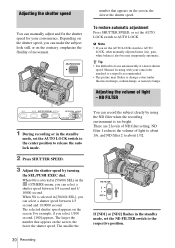
... or change colors under fluorescent lamps, sodium lamps, or mercury lamps. b Note • If you can manually adjust and fix the shutter speed for your camcorder attached to the respective position. 30 Recording There are 2 levels of light - Manual focusing with your convenience. Depending on the screen, the faster the shutter...
... or change colors under fluorescent lamps, sodium lamps, or mercury lamps. b Note • If you can manually adjust and fix the shutter speed for your camcorder attached to the respective position. 30 Recording There are 2 levels of light - Manual focusing with your convenience. Depending on the screen, the faster the shutter...
Operating Instructions
Page 34
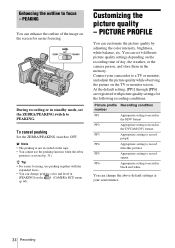
Customizing the picture quality - PICTURE PROFILE You can change the above default settings at your camcorder to a TV or monitor, and adjust the picture quality while observing the picture on the tape. • You cannot use peaking together with picture quality ...
Customizing the picture quality - PICTURE PROFILE You can change the above default settings at your camcorder to a TV or monitor, and adjust the picture quality while observing the picture on the tape. • You cannot use peaking together with picture quality ...


