Operating Instructions
Page 1
Refer to these numbers whenever you call upon your Sony dealer regarding this product. 2-898-341-11(1) Hard Disk Recording Unit Operating Instructions Owner's record The model number and the serial number are located at the name plate on the left of the unit. Model No. Record the serial number in the space provided below. Serial No HVR-DR60 2006 Sony Corporation HVR-
Refer to these numbers whenever you call upon your Sony dealer regarding this product. 2-898-341-11(1) Hard Disk Recording Unit Operating Instructions Owner's record The model number and the serial number are located at the name plate on the left of the unit. Model No. Record the serial number in the space provided below. Serial No HVR-DR60 2006 Sony Corporation HVR-
Operating Instructions
Page 3
... Interference (Emission) • EN55103-2 :Electromagnetic Susceptibility (Immunity) This product is disposed of this product, please contact your local Sony office or visit Sony Europe's web site for business use (Applicable in the European Union and other materials may be handed over to the following Electromagnetic...the i.LINK jack does not exceed 1 m in length. By ensuring this product is intended for the recycling of this unit. Unauthorized recording of such material may be caused by the Commission of the copyright laws. This product has been tested and found to...
... Interference (Emission) • EN55103-2 :Electromagnetic Susceptibility (Immunity) This product is disposed of this product, please contact your local Sony office or visit Sony Europe's web site for business use (Applicable in the European Union and other materials may be handed over to the following Electromagnetic...the i.LINK jack does not exceed 1 m in length. By ensuring this product is intended for the recycling of this unit. Unauthorized recording of such material may be caused by the Commission of the copyright laws. This product has been tested and found to...
Operating Instructions
Page 4
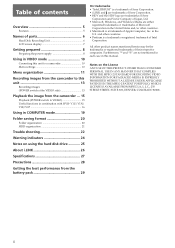
...Notes on using the hard disk drive 25 About i.LINK 26 Specifications 27 Precautions 28 Getting the best performance from the camcorder ... 15 Playback (POWER switch to this unit 13 Recording images (POWER switch at...Sony Corporation and Victor Company of Japan, Ltd. • Microsoft, Windows, and Windows Media are not mentioned in each case in this unit to a camcorder 10 Menu settings 10 Menu organization 11 Recording images from the camcorder to VIDEO 15 Useful functions in combination with HVR- Table of contents Overview 5 Features 5 Names of parts 6 Hard Disk Recording Unit...
...Notes on using the hard disk drive 25 About i.LINK 26 Specifications 27 Precautions 28 Getting the best performance from the camcorder ... 15 Playback (POWER switch to this unit 13 Recording images (POWER switch at...Sony Corporation and Victor Company of Japan, Ltd. • Microsoft, Windows, and Windows Media are not mentioned in each case in this unit to a camcorder 10 Menu settings 10 Menu organization 11 Recording images from the camcorder to VIDEO 15 Useful functions in combination with HVR- Table of contents Overview 5 Features 5 Names of parts 6 Hard Disk Recording Unit...

Operating Instructions
Page 5
...this unit and its operational status (remaining recording time, battery level, recording format etc.) on a camcorder. COMPUTER mode In COMPUTER mode, the HVR-DR60 is retracted. The HVR-DR60 enables efficient operation with the HVR-V1U/V1N/V1E/V1P The combination of this unit and the HVR-V1U/.../V1P. When connecting to supported models and their functions." 5 Supported models The HVR-DR60 can output the record command without a tape, so the unit is recorded simultaneously to check the unit itself means you can concentrate more useful functions. and a buffer memory, which ...
...this unit and its operational status (remaining recording time, battery level, recording format etc.) on a camcorder. COMPUTER mode In COMPUTER mode, the HVR-DR60 is retracted. The HVR-DR60 enables efficient operation with the HVR-V1U/V1N/V1E/V1P The combination of this unit and the HVR-V1U/.../V1P. When connecting to supported models and their functions." 5 Supported models The HVR-DR60 can output the record command without a tape, so the unit is recorded simultaneously to check the unit itself means you can concentrate more useful functions. and a buffer memory, which ...

Operating Instructions
Page 6
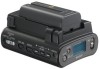
... lamp blinks while accessing the computer in VIDEO mode. qf PLAY/EXEC button Play recorded files by pressing this button. POWER switch Turn the power of this unit on or off . 4 REC switch Start recording by sliding the REC switch. 5 REC lamp/Access lamp REC lamp/Access lamp..., etc. 9 Screw holes You can use the supplied shoe adaptor to attach this unit to execute the selected menu item. Names of parts Hard Disk Recording Unit 7 1 6 8 2 3 4 5 1 BATT RELEASE button Remove the battery pack from this unit by pressing the STOP button. 3 MENU/LCD BACK LIGHT button Display the menu screen...
... lamp blinks while accessing the computer in VIDEO mode. qf PLAY/EXEC button Play recorded files by pressing this button. POWER switch Turn the power of this unit on or off . 4 REC switch Start recording by sliding the REC switch. 5 REC lamp/Access lamp REC lamp/Access lamp..., etc. 9 Screw holes You can use the supplied shoe adaptor to attach this unit to execute the selected menu item. Names of parts Hard Disk Recording Unit 7 1 6 8 2 3 4 5 1 BATT RELEASE button Remove the battery pack from this unit by pressing the STOP button. 3 MENU/LCD BACK LIGHT button Display the menu screen...
Operating Instructions
Page 8
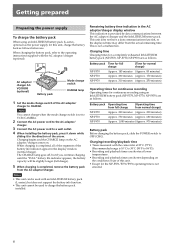
...the segments of the battery life indicator appear in the direction of this unit, charge the battery back as follows before use of the arrow. When charging is not ensured. 8 Charging/recording/playback time • Times measured with the AC adaptor/charger (optional). ...) NP-F970 Approx. 310 minutes (Approx. 250 minutes) Operating times for continuous recording Operating times for continuous recording using an InfoLITHIUM battery pack (L-series, optional) as the power supply for this unit. • Except for a completely exhausted InfoLITHIUM battery pack (NP-F570, NP-F770...
...the segments of the battery life indicator appear in the direction of this unit, charge the battery back as follows before use of the arrow. When charging is not ensured. 8 Charging/recording/playback time • Times measured with the AC adaptor/charger (optional). ...) NP-F970 Approx. 310 minutes (Approx. 250 minutes) Operating times for continuous recording Operating times for continuous recording using an InfoLITHIUM battery pack (L-series, optional) as the power supply for this unit. • Except for a completely exhausted InfoLITHIUM battery pack (NP-F570, NP-F770...
Operating Instructions
Page 9
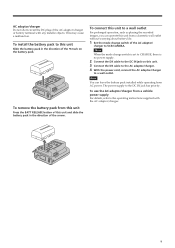
... in the direction of the AC adaptor/ charger to the DC IN jack on the battery pack. To connect this unit to a wall outlet For prolonged operation, such as playing the recorded images, you can leave the battery pack installed while operating from a domestic wall outlet without worrying about battery life. 1 Set...
... in the direction of the AC adaptor/ charger to the DC IN jack on the battery pack. To connect this unit to a wall outlet For prolonged operation, such as playing the recorded images, you can leave the battery pack installed while operating from a domestic wall outlet without worrying about battery life. 1 Set...
Operating Instructions
Page 10
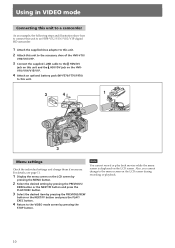
... camcorder. 1 Attach the supplied shoe adaptor to this unit. 2 Attach this unit to the accessory shoe of the HVR-V1U/ V1N/V1E/V1P. 3 Connect the supplied i.LINK cable to the HDV/DV jack on this unit and the HDV/DV jack on the LCD screen during recording or playback. 10 For details, see page 11.... 1 Display the menu screen on the LCD screen. Note You cannot record or play...
... camcorder. 1 Attach the supplied shoe adaptor to this unit. 2 Attach this unit to the accessory shoe of the HVR-V1U/ V1N/V1E/V1P. 3 Connect the supplied i.LINK cable to the HDV/DV jack on this unit and the HDV/DV jack on the LCD screen during recording or playback. 10 For details, see page 11.... 1 Display the menu screen on the LCD screen. Note You cannot record or play...
Operating Instructions
Page 11
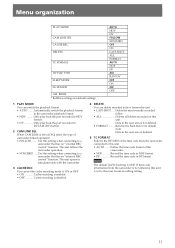
The unit follows the camcorder operation. • SYNCHRO ...... Data in DVCAM (DV) format. 2 CAM LINK SEL When CAM LINK is NDF. Returns the hard disk to a camcorder that has no "external REC control" function. If time code information from the camcorder ...connected to [ON], select the type of camcorder-linked operation. • FOLLOW ......... Delete the most recent recording setting. 11 The unit operates simultaneously with the...
The unit follows the camcorder operation. • SYNCHRO ...... Data in DVCAM (DV) format. 2 CAM LINK SEL When CAM LINK is NDF. Returns the hard disk to a camcorder that has no "external REC control" function. If time code information from the camcorder ...connected to [ON], select the type of camcorder-linked operation. • FOLLOW ......... Delete the most recent recording setting. 11 The unit operates simultaneously with the...
Operating Instructions
Page 12
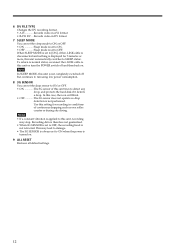
...; When 3G SENSOR is set the drop sensor to OFF, the recording head is not retracted. When SLEEP MODE is set to detect any drop, and protects the hard disk if it detects a drop. Use this setting for 5 minutes or more, this unit automatically switches to ON when the power is turned on . Notes...
...; When 3G SENSOR is set the drop sensor to OFF, the recording head is not retracted. When SLEEP MODE is set to detect any drop, and protects the hard disk if it detects a drop. Use this setting for 5 minutes or more, this unit automatically switches to ON when the power is turned on . Notes...
Operating Instructions
Page 13
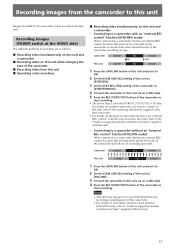
...CTRL] setting of the camcorder to [SYNCHRONOUS]. 4 Connect the camcorder to this unit via an i.LINK cable. 4 Press the REC START/STOP button of the camcorder to start recording. • The above Step 3 is for the HVR-V1U/V1N/V1E/V1P only. Connecting to a camcorder without an "external REC ...control" function (FOLLOW mode) When connected to a camcorder that have been tested in FOLLOW mode, refer to "Guide to this unit via an i.LINK cable...
...CTRL] setting of the camcorder to [SYNCHRONOUS]. 4 Connect the camcorder to this unit via an i.LINK cable. 4 Press the REC START/STOP button of the camcorder to start recording. • The above Step 3 is for the HVR-V1U/V1N/V1E/V1P only. Connecting to a camcorder without an "external REC ...control" function (FOLLOW mode) When connected to a camcorder that have been tested in FOLLOW mode, refer to "Guide to this unit via an i.LINK cable...
Operating Instructions
Page 14
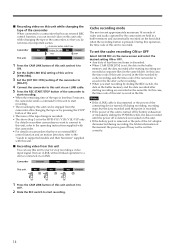
... of this unit and set it to ON. 2 Set the [CAM LINK SEL] setting of this unit to [SYNCHRO]. 3 Set the [EXT REC CTRL] setting of the camcorder to [RELAY]. 4 Connect the camcorder to this unit is saved in a buffer memory and automatically recorded on the hard disk when the recording button is ...turned off by cache recording, and the time code of this case, the time code of the camcorder is for the HVR-V1U/V1N/V1E/V1P only. To set , ...
... of this unit and set it to ON. 2 Set the [CAM LINK SEL] setting of this unit to [SYNCHRO]. 3 Set the [EXT REC CTRL] setting of the camcorder to [RELAY]. 4 Connect the camcorder to this unit is saved in a buffer memory and automatically recorded on the hard disk when the recording button is ...turned off by cache recording, and the time code of this case, the time code of the camcorder is for the HVR-V1U/V1N/V1E/V1P only. To set , ...

Operating Instructions
Page 15
...B-2 File B-3 Folder-C File C-1 File C-2 File C-3 15 To play back in the forward direction, hold the . For details on this unit. DV Only play back the part recorded in the desired folder are played back to a playback device via an i.LINK cable. Play back the image by pressing the H button... the first folder and repeats playback. - OFF When recorded images in HDV format. - To play back video data recorded on the type of all recorded images in this unit. - Standard playback In this mode, the recorded file in this unit to the last folder then goes back to the i....
...B-2 File B-3 Folder-C File C-1 File C-2 File C-3 15 To play back in the forward direction, hold the . For details on this unit. DV Only play back the part recorded in the desired folder are played back to a playback device via an i.LINK cable. Play back the image by pressing the H button... the first folder and repeats playback. - OFF When recorded images in HDV format. - To play back video data recorded on the type of all recorded images in this unit. - Standard playback In this mode, the recorded file in this unit to the last folder then goes back to the i....
Operating Instructions
Page 16
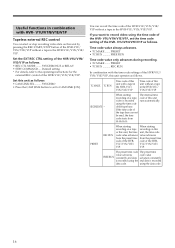
...as follows. V1U/V1N/V1E/ V1U/V1N/V1E/ V1P. Set the EXT REC CTRL setting of the HVR- If you want to record video using the time code of this unit with HVR- The preset time code The preset time value advances code value FREE RUN constantly and data advances constantly...RUN Time code value only advances during recording. • TC MAKE ........ TC MAKE TC RUN Time code of the tape base. When starting recording on a tape recording on a tape, code of this unit without a tape in the HVR-V1U/ V1N/V1E/V1P Time code of the HVR-V1U/V1N/V1E/ V1P without a ...
...as follows. V1U/V1N/V1E/ V1U/V1N/V1E/ V1P. Set the EXT REC CTRL setting of the HVR- If you want to record video using the time code of this unit with HVR- The preset time code The preset time value advances code value FREE RUN constantly and data advances constantly...RUN Time code value only advances during recording. • TC MAKE ........ TC MAKE TC RUN Time code of the tape base. When starting recording on a tape recording on a tape, code of this unit without a tape in the HVR-V1U/ V1N/V1E/V1P Time code of the HVR-V1U/V1N/V1E/ V1P without a ...
Operating Instructions
Page 17
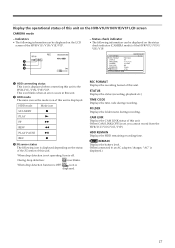
...icon blinks. FOLDER Displays the folder name during recording. REMAIN Displays the battery level. (When connected to the HVR-V1U/V1N/V1E/V1P. Display the operational status of this unit on the status of the 3G sensor of this unit. When drop detection function is OFF: icon is...displayed. STATUS Displays the status (recording, playback etc.) TIME CODE Displays the time code during recording. Status check indicator • The following information can be displayed on the LCD screen of this unit is off. REC FORMAT Displays the recording format of the HVR-V1U/V1N/V1E/V1P. -...
...icon blinks. FOLDER Displays the folder name during recording. REMAIN Displays the battery level. (When connected to the HVR-V1U/V1N/V1E/V1P. Display the operational status of this unit on the status of the 3G sensor of this unit. When drop detection function is OFF: icon is...displayed. STATUS Displays the status (recording, playback etc.) TIME CODE Displays the time code during recording. Status check indicator • The following information can be displayed on the LCD screen of this unit is off. REC FORMAT Displays the recording format of the HVR-V1U/V1N/V1E/V1P. -...
Operating Instructions
Page 18
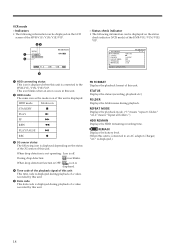
... connected to the HVR-V1U/V1N/V1E/V1P. REPEAT MODE Displays the playback mode. ("1" means "repeat 1 folder," "ALL" means "repeat all folders.") HDD REMAIN Displays the HDD remaining recording time. STATUS Displays the status (recording, playback etc.) FOLDER Displays the folder name during playback of a video recorded by this unit. 5 Data code This data code...
... connected to the HVR-V1U/V1N/V1E/V1P. REPEAT MODE Displays the playback mode. ("1" means "repeat 1 folder," "ALL" means "repeat all folders.") HDD REMAIN Displays the HDD remaining recording time. STATUS Displays the status (recording, playback etc.) FOLDER Displays the folder name during playback of a video recorded by this unit. 5 Data code This data code...
Operating Instructions
Page 19
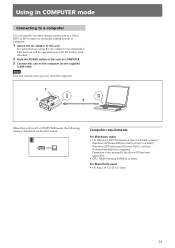
... (Service Pack 4 or later)/ Windows XP Home Edition (Service Pack 2 or later)/ Windows XP Professional (Service Pack 2 or later) Standard installation is displayed on this unit as a file in COMPUTER mode Connecting to a computer You can still be operated even with the battery pack attached. 2 Slide the POWER switch of this... has been upgraded. • CPU: MMX Pentium 200MHz or faster For Macintosh users • OS: Mac OS X (v10.3 or later) 19 Operation is recommended. This unit can transfer recorded images on the LCD screen.
... (Service Pack 4 or later)/ Windows XP Home Edition (Service Pack 2 or later)/ Windows XP Professional (Service Pack 2 or later) Standard installation is displayed on this unit as a file in COMPUTER mode Connecting to a computer You can still be operated even with the battery pack attached. 2 Slide the POWER switch of this... has been upgraded. • CPU: MMX Pentium 200MHz or faster For Macintosh users • OS: Mac OS X (v10.3 or later) 19 Operation is recommended. This unit can transfer recorded images on the LCD screen.
Operating Instructions
Page 20
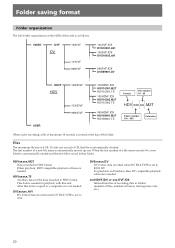
....TS Format File number 01 - 99 HDV xxx xx .M2T Folder number 100 - 999 Extension When cache recording, a file of the folder. HDVxxxxx.M2T Data recorded in folders (number of files, number of this unit. After this data is copied to RAW DV For playback on the HDD of frames, starting time code..., etc.) 20 When the last number of a new file name is 4 GB. HDVxxxxx.TS Ancillary data for playback with this unit is as...
....TS Format File number 01 - 99 HDV xxx xx .M2T Folder number 100 - 999 Extension When cache recording, a file of the folder. HDVxxxxx.M2T Data recorded in folders (number of files, number of this unit. After this data is copied to RAW DV For playback on the HDD of frames, starting time code..., etc.) 20 When the last number of a new file name is 4 GB. HDVxxxxx.TS Ancillary data for playback with this unit is as...
Operating Instructions
Page 21
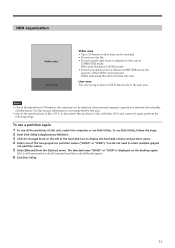
... Notes • Due to the limitations of Windows, this unit may not be recorded. • Do not save the file. • Do not transfer data from a computer to this unit from the [Option] menu. You do not need to display the hard disk volume and partition name. 4 Select one of the two ...is not increased. For this reason, hibernation is not supported by this unit. • Due to the specifications of Mac OS X, to disconnect this unit in COMPUTER mode, the capacity of the HDD is displayed on the left of the hard disk icon to select multiple grayed out partition names. 5 Select [Mount] ...
... Notes • Due to the limitations of Windows, this unit may not be recorded. • Do not save the file. • Do not transfer data from a computer to this unit from the [Option] menu. You do not need to display the hard disk volume and partition name. 4 Select one of the two ...is not increased. For this reason, hibernation is not supported by this unit. • Due to the specifications of Mac OS X, to disconnect this unit in COMPUTER mode, the capacity of the HDD is displayed on the left of the hard disk icon to select multiple grayed out partition names. 5 Select [Mount] ...
Operating Instructions
Page 22
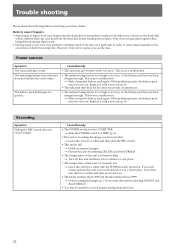
... formatted or replaced. Back-up your Sony dealer. Recording Symptom Sliding the REC switch does not record images. Power sources Symptom The camcorder gets warm. t Delete unrequired images (p. 11) or format this unit is extremely low. Trouble shooting Please check the following before contacting your data from the hard disk before sending it to COMPUTER. The...
... formatted or replaced. Back-up your Sony dealer. Recording Symptom Sliding the REC switch does not record images. Power sources Symptom The camcorder gets warm. t Delete unrequired images (p. 11) or format this unit is extremely low. Trouble shooting Please check the following before contacting your data from the hard disk before sending it to COMPUTER. The...


