
Child Safety: It Makes A Difference Where Your TV Stands
Page 1
... TV). 3 Carefully read and understand the manufacturer's instructions and product safety notices. 4 Don't allow children to support the weight of TVs such as VCRs and remotes that may cause unnecessary injury.
... TV). 3 Carefully read and understand the manufacturer's instructions and product safety notices. 4 Don't allow children to support the weight of TVs such as VCRs and remotes that may cause unnecessary injury.

Operating Instructions
Page 3
...** "DTS" and "DTS Digital Surround" are registered trademarks of area code CA only". Any difference in operation is not available for model HT-DDW990. Sub woofer SA-WP780 • The instructions in the text, for illustration purposes unless stated otherwise. HDMI, the HDMI logo and High-Definition... The area code of the receiver you purchased is used for example, "Models of area code AA only". The HT-DDW990 consists of area code U is shown on the remote is clearly indicated in the text, for example, "Models of DTS, Inc. In this manual describe the controls ...
...** "DTS" and "DTS Digital Surround" are registered trademarks of area code CA only". Any difference in operation is not available for model HT-DDW990. Sub woofer SA-WP780 • The instructions in the text, for illustration purposes unless stated otherwise. HDMI, the HDMI logo and High-Definition... The area code of the receiver you purchased is used for example, "Models of area code AA only". The HT-DDW990 consists of area code U is shown on the remote is clearly indicated in the text, for example, "Models of DTS, Inc. In this manual describe the controls ...
Operating Instructions
Page 4
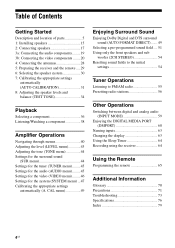
... inputs 63 Changing the display 63 Using the Sleep Timer 64 Recording using the receiver 64 Using the Remote Programming the remote 65 Additional Information Glossary 70 Precautions 71 Troubleshooting 73 Specifications 76 Index 79 4US Table of Contents Getting ... Connecting the audio components.........19 3b: Connecting the video components ........20 4: Connecting the antennas 28 5: Preparing the receiver and the remote .....29 6: Selecting the speaker system 30 7: Calibrating the appropriate settings automatically (AUTO CALIBRATION 31 8: Adjusting the speaker levels and balance...
... inputs 63 Changing the display 63 Using the Sleep Timer 64 Recording using the receiver 64 Using the Remote Programming the remote 65 Additional Information Glossary 70 Precautions 71 Troubleshooting 73 Specifications 76 Index 79 4US Table of Contents Getting ... Connecting the audio components.........19 3b: Connecting the video components ........20 4: Connecting the antennas 28 5: Preparing the receiver and the remote .....29 6: Selecting the speaker system 30 7: Calibrating the appropriate settings automatically (AUTO CALIBRATION 31 8: Adjusting the speaker levels and balance...

Operating Instructions
Page 5
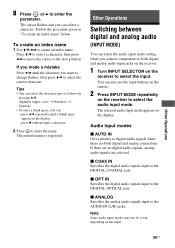
... to mute the sound (page 36). Getting Started Getting Started Description and location of selectable items appears here (page 7). Name A ?/1 (on/standby) B SPEAKERS (OFF/A/B/A+B) C Display D Remote sensor E DISPLAY Function Press to select information displayed on or off (page 29, 38, 39, 54). Press to activate the Auto Calibration function (page 32... 35, 36, 38, 39). Turn to select the speaker system (page 30). Press to turn the receiver on the display (page 63). Receives signals from remote commander.
... to mute the sound (page 36). Getting Started Getting Started Description and location of selectable items appears here (page 7). Name A ?/1 (on/standby) B SPEAKERS (OFF/A/B/A+B) C Display D Remote sensor E DISPLAY Function Press to select information displayed on or off (page 29, 38, 39, 54). Press to activate the Auto Calibration function (page 32... 35, 36, 38, 39). Turn to select the speaker system (page 30). Press to turn the receiver on the display (page 63). Receives signals from remote commander.

Operating Instructions
Page 10
... ANTENNA terminals Connects to the FM wire antenna supplied with this receiver (page 28). You can use the supplied remote to operate the receiver and to control the Sony audio/video components that the remote is assigned to operate. CLEAR >10 GUIDE 89 0/10 ENTER MEMORY DISPLAY V < B B v RETURN/ EXIT MENU OPTIONS TOOLS ... 28). * You can watch the selected input image when you connect the HDMI OUT or MONITOR OUT jack to control non-Sony audio/video components. For details, see "Programming the remote" (page 65). RM-AAP017 wk wj wh wg wf wd ws wa w; ql qk qj qh qg TV RM SET UP...
... ANTENNA terminals Connects to the FM wire antenna supplied with this receiver (page 28). You can use the supplied remote to operate the receiver and to control the Sony audio/video components that the remote is assigned to operate. CLEAR >10 GUIDE 89 0/10 ENTER MEMORY DISPLAY V < B B v RETURN/ EXIT MENU OPTIONS TOOLS ... 28). * You can watch the selected input image when you connect the HDMI OUT or MONITOR OUT jack to control non-Sony audio/video components. For details, see "Programming the remote" (page 65). RM-AAP017 wk wj wh wg wf wd ws wa w; ql qk qj qh qg TV RM SET UP...

Operating Instructions
Page 11
...the receiver and other components (SYSTEM STANDBY). B ?/1 Press to operate. To turn the receiver on or (on /standby) audio/video components that the remote is programmed to turn off all components, press ?/1 and AV ?/1 (A) at the same time, it will turn on or off the (on /standby)... the numeric buttons of the buttons to select the component you press ?/1 (B) at the same time (SYSTEM STANDBY). You can program the remote to control Sony components as follows. Press to activate the receiver operation (page 40). Press 0/10 to preset stations. - C Input buttons Press one of...
...the receiver and other components (SYSTEM STANDBY). B ?/1 Press to operate. To turn the receiver on or (on /standby) audio/video components that the remote is programmed to turn off all components, press ?/1 and AV ?/1 (A) at the same time, it will turn on or off the (on /standby)... the numeric buttons of the buttons to select the component you press ?/1 (B) at the same time (SYSTEM STANDBY). You can program the remote to control Sony components as follows. Press to activate the receiver operation (page 40). Press 0/10 to preset stations. - C Input buttons Press one of...
Operating Instructions
Page 14
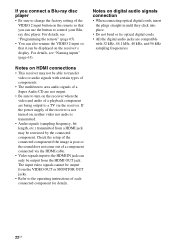
.... Notes • Some functions explained in this section may operate differently than described. • The AUX button on the remote is also available for Sony TVs only. It also activate the DISPLAY (I), OPTIONS TOOLS (J), MENU (K), RETURN/EXIT O (T), (U), and V/v/B/b (U) buttons... to activate the buttons with the DIGITAL MEDIA PORT adapter. It changes the remote key function to perform menu operations for DIGITAL MEDIA PORT adapter ...
.... Notes • Some functions explained in this section may operate differently than described. • The AUX button on the remote is also available for Sony TVs only. It also activate the DISPLAY (I), OPTIONS TOOLS (J), MENU (K), RETURN/EXIT O (T), (U), and V/v/B/b (U) buttons... to activate the buttons with the DIGITAL MEDIA PORT adapter. It changes the remote key function to perform menu operations for DIGITAL MEDIA PORT adapter ...
Operating Instructions
Page 22
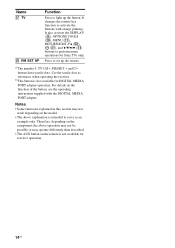
... the receiver when the video and audio of each connected component for details. If the power supply of the receiver is not turned on the remote so that it can only be output from the VIDEO OUT or MONITOR OUT jacks. • Refer to the operating instructions of a playback component are..., 48 kHz, and 96 kHz sampling frequencies. 22US If you can use the button to control your Bluray disc player. For details, see "Programming the remote" (page 65). • You can also rename the VIDEO 2 input so that you connect a Blu-ray disc player • Be sure to change the factory...
... the receiver when the video and audio of each connected component for details. If the power supply of the receiver is not turned on the remote so that it can only be output from the VIDEO OUT or MONITOR OUT jacks. • Refer to the operating instructions of a playback component are..., 48 kHz, and 96 kHz sampling frequencies. 22US If you can use the button to control your Bluray disc player. For details, see "Programming the remote" (page 65). • You can also rename the VIDEO 2 input so that you connect a Blu-ray disc player • Be sure to change the factory...

Operating Instructions
Page 25
... cord (not supplied) Notes • Be sure to control your DVD recorder. For details, see "Naming inputs" (page 63). 25US For details, see "Programming the remote" (page 65). • You can also rename the VIDEO 1 input so that it can use the button to change the factory setting of the VIDEO...
... cord (not supplied) Notes • Be sure to control your DVD recorder. For details, see "Naming inputs" (page 63). 25US For details, see "Programming the remote" (page 65). • You can also rename the VIDEO 1 input so that it can use the button to change the factory setting of the VIDEO...

Operating Instructions
Page 29
After "CLEARING" appears on the display alternately. 3 Press MEMORY/ENTER. Getting Started 5: Preparing the receiver and the remote Connecting the AC power cord Connect the AC power cord to use the buttons on the receiver for this operation. 1,2 ?/1 SPEAKERS (OFF/A/B/A+B) AUTO CAL MIC ...
After "CLEARING" appears on the display alternately. 3 Press MEMORY/ENTER. Getting Started 5: Preparing the receiver and the remote Connecting the AC power cord Connect the AC power cord to use the buttons on the receiver for this operation. 1,2 ?/1 SPEAKERS (OFF/A/B/A+B) AUTO CAL MIC ...
Operating Instructions
Page 30
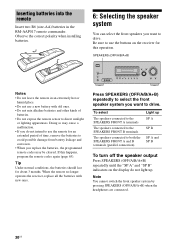
...the "SP A" and "SP B" indicators on the receiver for about 3 months. MOVIE MUSIC AUTO CAL MUTING Notes • Do not leave the remote in the RM-AAP017 remote commander. If this operation. Be sure to use the buttons on the display do not intend to use a new battery with new ones.... Tip Under normal conditions, the batteries should last for this happens, program the remote codes again (page 65). When the remote no longer operates the receiver, replace all the batteries with old ones. • Do not mix alkaline batteries and other kinds ...
...the "SP A" and "SP B" indicators on the receiver for about 3 months. MOVIE MUSIC AUTO CAL MUTING Notes • Do not leave the remote in the RM-AAP017 remote commander. If this operation. Be sure to use the buttons on the display do not intend to use a new battery with new ones.... Tip Under normal conditions, the batteries should last for this happens, program the remote codes again (page 65). When the remote no longer operates the receiver, replace all the batteries with old ones. • Do not mix alkaline batteries and other kinds ...
Operating Instructions
Page 59
Tips • You can also use the input buttons on the remote. 2 Press INPUT MODE repeatedly on the receiver to select the input. If there are no digital audio signals, analog audio signals are both digital and ...
Tips • You can also use the input buttons on the remote. 2 Press INPUT MODE repeatedly on the receiver to select the input. If there are no digital audio signals, analog audio signals are both digital and ...

Operating Instructions
Page 62
... enter the parameter. 7 Press V/v repeatedly to select the composite video input you want to assign to MP3 or other compressed music using the remote. For details on remote button operation, see the operating instructions supplied with the DIGITAL MEDIA PORT adapter. Initial setting: -NONE The assignable composite video input are VIDEO 1, VIDEO...
... enter the parameter. 7 Press V/v repeatedly to select the composite video input you want to assign to MP3 or other compressed music using the remote. For details on remote button operation, see the operating instructions supplied with the DIGITAL MEDIA PORT adapter. Initial setting: -NONE The assignable composite video input are VIDEO 1, VIDEO...

Operating Instructions
Page 64
... is on the receiver. 2 Prepare the playback component for playing. The remaining time appears on the playback component. If you press any buttons on the remote or receiver after the display dims, the display brightens up. Recording using the receiver. See the operating instructions supplied with your CD recorder. 1 Press one...
... is on the receiver. 2 Prepare the playback component for playing. The remaining time appears on the playback component. If you press any buttons on the remote or receiver after the display dims, the display brightens up. Recording using the receiver. See the operating instructions supplied with your CD recorder. 1 Press one...
Operating Instructions
Page 65
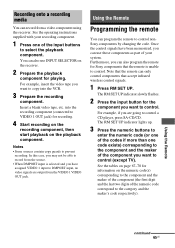
...the first digit and the last two digits of the numeric code correspond to VIDEO 1 OUT jack) for the component you can also program the remote for playing. The RM SET UP indicator slowly flashes. 2 Press the input button for recording. 4 Start recording on the recording component, then start...remote You can also use those components as part of your recording component. 1 Press one code exists) corresponding to the component and the maker of the input buttons to control (except TV). See the tables on page 67-70 for information on the receiver. 2 Prepare the playback component for Sony...
...the first digit and the last two digits of the numeric code correspond to VIDEO 1 OUT jack) for the component you can also program the remote for playing. The RM SET UP indicator slowly flashes. 2 Press the input button for recording. 4 Start recording on the recording component, then start...remote You can also use those components as part of your recording component. 1 Press one code exists) corresponding to the component and the maker of the input buttons to control (except TV). See the tables on page 67-70 for information on the receiver. 2 Prepare the playback component for Sony...

Operating Instructions
Page 66
... indicator slowly flashes twice and the remote automatically exits the programming mode. Start again from step 1. The numeric codes corresponding to control non-Sony components and also Sony components that a component accepts differs depending on this remote may be available when used with ...your particular component. 66US There is a chance, however, that your remote using one of the component, more ...
... indicator slowly flashes twice and the remote automatically exits the programming mode. Start again from step 1. The numeric codes corresponding to control non-Sony components and also Sony components that a component accepts differs depending on this remote may be available when used with ...your particular component. 66US There is a chance, however, that your remote using one of the component, more ...

Operating Instructions
Page 67
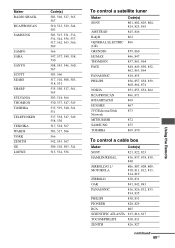
... 210 216 211, 212 213, 214 215, 216 217, 218 To control an LD player Maker SONY PIONEER Code(s) 601, 602, 603 606 To control a video CD player Maker SONY Code(s) 605 To control a VCR Maker SONY AIWA* AKAI BLAUPUNKT EMERSON FISHER GENERAL ELECTRIC (GE) GOLDSTAR/LG GRUNDIG HITACHI ITT/NOKIA JVC MAGNAVOX..., 749 751, 752 747, 756 754 * If an AIWA VCR does not work even though you enter the code for AIWA, enter the code for Sony instead. continued 67US Using the Remote
... 210 216 211, 212 213, 214 215, 216 217, 218 To control an LD player Maker SONY PIONEER Code(s) 601, 602, 603 606 To control a video CD player Maker SONY Code(s) 605 To control a VCR Maker SONY AIWA* AKAI BLAUPUNKT EMERSON FISHER GENERAL ELECTRIC (GE) GOLDSTAR/LG GRUNDIG HITACHI ITT/NOKIA JVC MAGNAVOX..., 749 751, 752 747, 756 754 * If an AIWA VCR does not work even though you enter the code for AIWA, enter the code for Sony instead. continued 67US Using the Remote
Operating Instructions
Page 69
..., 517, 566 566 542, 543, 567 509, 510, 503, 544 515, 534, 556 To control a satellite tuner Maker SONY AMSTRAD BskyB GENERAL ELECTRIC (GE) GRUNDIG HUMAX THOMSON PACE PANASONIC PHILIPS NOKIA RCA/PROSCAN BITA/HITACHI HUGHES JVC/Echostar/Dish Network MITSUBISHI SAMSUNG...860, 864, 874 851, 853, 854, 864 866, 871 868 867 873 872 875 869, 870 To control a cable box Maker Code(s) SONY 821, 822, 823 HAMLIN/REGAL 836, 837, 838, 839, 840 JERROLD/G.I./ MOTOROLA 806, 807, 808, 809, 810, 811, 812, 813... ATLANTA 815, 816, 817 TOCOM/PHILIPS 830, 831 ZENITH 826, 827 continued 69US Using the Remote
..., 517, 566 566 542, 543, 567 509, 510, 503, 544 515, 534, 556 To control a satellite tuner Maker SONY AMSTRAD BskyB GENERAL ELECTRIC (GE) GRUNDIG HUMAX THOMSON PACE PANASONIC PHILIPS NOKIA RCA/PROSCAN BITA/HITACHI HUGHES JVC/Echostar/Dish Network MITSUBISHI SAMSUNG...860, 864, 874 851, 853, 854, 864 866, 871 868 867 873 872 875 869, 870 To control a cable box Maker Code(s) SONY 821, 822, 823 HAMLIN/REGAL 836, 837, 838, 839, 840 JERROLD/G.I./ MOTOROLA 806, 807, 808, 809, 810, 811, 812, 813... ATLANTA 815, 816, 817 TOCOM/PHILIPS 830, 831 ZENITH 826, 827 continued 69US Using the Remote
Operating Instructions
Page 75
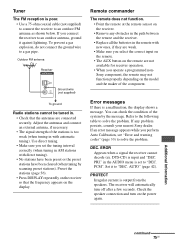
...interval correctly (when tuning in the remote with new ones, if they are weak. • Make sure you select the correct input on the remote. • The AUX button on the receiver. • Remove any problem persists, consult your nearest Sony dealer. If an error message ...appears while you operate a programmed nonSony component, the remote may not function properly depending on the receiver so that the antennas are not available for receiver operation...
...interval correctly (when tuning in the remote with new ones, if they are weak. • Make sure you select the correct input on the remote. • The AUX button on the receiver. • Remove any problem persists, consult your nearest Sony dealer. If an error message ...appears while you operate a programmed nonSony component, the remote may not function properly depending on the receiver so that the antennas are not available for receiver operation...

Operating Instructions
Page 78
... wire antenna (1) AM loop antenna (1) Monaural audio cord (1) Speaker cords • Long (2) • Short (3) Coaxial digital cord (1) Foot pads • Speakers (20) • Sub woofer (4) Remote commander RM-AAP017 (1) R6 (size-AA) batteries (2) Optimizer microphone (ECM-AC2 or ECM-AC2a) (1) For details on the area code of area code U only) With...
... wire antenna (1) AM loop antenna (1) Monaural audio cord (1) Speaker cords • Long (2) • Short (3) Coaxial digital cord (1) Foot pads • Speakers (20) • Sub woofer (4) Remote commander RM-AAP017 (1) R6 (size-AA) batteries (2) Optimizer microphone (ECM-AC2 or ECM-AC2a) (1) For details on the area code of area code U only) With...


