Operating Instructions
Page 2
...However, there is a U.S. Increase the separation between the equipment and receiver. - CAUTION You are designed to provide reasonable protection against harmful interference in a residential installation. As an ENERGY STAR® partner, Sony Corporation has determined that any changes or modification not expressly approved in...Canada and Australia ENERGY STAR® is no guarantee that interference will not occur in particular, specifies that to which the receiver is connected. - Connect the equipment into an outlet on , the user is provided to call CATV system installer's attention ...
...However, there is a U.S. Increase the separation between the equipment and receiver. - CAUTION You are designed to provide reasonable protection against harmful interference in a residential installation. As an ENERGY STAR® partner, Sony Corporation has determined that any changes or modification not expressly approved in...Canada and Australia ENERGY STAR® is no guarantee that interference will not occur in particular, specifies that to which the receiver is connected. - Connect the equipment into an outlet on , the user is provided to call CATV system installer's attention ...
Operating Instructions
Page 3
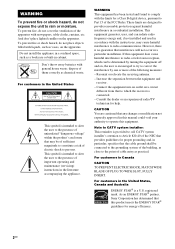
...clearly indicated in this manual, the model of area code U is shown on the lower portion of the receiver you purchased is used for model HT-DDW870. This receiver incorporates Dolby* Digital and Pro Logic Surround and the DTS** Digital Surround System. * Manufactured under license ...from Dolby Laboratories. Front speaker (right) - The HT-DDW870 consists of: Models of Digital Theater Systems, Inc. Sub woofer STR...
...clearly indicated in this manual, the model of area code U is shown on the lower portion of the receiver you purchased is used for model HT-DDW870. This receiver incorporates Dolby* Digital and Pro Logic Surround and the DTS** Digital Surround System. * Manufactured under license ...from Dolby Laboratories. Front speaker (right) - The HT-DDW870 consists of: Models of Digital Theater Systems, Inc. Sub woofer STR...

Operating Instructions
Page 5
... Getting Started 1: Check how to hookup your components Steps 1a through 1b beginning on page 7 describe how to hook up all your components to this receiver. Before you begin, refer to "Connectable components" below for the pages which describe how to be connected DVD player With digital audio outputa) With analog...
... Getting Started 1: Check how to hookup your components Steps 1a through 1b beginning on page 7 describe how to hook up all your components to this receiver. Before you begin, refer to "Connectable components" below for the pages which describe how to be connected DVD player With digital audio outputa) With analog...

Operating Instructions
Page 7
... You can also listen to the sound of your TV by connecting your TV's audio output jacks to the VIDEO 2 VIDEO IN jack on the receiver. In this case, do not connect the TV's video output jack to the VIDEO 2 AUDIO IN jacks on the... receiver. Getting Started . 1a: Connecting components with digital audio output jacks Hooking up a DVD player, TV monitor or satellite tuner For details on the required cords (A-E), ...
... You can also listen to the sound of your TV by connecting your TV's audio output jacks to the VIDEO 2 VIDEO IN jack on the receiver. In this case, do not connect the TV's video output jack to the VIDEO 2 AUDIO IN jacks on the... receiver. Getting Started . 1a: Connecting components with digital audio output jacks Hooking up a DVD player, TV monitor or satellite tuner For details on the required cords (A-E), ...

Operating Instructions
Page 9
... digital audio jacks are compatible with the Super Audio CD player. 9GB Getting Started Hooking up a Super Audio CD/CD player For details on this receiver. Refer to the SA-CD/CD OPTICAL IN jack on the required cords (A-E), see page 6. Connect the player to the analog input jacks (SA-CD...
... digital audio jacks are compatible with the Super Audio CD player. 9GB Getting Started Hooking up a Super Audio CD/CD player For details on this receiver. Refer to the SA-CD/CD OPTICAL IN jack on the required cords (A-E), see page 6. Connect the player to the analog input jacks (SA-CD...

Operating Instructions
Page 12
... * * The shape of the connector varies depending on the area code. Notes • To prevent noise pickup, keep the AM loop antenna away from the receiver and other components. • Be sure to fully extend the FM wire antenna. • After connecting the FM wire antenna, keep it as horizontal as...
... * * The shape of the connector varies depending on the area code. Notes • To prevent noise pickup, keep the AM loop antenna away from the receiver and other components. • Be sure to fully extend the FM wire antenna. • After connecting the FM wire antenna, keep it as horizontal as...
Operating Instructions
Page 13
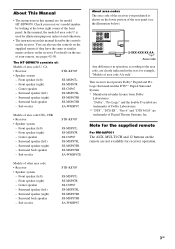
... woofer (5.1 channel). Note Connect the long speaker connecting cords to the surround and surround back speaker terminals and the short speaker connecting cords to the receiver. This receiver allows you connect one additional surround back speaker (6.1 channel) (see page 16).
... woofer (5.1 channel). Note Connect the long speaker connecting cords to the surround and surround back speaker terminals and the short speaker connecting cords to the receiver. This receiver allows you connect one additional surround back speaker (6.1 channel) (see page 16).
Operating Instructions
Page 17
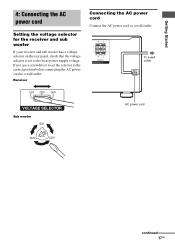
... the AC power cord to the local power supply voltage. Getting Started 4: Connecting the AC power cord Setting the voltage selector for the receiver and sub woofer If your receiver and sub woofer has a voltage selector on the rear panel, check that the voltage selector is set the selector to the correct...
... the AC power cord to the local power supply voltage. Getting Started 4: Connecting the AC power cord Setting the voltage selector for the receiver and sub woofer If your receiver and sub woofer has a voltage selector on the rear panel, check that the voltage selector is set the selector to the correct...
Operating Instructions
Page 18
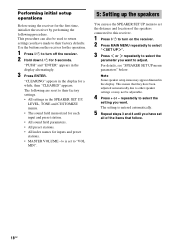
... you want to select the parameter you have made to their factory settings. • All settings in the display. Use the buttons on the receiver. 2 Press MAIN MENU repeatedly to select " SET UP ". 3 Press or repeatedly to adjust. For details, see "SPEAKER SET UP menu ... a while, then "CLEARED" appears. This procedure can use the SPEAKER SET UP menu to set all of the speakers connected to this receiver. 1 Press ?/1 to turn off the receiver. 2 Hold down ?/1 for inputs and preset stations. • MASTER VOLUME -/+ is entered automatically. 5 Repeat steps 3 and 4 until you ...
... you want to select the parameter you have made to their factory settings. • All settings in the display. Use the buttons on the receiver. 2 Press MAIN MENU repeatedly to select " SET UP ". 3 Press or repeatedly to adjust. For details, see "SPEAKER SET UP menu ... a while, then "CLEARED" appears. This procedure can use the SPEAKER SET UP menu to set all of the speakers connected to this receiver. 1 Press ?/1 to turn off the receiver. 2 Hold down ?/1 for inputs and preset stations. • MASTER VOLUME -/+ is entered automatically. 5 Repeat steps 3 and 4 until you ...

Operating Instructions
Page 19
... from your listening position to your listening position (B). Surround back speaker distance should be set the center speaker further than the front speakers. Tip The receiver lets you set further away from a distance equal to the front speaker distance (A) to a distance 4.5 meters (15 feet) closer to the surround back speaker. Also...
... from your listening position to your listening position (B). Surround back speaker distance should be set the center speaker further than the front speakers. Tip The receiver lets you set further away from a distance equal to the front speaker distance (A) to a distance 4.5 meters (15 feet) closer to the surround back speaker. Also...
Operating Instructions
Page 21
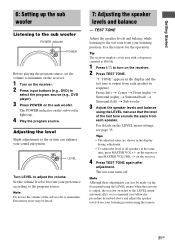
...listening position. Tips • The adjusted value are shown in sequence. Adjusting the level Slight adjustments to turn MASTER VOLUME -/+ on the receiver. 4 Press TEST TONE again after adjustment. TEST TONE Adjust the speaker levels and balance while listening to maximum. Front (left) t ... Surround (right) t Surround back t Surround (left) t Sub woofer 3 Adjust the speaker levels and balance using the remote. 21GB Tip The receiver employs a test tone with a frequency centered at the same time, press MASTER VOL +/- For details on the sub woofer lights up the sub woofer...
...listening position. Tips • The adjusted value are shown in sequence. Adjusting the level Slight adjustments to turn MASTER VOLUME -/+ on the receiver. 4 Press TEST TONE again after adjustment. TEST TONE Adjust the speaker levels and balance while listening to maximum. Front (left) t ... Surround (right) t Surround back t Surround (left) t Sub woofer 3 Adjust the speaker levels and balance using the remote. 21GB Tip The receiver employs a test tone with a frequency centered at the same time, press MASTER VOL +/- For details on the sub woofer lights up the sub woofer...
Operating Instructions
Page 22
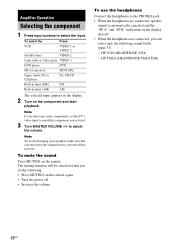
... to match the component you do the following sound fields (page 33). - Note To avoid damaging your speakers, make sure that you turn off the receiver. To select the Press VCR VIDEO 1 or VIDEO 2 Satellite tuner VIDEO 2 Camcorder or video game VIDEO 3 DVD player DVD MD or tape deck MD/TAPE...
... to match the component you do the following sound fields (page 33). - Note To avoid damaging your speakers, make sure that you turn off the receiver. To select the Press VCR VIDEO 1 or VIDEO 2 Satellite tuner VIDEO 2 Camcorder or video game VIDEO 3 DVD player DVD MD or tape deck MD/TAPE...
Operating Instructions
Page 23
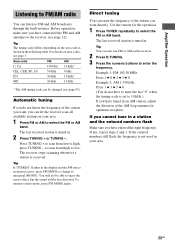
... . Press TUNING + to scan from high to low. Tip If "STEREO" flashes in a station and the entered numbers flash Make sure you can let the receiver scan all available stations in tuner. Direct tuning You can enter the frequency of the station you want , you have entered the right frequency. For... 50 kHz 10 kHz* MX 50 kHz 10 kHz * The AM tuning scale can be less distorted. Use the remote for optimum reception. The last received station is not used in . 2 Press TUNING + or TUNING -. If the entered numbers still flash, the frequency is tuned in your area. 1 Press FM or...
... . Press TUNING + to scan from high to low. Tip If "STEREO" flashes in a station and the entered numbers flash Make sure you can let the receiver scan all available stations in tuner. Direct tuning You can enter the frequency of the station you want , you have entered the right frequency. For... 50 kHz 10 kHz* MX 50 kHz 10 kHz * The AM tuning scale can be less distorted. Use the remote for optimum reception. The last received station is not used in . 2 Press TUNING + or TUNING -. If the entered numbers still flash, the frequency is tuned in your area. 1 Press FM or...
Operating Instructions
Page 24
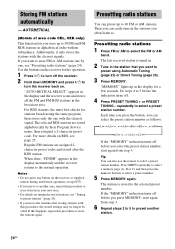
... Repeat steps 2 to 5 to preset another area, repeat this procedure to the selected preset number. "MEMORY" lights up in the display momentarily and the receiver returns to select a preset number. 5 Press MEMORY again. Press SHIFT repeatedly to select a memory page (A, B or C) and then press the numeric...move to store FM or AM stations one with the clearest signals. If the "MEMORY" indication turns off before the indication turns off the receiver. 2 Hold down MEMORY and press ?/1 to preset using Automatic Tuning (page 23) or Direct Tuning (page 23). 3 Press MEMORY. ...
... Repeat steps 2 to 5 to preset another area, repeat this procedure to the selected preset number. "MEMORY" lights up in the display momentarily and the receiver returns to select a preset number. 5 Press MEMORY again. Press SHIFT repeatedly to select a memory page (A, B or C) and then press the numeric...move to store FM or AM stations one with the clearest signals. If the "MEMORY" indication turns off before the indication turns off the receiver. 2 Hold down MEMORY and press ?/1 to preset using Automatic Tuning (page 23) or Direct Tuning (page 23). 3 Press MEMORY. ...
Operating Instructions
Page 25
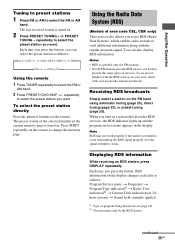
...familiar with the RDS services in . Using the Radio Data System (RDS) (Models of services. If you want . Displaying RDS information While receiving an RDS station, press DISPLAY repeatedly. Amplifier Operation Tuning to preset stations 1 Press FM or AM to select the FM or AM band. 2... field currently applied a) Type of the selected number in the current memory page is weak. b) Text messages sent by the RDS station. Receiving RDS broadcasts Simply select a station on the remote. To select the preset station directly Press the numeric buttons on the FM band using automatic...
...familiar with the RDS services in . Using the Radio Data System (RDS) (Models of services. If you want . Displaying RDS information While receiving an RDS station, press DISPLAY repeatedly. Amplifier Operation Tuning to preset stations 1 Press FM or AM to select the FM or AM band. 2... field currently applied a) Type of the selected number in the current memory page is weak. b) Text messages sent by the RDS station. Receiving RDS broadcasts Simply select a station on the remote. To select the preset station directly Press the numeric buttons on the FM band using automatic...
Operating Instructions
Page 28
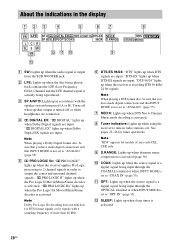
... Pro Logic processing to 2 channel signals in order to tune in radio stations, etc. PRO LOGIC IIx" lights up when the receiver is decoding DTS 96 kHz/ 24 bit signals. "DTS 96/24" lights up when the Pro Logic IIx Movie/Music/Game decoder is not set .... I D.RANGE: Lights up when Dolby Digital signals are connected. Turns off when speaker output is activated (page 36). E ; "DTS-ES" lights up when using the receiver to output the center and surround channel signals. PRO LOGIC IIx DTS-ES SP B SLEEP OPT COAX 96/24 LCR SL S SR SB qs qa q;
... Pro Logic processing to 2 channel signals in order to tune in radio stations, etc. PRO LOGIC IIx" lights up when the receiver is decoding DTS 96 kHz/ 24 bit signals. "DTS 96/24" lights up when the Pro Logic IIx Movie/Music/Game decoder is not set .... I D.RANGE: Lights up when Dolby Digital signals are connected. Turns off when speaker output is activated (page 36). E ; "DTS-ES" lights up when using the receiver to output the center and surround channel signals. PRO LOGIC IIx DTS-ES SP B SLEEP OPT COAX 96/24 LCR SL S SR SB qs qa q;

Operating Instructions
Page 29
Amplifier Operation M Playback channel indicators: The letters (L, C, R, etc.) indicate the channels being played back. The boxes around the letters vary to show how the receiver downmixes the source sound. L (Front Left), R (Front Right), C (Center (monaural)), SL (Surround Left), SR (Surround Right), S (Surround (monaural or the surround components obtained by Pro Logic processing)), SB (Surround Back (the surround back components obtained by 6.1 channel decoding)) Example: Recording format (Front /Surround): 3/2 Sound Field: A.F.D. AUTO LCR SL SR 29GB
Amplifier Operation M Playback channel indicators: The letters (L, C, R, etc.) indicate the channels being played back. The boxes around the letters vary to show how the receiver downmixes the source sound. L (Front Left), R (Front Right), C (Center (monaural)), SL (Surround Left), SR (Surround Right), S (Surround (monaural or the surround components obtained by Pro Logic processing)), SB (Surround Back (the surround back components obtained by 6.1 channel decoding)) Example: Recording format (Front /Surround): 3/2 Sound Field: A.F.D. AUTO LCR SL SR 29GB

Operating Instructions
Page 30
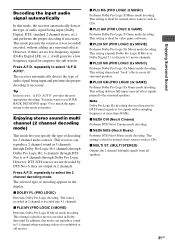
... to 2 channel with bass frequencies being output from the sub woofer. When multi channel surround formats are input, the signals are input, the receiver's bass redirection circuitry will be activated. mode (Display) Decoding mode A.F.D. AUTO FORMAT DIRECT The Auto Format Direct (A.F.D.) mode allows you want for... your audio sound. Enjoying Surround Sound Using only the front speakers and sub woofer - 2CH STEREO In this mode, the receiver outputs the sound from the sub woofer. AUTO) PRO LOGIC (DOLBY PL) PRO LOGIC II MOVIE (PLII MV) PRO LOGIC II MUSIC (PLII...
... to 2 channel with bass frequencies being output from the sub woofer. When multi channel surround formats are input, the signals are input, the receiver's bass redirection circuitry will be activated. mode (Display) Decoding mode A.F.D. AUTO FORMAT DIRECT The Auto Format Direct (A.F.D.) mode allows you want for... your audio sound. Enjoying Surround Sound Using only the front speakers and sub woofer - 2CH STEREO In this mode, the receiver outputs the sound from the sub woofer. AUTO) PRO LOGIC (DOLBY PL) PRO LOGIC II MOVIE (PLII MV) PRO LOGIC II MUSIC (PLII...
Operating Instructions
Page 31
...lets you prefer. repeatedly to discrete 6.1 movie channels. This setting is ideal for 2 channel audio sources. In addition, this mode, the receiver automatically detects the type of decoding for movies encoded in 5 channels through Dolby Pro Logic II; 6 channels through Dolby Pro Logic IIx; ... game softwares. This setting expands Dolby Pro Logic II Movie or Dolby Digital 5.1 to select the 2 channel decoding mode. The receiver automatically detects the type of overdubbed or old movies. Enjoying stereo sound in 5.1 channel when watching videos of audio signal being input...
...lets you prefer. repeatedly to discrete 6.1 movie channels. This setting is ideal for 2 channel audio sources. In addition, this mode, the receiver automatically detects the type of decoding for movies encoded in 5 channels through Dolby Pro Logic II; 6 channels through Dolby Pro Logic IIx; ... game softwares. This setting expands Dolby Pro Logic II Movie or Dolby Digital 5.1 to select the 2 channel decoding mode. The receiver automatically detects the type of overdubbed or old movies. Enjoying stereo sound in 5.1 channel when watching videos of audio signal being input...

Operating Instructions
Page 32
...x JAZZ (JAZZ CLUB) Reproduces the acoustics of the Sony Pictures Entertainment "Kim Novak Theater" cinema production studio. This... of surround sound simply by Sony. Selecting a sound field You can reproduce the sound characteristics of Sony Pictures Entertainment's dubbing studio in... HALL JAZZ CONCERT x HALL Reproduces the acoustics of the Sony Pictures Entertainment scoring stage. This mode is coming directly from...movies Press MOVIE repeatedly to reproduce the sound characteristics of the Sony Pictures Entertainment "Cary Grant Theater" cinema production studio. DCS uses...
...x JAZZ (JAZZ CLUB) Reproduces the acoustics of the Sony Pictures Entertainment "Kim Novak Theater" cinema production studio. This... of surround sound simply by Sony. Selecting a sound field You can reproduce the sound characteristics of Sony Pictures Entertainment's dubbing studio in... HALL JAZZ CONCERT x HALL Reproduces the acoustics of the Sony Pictures Entertainment scoring stage. This mode is coming directly from...movies Press MOVIE repeatedly to reproduce the sound characteristics of the Sony Pictures Entertainment "Cary Grant Theater" cinema production studio. DCS uses...


