
Operating Instructions
Page 4
... of the IC radio frequency (RF) Exposure rules. This equipment has very low levels of RF energy that may cause undesired operation of the Sound Bar. If you may fall down and injure yourself, or system damage may not cause interference, and (2) this device must be ...changed only at a large volume, the system temperature of RF energy that the operating voltage is indicated on the Sound Bar or the subwoofer, as you are unable to comply without maximum permissive exposure evaluation (MPE). This equipment complies with FCC radiation exposure limits ...
... of the IC radio frequency (RF) Exposure rules. This equipment has very low levels of RF energy that may cause undesired operation of the Sound Bar. If you may fall down and injure yourself, or system damage may not cause interference, and (2) this device must be ...changed only at a large volume, the system temperature of RF energy that the operating voltage is indicated on the Sound Bar or the subwoofer, as you are unable to comply without maximum permissive exposure evaluation (MPE). This equipment complies with FCC radiation exposure limits ...
Operating Instructions
Page 5
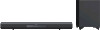
..., or in a place subject to direct sunlight, excessive dust, or mechanical shock. Do not place anything at the rear of the Sound Bar that have any type of abrasive pad, scouring powder or solvent such as staining or discoloration of the surface may result. Take ...minutes. DTS, the Symbol, & DTS and the Symbol together are registered trademarks & DTS Digital Surround and the DTS logos are registered trademarks owned by Sony Corporation is being used in combination with a soft dry cloth. Product includes software. © DTS, Inc. Turn off and unplug the system. On...
..., or in a place subject to direct sunlight, excessive dust, or mechanical shock. Do not place anything at the rear of the Sound Bar that have any type of abrasive pad, scouring powder or solvent such as staining or discoloration of the surface may result. Take ...minutes. DTS, the Symbol, & DTS and the Symbol together are registered trademarks & DTS Digital Surround and the DTS logos are registered trademarks owned by Sony Corporation is being used in combination with a soft dry cloth. Product includes software. © DTS, Inc. Turn off and unplug the system. On...
Operating Instructions
Page 8
... Wireless System 18 Operations and Features Operating the system using the supplied remote control 19 Using the Control for HDMI function 19 Setting up the sound output of the connected equipment 20 BLUETOOTH Function Using the BLUETOOTH function 21 Surround Function Enjoying the surround effect 24 Advanced Settings Settings and adjustments...
... Wireless System 18 Operations and Features Operating the system using the supplied remote control 19 Using the Control for HDMI function 19 Setting up the sound output of the connected equipment 20 BLUETOOTH Function Using the BLUETOOTH function 21 Surround Function Enjoying the surround effect 24 Advanced Settings Settings and adjustments...
Operating Instructions
Page 9
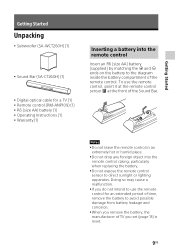
... to use the remote control, point it at the remote control sensor at the front of TV you remove the battery, the manufacturer of the Sound Bar. To use the remote control for a TV (1) Remote control (RM-ANP109) (1) R6 (size AA) battery (1) ...; ends on the battery to direct sunlight or lighting apparatus. Getting Started Getting Started Unpacking Subwoofer (SA-WCT260H) (1) Sound Bar (SA-CT260H) (1) Digital optical cable for an extended period of time, remove the battery to avoid possible damage from battery leakage and corrosion...
... to use the remote control, point it at the remote control sensor at the front of TV you remove the battery, the manufacturer of the Sound Bar. To use the remote control for a TV (1) Remote control (RM-ANP109) (1) R6 (size AA) battery (1) ...; ends on the battery to direct sunlight or lighting apparatus. Getting Started Getting Started Unpacking Subwoofer (SA-WCT260H) (1) Sound Bar (SA-CT260H) (1) Digital optical cable for an extended period of time, remove the battery to avoid possible damage from battery leakage and corrosion...
Operating Instructions
Page 10
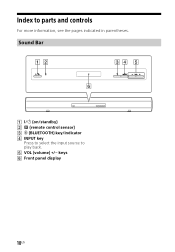
Sound Bar on/standby) (remote control sensor) (BLUETOOTH) key/indicator INPUT key Press to select the input source to parts and controls For more information, see the pages indicated in parentheses. Index to play back. VOL (volume) +/ keys Front panel display 10US
Sound Bar on/standby) (remote control sensor) (BLUETOOTH) key/indicator INPUT key Press to select the input source to parts and controls For more information, see the pages indicated in parentheses. Index to play back. VOL (volume) +/ keys Front panel display 10US
Operating Instructions
Page 11
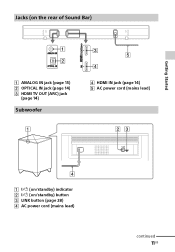
Getting Started Jacks (on the rear of Sound Bar) ANALOG IN jack (page 15) OPTICAL IN jack (page 14) HDMI TV OUT (ARC) jack (page 14) Subwoofer HDMI IN jack (page 14) AC power cord (mains lead) on/standby) indicator on/standby) button LINK button (page 28) AC power cord (mains lead) continued 11US
Getting Started Jacks (on the rear of Sound Bar) ANALOG IN jack (page 15) OPTICAL IN jack (page 14) HDMI TV OUT (ARC) jack (page 14) Subwoofer HDMI IN jack (page 14) AC power cord (mains lead) on/standby) indicator on/standby) button LINK button (page 28) AC power cord (mains lead) continued 11US
Operating Instructions
Page 12
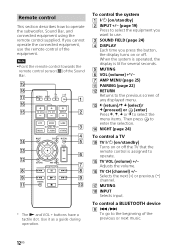
... the equipment. To control the system on/standby) INPUT +/ (page 19) Press to select the equipment you want to use. SOUND FIELD (page 24) DISPLAY Each time you cannot operate the connected equipment, use the remote control of any displayed menu. (...several seconds. MUTING VOL (volume AMP MENU (page 25) PAIRING (page 22) RETURN Returns to the beginning of the Sound Bar. * The and VOL + buttons have a tactile dot. If you press the button, the display turns on or off . When the system is...
... the equipment. To control the system on/standby) INPUT +/ (page 19) Press to select the equipment you want to use. SOUND FIELD (page 24) DISPLAY Each time you cannot operate the connected equipment, use the remote control of any displayed menu. (...several seconds. MUTING VOL (volume AMP MENU (page 25) PAIRING (page 22) RETURN Returns to the beginning of the Sound Bar. * The and VOL + buttons have a tactile dot. If you press the button, the display turns on or off . When the system is...
Operating Instructions
Page 14
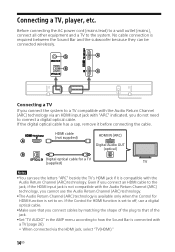
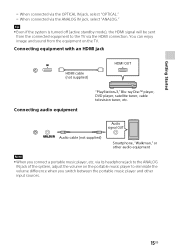
... Channel (ARC) technology. The Audio Return Channel (ARC) technology is available only when the Control for HDMI function is required between the Sound Bar and the subwoofer because they can see the letters "ARC" beside the TV's HDMI jack if it before connecting the cable. If the digital... Audio OUT (optical) Digital optical cable for HDMI function is compatible with the Audio Return Channel (ARC) technology, you do not need to how the Sound Bar is connected with a TV (page 26). When connected via the HDMI jack, select "TV(HDMI)." 14US No cable connection is set...
... Channel (ARC) technology. The Audio Return Channel (ARC) technology is available only when the Control for HDMI function is required between the Sound Bar and the subwoofer because they can see the letters "ARC" beside the TV's HDMI jack if it before connecting the cable. If the digital... Audio OUT (optical) Digital optical cable for HDMI function is compatible with the Audio Return Channel (ARC) technology, you do not need to how the Sound Bar is connected with a TV (page 26). When connected via the HDMI jack, select "TV(HDMI)." 14US No cable connection is set...
Operating Instructions
Page 15
...) HDMI OUT Connecting audio equipment "PlayStation®3," Blu-ray Disc™ player, DVD player, satellite tuner, cable television tuner, etc. You can enjoy image and sound from the connected equipment to eliminate the volume difference when you switch between the portable music player and other audio equipment Note When you...
...) HDMI OUT Connecting audio equipment "PlayStation®3," Blu-ray Disc™ player, DVD player, satellite tuner, cable television tuner, etc. You can enjoy image and sound from the connected equipment to eliminate the volume difference when you switch between the portable music player and other audio equipment Note When you...
Operating Instructions
Page 16
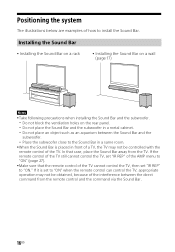
... and the subwoofer in a metal cabinet. Do not place an object such as an aquarium between the Sound Bar and the subwoofer. Place the subwoofer close to the Sound Bar in front of a TV, the TV may not be controlled with the remote control of the AMP menu to "ON..." (page 27). Make sure that case, place the Sound Bar away from the remote control and the command via the Sound Bar. 16US Positioning the system The illustrations below are examples of the TV still cannot control the TV, set "IR...
... and the subwoofer in a metal cabinet. Do not place an object such as an aquarium between the Sound Bar and the subwoofer. Place the subwoofer close to the Sound Bar in front of a TV, the TV may not be controlled with the remote control of the AMP menu to "ON..." (page 27). Make sure that case, place the Sound Bar away from the remote control and the command via the Sound Bar. 16US Positioning the system The illustrations below are examples of the TV still cannot control the TV, set "IR...
Operating Instructions
Page 17
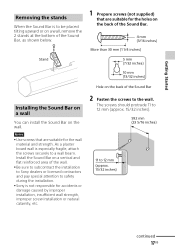
Install the Sound Bar on a vertical and flat reinforced area of the wall. Be sure to subcontract the installation to Sony dealers or licensed contractors and pay special attention to safety during the installation. Sony is not responsible for the wall material and strength. The screws should protrude 11 to... screws to 12 mm (approx. 15/32 inches) continued 17US Notes Use screws that are suitable for the holes on the back of the Sound Bar. 4 mm (3/16 inches) More than 30 mm (1 1/4 inches) Stand 5 mm (7/32 inches) 10 mm (13/32 inches) Hole on the wall. ...
Install the Sound Bar on a vertical and flat reinforced area of the wall. Be sure to subcontract the installation to Sony dealers or licensed contractors and pay special attention to safety during the installation. Sony is not responsible for the wall material and strength. The screws should protrude 11 to... screws to 12 mm (approx. 15/32 inches) continued 17US Notes Use screws that are suitable for the holes on the back of the Sound Bar. 4 mm (3/16 inches) More than 30 mm (1 1/4 inches) Stand 5 mm (7/32 inches) 10 mm (13/32 inches) Hole on the wall. ...
Operating Instructions
Page 18
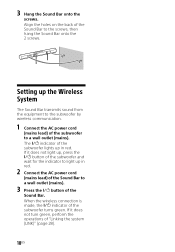
..., the indicator of the subwoofer to light up the Wireless System The Sound Bar transmits sound from the equipment to the screws, then hang the Sound Bar onto the 2 screws. 3 Hang the Sound Bar onto the screws. Setting up in red. Align the holes on the back of the.... If it does not light up in red. 2 Connect the AC power cord (mains lead) of the Sound Bar to a wall outlet (mains). 3 Press the button of the Sound Bar to the subwoofer by wireless communication. 1 Connect the AC power cord (mains lead) of the subwoofer turns ...
..., the indicator of the subwoofer to light up the Wireless System The Sound Bar transmits sound from the equipment to the screws, then hang the Sound Bar onto the 2 screws. 3 Hang the Sound Bar onto the screws. Setting up in red. Align the holes on the back of the.... If it does not light up in red. 2 Connect the AC power cord (mains lead) of the Sound Bar to a wall outlet (mains). 3 Press the button of the Sound Bar to the subwoofer by wireless communication. 1 Connect the AC power cord (mains lead) of the subwoofer turns ...

Operating Instructions
Page 19
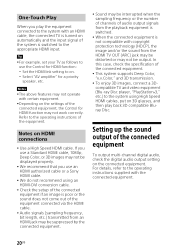
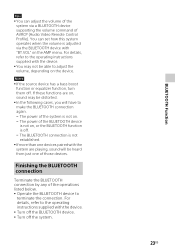
...you turned off the TV, the system is turned on automatically when you turn on the system while you are watching the TV, the TV sound is compatible with the features below. System Audio Control If you turn the volume of the system is compatible with the Control for listening to... output from the TV's speaker. Operations and Features Operations and Features Operating the system using the power button on the front panel display of the Sound Bar. The volume of the TV's speaker down to display the input source on the TV's remote control, the system and the connected equipment ...
...you turned off the TV, the system is turned on automatically when you turn on the system while you are watching the TV, the TV sound is compatible with the features below. System Audio Control If you turn the volume of the system is compatible with the Control for listening to... output from the TV's speaker. Operations and Features Operations and Features Operating the system using the power button on the front panel display of the Sound Bar. The volume of the TV's speaker down to display the input source on the TV's remote control, the system and the connected equipment ...
Operating Instructions
Page 20
.... Audio signals (sampling frequency, bit length, etc.) transmitted from an HDMI jack may be suppressed by the connected equipment. Sound may be interrupted when the sampling frequency or the number of channels of the connected equipment, the Control for HDMI function may not be distorted...HDMI connections Use a High Speed HDMI cable. Tip For example, set your TV as follows to use an HDMI authorized cable or a Sony HDMI cable. We do not recommend using High Speed HDMI cables, put on . Select "AV amplifier" for a priority speaker, etc....
.... Audio signals (sampling frequency, bit length, etc.) transmitted from an HDMI jack may be suppressed by the connected equipment. Sound may be interrupted when the sampling frequency or the number of channels of the connected equipment, the Control for HDMI function may not be distorted...HDMI connections Use a High Speed HDMI cable. Tip For example, set your TV as follows to use an HDMI authorized cable or a Sony HDMI cable. We do not recommend using High Speed HDMI cables, put on . Select "AV amplifier" for a priority speaker, etc....
Operating Instructions
Page 21
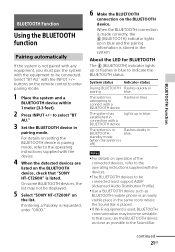
... instructions supplied with the INPUT +/ buttons on the list. The system is in Flashes slowly in pairing blue. In that "SONY HT-CT260H" is listed. BLUETOOTH Function BLUETOOTH Function Using the BLUETOOTH function Pairing automatically If the system is not paired with any equipment, you must...to the Sound Bar. Select "BT AU" with the device. 4 When the detected devices are listed on the BLUETOOTH device, check that case, use the BLUETOOTH device as close as BLUETOOTH mobile phone in an easily visible place in blue to be displayed. 5 Select "SONY HT-CT260H" on ...
... instructions supplied with the INPUT +/ buttons on the list. The system is in Flashes slowly in pairing blue. In that "SONY HT-CT260H" is listed. BLUETOOTH Function BLUETOOTH Function Using the BLUETOOTH function Pairing automatically If the system is not paired with any equipment, you must...to the Sound Bar. Select "BT AU" with the device. 4 When the detected devices are listed on the BLUETOOTH device, check that case, use the BLUETOOTH device as close as BLUETOOTH mobile phone in an easily visible place in blue to be displayed. 5 Select "SONY HT-CT260H" on ...
Operating Instructions
Page 22
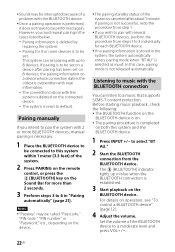
... connected to this system within 1 meter (3.3 feet) of the system. 2 Press PAIRING on the remote control, or press the (BLUETOOTH) key on the Sound Bar for 9 or more than 2 seconds. 3 Perform steps 3 to default. Set the volume of the BLUETOOTH device to a music that supports SCMS-T content... Pairing for more devices is to be performed again. However, you wish to pair with up in "Pairing automatically" (page 21). Sound may be called "Passcode," "PIN code," "PIN number" or "Password," etc., depending on the device. The pairing standby status of the ...
... connected to this system within 1 meter (3.3 feet) of the system. 2 Press PAIRING on the remote control, or press the (BLUETOOTH) key on the Sound Bar for 9 or more than 2 seconds. 3 Perform steps 3 to default. Set the volume of the BLUETOOTH device to a music that supports SCMS-T content... Pairing for more devices is to be performed again. However, you wish to pair with up in "Pairing automatically" (page 21). Sound may be called "Passcode," "PIN code," "PIN number" or "Password," etc., depending on the device. The pairing standby status of the ...
Operating Instructions
Page 23
...of AVRCP (Audio Video Remote Control Profile). You can adjust the volume of the system via the BLUETOOTH device with the system are on, sound may not be heard from just one devices paired with "BT.VOL" on the device. Finishing the BLUETOOTH connection Terminate the BLUETOOTH connection ... supplied with the device. Turn off the BLUETOOTH device. Turn off the system. 23US BLUETOOTH Function If these functions are playing, sound will have to make the BLUETOOTH connection again. The power of the system is not on. The power of the BLUETOOTH device ...
...of AVRCP (Audio Video Remote Control Profile). You can adjust the volume of the system via the BLUETOOTH device with the system are on, sound may not be heard from just one devices paired with "BT.VOL" on the device. Finishing the BLUETOOTH connection Terminate the BLUETOOTH connection ... supplied with the device. Turn off the BLUETOOTH device. Turn off the system. 23US BLUETOOTH Function If these functions are playing, sound will have to make the BLUETOOTH connection again. The power of the system is not on. The power of the BLUETOOTH device ...
Operating Instructions
Page 24
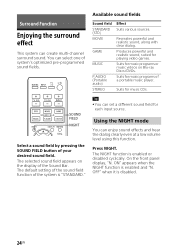
...ray Discs/DVDs. Press NIGHT. On the front panel display, "N. The default setting of the sound field function of the system is enabled or disabled cyclically. Tip You can enjoy sound effects and hear the dialog clearly even at a low volume level using this function. The ...NIGHT function is "STANDARD." Suits for music programs or music videos on the display of the Sound Bar. OFF" when it is enabled and "N. Available sound fields Surround Function Enjoying the surround effect This system can select one of system's optimized pre-programmed...
...ray Discs/DVDs. Press NIGHT. On the front panel display, "N. The default setting of the sound field function of the system is enabled or disabled cyclically. Tip You can enjoy sound effects and hear the dialog clearly even at a low volume level using this function. The ...NIGHT function is "STANDARD." Suits for music programs or music videos on the display of the Sound Bar. OFF" when it is enabled and "N. Available sound fields Surround Function Enjoying the surround effect This system can select one of system's optimized pre-programmed...
Operating Instructions
Page 25
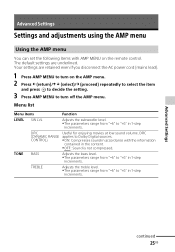
... subwoofer level. The parameters range from "6" to "+6" in the content. OFF: Sound is not compressed. DRC applies to Dolby Digital sources. ON: Compresses sound in accordance with AMP MENU on the AMP menu. 2 Press (return)/ (select... The parameters range from "6" to "+6" in 1-step increments. DRC (DYNAMIC RANGE CONTROL) Useful for enjoying movies at low sound volume. TONE BASS Adjusts the bass level. The parameters range from "6" to "+6" in 1-step increments. Advanced Settings continued 25US...
... subwoofer level. The parameters range from "6" to "+6" in the content. OFF: Sound is not compressed. DRC applies to Dolby Digital sources. ON: Compresses sound in accordance with AMP MENU on the AMP menu. 2 Press (return)/ (select... The parameters range from "6" to "+6" in 1-step increments. DRC (DYNAMIC RANGE CONTROL) Useful for enjoying movies at low sound volume. TONE BASS Adjusts the bass level. The parameters range from "6" to "+6" in 1-step increments. Advanced Settings continued 25US...
Operating Instructions
Page 26
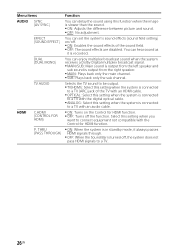
...; MAIN: Plays back only the main channel. SUB: Plays back only the sub channel. You can hear sound as it always passes HDMI signals through. OFF: When the Sound Bar is turned off, the system does not pass HDMI signals to connect equipment not compatible with the Control for... HDMI function. OFF: Turns off . ON: Enables the sound effects of the TV with an HDMI cable. OPTICAL: Select this setting when the system is connected to a TV with the digital optical cable...
...; MAIN: Plays back only the main channel. SUB: Plays back only the sub channel. You can hear sound as it always passes HDMI signals through. OFF: When the Sound Bar is turned off, the system does not pass HDMI signals to connect equipment not compatible with the Control for... HDMI function. OFF: Turns off . ON: Enables the sound effects of the TV with an HDMI cable. OPTICAL: Select this setting when the system is connected to a TV with the digital optical cable...


