
Operating Instructions
Page 1
3-867-863-12 (1) Trinitron® Color Computer Display Operating Instructions US Mode d'emploi FR Manual de instrucciones ES HMD-A100 HMD-A200 © 1999 by Sony Corporation
3-867-863-12 (1) Trinitron® Color Computer Display Operating Instructions US Mode d'emploi FR Manual de instrucciones ES HMD-A100 HMD-A200 © 1999 by Sony Corporation
Operating Instructions
Page 2
...: Address: Telephone No.: SONY HMD-A100, A200 Sony Electronics Inc. 1 Sony Drive, Park Ridge, NJ 07656 USA 201-930-6972 This device complies with the instructions, may cause harmful interference to correct the interference by turning the equipment off and on a circuit different from that any changes or modifications not expressly approved in a particular installation. Record these numbers in a residential...
...: Address: Telephone No.: SONY HMD-A100, A200 Sony Electronics Inc. 1 Sony Drive, Park Ridge, NJ 07656 USA 201-930-6972 This device complies with the instructions, may cause harmful interference to correct the interference by turning the equipment off and on a circuit different from that any changes or modifications not expressly approved in a particular installation. Record these numbers in a residential...
Operating Instructions
Page 3
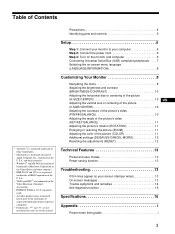
... the Video Electronics Standard Association. • ENERGY STAR is a trademark licensed to your computer 6 Step 2: Connect the power cord 6 Step 3: Turn on the monitor and computer 6 Connecting Universal Serial Bus (USB) compliant peripherals . . . . 7 Selecting the on-screen menu language (LANGUAGE/INFORMATION 8 Customizing Your Monitor 8 Navigating the menu 8 Adjusting the brightness and contrast (BRIGHTNESS/CONTRAST 10 Adjusting the horizontal size or centering of the picture (H-SIZE/CENTER 10 US Adjusting the vertical size or centering of the picture (V-SIZE/CENTER 10 Adjusting...
... the Video Electronics Standard Association. • ENERGY STAR is a trademark licensed to your computer 6 Step 2: Connect the power cord 6 Step 3: Turn on the monitor and computer 6 Connecting Universal Serial Bus (USB) compliant peripherals . . . . 7 Selecting the on-screen menu language (LANGUAGE/INFORMATION 8 Customizing Your Monitor 8 Navigating the menu 8 Adjusting the brightness and contrast (BRIGHTNESS/CONTRAST 10 Adjusting the horizontal size or centering of the picture (H-SIZE/CENTER 10 US Adjusting the vertical size or centering of the picture (V-SIZE/CENTER 10 Adjusting...
Operating Instructions
Page 4
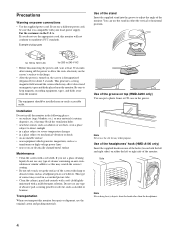
... a soft cloth. Be sure to severe temperature changes • in the following places: • on either the vertical or horizontal position. This type of contact may scratch the screen's coating. • Do not rub, touch, or tap the surface of the monitor. Example of plug types Use of the stand Insert the supplied stand into one of the holes (ten on an...
... a soft cloth. Be sure to severe temperature changes • in the following places: • on either the vertical or horizontal position. This type of contact may scratch the screen's coating. • Do not rub, touch, or tap the surface of the monitor. Example of plug types Use of the stand Insert the supplied stand into one of the holes (ten on an...
Operating Instructions
Page 5
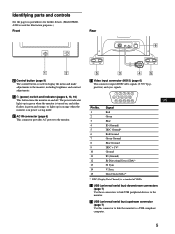
... IN MENU 1 Control button (page 9) The control button is used to display the menu and make adjustments to the monitor, including brightness and contrast adjustments. 2 1 (power) switch and indicator (pages 6, 13, 16) This button turns the monitor on , and either flashes in green and orange, or lights up in power saving mode. 3 AC IN connector (page 6) This connector provides AC power to a USB compliant computer. 5 Sync Data Clock (SCL)* * DDC (Display Data Channel) is a standard of VESA. 5 USB (universal serial bus) downstream connectors (page 7) Use these connectors...
... IN MENU 1 Control button (page 9) The control button is used to display the menu and make adjustments to the monitor, including brightness and contrast adjustments. 2 1 (power) switch and indicator (pages 6, 13, 16) This button turns the monitor on , and either flashes in green and orange, or lights up in power saving mode. 3 AC IN connector (page 6) This connector provides AC power to a USB compliant computer. 5 Sync Data Clock (SCL)* * DDC (Display Data Channel) is a standard of VESA. 5 USB (universal serial bus) downstream connectors (page 7) Use these connectors...
Operating Instructions
Page 6
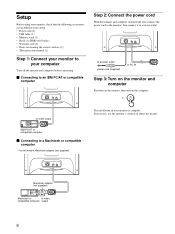
... on cleaning the screen's surface (1) • This instruction manual (1) Step 1: Connect your monitor to video compatible computer output 6 Macintosh adapter (not supplied) Macintosh or to your computer Turn off , first connect the power cord to the monitor, then connect it to a Macintosh or compatible computer You will need a Macintosh adapter (not supplied). Setup Before using your monitor, check that the following accessories are included in your carton: • Power cord (1) • USB cable (1) • Monitor stand (1) • Hook (1) (HMD-A100 only) • Warranty card...
... on cleaning the screen's surface (1) • This instruction manual (1) Step 1: Connect your monitor to video compatible computer output 6 Macintosh adapter (not supplied) Macintosh or to your computer Turn off , first connect the power cord to the monitor, then connect it to a Macintosh or compatible computer You will need a Macintosh adapter (not supplied). Setup Before using your monitor, check that the following accessories are included in your carton: • Power cord (1) • USB cable (1) • Monitor stand (1) • Hook (1) (HMD-A100 only) • Warranty card...
Operating Instructions
Page 7
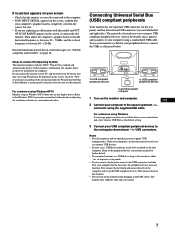
... "Trouble symptoms and remedies" on page 14. No specific driver needs to be displayed on the screen. Click on "Next" several times according to the instructions from the Wizard until the Plug & Play Monitor is either "on" or in power saving mode. • If you connect a keyboard or mouse to the USB connectors and then boot your computer for further details on adjusting the resolution, refresh rate, and number of colors...
... "Trouble symptoms and remedies" on page 14. No specific driver needs to be displayed on the screen. Click on "Next" several times according to the instructions from the Wizard until the Plug & Play Monitor is either "on" or in power saving mode. • If you connect a keyboard or mouse to the USB connectors and then boot your computer for further details on adjusting the resolution, refresh rate, and number of colors...
Operating Instructions
Page 8
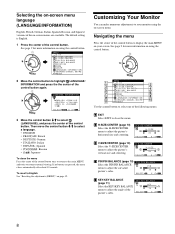
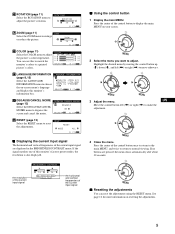
... L OR L ANGUAGE / I NFORMA T I ON DEGAUSS / CANCE L MO I RE RESET 2 Move the control button to adjust the picture's horizontal size and centering. V - S I ZE 26 SE L ECT E IT 3 V-SIZE/CENTER (page 10) Select the V-SIZE/CENTER menu to your screen. To reset to adjust the curvature picture's sides. S I ZE / CENTER V - H - MENU MENU E IT H - Customizing Your Monitor You can make numerous adjustments to adjust the picture's vertical size and centering. KEY / KEY BALANCE KEY 26 SE...
... L OR L ANGUAGE / I NFORMA T I ON DEGAUSS / CANCE L MO I RE RESET 2 Move the control button to adjust the picture's horizontal size and centering. V - S I ZE 26 SE L ECT E IT 3 V-SIZE/CENTER (page 10) Select the V-SIZE/CENTER menu to your screen. To reset to adjust the curvature picture's sides. S I ZE / CENTER V - H - MENU MENU E IT H - Customizing Your Monitor You can make numerous adjustments to adjust the picture's vertical size and centering. KEY / KEY BALANCE KEY 26 SE...
Operating Instructions
Page 9
... RESET (page 12) Select the RESET menu to adjust USER 5000K 6500K 9300K the picture's color temperature. RESET RESET MO D E ALL E IT x Displaying the current input signal The horizontal and vertical frequencies of the control button to choose the on your screen. If the signal matches one of the current input signal x Using the control button 1 Display the main MENU. the resolution of the current input signal BR I GHTNESS / CONTRAST 26 26 68 . 7 kHz / 85 . 0Hz 1024 768 the horizontal and vertical frequencies...
... RESET (page 12) Select the RESET menu to adjust USER 5000K 6500K 9300K the picture's color temperature. RESET RESET MO D E ALL E IT x Displaying the current input signal The horizontal and vertical frequencies of the control button to choose the on your screen. If the signal matches one of the current input signal x Using the control button 1 Display the main MENU. the resolution of the current input signal BR I GHTNESS / CONTRAST 26 26 68 . 7 kHz / 85 . 0Hz 1024 768 the horizontal and vertical frequencies...

Operating Instructions
Page 10
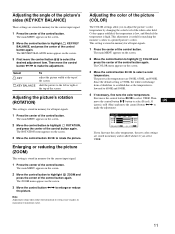
These settings are made using a separate BRIGHTNESS/CONTRAST menu. The BRIGHTNESS/CONTRAST menu appears on the screen. Adjusting the brightness and contrast (BRIGHTNESS/CONTRAST) Brightness and contrast adjustments are stored in memory for all input signals. 1 Move the control button in any direction. BR I GHTNESS / CONTRAST 26 26 68 . 7 kHz / 85 . 0Hz 1024 768 2 Move the control button m/M to adjust the brightness ( ), and
These settings are made using a separate BRIGHTNESS/CONTRAST menu. The BRIGHTNESS/CONTRAST menu appears on the screen. Adjusting the brightness and contrast (BRIGHTNESS/CONTRAST) Brightness and contrast adjustments are stored in memory for all input signals. 1 Move the control button in any direction. BR I GHTNESS / CONTRAST 26 26 68 . 7 kHz / 85 . 0Hz 1024 768 2 Move the control button m/M to adjust the brightness ( ), and
Operating Instructions
Page 11
Then move the control button m/M to highlight KEY/KEY BALANCE, and press the center of the control button. The KEY/KEY BALANCE menu appears on the screen. 2 Move the control button to select the desired adjustment item. Adjusting the angle of the picture's sides (KEY/KEY BALANCE) These settings are stored in memory for the current input signal. 1 Press the center of the control button again. The main MENU appears on the screen. 3 First move the control button
Then move the control button m/M to highlight KEY/KEY BALANCE, and press the center of the control button. The KEY/KEY BALANCE menu appears on the screen. 2 Move the control button to select the desired adjustment item. Adjusting the angle of the picture's sides (KEY/KEY BALANCE) These settings are stored in memory for the current input signal. 1 Press the center of the control button again. The main MENU appears on the screen. 3 First move the control button
Operating Instructions
Page 12
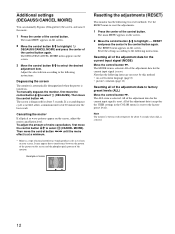
... center of moire cancellation, first move the control button Degaussing the screen The monitor is automatically demagnetized when the power is degaussed for the best result. If a second degauss cycle is needed, allow a minimum interval of the control button. The main MENU appears on . Additional settings (DEGAUSS/CANCEL MOIRE) You can manually degauss (demagnetize) the screen, and cancel the moire. 1 Press the center...
... center of moire cancellation, first move the control button Degaussing the screen The monitor is automatically demagnetized when the power is degaussed for the best result. If a second degauss cycle is needed, allow a minimum interval of the control button. The main MENU appears on . Additional settings (DEGAUSS/CANCEL MOIRE) You can manually degauss (demagnetize) the screen, and cancel the moire. 1 Press the center...

Operating Instructions
Page 13
... appear on your video board manual or the utility program which comes with the input signal, one of the factory preset modes, the digital Multiscan technology of the following messages appears on the screen for any timing in the monitor's frequency range (horizontal: 30 - 70 kHz, vertical: 48 - 120 Hz) . Power saving function This monitor meets the power-saving guidelines set by the monitor's specifications. If the picture is adjusted, the adjustment data is stored...
... appear on your video board manual or the utility program which comes with the input signal, one of the factory preset modes, the digital Multiscan technology of the following messages appears on the screen for any timing in the monitor's frequency range (horizontal: 30 - 70 kHz, vertical: 48 - 120 Hz) . Power saving function This monitor meets the power-saving guidelines set by the monitor's specifications. If the picture is adjusted, the adjustment data is stored...
Operating Instructions
Page 14
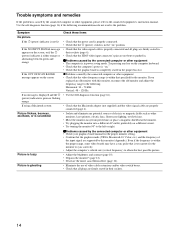
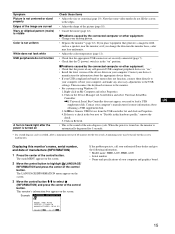
.../or video switch boxes. • Check that the HD15 video input connector's pins are firmly seated in their sockets (page 6). • Check that all plugs are not bent or pushed in. If using a Macintosh system Picture flickers, bounces, oscillates, or is scrambled • Check that the Macintosh adapter (not supplied) and the video signal cable are supported by this monitor, reconnect the old monitor and adjust the frequency range to the connected equipment's instruction manual. xProblems...
.../or video switch boxes. • Check that the HD15 video input connector's pins are firmly seated in their sockets (page 6). • Check that all plugs are not bent or pushed in. If using a Macintosh system Picture flickers, bounces, oscillates, or is scrambled • Check that the Macintosh adapter (not supplied) and the video signal cable are supported by this monitor, reconnect the old monitor and adjust the frequency range to the connected equipment's instruction manual. xProblems...
Operating Instructions
Page 15
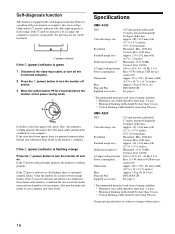
... Universal Serial Bus Controller. ,If Universal Serial Bus Controller does not appear, you change the direction the monitor faces, color may be heard, but this is the sound of your computer. Example LANGUAGE / INFORMAT I AL : 1 2 3 4 5 6 7 8 MANUF ACTURED : 1 9 9 9 - 5 2 SE L ECT E IT If the problem persists, call your authorized Sony dealer and give the following information. • Model name: HMD-A100, HMD-A200 • Serial number • Name and specifications...
... Universal Serial Bus Controller. ,If Universal Serial Bus Controller does not appear, you change the direction the monitor faces, color may be heard, but this is the sound of your computer. Example LANGUAGE / INFORMAT I AL : 1 2 3 4 5 6 7 8 MANUF ACTURED : 1 9 9 9 - 5 2 SE L ECT E IT If the problem persists, call your authorized Sony dealer and give the following information. • Model name: HMD-A100, HMD-A200 • Serial number • Name and specifications...
Operating Instructions
Page 16
.... 3 Move the control button , for 2 seconds before the monitor enters power saving mode. MENU If all three color bars appear (red, green, blue), the monitor is a potential monitor failure. Specifications HMD-A100 CRT Viewable image size Resolution Standard image area Deflection frequency* AC input voltage/current Power consumption Dimensions Mass Plug and Play Supplied accessories 0.25 mm aperture grille pitch 15 inches measured diagonally 90-degree deflection Approx. 285 × 215 mm (w/h) (11 1/4 × 8 1/2 inches) 14.0" viewing image Horizontal: Max. 1280...
.... 3 Move the control button , for 2 seconds before the monitor enters power saving mode. MENU If all three color bars appear (red, green, blue), the monitor is a potential monitor failure. Specifications HMD-A100 CRT Viewable image size Resolution Standard image area Deflection frequency* AC input voltage/current Power consumption Dimensions Mass Plug and Play Supplied accessories 0.25 mm aperture grille pitch 15 inches measured diagonally 90-degree deflection Approx. 285 × 215 mm (w/h) (11 1/4 × 8 1/2 inches) 14.0" viewing image Horizontal: Max. 1280...

Operating Instructions
Page 48
Sony Corporation Printed in Thailand
Sony Corporation Printed in Thailand
Marketing Specifications
Page 1
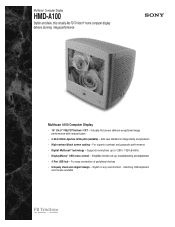
...; OSD menu control - For easy connection of peripheral devices • Uniquely sleek and elegant design - Supports resolutions up , troubleshooting and adjustment • 4 Port USB hub - matching USB keyboard and mouse available Sets new standard in any environment - Stylish in image clarity and precision • High-contrast black screen coating - For superior contrast and grayscale performance • Digital Multiscan® technology - Multiscan® Computer Display HMD-A100 Stylish and sleek, this virtually-flat...
...; OSD menu control - For easy connection of peripheral devices • Uniquely sleek and elegant design - Supports resolutions up , troubleshooting and adjustment • 4 Port USB hub - matching USB keyboard and mouse available Sets new standard in any environment - Stylish in image clarity and precision • High-contrast black screen coating - For superior contrast and grayscale performance • Digital Multiscan® technology - Multiscan® Computer Display HMD-A100 Stylish and sleek, this virtually-flat...
Marketing Specifications
Page 2
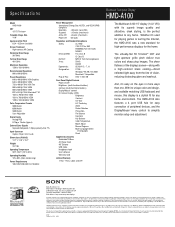
Specifications Model HMD-A100 CRT 15" FD Trinitron® Viewable Image Size 14.0" Aperture Grille Pitch 0.24 - 0.25mm (variable) Screen Treatment High-contrast AR Coating Horizontal Scan Range 30-70kHz Vertical Scan Range 48-120Hz Maximum Resolution 1280 x 1024 @ 60Hz Recommended Resolution 800 x 600 @ 85Hz Preset Resolutions 640 x 480 @ 60Hz VGA Graphics 640 x 480 @ 85Hz VESA 720 x 400 @ 70Hz VGA Text 800 x 600 @ 75Hz VESA 800 x 600 @ 85Hz VESA 832 x 624 @ 75Hz...
Specifications Model HMD-A100 CRT 15" FD Trinitron® Viewable Image Size 14.0" Aperture Grille Pitch 0.24 - 0.25mm (variable) Screen Treatment High-contrast AR Coating Horizontal Scan Range 30-70kHz Vertical Scan Range 48-120Hz Maximum Resolution 1280 x 1024 @ 60Hz Recommended Resolution 800 x 600 @ 85Hz Preset Resolutions 640 x 480 @ 60Hz VGA Graphics 640 x 480 @ 85Hz VESA 720 x 400 @ 70Hz VGA Text 800 x 600 @ 75Hz VESA 800 x 600 @ 85Hz VESA 832 x 624 @ 75Hz...

Warranty Card
Page 2
... pour ordinateurs 1-800-961-7669 Pour le service aux États-Unis : Sony Electronics Inc. Ft. has established a group to supply you with technical support: Sony Technical Support URL: www.sony.com/displays/support EMAIL: [email protected] or write to : Sony of Canada Ltd. Myers, FL 33913 or call: Sony Techinical Support 1-800-357-SONY (7669) For information about other...
... pour ordinateurs 1-800-961-7669 Pour le service aux États-Unis : Sony Electronics Inc. Ft. has established a group to supply you with technical support: Sony Technical Support URL: www.sony.com/displays/support EMAIL: [email protected] or write to : Sony of Canada Ltd. Myers, FL 33913 or call: Sony Techinical Support 1-800-357-SONY (7669) For information about other...


