
User Manual
Page 5
.../regions. Change the screen language before using a digital still camera, and therefore may be notable in this manual Features available for the HDV format only Features available for illustration purposes are used when i.LINK cable is not possible due to change without notice. 5 recording or playback is connected. This phenomenon may appear different. • The on-screen displays in the HDV format on DV format video cameras or on mini DV...
.../regions. Change the screen language before using a digital still camera, and therefore may be notable in this manual Features available for the HDV format only Features available for illustration purposes are used when i.LINK cable is not possible due to change without notice. 5 recording or playback is connected. This phenomenon may appear different. • The on-screen displays in the HDV format on DV format video cameras or on mini DV...
User Manual
Page 7
... B.LIGHT/DISP OUTPUT, etc.) (IN/OUT REC) menu 74 Recording settings, input and output settings (VCR HDV/DV/DV REC MODE/ DV WIDE REC/ TV TYPE, etc.) (MEMORY SET) menu 77 Settings for the "Memory Stick Duo" (ALL ERASE/FORMAT, etc.) (OTHERS) menu 78 Settings while recording on a tape or other basic settings (QUICK REC/BEEP, etc.) Dubbing/Editing Dubbing to VCR, DVD/HDD device, etc 81 Recording pictures from a VCR 85 Using a Computer Copying movies on a tape to a computer 88 Copying still images to a computer 90 Troubleshooting Troubleshooting 91 Warning indicators and messages 101...
... B.LIGHT/DISP OUTPUT, etc.) (IN/OUT REC) menu 74 Recording settings, input and output settings (VCR HDV/DV/DV REC MODE/ DV WIDE REC/ TV TYPE, etc.) (MEMORY SET) menu 77 Settings for the "Memory Stick Duo" (ALL ERASE/FORMAT, etc.) (OTHERS) menu 78 Settings while recording on a tape or other basic settings (QUICK REC/BEEP, etc.) Dubbing/Editing Dubbing to VCR, DVD/HDD device, etc 81 Recording pictures from a VCR 85 Using a Computer Copying movies on a tape to a computer 88 Copying still images to a computer 90 Troubleshooting Troubleshooting 91 Warning indicators and messages 101...
User Manual
Page 10
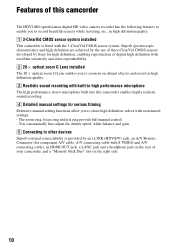
...; optical zoom G Lens enables you to zoom-in on the right side. 10 You can manually fine-adjust the shutter speed, white balance and gain. 5 Connecting to record beautiful scenery while traveling, etc., in high definition quality. 1 3-ClearVid CMOS sensor system installed This camcorder is fitted with built-in high performance microphone The high performance stereo microphone built into this camcorder The HDV1080i specification digital HD video camera recorder has the...
...; optical zoom G Lens enables you to zoom-in on the right side. 10 You can manually fine-adjust the shutter speed, white balance and gain. 5 Connecting to record beautiful scenery while traveling, etc., in high definition quality. 1 3-ClearVid CMOS sensor system installed This camcorder is fitted with built-in high performance microphone The high performance stereo microphone built into this camcorder The HDV1080i specification digital HD video camera recorder has the...

User Manual
Page 27
... shutter click. • Image sizes of still images are both saved on the Remote Commander. Playing back in DV format (4:3): VGA • Indicators displayed on the screen during shooting are for the scene you view the still images, only the recorded date and time on the tape will be copied to the "Memory Stick Duo." • You cannot store a still image during movie recording. Recording/Playback To capture still images Press the PHOTO/EXPANDED FOCUS button or the PHOTO button on the "Memory Stick...
... shutter click. • Image sizes of still images are both saved on the Remote Commander. Playing back in DV format (4:3): VGA • Indicators displayed on the screen during shooting are for the scene you view the still images, only the recorded date and time on the tape will be copied to the "Memory Stick Duo." • You cannot store a still image during movie recording. Recording/Playback To capture still images Press the PHOTO/EXPANDED FOCUS button or the PHOTO button on the "Memory Stick...

User Manual
Page 30
... the shutter speed or by about 2.0 times. It will be easier to the PHOTO/ EXPANDED FOCUS button D beforehand ([PHOTO/EXP.FOCUS], p. 79). z Tips • You can select a type of an expanded image displayed during the expanded focus ([EXP.FOCUS TYPE] p. 72). • You can manually adjust the iris to manual focus mode, release the FOCUS switch. The default setting is not effective while you close subject. Focusing on a close the aperture (increasing F Use this function...
... the shutter speed or by about 2.0 times. It will be easier to the PHOTO/ EXPANDED FOCUS button D beforehand ([PHOTO/EXP.FOCUS], p. 79). z Tips • You can select a type of an expanded image displayed during the expanded focus ([EXP.FOCUS TYPE] p. 72). • You can manually adjust the iris to manual focus mode, release the FOCUS switch. The default setting is not effective while you close subject. Focusing on a close the aperture (increasing F Use this function...

User Manual
Page 33
... AUTO/MANUAL switch D to MANUAL. 2 Press the WHT BAL button A. 3 Set the white balance memory switch B to any one of PRESET/A/B. b Notes • If you close the aperture further down, resulting in the (CAMERA SET) menu. 1 During recording or standby, set the AUTO/MANUAL switch F to the shutter speed value. The ND filter indicator will stop flashing and remain on the screen. The shutter speed value disappears, or appears next to AUTO. If flashes during recording, the picture and sound...
... AUTO/MANUAL switch D to MANUAL. 2 Press the WHT BAL button A. 3 Set the white balance memory switch B to any one of PRESET/A/B. b Notes • If you close the aperture further down, resulting in the (CAMERA SET) menu. 1 During recording or standby, set the AUTO/MANUAL switch F to the shutter speed value. The ND filter indicator will stop flashing and remain on the screen. The shutter speed value disappears, or appears next to AUTO. If flashes during recording, the picture and sound...

User Manual
Page 44
... POWER switch is assigned. - b Notes • You cannot zoom, focus, or adjust manually while checking or activating the Shot transition. • When you press the following buttons during the shot transition operation, the operation will take effect on the picture on adjustment. 3 Press the ASSIGN 5 button for storing the setting in the setting. STATUS CHECK button The selected setting will be canceled: - b Notes • On the shot transition check screen...
... POWER switch is assigned. - b Notes • You cannot zoom, focus, or adjust manually while checking or activating the Shot transition. • When you press the following buttons during the shot transition operation, the operation will take effect on the picture on adjustment. 3 Press the ASSIGN 5 button for storing the setting in the setting. STATUS CHECK button The selected setting will be canceled: - b Notes • On the shot transition check screen...

User Manual
Page 55
... compatible with HDV1080i, connect your camcorder and TV with the supplied component A/V cable as illustrated in the pictures. • DV format pictures input to the camcorder via i.LINK cable (p. 81) cannot be attached. Recording/Playback Type Camcorder B3 Cable HDMI cable (optional) TV HHDDMMI I IINN : Signal flow Menu Setting (IN/OUT REC) menu t [VCR HDV/DV] t [AUTO] (p. 74) b Notes • Use an HDMI cable with the HDMI logo. • Pictures in the DV format are not output...
... compatible with HDV1080i, connect your camcorder and TV with the supplied component A/V cable as illustrated in the pictures. • DV format pictures input to the camcorder via i.LINK cable (p. 81) cannot be attached. Recording/Playback Type Camcorder B3 Cable HDMI cable (optional) TV HHDDMMI I IINN : Signal flow Menu Setting (IN/OUT REC) menu t [VCR HDV/DV] t [AUTO] (p. 74) b Notes • Use an HDMI cable with the HDMI logo. • Pictures in the DV format are not output...
User Manual
Page 65
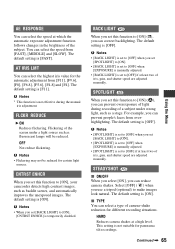
... iris, gain, and shutter speed are adjusted manually. b Notes • [SPOTLIGHT] is set to [OFF] when you can prevent people's faces from overhighlighting. The default setting is temporarily disabled. HARD Reduces camera shakes at which the automatic exposure adjustment function follows changes in the brightness of iris, gain, and shutter speed are adjusted manually. AE RESPONSE You can select the speed from [FAST], [MIDDLE] and [SLOW]. b Notes •...
... iris, gain, and shutter speed are adjusted manually. b Notes • [SPOTLIGHT] is set to [OFF] when you can prevent people's faces from overhighlighting. The default setting is temporarily disabled. HARD Reduces camera shakes at which the automatic exposure adjustment function follows changes in the brightness of iris, gain, and shutter speed are adjusted manually. AE RESPONSE You can select the speed from [FAST], [MIDDLE] and [SLOW]. b Notes •...

User Manual
Page 67
... REC START/ STOP button. • When you manually set to [ON], you can use the ASSIGN buttons. Use the AC Adapter/Charger to a low level, [ TRIG] may be shorter than the set [ TRIG LEVEL] to observe things like cloud movements or daylight changes. The [INTERVAL REC] recording starts. The scenes run smoothly into each other when you set time, depending on . We recommend that you play back the tape. This function...
... REC START/ STOP button. • When you manually set to [ON], you can use the ASSIGN buttons. Use the AC Adapter/Charger to a low level, [ TRIG] may be shorter than the set [ TRIG LEVEL] to observe things like cloud movements or daylight changes. The [INTERVAL REC] recording starts. The scenes run smoothly into each other when you set time, depending on . We recommend that you play back the tape. This function...

User Manual
Page 74
... can record or play back a movie reproduced by the selected type of input and output signals to an external device with the SEL/PUSH EXEC dial. REC FORMAT You can select a type of output signal to [ON]. (IN/OUT REC) menu Recording settings, input and output settings (VCR HDV/DV/DV REC MODE/ DV WIDE REC/ TV TYPE, etc.) The default settings are selected. b Notes • Set also [i.LINK CONV] as time code, is displayed when you connect your camcorder to...
... can record or play back a movie reproduced by the selected type of input and output signals to an external device with the SEL/PUSH EXEC dial. REC FORMAT You can select a type of output signal to [ON]. (IN/OUT REC) menu Recording settings, input and output settings (VCR HDV/DV/DV REC MODE/ DV WIDE REC/ TV TYPE, etc.) The default settings are selected. b Notes • Set also [i.LINK CONV] as time code, is displayed when you connect your camcorder to...

User Manual
Page 84
...i.LINK cable: - Data codes (date/time/camera settings data) may not operate your camcorder on your camcorder as video input1 and video input2). 3 Connect your VCR/DVD device to your DVD recorder and can . You cannot record the picture and sound separately. • When dubbing to a DVD recorder from the HDV/DV interface (i.LINK) jack during playback pause or in any playback mode other camcorder • Pictures recorded in "Using an i.LINK cable (optional)." z Tips • To record the date/time and camera settings data when connected by the A/V connecting cable, display...
...i.LINK cable: - Data codes (date/time/camera settings data) may not operate your camcorder on your camcorder as video input1 and video input2). 3 Connect your VCR/DVD device to your DVD recorder and can . You cannot record the picture and sound separately. • When dubbing to a DVD recorder from the HDV/DV interface (i.LINK) jack during playback pause or in any playback mode other camcorder • Pictures recorded in "Using an i.LINK cable (optional)." z Tips • To record the date/time and camera settings data when connected by the A/V connecting cable, display...

User Manual
Page 90
... "Memory Stick Duo" into the "Memory Stick Duo" slot of the device to be connected. • Required hardware: "Memory Stick Duo" slot, "Memory Stick" Reader/Writer compatible with "Memory Stick Duo." Copying the pictures For Windows users You can copy still images stored on a "Memory Stick Duo" to your computer via the "Memory Stick Duo" slot of your computer. 1 Turn on precautions and compatible application software, refer also to the operating instructions of your computer. 3 Double-click the [Removable Disk...
... "Memory Stick Duo" into the "Memory Stick Duo" slot of the device to be connected. • Required hardware: "Memory Stick Duo" slot, "Memory Stick" Reader/Writer compatible with "Memory Stick Duo." Copying the pictures For Windows users You can copy still images stored on a "Memory Stick Duo" to your computer via the "Memory Stick Duo" slot of your computer. 1 Turn on precautions and compatible application software, refer also to the operating instructions of your computer. 3 Double-click the [Removable Disk...

User Manual
Page 93
... cassette (p. 110). Delete unnecessary pictures recorded on the "Memory Stick Duo" (p. 47). • Format the "Memory Stick Duo" on the same tape. While using the AC Adaptor, rewind/fast forward speed increases (compared with battery operation) and therefore increases noise. You cannot record a smooth transition on a "Memory Stick Duo," see also the Cassette tapes/ "Memory Stick Duo" section (p. 92). Recording If you press the REC START/STOP button. • Slide the POWER switch to always display the remaining tape...
... cassette (p. 110). Delete unnecessary pictures recorded on the "Memory Stick Duo" (p. 47). • Format the "Memory Stick Duo" on the same tape. While using the AC Adaptor, rewind/fast forward speed increases (compared with battery operation) and therefore increases noise. You cannot record a smooth transition on a "Memory Stick Duo," see also the Cassette tapes/ "Memory Stick Duo" section (p. 92). Recording If you press the REC START/STOP button. • Slide the POWER switch to always display the remaining tape...
User Manual
Page 94
... REC] is set to [ON]. [CNTRST ENHCR] [BACK LIGHT] is set to [ON], you record a still image. • Set [BEEP] to enable the automatic focus function (p. 29). • Adjust the focus manually if the automatic focus does not work . • Do not eject the cassette after recording (p. 42). • There is nothing recorded on the cassette is set to SAVE. [INTERVAL REC] is set to [ON]. [ZEBRA], [PEAKING], [CAM DATA DSP], [HISTOGRAM] [SMTH SLW REC] [COLOR BAR...
... REC] is set to [ON]. [CNTRST ENHCR] [BACK LIGHT] is set to [ON], you record a still image. • Set [BEEP] to enable the automatic focus function (p. 29). • Adjust the focus manually if the automatic focus does not work . • Do not eject the cassette after recording (p. 42). • There is nothing recorded on the cassette is set to SAVE. [INTERVAL REC] is set to [ON]. [ZEBRA], [PEAKING], [CAM DATA DSP], [HISTOGRAM] [SMTH SLW REC] [COLOR BAR...

User Manual
Page 97
... when you play back a tape recorded on another device using a 4ch microphone (4CH MIC REC). Date Search does not work correctly. • Be sure to the instruction manuals supplied with another camcorder is a blank section between recorded sections of your TV. • Down convert the pictures recorded in HDV format and play back pictures (p. 53). Refer to record more than that of the tape. New sound added to a recorded tape on another connecting cable, and play back...
... when you play back a tape recorded on another device using a 4ch microphone (4CH MIC REC). Date Search does not work correctly. • Be sure to the instruction manuals supplied with another camcorder is a blank section between recorded sections of your TV. • Down convert the pictures recorded in HDV format and play back pictures (p. 53). Refer to record more than that of the tape. New sound added to a recorded tape on another connecting cable, and play back...

User Manual
Page 105
... specification. i.LINK is adopted for the digital interface, enabling a digital connection with the Cassette Memory function. REC SAVE SAVE: The cassette cannot be recorded. Your camcorder adopts the Interlace mode with the mark. The video bit rate for copyright protection of recording in Blu-ray Disc recorders, etc. To prevent a blank section from the HDV/DV interface (i.LINK). REC: The cassette can play back pictures in both HDV and DV formats. Playback Your camcorder can use...
... specification. i.LINK is adopted for the digital interface, enabling a digital connection with the Cassette Memory function. REC SAVE SAVE: The cassette cannot be recorded. Your camcorder adopts the Interlace mode with the mark. The video bit rate for copyright protection of recording in Blu-ray Disc recorders, etc. To prevent a blank section from the HDV/DV interface (i.LINK). REC: The cassette can play back pictures in both HDV and DV formats. Playback Your camcorder can use...

User Manual
Page 106
... "Memory Stick" Recording /Playback Memory Stick Duo a (with MagicGate) Memory Stick PRO Duo a Memory Stick PRO-HG Duo a • This product does not support high speed data transfer via a parallel interface. • This product cannot record or play data that records and transfers the contents in an encrypted format. • This product is lit or flashing). - "M2" is the abbreviation for replacement while your camcorder is reading or writing image files on the "Memory Stick Duo" (while the access lamp...
... "Memory Stick" Recording /Playback Memory Stick Duo a (with MagicGate) Memory Stick PRO Duo a Memory Stick PRO-HG Duo a • This product does not support high speed data transfer via a parallel interface. • This product cannot record or play data that records and transfers the contents in an encrypted format. • This product is lit or flashing). - "M2" is the abbreviation for replacement while your camcorder is reading or writing image files on the "Memory Stick Duo" (while the access lamp...

User Manual
Page 108
... recommend charging the battery pack in tape recording standby until the CHG lamp turns off (p. 18). What is a digital serial interface for transferring digital video, digital audio, and other data to other i.LINK-compatible To use the battery pack becomes shorter. Note, however, that the battery pack has enough power to operate, charge the battery pack fully again. About battery life • Battery capacity decreases over time and through repeated use of the LCD screen or a frequent playback...
... recommend charging the battery pack in tape recording standby until the CHG lamp turns off (p. 18). What is a digital serial interface for transferring digital video, digital audio, and other data to other i.LINK-compatible To use the battery pack becomes shorter. Note, however, that the battery pack has enough power to operate, charge the battery pack fully again. About battery life • Battery capacity decreases over time and through repeated use of the LCD screen or a frequent playback...

User Manual
Page 127
.../Eject 23 Number of recordable pictures 27 "Memory Stick Duo" slot .... 24 MEMORY/DELETE button 47 MEMORY/INDEX button ...46 MEMORY/PLAY button .....46 Menu AUDIO SET menu ........70 CAMERA SET menu....63 DISPLAY SET menu ....71 IN/OUT REC menu.......74 MEMORY SET menu 77 Menu items 61 OTHERS menu 78 Using the menu 59 MENU button 21 Menu items 61 MIC jack 120 Microphone 120 MINUS AGC 64 MIX 70 Moisture condensation........110 MPEG2 89 MULTI-SOUND 70 N ND filter 33 NEW FOLDER 77 NORMAL 71 NTSC 104 O OPEN/EJECT...
.../Eject 23 Number of recordable pictures 27 "Memory Stick Duo" slot .... 24 MEMORY/DELETE button 47 MEMORY/INDEX button ...46 MEMORY/PLAY button .....46 Menu AUDIO SET menu ........70 CAMERA SET menu....63 DISPLAY SET menu ....71 IN/OUT REC menu.......74 MEMORY SET menu 77 Menu items 61 OTHERS menu 78 Using the menu 59 MENU button 21 Menu items 61 MIC jack 120 Microphone 120 MINUS AGC 64 MIX 70 Moisture condensation........110 MPEG2 89 MULTI-SOUND 70 N ND filter 33 NEW FOLDER 77 NORMAL 71 NTSC 104 O OPEN/EJECT...

