Operating Guide
Page 6
... in fire. Do not handle damaged or leaking lithium ion batteries. Be sure to charge the battery pack using a genuine Sony battery charger or a device that may result. and CANADA RECYCLING LITHIUM-ION BATTERIES Lithium-Ion batteries are recyclable. You can help preserve our environment by... small children. Keep the battery pack dry. Replace only with the same or equivalent type recommended by returning your camcorder is turned off, AC power source (mains) is still supplied to it while connected to the wall outlet (wall socket) via the AC Adaptor. Use ...
... in fire. Do not handle damaged or leaking lithium ion batteries. Be sure to charge the battery pack using a genuine Sony battery charger or a device that may result. and CANADA RECYCLING LITHIUM-ION BATTERIES Lithium-Ion batteries are recyclable. You can help preserve our environment by... small children. Keep the battery pack dry. Replace only with the same or equivalent type recommended by returning your camcorder is turned off, AC power source (mains) is still supplied to it while connected to the wall outlet (wall socket) via the AC Adaptor. Use ...
Operating Guide
Page 8
... can radiate radio frequency energy and, if not installed and used in very loud areas (HDR-PJ600/PJ600V/XR260V). When the camcorder is connected to other devices through a USB connection and the power of the camcorder is turned on a TV, you need a NTSC system-based TV. Television programs, films... to the camcorder when the (Movie)/ (Photo) lamps (p. 27) or the access lamp (p. 25) are used for help. can be determined by turning the equipment off and on, the user is encouraged to try to correct the interference by one or more of the following . However, there is...
... can radiate radio frequency energy and, if not installed and used in very loud areas (HDR-PJ600/PJ600V/XR260V). When the camcorder is connected to other devices through a USB connection and the power of the camcorder is turned on a TV, you need a NTSC system-based TV. Television programs, films... to the camcorder when the (Movie)/ (Photo) lamps (p. 27) or the access lamp (p. 25) are used for help. can be determined by turning the equipment off and on, the user is encouraged to try to correct the interference by one or more of the following . However, there is...
Operating Guide
Page 10
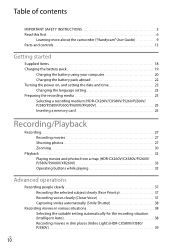
...Supplied Items 18 Charging the battery pack 19 Charging the battery using your computer 20 Charging the battery pack abroad 22 Turning the power on, and setting the date and time 23 Changing the language setting 23 Preparing the recording media 25 Selecting a recording.../Playback Recording 27 Recording movies 27 Shooting photos 27 Zooming 30 Playback 32 Playing movies and photos from a map (HDR-CX260V/CX580V/PJ260V/ PJ580V/PJ600V/XR260V 33 Operating buttons while playing 35 Advanced operations Recording people clearly 37 Recording the selected subject clearly (Face Priority 37 ...
...Supplied Items 18 Charging the battery pack 19 Charging the battery using your computer 20 Charging the battery pack abroad 22 Turning the power on, and setting the date and time 23 Changing the language setting 23 Preparing the recording media 25 Selecting a recording.../Playback Recording 27 Recording movies 27 Shooting photos 27 Zooming 30 Playback 32 Playing movies and photos from a map (HDR-CX260V/CX580V/PJ260V/ PJ580V/PJ600V/XR260V 33 Operating buttons while playing 35 Advanced operations Recording people clearly 37 Recording the selected subject clearly (Face Priority 37 ...
Operating Guide
Page 16
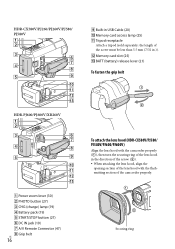
...screw must be less than 5.5 mm (7/32 in.)). Memory card slot (25) BATT (battery) release lever (21) To fasten the grip belt HDR-PJ600/PJ600V/XR260V Power zoom lever (30) PHOTO button (27) CHG (charge) lamp (19) Battery pack (19) START/STOP ... A/V Remote Connector (47) Grip belt US 16 To attach the lens hood (HDR-CX580V/PJ580/ PJ580V/PJ600/PJ600V) Align the lens hood with the camcorder properly (), then turn the securing ring of the lens hood in the direction of the arrow (). When attaching...
...screw must be less than 5.5 mm (7/32 in.)). Memory card slot (25) BATT (battery) release lever (21) To fasten the grip belt HDR-PJ600/PJ600V/XR260V Power zoom lever (30) PHOTO button (27) CHG (charge) lamp (19) Battery pack (19) START/STOP ... A/V Remote Connector (47) Grip belt US 16 To attach the lens hood (HDR-CX580V/PJ580/ PJ580V/PJ600/PJ600V) Align the lens hood with the camcorder properly (), then turn the securing ring of the lens hood in the direction of the arrow (). When attaching...
Operating Guide
Page 17
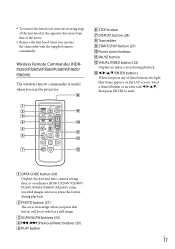
...commander is useful when you press any of the recorded images when you press this button during playback. To remove the lens hood, turn the securing ring of the lens hood in the opposite direction from that of the arrow. Remove the lens hood when you operate the...camcorder with then press ENTER to enter. DATA CODE button (69) Displays the date and time, camera setting data, or coordinates (HDR-CX260V/CX580V/ PJ260V/PJ580V/PJ600V/XR260V) of these buttons, the light blue frame appears on -screen image when you press this button will be recorded as a still image. ...
...commander is useful when you press any of the recorded images when you press this button during playback. To remove the lens hood, turn the securing ring of the lens hood in the opposite direction from that of the arrow. Remove the lens hood when you operate the...camcorder with then press ENTER to enter. DATA CODE button (69) Displays the date and time, camera setting data, or coordinates (HDR-CX260V/CX580V/ PJ260V/PJ580V/PJ600V/XR260V) of these buttons, the light blue frame appears on -screen image when you press this button will be recorded as a still image. ...

Operating Guide
Page 19
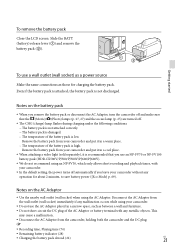
...the AC Adaptor from the DC IN jack of your camcorder. Charging the battery pack 1 Close the LCD screen and attach the battery pack. HDR-PJ600/ PJ600V/XR260V DC IN jack Align the mark on the DC plug with that on the DC IN jack CHG (charge) lamp DC plug &#... "InfoLITHIUM" battery pack other than the V series to your camcorder and the wall outlet (wall socket). The CHG (charge) lamp turns on. The CHG (charge) lamp turns off when the battery pack is fully charged. Getting started Battery pack 2 Connect the AC Adaptor () and the power cord (mains...
...the AC Adaptor from the DC IN jack of your camcorder. Charging the battery pack 1 Close the LCD screen and attach the battery pack. HDR-PJ600/ PJ600V/XR260V DC IN jack Align the mark on the DC plug with that on the DC IN jack CHG (charge) lamp DC plug &#... "InfoLITHIUM" battery pack other than the V series to your camcorder and the wall outlet (wall socket). The CHG (charge) lamp turns on. The CHG (charge) lamp turns off when the battery pack is fully charged. Getting started Battery pack 2 Connect the AC Adaptor () and the power cord (mains...
Operating Guide
Page 20
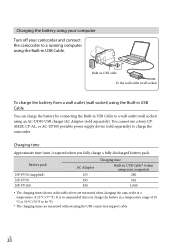
... USB charger/AC Adaptor (sold separately) to charge the camcorder. It is recommended that you fully charge a fully discharged battery pack. You cannot use a Sony CPAH2R, CP-AL, or AC-UP100 portable power supply device (sold separately). Charging time Approximate time (min.) required when you charge the battery in a ...(wall socket) using your camcorder and connect the camcorder to a running computer using the USB connection support cable. Charging the battery using your computer Turn off your computer) 280 545 1,000 The charging times shown in USB Cable. US 20
... USB charger/AC Adaptor (sold separately) to charge the camcorder. It is recommended that you fully charge a fully discharged battery pack. You cannot use a Sony CPAH2R, CP-AL, or AC-UP100 portable power supply device (sold separately). Charging time Approximate time (min.) required when you charge the battery in a ...(wall socket) using your camcorder and connect the camcorder to a running computer using the USB connection support cable. Charging the battery using your computer Turn off your computer) 280 545 1,000 The charging times shown in USB Cable. US 20
Operating Guide
Page 21
... battery pack from your camcorder and put it is recommended that the (Movie)/ (Photo) lamps (p. 27, 27) and the access lamp (p. 25) are turned off. The CHG (charge) lamp flashes during charging under the following conditions: The battery pack is not attached correctly. The ... if any malfunction occurs while using your camcorder without any metallic objects. Getting started To use an NP-FV70 or NP-FV100 battery pack (HDR-CX580V/PJ580/PJ580V/PJ600/PJ600V). We do not recommend using the AC Adaptor. Notes on the AC Adaptor Use the ...
... battery pack from your camcorder and put it is recommended that the (Movie)/ (Photo) lamps (p. 27, 27) and the access lamp (p. 25) are turned off. The CHG (charge) lamp flashes during charging under the following conditions: The battery pack is not attached correctly. The ... if any malfunction occurs while using your camcorder without any metallic objects. Getting started To use an NP-FV70 or NP-FV100 battery pack (HDR-CX580V/PJ580/PJ580V/PJ600/PJ600V). We do not recommend using the AC Adaptor. Notes on the AC Adaptor Use the ...
Operating Guide
Page 23
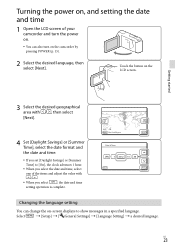
...screen displays to [On], the clock advances 1 hour. When you select the date and time, select one of your camcorder and turn the power on. You can also turn on the LCD screen. Select [Setup] [ General Settings] [Language Setting] a desired language. Touch...the date format and the date and time. If you set [Daylight Savings] or [Summer Time] to show messages in a specified language. Turning the power on, and setting the date and time 1 Open the LCD screen of the items and adjust the value with /. When you...
...screen displays to [On], the clock advances 1 hour. When you select the date and time, select one of your camcorder and turn the power on. You can also turn on the LCD screen. Select [Setup] [ General Settings] [Language Setting] a desired language. Touch...the date format and the date and time. If you set [Daylight Savings] or [Summer Time] to show messages in a specified language. Turning the power on, and setting the date and time 1 Open the LCD screen of the items and adjust the value with /. When you...
Operating Guide
Page 24
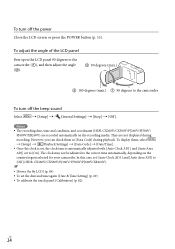
... camcorder. Notes The recording date, time and condition, and coordinates (HDR-CX260V/CX580V/PJ260V/PJ580V/ PJ600V/XR260V) are not displayed during playback. The clock may not be adjusted to [Off] (HDR-CX260V/CX580V/PJ260V/PJ580V/PJ600V/XR260V). [Power On By LCD] (p. 69) To... set [Auto Clock ADJ ] and [Auto Area ADJ] to the correct time automatically, depending on the recording media. To turn off the power Close the LCD...
... camcorder. Notes The recording date, time and condition, and coordinates (HDR-CX260V/CX580V/PJ260V/PJ580V/ PJ600V/XR260V) are not displayed during playback. The clock may not be adjusted to [Off] (HDR-CX260V/CX580V/PJ260V/PJ580V/PJ600V/XR260V). [Power On By LCD] (p. 69) To... set [Auto Clock ADJ ] and [Auto Area ADJ] to the correct time automatically, depending on the recording media. To turn off the power Close the LCD...
Operating Guide
Page 27
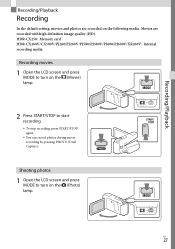
HDR-CX250: Memory card HDR-CX260V/CX580V/PJ260/PJ260V/PJ580/PJ580V/PJ600/PJ600V/XR260V: Internal recording media Recording movies 1 Open the LCD screen and press MODE to turn on the (Movie) lamp. 2 Press START/STOP to turn on the (Photo) lamp. Shooting photos 1 Open the LCD screen and press MODE to start recording. To stop...
HDR-CX250: Memory card HDR-CX260V/CX580V/PJ260/PJ260V/PJ580/PJ580V/PJ600/PJ600V/XR260V: Internal recording media Recording movies 1 Open the LCD screen and press MODE to turn on the (Movie) lamp. 2 Press START/STOP to turn on the (Photo) lamp. Shooting photos 1 Open the LCD screen and press MODE to start recording. To stop...
Operating Guide
Page 28
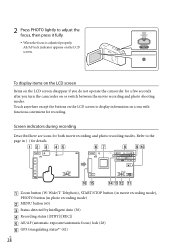
... properly, AE/AF lock indicator appears on the LCD screen. To display items on the LCD screen Items on the LCD screen disappear if you turn the camcorder on or switch between the movie recording and photo shooting modes. 2 Press PHOTO lightly to display information on icons with functions convenient for...
... properly, AE/AF lock indicator appears on the LCD screen. To display items on the LCD screen Items on the LCD screen disappear if you turn the camcorder on or switch between the movie recording and photo shooting modes. 2 Press PHOTO lightly to display information on icons with functions convenient for...
Operating Guide
Page 39
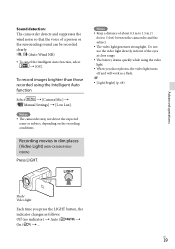
... Off (no indicator) Auto ( ) On ( ) ... Flash/ Video light Each time you shoot photos, the video light turns off and will work as follows. To record images brighter than those recorded using the video light. When you press the LIGHT button, the...expected scene or subject, depending on the recording conditions. US 39 Do not use the video light directly in dim places (Video Light) (HDR-CX580V/PJ580/ PJ580V) Press LIGHT. Advanced operations Sound detection: The camcorder detects and suppresses the wind noise so that the voice of about ...
... Off (no indicator) Auto ( ) On ( ) ... Flash/ Video light Each time you shoot photos, the video light turns off and will work as follows. To record images brighter than those recorded using the video light. When you press the LIGHT button, the...expected scene or subject, depending on the recording conditions. US 39 Do not use the video light directly in dim places (Video Light) (HDR-CX580V/PJ580/ PJ580V) Press LIGHT. Advanced operations Sound detection: The camcorder detects and suppresses the wind noise so that the voice of about ...
Operating Guide
Page 42
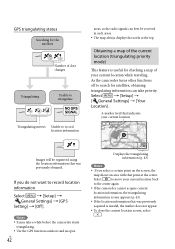
Notes It may take priority. As the camcorder turns other functions off to record location information Select [Setup] [ General Settings] [GPS Setting] [Off ]. If you select a certain point on the ...
Notes It may take priority. As the camcorder turns other functions off to record location information Select [Setup] [ General Settings] [GPS Setting] [Off ]. If you select a certain point on the ...
Operating Guide
Page 43
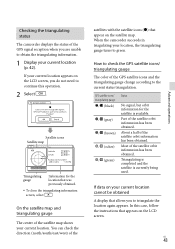
... icons/ triangulating gauge / (black) / (gray) / (brown) / (ocher) / (green) Status No signal, but orbit information for the location that appear on your location, the triangulating gauge turns to the current status triangulation. How to check the GPS satellite icons/ triangulating gauge The color of the GPS satellite icons and the triangulating gauge...
... icons/ triangulating gauge / (black) / (gray) / (brown) / (ocher) / (green) Status No signal, but orbit information for the location that appear on your location, the triangulating gauge turns to the current status triangulation. How to check the GPS satellite icons/ triangulating gauge The color of the GPS satellite icons and the triangulating gauge...
Operating Guide
Page 49
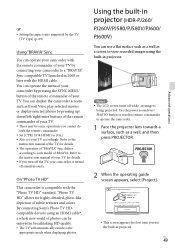
..."BRAVIA" Sync differs according to each model of your TV by connecting your camcorder is turned off simultaneously. By connecting Sony's Photo TV HDcompatible devices using the built-in projector. Notes The LCD screen turns off the TV, your camcorder to a "BRAVIA" Sync compatible TV launched in breathtaking.... You can use the built-in projector. On "Photo TV HD" This camcorder is being projected. Using the built-in projector (HDR-PJ260/ PJ260V/PJ580/PJ580V/PJ600/ PJ600V) You can operate the menu of your camcorder by pressing up/ down/left/right/enter buttons ...
..."BRAVIA" Sync differs according to each model of your TV by connecting your camcorder is turned off simultaneously. By connecting Sony's Photo TV HDcompatible devices using the built-in projector. Notes The LCD screen turns off the TV, your camcorder to a "BRAVIA" Sync compatible TV launched in breathtaking.... You can use the built-in projector. On "Photo TV HD" This camcorder is being projected. Using the built-in projector (HDR-PJ260/ PJ260V/PJ580/PJ580V/PJ600/ PJ600V) You can operate the menu of your camcorder by pressing up/ down/left/right/enter buttons ...
Operating Guide
Page 50
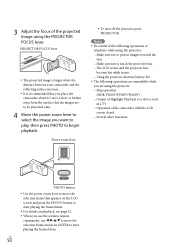
US 50 3 Adjust the focus of the projected image using the projector. Map operation (HDR-PJ260V/PJ580V/PJ600V) Output of Highlight Playback to a device such as a TV Operation of the following operations or situations while using the projector. &#... functions PHOTO button Use the power zoom lever to move the selection frame and press ENTER to begin playback. Power zoom lever To turn off the projector, press PROJECTOR.
US 50 3 Adjust the focus of the projected image using the projector. Map operation (HDR-PJ260V/PJ580V/PJ600V) Output of Highlight Playback to a device such as a TV Operation of the following operations or situations while using the projector. &#... functions PHOTO button Use the power zoom lever to move the selection frame and press ENTER to begin playback. Power zoom lever To turn off the projector, press PROJECTOR.
Operating Guide
Page 54
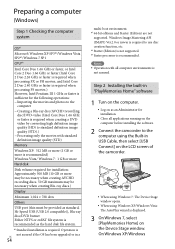
... or more Hard disk Disk volume required for installation. Close all computer environments is not assured. Step 2 Installing the built-in "PlayMemories Home" software 1 Turn on the computer. Log on the Device Stage window. Preparing a computer (Windows) Step 1 Checking the computer system OS*1 Microsoft Windows XP SP3*2/Windows Vista...
... or more Hard disk Disk volume required for installation. Close all computer environments is not assured. Step 2 Installing the built-in "PlayMemories Home" software 1 Turn on the computer. Log on the Device Stage window. Preparing a computer (Windows) Step 1 Checking the computer system OS*1 Microsoft Windows XP SP3*2/Windows Vista...
Operating Guide
Page 61
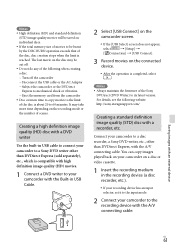
...sold separately), etc., which is compatible with high definition image quality (HD) movies. 1 Connect a DVD writer to your camcorder to a Sony DVD writer other than DVDirect Express, with the Built-in USB cable to connect your camcorder with the A/V connecting cable. Creating a high ...is completed, select . For details, see the following when creating a disc. Turn off . Do not do any of the following website. Saving images with a recorder, etc. http://sony.storagesupport.com/ Creating a standard definition image quality (STD) disc with an external device US...
...sold separately), etc., which is compatible with high definition image quality (HD) movies. 1 Connect a DVD writer to your camcorder to a Sony DVD writer other than DVDirect Express, with the Built-in USB cable to connect your camcorder with the A/V connecting cable. Creating a high ...is completed, select . For details, see the following when creating a disc. Turn off . Do not do any of the following website. Saving images with a recorder, etc. http://sony.storagesupport.com/ Creating a standard definition image quality (STD) disc with an external device US...
Operating Guide
Page 69
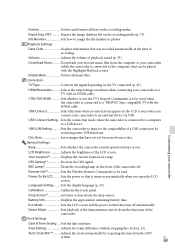
... Activates or deactivates the drop sensor. US 69 File Number Sets how to assign the file number to the computer) that they turn off . Power On By LCD........... Battery Info Displays the approximate remaining battery time. Demo Mode Sets playback of the demonstration movie ...TV Type Converts the signal depending on the front of a USB connection by restricting some USB functions. USB Connect Setting.... REC Lamp*1 Turns the recording lamp on the TV connected (p. 47). Remote Ctrl*6 Sets the Wireless Remote Commander to a TV with the Highlight Playback ...
... Activates or deactivates the drop sensor. US 69 File Number Sets how to assign the file number to the computer) that they turn off . Power On By LCD........... Battery Info Displays the approximate remaining battery time. Demo Mode Sets playback of the demonstration movie ...TV Type Converts the signal depending on the front of a USB connection by restricting some USB functions. USB Connect Setting.... REC Lamp*1 Turns the recording lamp on the TV connected (p. 47). Remote Ctrl*6 Sets the Wireless Remote Commander to a TV with the Highlight Playback ...


