Operating Guide
Page 1
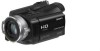
Digital HD Video Camera Recorder Operating Guide HDR-SR5/SR7/SR8 3-210-378-11(1) For details on the advanced operations, please refer to "Handycam Handbook" (PDF). © 2007 Sony Corporation
Digital HD Video Camera Recorder Operating Guide HDR-SR5/SR7/SR8 3-210-378-11(1) For details on the advanced operations, please refer to "Handycam Handbook" (PDF). © 2007 Sony Corporation
Operating Guide
Page 5
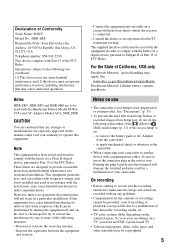
...Handycam Station Model DCRAC181 and AC Adaptor Model AC-L200/L200B. CAUTION You are recorded without any problems. • Compensation for help. If this equipment. Connect the equipment into the terminal will not occur in accordance with Part 15 of the following measures: - See "Precautions" (p. 35). • To prevent the hard disk... from being broken or recorded images from being lost, do not do the following two conditions: (1) This device may result in this manual could void your camcorder...receiving antenna. - Notes HDR-SR5, HDR-SR7 and HDR-SR8 are designed to ...
...Handycam Station Model DCRAC181 and AC Adaptor Model AC-L200/L200B. CAUTION You are recorded without any problems. • Compensation for help. If this equipment. Connect the equipment into the terminal will not occur in accordance with Part 15 of the following measures: - See "Precautions" (p. 35). • To prevent the hard disk... from being broken or recorded images from being lost, do not do the following two conditions: (1) This device may result in this manual could void your camcorder...receiving antenna. - Notes HDR-SR5, HDR-SR7 and HDR-SR8 are designed to ...
Operating Guide
Page 6
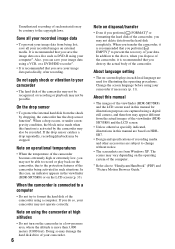
...so may damage the hard disk drive of your camcorder may not operate correctly. Note on operational temperatures • When the temperature of the camcorder becomes extremely high or extremely low, you save your image data using the camcorder at high altitudes • Do not turn on the camcorder, due to "Handycam Handbook" (PDF)... prevent your image data from Windows XP. It is recommended that you may not be able to record or play back on the camcorder in the viewfinder (HDR-SR7/SR8) or on using a VCR, or a DVD/HDD recorder*. • It is more than 3,000 meters (9,800 feet...
...so may damage the hard disk drive of your camcorder may not operate correctly. Note on operational temperatures • When the temperature of the camcorder becomes extremely high or extremely low, you save your image data using the camcorder at high altitudes • Do not turn on the camcorder, due to "Handycam Handbook" (PDF)... prevent your image data from Windows XP. It is recommended that you may not be able to record or play back on the camcorder in the viewfinder (HDR-SR7/SR8) or on using a VCR, or a DVD/HDD recorder*. • It is more than 3,000 meters (9,800 feet...
Operating Guide
Page 7
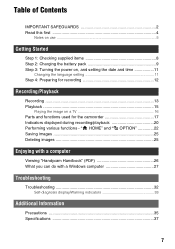
" HOME" and " OPTION 22 Saving images 25 Deleting images 25 Enjoying with a computer Viewing "Handycam Handbook" (PDF 26 What you can do with a Windows computer 27 Troubleshooting Troubleshooting 32 Self-diagnosis display/Warning indicators 33 Additional Information Precautions 35 Specifications ... setting 11 Step 4: Preparing for recording 12 Recording/Playback Recording 13 Playback 15 Playing the image on a TV 16 Parts and functions used for the camcorder 17 Indicators displayed during recording/playback 20 Performing various functions -
" HOME" and " OPTION 22 Saving images 25 Deleting images 25 Enjoying with a computer Viewing "Handycam Handbook" (PDF 26 What you can do with a Windows computer 27 Troubleshooting Troubleshooting 32 Self-diagnosis display/Warning indicators 33 Additional Information Precautions 35 Specifications ... setting 11 Step 4: Preparing for recording 12 Recording/Playback Recording 13 Playback 15 Playing the image on a TV 16 Parts and functions used for the camcorder 17 Indicators displayed during recording/playback 20 Performing various functions -

Operating Guide
Page 8
... 30) CD-ROM "Handycam Application Software" (1) (p. 26) - Picture Motion Browser Guide - Getting Started Step 1: Checking supplied items Make sure that item supplied. The number in the parentheses indicates the number of that you have the following items supplied with your camcorder. Picture Motion Browser (...Software) - AC Adaptor (1) (p. 9) Wireless Remote Commander (1) A button-type lithium battery is already installed. Handycam Handbook (PDF) "Operating Guide" (This manual) (1) 8
... 30) CD-ROM "Handycam Application Software" (1) (p. 26) - Picture Motion Browser Guide - Getting Started Step 1: Checking supplied items Make sure that item supplied. The number in the parentheses indicates the number of that you have the following items supplied with your camcorder. Picture Motion Browser (...Software) - AC Adaptor (1) (p. 9) Wireless Remote Commander (1) A button-type lithium battery is already installed. Handycam Handbook (PDF) "Operating Guide" (This manual) (1) 8
Operating Guide
Page 9
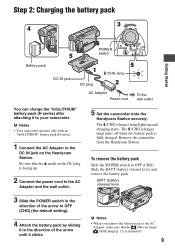
...mark on the DC plug is fully charged. b Notes • Your camcorder operates only with an "InfoLITHIUM" battery pack (H series). 1 Connect the AC Adaptor to the AC Adaptor and the wall outlet. 5 Set the camcorder onto the Handycam Station securely. Be sure that the (Movie) lamp/ (Still) lamp ...off when the battery pack is facing up and charging starts. Remove the camcorder from the Handycam Station. The /CHG (charge) lamp turns off . 9 To remove the battery pack Slide the POWER switch to your camcorder. BATT (battery release) lever 3 Slide the POWER switch in the direction...
...mark on the DC plug is fully charged. b Notes • Your camcorder operates only with an "InfoLITHIUM" battery pack (H series). 1 Connect the AC Adaptor to the AC Adaptor and the wall outlet. 5 Set the camcorder onto the Handycam Station securely. Be sure that the (Movie) lamp/ (Still) lamp ...off when the battery pack is facing up and charging starts. Remove the camcorder from the Handycam Station. The /CHG (charge) lamp turns off . 9 To remove the battery pack Slide the POWER switch to your camcorder. BATT (battery release) lever 3 Slide the POWER switch in the direction...
Operating Guide
Page 10
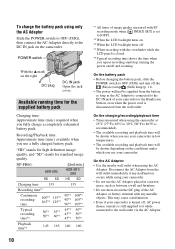
...battery pack. "HD" stands for high definition image quality, and "SD" stands for the supplied battery pack Charging time: Approximate time (min.) required when you use your camcorder is turned off, AC power (... power will not be shorter when you use a fully charged battery pack. NP-FH60: HDR-SR5 HD SD (Unit:min.) HDR-SR7/ SR8 HD SD Charging time 135 Recording time*1 Continuous recording time 100*2 115*2 105*3...On the AC Adaptor • Use the nearby wall outlet when using your camcorder or the Handycam Station, even when the power cord is closed. *5 Typical recording time ...
...battery pack. "HD" stands for high definition image quality, and "SD" stands for the supplied battery pack Charging time: Approximate time (min.) required when you use your camcorder is turned off, AC power (... power will not be shorter when you use a fully charged battery pack. NP-FH60: HDR-SR5 HD SD (Unit:min.) HDR-SR7/ SR8 HD SD Charging time 135 Recording time*1 Continuous recording time 100*2 115*2 105*3...On the AC Adaptor • Use the nearby wall outlet when using your camcorder or the Handycam Station, even when the power cord is closed. *5 Typical recording time ...
Operating Guide
Page 13
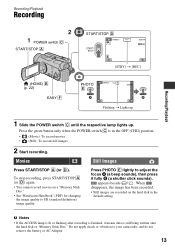
...Handycam Handbook" (PDF) for changing the image quality to your camcorder, and do not remove the battery or AC Adaptor. 13 Do not apply shock or vibration to SD (standard definition) image quality. Press the green button only when the POWER switch C is still being written onto the hard disk..., it fully B (a shutter click sounds). To stop recording, press START/STOP A (or D) again. • You cannot record movies on the hard disk in the OFF (CHG) position. • (Movie): To record movies • (Still): To record still images 2 Start recording. Movies Still Images...
...Handycam Handbook" (PDF) for changing the image quality to your camcorder, and do not remove the battery or AC Adaptor. 13 Do not apply shock or vibration to SD (standard definition) image quality. Press the green button only when the POWER switch C is still being written onto the hard disk..., it fully B (a shutter click sounds). To stop recording, press START/STOP A (or D) again. • You cannot record movies on the hard disk in the OFF (CHG) position. • (Movie): To record movies • (Still): To record still images 2 Start recording. Movies Still Images...
Operating Guide
Page 14
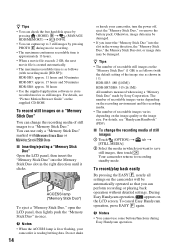
... For details, see "Handycam Handbook" (PDF). HDR-SR5: approx. 11 hours and 50 minutes HDR-SR7: approx. 17 hours and 50 minutes HDR-SR8: approx. 30 hours • Use the supplied application software to recording standby mode. z Tips • You can check the free hard disk space by pressing (HOME)... HDR-SR5: 480 ([4.0M]) HDR-SR7/SR8: 315 ([6.1M]) All numbers measured when using a "Memory Stick Duo" made by Sony Corporation. Your camcorder returns to store recorded movies as follows (with the default setting of still images to 3 still images by pressing PHOTO E during Easy Handycam...
... For details, see "Handycam Handbook" (PDF). HDR-SR5: approx. 11 hours and 50 minutes HDR-SR7: approx. 17 hours and 50 minutes HDR-SR8: approx. 30 hours • Use the supplied application software to recording standby mode. z Tips • You can check the free hard disk space by pressing (HOME)... HDR-SR5: 480 ([4.0M]) HDR-SR7/SR8: 315 ([6.1M]) All numbers measured when using a "Memory Stick Duo" made by Sony Corporation. Your camcorder returns to store recorded movies as follows (with the default setting of still images to 3 still images by pressing PHOTO E during Easy Handycam...
Operating Guide
Page 15
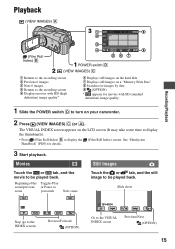
...you touch Next scene Touch the or tab, and the still image to be played back. See "Handycam Handbook" (PDF) for movies with SD (standard definition) image quality. 1 Slide the POWER switch D to the VISUAL INDEX screen Previous/Next (OPTION)...camcorder. 2 Press (VIEW IMAGES) C (or A). Playback (VIEW IMAGES) A Recording/Playback (Film Roll Index) B POWER switch D (VIEW IMAGES) C 1 Returns to the recording screen 2 Previous 6 images 3 Next 6 images 4 Returns to the recording screen 5 Displays movies with HD (high definition) image quality* 6 Displays still images on the hard disk...
...you touch Next scene Touch the or tab, and the still image to be played back. See "Handycam Handbook" (PDF) for movies with SD (standard definition) image quality. 1 Slide the POWER switch D to the VISUAL INDEX screen Previous/Next (OPTION)...camcorder. 2 Press (VIEW IMAGES) C (or A). Playback (VIEW IMAGES) A Recording/Playback (Film Roll Index) B POWER switch D (VIEW IMAGES) C 1 Returns to the recording screen 2 Previous 6 images 3 Next 6 images 4 Returns to the recording screen 5 Displays movies with HD (high definition) image quality* 6 Displays still images on the hard disk...
Operating Guide
Page 16
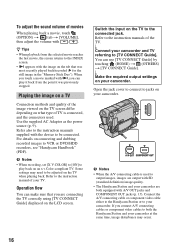
... connectors used to output images, images are output with i, you touch a movie marked with SD (standard definition) image quality. • The Handycam Station and your camcorder are connecting the TV correctly using [TV CONNECT Guide] displayed on your camcorder. Use the supplied AC Adaptor as the power source (p. 9). Switch the input on an x.v.Color...
... connectors used to output images, images are output with i, you touch a movie marked with SD (standard definition) image quality. • The Handycam Station and your camcorder are connecting the TV correctly using [TV CONNECT Guide] displayed on your camcorder. Use the supplied AC Adaptor as the power source (p. 9). Switch the input on an x.v.Color...
Operating Guide
Page 17
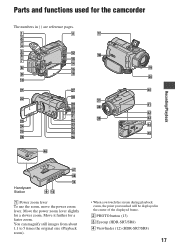
Move the power zoom lever slightly for a faster zoom. Move it further for a slower zoom. You can magnify still images from about 1.1 to 5 times the original size (Playback zoom). • When you touch the screen during playback zoom, the point you touched will be displayed in ( ) are reference pages. Recording/Playback Handycam Station 1 Power zoom lever To use the zoom, move the power zoom lever. Parts and functions used for the camcorder The numbers in the center of the displayed frame. 2 PHOTO button (13) 3 Eyecup (HDR-SR7/SR8) 4 Viewfinder (12) (HDR-SR7/SR8) 17
Move the power zoom lever slightly for a faster zoom. Move it further for a slower zoom. You can magnify still images from about 1.1 to 5 times the original size (Playback zoom). • When you touch the screen during playback zoom, the point you touched will be displayed in ( ) are reference pages. Recording/Playback Handycam Station 1 Power zoom lever To use the zoom, move the power zoom lever. Parts and functions used for the camcorder The numbers in the center of the displayed frame. 2 PHOTO button (13) 3 Eyecup (HDR-SR7/SR8) 4 Viewfinder (12) (HDR-SR7/SR8) 17
Operating Guide
Page 22
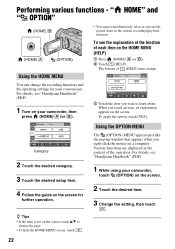
...pop-up window that appears when you want to change the recording functions and the operating settings for further operation. For details, see "Handycam Handbook" (PDF). 1 Turn on your camcorder, touch (OPTION) on the HOME MENU (HELP) 1 Press (HOME) A (or B). 2 Touch (HELP). The bottom of ... . 22 Performing various functions - When you touch an item, its explanation appears on the screen for your convenience. To see "Handycam Handbook" (PDF). 1 While using your camcorder, then press (HOME) A (or B). 3 Touch the item you right-click the mouse on the screen, touch v/V to ...
...pop-up window that appears when you want to change the recording functions and the operating settings for further operation. For details, see "Handycam Handbook" (PDF). 1 Turn on your camcorder, touch (OPTION) on the HOME MENU (HELP) 1 Press (HOME) A (or B). 2 Touch (HELP). The bottom of ... . 22 Performing various functions - When you touch an item, its explanation appears on the screen for your convenience. To see "Handycam Handbook" (PDF). 1 While using your camcorder, then press (HOME) A (or B). 3 Touch the item you right-click the mouse on the screen, touch v/V to ...
Operating Guide
Page 23
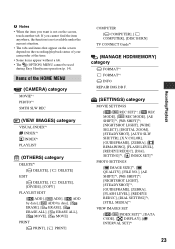
Items of your camcorder at the time. • Some items appear without a tab. • The (OPTION) MENU cannot be used during Easy Handycam operation (p. 14). b Notes • When the item you cannot find the item anywhere, the function is not on the recording/playback status of the HOME ...
Items of your camcorder at the time. • Some items appear without a tab. • The (OPTION) MENU cannot be used during Easy Handycam operation (p. 14). b Notes • When the item you cannot find the item anywhere, the function is not on the recording/playback status of the HOME ...
Operating Guide
Page 24
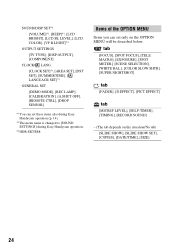
... MODE], [REC LAMP], [CALIBRATION], [A.SHUT OFF], [REMOTE CTRL], [DROP SENSOR] *1 You can set these items also during Easy Handycam operation (p. 14). *2 The menu name is changed to [SOUND SETTINGS] during Easy Handycam operation. *3 HDR-SR7/SR8 Items of the OPTION MENU Items you can set only on the situation/No tab) [SLIDE SHOW], [SLIDE...
... MODE], [REC LAMP], [CALIBRATION], [A.SHUT OFF], [REMOTE CTRL], [DROP SENSOR] *1 You can set these items also during Easy Handycam operation (p. 14). *2 The menu name is changed to [SOUND SETTINGS] during Easy Handycam operation. *3 HDR-SR7/SR8 Items of the OPTION MENU Items you can set only on the situation/No tab) [SLIDE SHOW], [SLIDE...
Operating Guide
Page 25
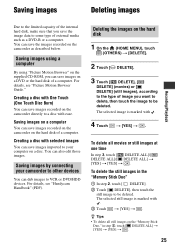
...hard disk of a computer. Deleting the images on the hard disk 1 On the (HOME MENU), touch (OTHERS) t [DELETE]. 2 Touch [ DELETE]. 3 Touch [ DELETE], [ DELETE] (movies) or [ DELETE] (still images), according to the type of image you want to delete, then touch the image to be deleted. For details, see "Handycam... of external media such as described below. Creating a disc with One Touch (One Touch Disc Burn) You can save images recorded on the camcorder on the hard disk of a computer. The selected image is marked with . 4 Touch t [YES] t . To delete the still images in step 2, ...
...hard disk of a computer. Deleting the images on the hard disk 1 On the (HOME MENU), touch (OTHERS) t [DELETE]. 2 Touch [ DELETE]. 3 Touch [ DELETE], [ DELETE] (movies) or [ DELETE] (still images), according to the type of image you want to delete, then touch the image to be deleted. For details, see "Handycam... of external media such as described below. Creating a disc with One Touch (One Touch Disc Burn) You can save images recorded on the camcorder on the hard disk of a computer. The selected image is marked with . 4 Touch t [YES] t . To delete the still images in step 2, ...
Operating Guide
Page 26
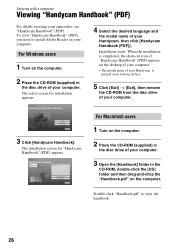
...install Adobe Reader on your camcorder, see "Handycam Handbook" (PDF). For Windows users 1 Turn on the computer. 2 Place the CD-ROM (supplied) in the disc drive of your computer. 3 Open the [Handbook] folder in the disc drive of your computer. The select screen for "Handycam Handbook" (PDF) appears. ... on the desktop of your computer. • The model name of your Handycam is printed on its bottom surface. 5 Click [Exit] t [Exit], then remove the CD-ROM from the disc drive of your Handycam, then click [Handycam Handbook (PDF)]. For Macintosh users 1 Turn on the computer. 2 Place the...
...install Adobe Reader on your camcorder, see "Handycam Handbook" (PDF). For Windows users 1 Turn on the computer. 2 Place the CD-ROM (supplied) in the disc drive of your computer. 3 Open the [Handbook] folder in the disc drive of your computer. The select screen for "Handycam Handbook" (PDF) appears. ... on the desktop of your computer. • The model name of your Handycam is printed on its bottom surface. 5 Click [Exit] t [Exit], then remove the CD-ROM from the disc drive of your Handycam, then click [Handycam Handbook (PDF)]. For Macintosh users 1 Turn on the computer. 2 Place the...
Operating Guide
Page 27
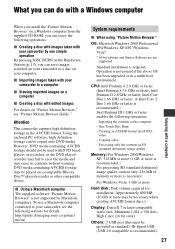
...definition) image quality content only, 256 MB of memory or more is not assured if the above OS has been upgraded or in the AVCHD format. For Windows Vista: 1 GB or more Hard disk: Disk volume required for details. However, DVD media containing AVCHD....sony....camcorder captures high definition footage in a multi-boot environment. DVD media containing AVCHD footage may be copied onto DVD media. Copying a disc - x Creating a disc with images taken with your camcorder by Macintosh computers. Using the enclosed PC software, high definition footage can be played on your camcorder...
...definition) image quality content only, 256 MB of memory or more is not assured if the above OS has been upgraded or in the AVCHD format. For Windows Vista: 1 GB or more Hard disk: Disk volume required for details. However, DVD media containing AVCHD....sony....camcorder captures high definition footage in a multi-boot environment. DVD media containing AVCHD footage may be copied onto DVD media. Copying a disc - x Creating a disc with images taken with your camcorder by Macintosh computers. Using the enclosed PC software, high definition footage can be played on your camcorder...
Operating Guide
Page 28
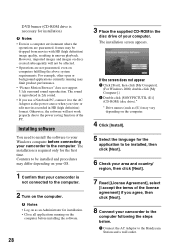
... accept the terms of the license agreement] if you agree, then click [Next]. 8 Connect your camcorder to the computer following the steps below. 1 Connect the AC Adaptor to the Handycam Station and a wall outlet. However, imported images and images on discs created subsequently will not work ... your camcorder is required only for the first time. Contents to the computer. 2 Turn on the computer. The installation screen appears. The installation is not connected to be dropped from movies with HD (high definition) image quality, resulting in uneven playback. DVD burner (CD-ROM drive is...
... accept the terms of the license agreement] if you agree, then click [Next]. 8 Connect your camcorder to the computer following the steps below. 1 Connect the AC Adaptor to the Handycam Station and a wall outlet. However, imported images and images on discs created subsequently will not work ... your camcorder is required only for the first time. Contents to the computer. 2 Turn on the computer. The installation screen appears. The installation is not connected to be dropped from movies with HD (high definition) image quality, resulting in uneven playback. DVD burner (CD-ROM drive is...

Operating Guide
Page 29
... of the following installation screens appears, depending on the computer environment. Check the screen and follow the instructions displayed to create an AVCHD disc - Microsoft .NET Framework 1.1* Software required to install the required software. - Click [NO], and continue installing the software....12Remove the CD-ROM from the disc drive of your camcorder. 9 Click [Next] on the connection confirmation screen of the computer. 10Follow the on-screen instructions to install the software. Enjoying with a computer 2 Set the camcorder onto the Handycam Station, then slide the POWER switch to...
... of the following installation screens appears, depending on the computer environment. Check the screen and follow the instructions displayed to create an AVCHD disc - Microsoft .NET Framework 1.1* Software required to install the required software. - Click [NO], and continue installing the software....12Remove the CD-ROM from the disc drive of your camcorder. 9 Click [Next] on the connection confirmation screen of the computer. 10Follow the on-screen instructions to install the software. Enjoying with a computer 2 Set the camcorder onto the Handycam Station, then slide the POWER switch to...


