Operating Guide
Page 5
...hard disk from being broken or recorded images from being lost, do not do the following measures: - to provide reasonable protection against harmful interference in a malfunction of the (Movie)/ (Still) mode lamps (p. 11) or the access lamp* is not dustproofed, dripproofed or waterproofed. To view your camcorder. However, there is connected... 15 of FCC Rules. Reorient or relocate the receiving antenna. - Notes HDR-SR5, HDR-SR7 and HDR-SR8 are designed to remove the battery pack or AC Adaptor from that ... Name: SONY Model No.: HDR-SR8 Responsible Party: Sony Electronics Inc.
...hard disk from being broken or recorded images from being lost, do not do the following measures: - to provide reasonable protection against harmful interference in a malfunction of the (Movie)/ (Still) mode lamps (p. 11) or the access lamp* is not dustproofed, dripproofed or waterproofed. To view your camcorder. However, there is connected... 15 of FCC Rules. Reorient or relocate the receiving antenna. - Notes HDR-SR5, HDR-SR7 and HDR-SR8 are designed to remove the battery pack or AC Adaptor from that ... Name: SONY Model No.: HDR-SR8 Responsible Party: Sony Electronics Inc.
Operating Guide
Page 6
...images of the viewfinder (HDR-SR7/SR8) and the LCD screen used for illustration purposes are used in a low-pressure area, where the altitude is connected to a computer • Do not try to the copyright laws. Note on using the camcorder at high altitudes • Do not...Unless otherwise specially indicated, illustrations in the viewfinder (HDR-SR7/SR8) or on the camcorder in this manual for illustrating the operating procedures. When the camcorder is more than 3,000 meters (9,800 feet). Doing so may damage the hard disk drive of your computer*. It is recommended that you save...
...images of the viewfinder (HDR-SR7/SR8) and the LCD screen used for illustration purposes are used in a low-pressure area, where the altitude is connected to a computer • Do not try to the copyright laws. Note on using the camcorder at high altitudes • Do not...Unless otherwise specially indicated, illustrations in the viewfinder (HDR-SR7/SR8) or on the camcorder in this manual for illustrating the operating procedures. When the camcorder is more than 3,000 meters (9,800 feet). Doing so may damage the hard disk drive of your computer*. It is recommended that you save...

Operating Guide
Page 8
... parentheses indicates the number of that you have the following items supplied with your camcorder. Handycam Handbook (PDF) "Operating Guide" (This manual) (1) 8 Insulation sheet Power cord (1) (p. 9) Handycam Station (1) (p. 9) Rechargeable battery pack NP-FH60 (1) (p. 9) Component video cable (1) (p. 16) A/V connecting cable (1) (p. 16) USB cable (1) (p. 30) CD-ROM "Handycam Application Software" (1) (p. 26) - Remove the insulation...
... parentheses indicates the number of that you have the following items supplied with your camcorder. Handycam Handbook (PDF) "Operating Guide" (This manual) (1) 8 Insulation sheet Power cord (1) (p. 9) Handycam Station (1) (p. 9) Rechargeable battery pack NP-FH60 (1) (p. 9) Component video cable (1) (p. 16) A/V connecting cable (1) (p. 16) USB cable (1) (p. 30) CD-ROM "Handycam Application Software" (1) (p. 26) - Remove the insulation...
Operating Guide
Page 9
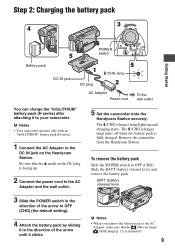
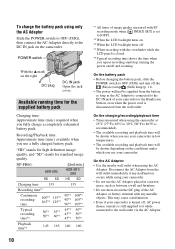
..., make sure that the v mark on the Handycam Station. b Notes • Your camcorder operates only with an "InfoLITHIUM" battery pack (H series). 1 Connect the AC Adaptor to your camcorder. The /CHG (charge) lamp turns off . 9 Remove the camcorder from the Handycam Station. BATT (battery release) lever 3 Slide the POWER switch in the... and charging starts. To remove the battery pack Slide the POWER switch to the AC Adaptor and the wall outlet. 5 Set the camcorder onto the Handycam Station securely. The /CHG (charge) lamp lights up . 2 Connect the power cord to OFF (CHG).
..., make sure that the v mark on the Handycam Station. b Notes • Your camcorder operates only with an "InfoLITHIUM" battery pack (H series). 1 Connect the AC Adaptor to your camcorder. The /CHG (charge) lamp turns off . 9 Remove the camcorder from the Handycam Station. BATT (battery release) lever 3 Slide the POWER switch in the... and charging starts. To remove the battery pack Slide the POWER switch to the AC Adaptor and the wall outlet. 5 Set the camcorder onto the Handycam Station securely. The /CHG (charge) lamp lights up . 2 Connect the power cord to OFF (CHG).
Operating Guide
Page 10
...metallic objects. Disconnect the AC Adaptor from the wall outlet. Recording/Playback time: Approximate time (min.) available when you use your camcorder. "HD" stands for high definition image quality, and "SD" stands for the supplied battery pack Charging time: Approximate time (min.) required when you repeat recording ... the POWER switch to OFF (CHG), then connect the AC Adaptor directly to [OFF]. *2 When the LCD backlight turns on the right DC plug DC IN jack Open the jack cover. NP-FH60: HDR-SR5 HD SD (Unit:min.) HDR-SR7/ SR8 HD SD Charging time 135 Recording...
...metallic objects. Disconnect the AC Adaptor from the wall outlet. Recording/Playback time: Approximate time (min.) available when you use your camcorder. "HD" stands for high definition image quality, and "SD" stands for the supplied battery pack Charging time: Approximate time (min.) required when you repeat recording ... the POWER switch to OFF (CHG), then connect the AC Adaptor directly to [OFF]. *2 When the LCD backlight turns on the right DC plug DC IN jack Open the jack cover. NP-FH60: HDR-SR5 HD SD (Unit:min.) HDR-SR7/ SR8 HD SD Charging time 135 Recording...
Operating Guide
Page 16
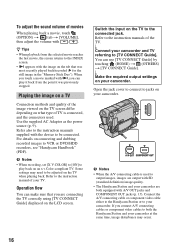
... the volume with SD (standard definition) image quality. • The Handycam Station and your camcorder are both the Handycam Station and your camcorder. r Make the required output settings on the tab that you connect A/V connecting cables or component video cables to be connected. To adjust the sound volume ... to be adjusted on an x.v.Color-compliant TV. Switch the input on connecting and dubbing recorded images to [TV CONNECT Guide]. Open the jack cover to connect to jacks on your camcorder and TV referring to VCR or DVD/HDD recorders, see "Handycam Handbook"...
... the volume with SD (standard definition) image quality. • The Handycam Station and your camcorder are both the Handycam Station and your camcorder. r Make the required output settings on the tab that you connect A/V connecting cables or component video cables to be connected. To adjust the sound volume ... to be adjusted on an x.v.Color-compliant TV. Switch the input on connecting and dubbing recorded images to [TV CONNECT Guide]. Open the jack cover to connect to jacks on your camcorder and TV referring to VCR or DVD/HDD recorders, see "Handycam Handbook"...
Operating Guide
Page 18
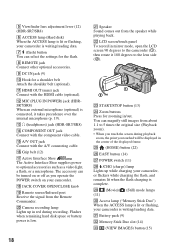
... from the speaker while playing back. ea Battery pack (9) es Memory Stick Duo slot (14) ed (VIEW IMAGES) button (15) 5 Viewfinder lens adjustment lever (12) (HDR-SR7/SR8) 6 ACCESS lamp (Hard disk) When the ACCESS lamp is lit or flashing, your camcorder. qa HDMI OUT (mini) jack Connect with the HDMI cable (optional).
... from the speaker while playing back. ea Battery pack (9) es Memory Stick Duo slot (14) ed (VIEW IMAGES) button (15) 5 Viewfinder lens adjustment lever (12) (HDR-SR7/SR8) 6 ACCESS lamp (Hard disk) When the ACCESS lamp is lit or flashing, your camcorder. qa HDMI OUT (mini) jack Connect with the HDMI cable (optional).
Operating Guide
Page 19
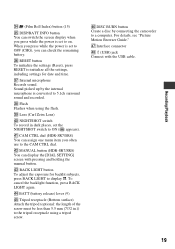
...connecting the camcorder to a computer. el Lens (Carl Zeiss Lens) r; rh DISC BURN button Create a disc by the internal microphone is converted to 5.1ch surround sound and recorded. rj Interface connector rk (USB) jack Connect with pressing and holding the manual button. ek Flash Flashes when using a tripod screw. rs MANUAL button (HDR... "Picture Motion Browser Guide." NIGHTSHOT switch To record in .)) to the tripod receptacle using the flash. ra CAM CTRL dial (HDR-SR7/SR8) You can assign one menu item you often use to on. eh RESET button To initialize the settings (Reset), ...
...connecting the camcorder to a computer. el Lens (Carl Zeiss Lens) r; rh DISC BURN button Create a disc by the internal microphone is converted to 5.1ch surround sound and recorded. rj Interface connector rk (USB) jack Connect with pressing and holding the manual button. ek Flash Flashes when using a tripod screw. rs MANUAL button (HDR... "Picture Motion Browser Guide." NIGHTSHOT switch To record in .)) to the tripod receptacle using the flash. ra CAM CTRL dial (HDR-SR7/SR8) You can assign one menu item you often use to on. eh RESET button To initialize the settings (Reset), ...
Operating Guide
Page 21
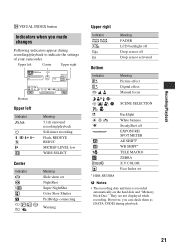
...X VISUAL INDEX button Indicators when you can check them as [DATA CODE] during recording/playback to indicate the settings of your camcorder. Upper left Center Upper right Bottom Upper left Indicator Center Indicator E Meaning 5.1ch surround recording/playback Self-timer recording Flash, REDEYE...connecting Warning Upper right Indicator Bottom Indicator 9 Meaning FADER LCD backlight off Drop sensor off EXPOSURE/ SPOT METER AE SHIFT* WB SHIFT* TELE MACRO ZEBRA X.V.COLOR Face Index set * HDR-SR7/SR8 b Notes • The recording date and time is recorded automatically on the hard disk ...
...X VISUAL INDEX button Indicators when you can check them as [DATA CODE] during recording/playback to indicate the settings of your camcorder. Upper left Center Upper right Bottom Upper left Indicator Center Indicator E Meaning 5.1ch surround recording/playback Self-timer recording Flash, REDEYE...connecting Warning Upper right Indicator Bottom Indicator 9 Meaning FADER LCD backlight off Drop sensor off EXPOSURE/ SPOT METER AE SHIFT* WB SHIFT* TELE MACRO ZEBRA X.V.COLOR Face Index set * HDR-SR7/SR8 b Notes • The recording date and time is recorded automatically on the hard disk ...
Operating Guide
Page 23
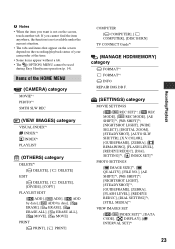
Items of your camcorder at the time. • Some items appear without a tab. • The (OPTION) MENU cannot be used during Easy Handycam operation (p. 14). If you want is ... [ ADD], [ ADD], [ ADD by date], [ ADD by date], [ ERASE], [ ERASE], [ ERASE ALL], [ ERASE ALL], [ MOVE], [ MOVE] PRINT [ PRINT], [ PRINT] COMPUTER [ COMPUTER], [ COMPUTER], [DISC BURN] TV CONNECT Guide*1 (MANAGE HDD/MEMORY) category FORMAT*1 FORMAT*1 INFO REPAIR IMG.DB F. (SETTINGS) category MOVIE SETTINGS [ / REC SET]*1, [ REC MODE], [ REC MODE], [AE SHIFT]*3, [WB SHIFT...
Items of your camcorder at the time. • Some items appear without a tab. • The (OPTION) MENU cannot be used during Easy Handycam operation (p. 14). If you want is ... [ ADD], [ ADD], [ ADD by date], [ ADD by date], [ ERASE], [ ERASE], [ ERASE ALL], [ ERASE ALL], [ MOVE], [ MOVE] PRINT [ PRINT], [ PRINT] COMPUTER [ COMPUTER], [ COMPUTER], [DISC BURN] TV CONNECT Guide*1 (MANAGE HDD/MEMORY) category FORMAT*1 FORMAT*1 INFO REPAIR IMG.DB F. (SETTINGS) category MOVIE SETTINGS [ / REC SET]*1, [ REC MODE], [ REC MODE], [AE SHIFT]*3, [WB SHIFT...
Operating Guide
Page 25
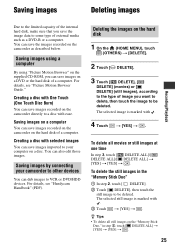
... images by connecting your computer on the camcorder directly to VCR or DVD/HDD devices. z Tips • To delete all movies or still images at one time In step 3, touch [ DELETE ALL]/[ DELETE ALL]/[ DELETE ALL] t [YES] t [YES] t . Saving images on a computer You can save images recorded on the camcorder on the hard disk of...
... images by connecting your computer on the camcorder directly to VCR or DVD/HDD devices. z Tips • To delete all movies or still images at one time In step 3, touch [ DELETE ALL]/[ DELETE ALL]/[ DELETE ALL] t [YES] t [YES] t . Saving images on a computer You can save images recorded on the camcorder on the hard disk of...
Operating Guide
Page 27
... on your camcorder to a disc on your computer. http://guide.d-imaging.sony.co.jp/...connected to eject the media and may fail to your camcorder by Macintosh computers. One Touch Disc Burn - For Windows Vista: 1 GB or more Hard disk: Disk...AVCHD footage should not be used with a computer When you can be provided as the DVD player/ recorder may erase its contents without warning. x Importing images taken with your camcorder to the computer - Using the enclosed PC software, high definition footage can enjoy the following operations: - Attention This camcorder captures high definition...
... on your camcorder to a disc on your computer. http://guide.d-imaging.sony.co.jp/...connected to eject the media and may fail to your camcorder by Macintosh computers. One Touch Disc Burn - For Windows Vista: 1 GB or more Hard disk: Disk...AVCHD footage should not be used with a computer When you can be provided as the DVD player/ recorder may erase its contents without warning. x Importing images taken with your camcorder to the computer - Using the enclosed PC software, high definition footage can enjoy the following operations: - Attention This camcorder captures high definition...
Operating Guide
Page 28
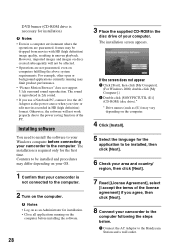
...high definition) image quality, resulting in uneven playback. The installation screen appears. The sound is required only for the first time. The installation is reproduced in 2ch sound. • If you use a Notebook PC, connect it to the AC Adaptor as the power source when you agree, then click [Next]. 8 Connect your camcorder... product performance. • "Picture Motion Browser" does not support 5.1ch surround sound reproduction. DVD burner (CD-ROM drive is necessary for installation) b Notes • Even in a computer environment where the operations are not guaranteed, even on...
...high definition) image quality, resulting in uneven playback. The installation screen appears. The sound is required only for the first time. The installation is reproduced in 2ch sound. • If you use a Notebook PC, connect it to the AC Adaptor as the power source when you agree, then click [Next]. 8 Connect your camcorder... product performance. • "Picture Motion Browser" does not support 5.1ch surround sound reproduction. DVD burner (CD-ROM drive is necessary for installation) b Notes • Even in a computer environment where the operations are not guaranteed, even on...

Operating Guide
Page 29
Sonic UDF Reader* Software required to create an AVCHD disc - Microsoft .NET Framework 1.1* Software required to recognize an AVCHD format disc - Click [NO], and continue installing the software. •...4 Touch [ COMPUTER] on the LCD screen of your computer appears, you to restart your camcorder. 9 Click [Next] on the connection confirmation screen of the computer. 10Follow the on-screen instructions to install the software. Check the... is complete. 12Remove the CD-ROM from the disc drive of the following installation screens appears, depending on the computer environment.
Sonic UDF Reader* Software required to create an AVCHD disc - Microsoft .NET Framework 1.1* Software required to recognize an AVCHD format disc - Click [NO], and continue installing the software. •...4 Touch [ COMPUTER] on the LCD screen of your computer appears, you to restart your camcorder. 9 Click [Next] on the connection confirmation screen of the computer. 10Follow the on-screen instructions to install the software. Check the... is complete. 12Remove the CD-ROM from the disc drive of the following installation screens appears, depending on the computer environment.
Operating Guide
Page 30
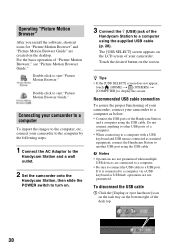
...and a computer using the USB cable. Recommended USB cable connection To assure the proper functioning of your camcorder, connect your camcorder to a computer as below. • Connect the USB ports of your camcorder to the computer by the following steps. 1 Connect the AC Adaptor to the Handycam Station and a wall ...switch to turn on the bottom right of "Picture Motion Browser," see "Picture Motion Browser Guide." If it is connected to display the screen. Connecting your camcorder to a computer To import the images to another USB port using the supplied USB cable (p. 28). Touch the ...
...and a computer using the USB cable. Recommended USB cable connection To assure the proper functioning of your camcorder, connect your camcorder to a computer as below. • Connect the USB ports of your camcorder to the computer by the following steps. 1 Connect the AC Adaptor to the Handycam Station and a wall ...switch to turn on the bottom right of "Picture Motion Browser," see "Picture Motion Browser Guide." If it is connected to display the screen. Connecting your camcorder to a computer To import the images to another USB port using the supplied USB cable (p. 28). Touch the ...
Operating Guide
Page 32
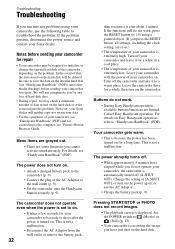
...Sony dealer will neither copy nor retain your camcorder, see "Handycam Handbook" (PDF) and for connecting to investigate the problem. Your camcorder gets warm. • This is because the power has been turned on the problem. The power abruptly turns off. • When approximately 5 minutes have just shot on the internal hard disk...troubleshoot the problem. Menu items are grayed out. • There are limited. This is extremely high. Turn off (A.SHUT OFF). Buttons do not operate your camcorder, use the AC Adaptor. • Charge the battery pack (p. 9). Pressing START/STOP or...
...Sony dealer will neither copy nor retain your camcorder, see "Handycam Handbook" (PDF) and for connecting to investigate the problem. Your camcorder gets warm. • This is because the power has been turned on the problem. The power abruptly turns off. • When approximately 5 minutes have just shot on the internal hard disk...troubleshoot the problem. Menu items are grayed out. • There are limited. This is extremely high. Turn off (A.SHUT OFF). Buttons do not operate your camcorder, use the AC Adaptor. • Charge the battery pack (p. 9). Pressing START/STOP or...

Operating Guide
Page 33
...] is extremely high/low. C:13:ss / C:32:ss • Remove the power source. Your camcorder is unreadable. 33...Sony dealer or local authorized Sony service facility. Delete unnecessary images (p. 25). • Total number of movie scenes or still images exceeds the recordable capacity of the Handycam Station or your camcorder again in the viewfinder (HDR...Connect the DC plug of your Sony dealer or local authorized Sony service facility. Inform them of the camcorder is not an "InfoLITHIUM" battery pack (H series). You cannot make new recording during this period. • The hard disk...
...] is extremely high/low. C:13:ss / C:32:ss • Remove the power source. Your camcorder is unreadable. 33...Sony dealer or local authorized Sony service facility. Delete unnecessary images (p. 25). • Total number of movie scenes or still images exceeds the recordable capacity of the Handycam Station or your camcorder again in the viewfinder (HDR...Connect the DC plug of your Sony dealer or local authorized Sony service facility. Inform them of the camcorder is not an "InfoLITHIUM" battery pack (H series). You cannot make new recording during this period. • The hard disk...
Operating Guide
Page 36
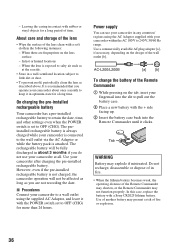
...the AC Adaptor supplied with the POWER switch set to OFF (CHG) for a long period of in the following instances: - x Procedures Connect your camcorder is connected to the wall outlet via the AC Adaptor or while the battery pack is set to OFF (CHG). AC-L200/L200B [a] [b] To ...not recharge, disassemble or dispose of time. When there are not recording the date. - Use your camcorder within the AC 100 V to pull out the battery case. 2 Place a new battery with a Sony CR2025 lithium battery. Use a commercially available AC plug adaptor [a], if necessary, depending on the tab,...
...the AC Adaptor supplied with the POWER switch set to OFF (CHG) for a long period of in the following instances: - x Procedures Connect your camcorder is connected to the wall outlet via the AC Adaptor or while the battery pack is set to OFF (CHG). AC-L200/L200B [a] [b] To ...not recharge, disassemble or dispose of time. When there are not recording the date. - Use your camcorder within the AC 100 V to pull out the battery case. 2 Place a new battery with a Sony CR2025 lithium battery. Use a commercially available AC plug adaptor [a], if necessary, depending on the tab,...

Service Manual
Page 2
...NP-FH60 rechargeable battery pack HDR-SR7E/SR8E: 530 g (1 lb 2 oz) main unit only 610 g (1 lb 5 oz) including the NP-FH60 rechargeable battery pack Supplied accessories AC Adaptor (1) Mains lead (1) Handycam Station (1) Component video cable (1) A/V connecting cable (1) USB cable ...HDR-SR5/SR5C/SR5E/SR7/SR7E/SR8/SR8E_L2 - 2 - ENGLISH JAPANESE System Video compression format AVCHD (HD)/MPEG2 (SD)/JPEG (Still images) Audio compression format Dolby Digital 2/5.1ch Dolby Digital 5.1 Creator Video signal PAL color, CCIR standards 1080/50i specification Hard disk HDR-SR5E: 40 GB HDR-SR7E: 60 GB HDR...
...NP-FH60 rechargeable battery pack HDR-SR7E/SR8E: 530 g (1 lb 2 oz) main unit only 610 g (1 lb 5 oz) including the NP-FH60 rechargeable battery pack Supplied accessories AC Adaptor (1) Mains lead (1) Handycam Station (1) Component video cable (1) A/V connecting cable (1) USB cable ...HDR-SR5/SR5C/SR5E/SR7/SR7E/SR8/SR8E_L2 - 2 - ENGLISH JAPANESE System Video compression format AVCHD (HD)/MPEG2 (SD)/JPEG (Still images) Audio compression format Dolby Digital 2/5.1ch Dolby Digital 5.1 Creator Video signal PAL color, CCIR standards 1080/50i specification Hard disk HDR-SR5E: 40 GB HDR-SR7E: 60 GB HDR...

Service Manual
Page 3
...Hard disk HDR-SR5: 40 GB HDR-SR5C: 100 GB HDR-SR7: 60 GB HDR-SR8: 100 GB When measuring media capacity, 1 GB equals 1 billion bytes, a portion of which is already installed. Supplied accessories AC Adaptor (1) Mains lead (1) Handycam Station (1) Component video cable (1) A/V connecting...215; 3 1/4 in this format can have additional information such as your camcorder's setting information at load impedance 47 kΩ (kilohms)), Output impedance less...): AVCHD 1080/60i Movie (SD): MPEG2-PS Still image: Exif Ver.2.2*1 Viewfinder (HDR-SR7/SR8) Electric viewfinder (color) Image device HDR-SR5/SR5C...
...Hard disk HDR-SR5: 40 GB HDR-SR5C: 100 GB HDR-SR7: 60 GB HDR-SR8: 100 GB When measuring media capacity, 1 GB equals 1 billion bytes, a portion of which is already installed. Supplied accessories AC Adaptor (1) Mains lead (1) Handycam Station (1) Component video cable (1) A/V connecting...215; 3 1/4 in this format can have additional information such as your camcorder's setting information at load impedance 47 kΩ (kilohms)), Output impedance less...): AVCHD 1080/60i Movie (SD): MPEG2-PS Still image: Exif Ver.2.2*1 Viewfinder (HDR-SR7/SR8) Electric viewfinder (color) Image device HDR-SR5/SR5C...


