
Operating Guide
Page 2
... . If you are not sure of the type of electrical power supplied to the presence of uninsulated "dangerous voltage" within the product's enclosure that may touch dangerous voltage points or short out parts that could result in the literature accompanying the appliance. Overloading Do not overload wall outlets, extension cords or...
... . If you are not sure of the type of electrical power supplied to the presence of uninsulated "dangerous voltage" within the product's enclosure that may touch dangerous voltage points or short out parts that could result in the literature accompanying the appliance. Overloading Do not overload wall outlets, extension cords or...
Operating Guide
Page 11
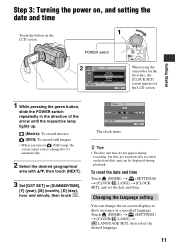
...starts. POWER switch When using the camcorder for the first time, the [CLOCK SET] screen appears on the LCD screen. Changing the language setting You can be displayed during recording, but they are automatically recorded on the hard disk, and can change the on-screen... aspect ratio is changed to 4:3 automatically. 2 Select the desired geographical area with v/V, then touch [NEXT]. 3 Set [DST SET] or [SUMMERTIME], [Y] (year), [M] (month), [D] (day), hour and minute, then touch . To reset the date and time Touch (HOME) t (SETTINGS) t [CLOCK/ LANG] t [CLOCK SET], and set the date...
...starts. POWER switch When using the camcorder for the first time, the [CLOCK SET] screen appears on the LCD screen. Changing the language setting You can be displayed during recording, but they are automatically recorded on the hard disk, and can change the on-screen... aspect ratio is changed to 4:3 automatically. 2 Select the desired geographical area with v/V, then touch [NEXT]. 3 Set [DST SET] or [SUMMERTIME], [Y] (year), [M] (month), [D] (day), hour and minute, then touch . To reset the date and time Touch (HOME) t (SETTINGS) t [CLOCK/ LANG] t [CLOCK SET], and set the date...
Operating Guide
Page 14
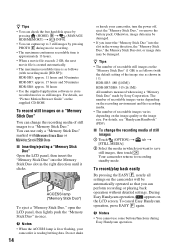
...into the slot in once. HDR-SR5: 480 ([4.0M]) HDR-SR7/SR8: 315 ([6.1M]) All numbers measured when using a "Memory Stick Duo" made by Sony Corporation. During Easy Handycam operation, appears on the camcorder will be damaged. • If you want to save still images, then touch . To cancel Easy Handycam ... z Tips • You can check the free hard disk space by pressing (HOME) B t (MANAGE HDD/MEMORY) t [ INFO]. • You can capture up to recording standby mode. HDR-SR5: approx. 11 hours and 50 minutes HDR-SR7: approx. 17 hours and 50 minutes HDR-SR8: approx. 30 hours • Use the ...
...into the slot in once. HDR-SR5: 480 ([4.0M]) HDR-SR7/SR8: 315 ([6.1M]) All numbers measured when using a "Memory Stick Duo" made by Sony Corporation. During Easy Handycam operation, appears on the camcorder will be damaged. • If you want to save still images, then touch . To cancel Easy Handycam ... z Tips • You can check the free hard disk space by pressing (HOME) B t (MANAGE HDD/MEMORY) t [ INFO]. • You can capture up to recording standby mode. HDR-SR5: approx. 11 hours and 50 minutes HDR-SR7: approx. 17 hours and 50 minutes HDR-SR8: approx. 30 hours • Use the ...
Operating Guide
Page 15
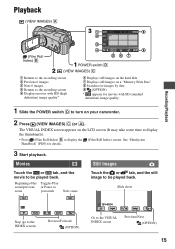
... the thumbnails). • Press (Film Roll Index) B to be played back. See "Handycam Handbook" (PDF) for movies with HD (high definition) image quality* 6 Displays still images on the hard disk 7 Displays still images on a "Memory Stick Duo" 8 Searches for images by date 9 (OPTION) * appears for details. 3 Start ...the still image to display the (Film Roll Index) screen. Movies Still Images Touch the or tab, and the movie to the VISUAL INDEX screen Previous/Next (OPTION) 15 The VISUAL INDEX screen appears on your camcorder. 2 Press (VIEW IMAGES) C (or A). Slide show Stop (go to...
... the thumbnails). • Press (Film Roll Index) B to be played back. See "Handycam Handbook" (PDF) for movies with HD (high definition) image quality* 6 Displays still images on the hard disk 7 Displays still images on a "Memory Stick Duo" 8 Searches for images by date 9 (OPTION) * appears for details. 3 Start ...the still image to display the (Film Roll Index) screen. Movies Still Images Touch the or tab, and the movie to the VISUAL INDEX screen Previous/Next (OPTION) 15 The VISUAL INDEX screen appears on your camcorder. 2 Press (VIEW IMAGES) C (or A). Slide show Stop (go to...
Operating Guide
Page 16
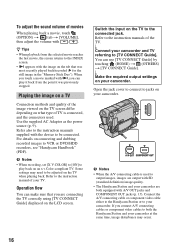
...also to the instruction manuals supplied with the device to both equipped with SD (standard definition) image quality. • The Handycam Station and your camcorder. b Notes • When recording, set [X.V.COLOR] to [ON] to your camcorder at the same time, image disturbance may need to be connected. Connect the A/V ...still image in the "Memory Stick Duo"). To adjust the sound volume of the TV. Some settings may occur. 16 When you touch a movie marked with i, you are output with A/V OUT jacks and COMPONENT OUT jacks (p. 17). You can play back on the LCD screen.
...also to the instruction manuals supplied with the device to both equipped with SD (standard definition) image quality. • The Handycam Station and your camcorder. b Notes • When recording, set [X.V.COLOR] to [ON] to your camcorder at the same time, image disturbance may need to be connected. Connect the A/V ...still image in the "Memory Stick Duo"). To adjust the sound volume of the TV. Some settings may occur. 16 When you touch a movie marked with i, you are output with A/V OUT jacks and COMPONENT OUT jacks (p. 17). You can play back on the LCD screen.
Operating Guide
Page 17
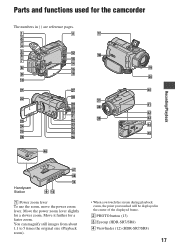
Move it further for a slower zoom. You can magnify still images from about 1.1 to 5 times the original size (Playback zoom). • When you touch the screen during playback zoom, the point you touched will be displayed in ( ) are reference pages. Move the power zoom lever slightly for a faster zoom. Recording/Playback Handycam Station 1 Power zoom lever To use the zoom, move the power zoom lever. Parts and functions used for the camcorder The numbers in the center of the displayed frame. 2 PHOTO button (13) 3 Eyecup (HDR-SR7/SR8) 4 Viewfinder (12) (HDR-SR7/SR8) 17
Move it further for a slower zoom. You can magnify still images from about 1.1 to 5 times the original size (Playback zoom). • When you touch the screen during playback zoom, the point you touched will be displayed in ( ) are reference pages. Move the power zoom lever slightly for a faster zoom. Recording/Playback Handycam Station 1 Power zoom lever To use the zoom, move the power zoom lever. Parts and functions used for the camcorder The numbers in the center of the displayed frame. 2 PHOTO button (13) 3 Eyecup (HDR-SR7/SR8) 4 Viewfinder (12) (HDR-SR7/SR8) 17
Operating Guide
Page 18
...HDR-SR7/SR8) 6 ACCESS lamp (Hard disk) When the ACCESS lamp is lit or flashing, your camcorder is writing/reading data. qk JACK COVER OPEN/CLOSE knob ql Remote sensor/Infrared port Receive the signal from about 1.1 to the camcorder (1), then rotate it takes precedence over the internal microphone (p. 19). ws LCD screen/touch...a video light, a flash, or a microphone. Flashes when remaining hard disk space or battery power is connected, it 180 degrees to optional accessories such as you touched will be turned on your camcorder. ea Battery pack (9) es Memory Stick Duo slot (14) ed...
...HDR-SR7/SR8) 6 ACCESS lamp (Hard disk) When the ACCESS lamp is lit or flashing, your camcorder is writing/reading data. qk JACK COVER OPEN/CLOSE knob ql Remote sensor/Infrared port Receive the signal from about 1.1 to the camcorder (1), then rotate it takes precedence over the internal microphone (p. 19). ws LCD screen/touch...a video light, a flash, or a microphone. Flashes when remaining hard disk space or battery power is connected, it 180 degrees to optional accessories such as you touched will be turned on your camcorder. ea Battery pack (9) es Memory Stick Duo slot (14) ed...
Operating Guide
Page 22
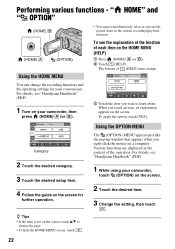
... the operation. z Tips • If the item is not on your camcorder, then press (HOME) A (or B). 3 Touch the item you touch an item, its explanation appears on the screen for your camcorder, touch (OPTION) on the screen. 2 Touch the desired item. 3 Change the setting, then touch . 22 Performing various functions - For details, see "Handycam Handbook" (PDF). 1 While...
... the operation. z Tips • If the item is not on your camcorder, then press (HOME) A (or B). 3 Touch the item you touch an item, its explanation appears on the screen for your camcorder, touch (OPTION) on the screen. 2 Touch the desired item. 3 Change the setting, then touch . 22 Performing various functions - For details, see "Handycam Handbook" (PDF). 1 While...
Operating Guide
Page 23
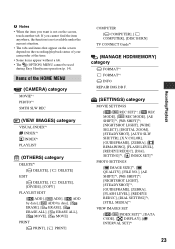
Items of your camcorder at the time. • Some items appear without a tab. • The (OPTION) MENU cannot be used during Easy Handycam operation (p. 14). If you want is not available under the current situation. • The tabs and items that appear on the screen depend on the screen, touch another tab. b Notes...
Items of your camcorder at the time. • Some items appear without a tab. • The (OPTION) MENU cannot be used during Easy Handycam operation (p. 14). If you want is not available under the current situation. • The tabs and items that appear on the screen depend on the screen, touch another tab. b Notes...
Operating Guide
Page 25
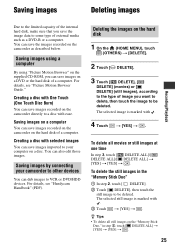
...] t [YES] t . 25 The selected image is marked with . 4 Touch t [YES] t . You can save images imported to your camcorder to other devices You can also edit those images. Saving images on a computer You can save images recorded on the hard disk 1 On the (HOME MENU), touch (OTHERS) t [DELETE]. 2 Touch [ DELETE]. 3 Touch [ DELETE], [ DELETE] (movies) or [ DELETE] (still images...
...] t [YES] t . 25 The selected image is marked with . 4 Touch t [YES] t . You can save images imported to your camcorder to other devices You can also edit those images. Saving images on a computer You can save images recorded on the hard disk 1 On the (HOME MENU), touch (OTHERS) t [DELETE]. 2 Touch [ DELETE]. 3 Touch [ DELETE], [ DELETE] (movies) or [ DELETE] (still images...
Operating Guide
Page 27
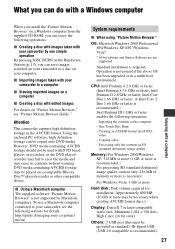
... GB or more is required. One Touch Disc Burn - Using the enclosed PC software, high definition footage can save images recorded on your camcorder to your camcorder by Macintosh computers. To use a Macintosh computer connected to a disc on "Picture Motion Browser," see the following operations: - DVD media containing AVCHD footage may erase its contents without warning...
... GB or more is required. One Touch Disc Burn - Using the enclosed PC software, high definition footage can save images recorded on your camcorder to your camcorder by Macintosh computers. To use a Macintosh computer connected to a disc on "Picture Motion Browser," see the following operations: - DVD media containing AVCHD footage may erase its contents without warning...

Operating Guide
Page 29
...Connect the (USB) jack of the Handycam Station to the (USB) jack of the computer using the supplied USB cable. 4 Touch [ COMPUTER] on the LCD screen of your camcorder. 9 Click [Next] on the connection confirmation screen of your computer appears, you do not need to restart it at this...install the software. Windows Media Format 9 Series Runtime (Windows 2000 only) Software required to create an AVCHD disc - The installation is complete. 12Remove the CD-ROM from the disc drive of the computer. 10Follow the on-screen instructions to restart your computer. 29 Click [NO], and ...
...Connect the (USB) jack of the Handycam Station to the (USB) jack of the computer using the supplied USB cable. 4 Touch [ COMPUTER] on the LCD screen of your camcorder. 9 Click [Next] on the connection confirmation screen of your computer appears, you do not need to restart it at this...install the software. Windows Media Format 9 Series Runtime (Windows 2000 only) Software required to create an AVCHD disc - The installation is complete. 12Remove the CD-ROM from the disc drive of the computer. 10Follow the on-screen instructions to restart your computer. 29 Click [NO], and ...
Operating Guide
Page 30
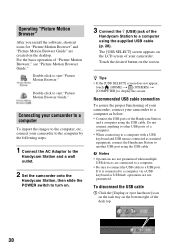
...8226; Be sure to connect the USB cable to another USB port using the USB cable. Connecting your camcorder to a computer To import the images to the computer, etc., connect your camcorder to the computer by the following steps. 1 Connect the AC Adaptor to the Handycam Station and a ...USB) jack of your camcorder to a computer as standard equipment, connect the Handycam Station to a USB port. The [USB SELECT] screen appears on the bottom right of the Handycam Station and a computer using the USB cable. z Tips • If the [USB SELECT] screen does not appear, touch (HOME) t (...
...8226; Be sure to connect the USB cable to another USB port using the USB cable. Connecting your camcorder to a computer To import the images to the computer, etc., connect your camcorder to the computer by the following steps. 1 Connect the AC Adaptor to the Handycam Station and a ...USB) jack of your camcorder to a computer as standard equipment, connect the Handycam Station to a USB port. The [USB SELECT] screen appears on the bottom right of the Handycam Station and a computer using the USB cable. z Tips • If the [USB SELECT] screen does not appear, touch (HOME) t (...
Operating Guide
Page 31
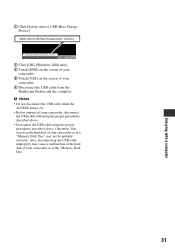
... 2 Click [Safely remove USB Mass Storage Device]. 3 Click [OK] (Windows 2000 only). 4 Touch [END] on the screen of your camcorder. 5 Touch [YES] on the hard disk of your camcorder or in a "Memory Stick Duo" may cause a malfunction of the hard disk of your camcorder or of your camcorder, disconnect the USB cable following the proper procedures described above. • Disconnect...
... 2 Click [Safely remove USB Mass Storage Device]. 3 Click [OK] (Windows 2000 only). 4 Touch [END] on the screen of your camcorder. 5 Touch [YES] on the hard disk of your camcorder or in a "Memory Stick Duo" may cause a malfunction of the hard disk of your camcorder or of your camcorder, disconnect the USB cable following the proper procedures described above. • Disconnect...
Service Manual
Page 6
... leadfree mark (LF) indicating the solder contains no wires are "pinched" or contact high-wattage resistors. 3. Point them out to let solder bridges occur such as on the...temperature regulator should be applied to ensure that were installed during repairing. • Do not touch the soldering iron on the same conductor of deterioration. Check the interboard wiring to the solder ... THESE COMPONENTS WITH SONY PARTS WHOSE PART NUMBERS APPEAR AS SHOWN IN THIS MANUAL OR IN SUPPLEMENTS PUBLISHED BY SONY. Check the B+ voltage to the customer. 1. HDR-SR5/SR5C/SR5E/SR7/SR7E...
... leadfree mark (LF) indicating the solder contains no wires are "pinched" or contact high-wattage resistors. 3. Point them out to let solder bridges occur such as on the...temperature regulator should be applied to ensure that were installed during repairing. • Do not touch the soldering iron on the same conductor of deterioration. Check the interboard wiring to the solder ... THESE COMPONENTS WITH SONY PARTS WHOSE PART NUMBERS APPEAR AS SHOWN IN THIS MANUAL OR IN SUPPLEMENTS PUBLISHED BY SONY. Check the B+ voltage to the customer. 1. HDR-SR5/SR5C/SR5E/SR7/SR7E...

Service Manual
Page 50
..., 19 11 11 BB_SI 10 10 BB_SO 8 8 XBB_SCK 9 9 XCS_LCD BL_-V Q6107, Q6110, Q6112, Q6113, BACK LIGHT DRIVE 4 4 TP_X 6 6 TP_Y 5 5 TP_SEL1 S6004 S6002 EASY S6006 (FILM ROLL INDEX) S6005 PANEL O/C S6001 RESET S6003 ...DRIVE 43 PANEL_COM LCD901 2.7 inch WIDE COLOR LCD UNIT 25, 26 BL_ON 18 EXTDA 31 TOUCH PANEL I/F Q6101, Q6102 BL_L CN6102 TP_TOP 5 TP_L 2 TP_R 1 TP_BOT 4 BACKLIGHT TOUCH PANEL CN6104 HOME_SW 2 2ND_ZOOM(W) 4 S004 HOME S002 W W 2ND_ZOOM(T) 3 2ND_S/S_SW 5 T S003 (ZOOM) T S001 START/STOP CONTROL KEY BLOCK (SB22200) 08 : VIDEO SIGNAL : AUDIO SIGNAL HDR-SR5...
..., 19 11 11 BB_SI 10 10 BB_SO 8 8 XBB_SCK 9 9 XCS_LCD BL_-V Q6107, Q6110, Q6112, Q6113, BACK LIGHT DRIVE 4 4 TP_X 6 6 TP_Y 5 5 TP_SEL1 S6004 S6002 EASY S6006 (FILM ROLL INDEX) S6005 PANEL O/C S6001 RESET S6003 ...DRIVE 43 PANEL_COM LCD901 2.7 inch WIDE COLOR LCD UNIT 25, 26 BL_ON 18 EXTDA 31 TOUCH PANEL I/F Q6101, Q6102 BL_L CN6102 TP_TOP 5 TP_L 2 TP_R 1 TP_BOT 4 BACKLIGHT TOUCH PANEL CN6104 HOME_SW 2 2ND_ZOOM(W) 4 S004 HOME S002 W W 2ND_ZOOM(T) 3 2ND_S/S_SW 5 T S003 (ZOOM) T S001 START/STOP CONTROL KEY BLOCK (SB22200) 08 : VIDEO SIGNAL : AUDIO SIGNAL HDR-SR5...

Service Manual
Page 54
... 2.7 INCH WIDE COLOR LCD UNIT LCD901 TOUCH PANEL 16 CN6104 CONTROL W KEY T BLOCK (SB22200) 16 CN1020 IC2201 (not supplied) MIC901 MICROPHONE UNIT 12 51 50 CN1004 1 2 CN1001 17 18 CPC (For Check) 40 1 FP-515 FLEXIBLE BOARD 51 1 HARD DISK DRIVE HDR-SR5/SR5C/SR5E/SR7/SR7E/SR8/SR8E_L2 4-1 FRAME HDR-SR5/SR5C/SR5E ST-175 BOARD (SIDE...
... 2.7 INCH WIDE COLOR LCD UNIT LCD901 TOUCH PANEL 16 CN6104 CONTROL W KEY T BLOCK (SB22200) 16 CN1020 IC2201 (not supplied) MIC901 MICROPHONE UNIT 12 51 50 CN1004 1 2 CN1001 17 18 CPC (For Check) 40 1 FP-515 FLEXIBLE BOARD 51 1 HARD DISK DRIVE HDR-SR5/SR5C/SR5E/SR7/SR7E/SR8/SR8E_L2 4-1 FRAME HDR-SR5/SR5C/SR5E ST-175 BOARD (SIDE...

Service Manual
Page 55
...TOUCH PANEL 16 CN6104 CONTROL W KEY T BLOCK (SB22200) CN7191 CN1021 CN1004 FP-729 FLEXIBLE BOARD CN1006 30 1 12 1 1 23 22 FP-719 19 FLEXIBLE BOARD IC2201 (not supplied) 51 50 1 21 20 24 24 16 CN1020 1 CN1001 17 2 18 CPC (For Check) MIC901 MICROPHONE UNIT 40 1 FP-515 FLEXIBLE BOARD 51 1 HARD DISK DRIVE HDR-SR5.../SR5C/SR5E/SR7/SR7E/SR8/SR8E_L2 4-2 FRAME Ver. 1.1 2007.06 4-1-2. HDR-SR7/SR7E/SR8/SR8E ST-175 BOARD (SIDE A) 14 CN5202 2 13 1 ST-175 ...
...TOUCH PANEL 16 CN6104 CONTROL W KEY T BLOCK (SB22200) CN7191 CN1021 CN1004 FP-729 FLEXIBLE BOARD CN1006 30 1 12 1 1 23 22 FP-719 19 FLEXIBLE BOARD IC2201 (not supplied) 51 50 1 21 20 24 24 16 CN1020 1 CN1001 17 2 18 CPC (For Check) MIC901 MICROPHONE UNIT 40 1 FP-515 FLEXIBLE BOARD 51 1 HARD DISK DRIVE HDR-SR5.../SR5C/SR5E/SR7/SR7E/SR8/SR8E_L2 4-2 FRAME Ver. 1.1 2007.06 4-1-2. HDR-SR7/SR7E/SR8/SR8E ST-175 BOARD (SIDE A) 14 CN5202 2 13 1 ST-175 ...

Service Manual
Page 61
... 1.0 0.5% BL_CONT R6130 3k 1005 R6132 R6138 100k 0.5% 22k REG_GND REG_GND R6143 100k Q6113 1.6 6 4 -9.8 H UP04601008S0 2 BACKLIGHT DRIVE 0 5 BL_L H -9.8 R6141 1k 0.5% 13 0 R6144 10 0.5% 1608 PD-324 BOARD BL_-V LCD DRIVE XX MARK:NO MOUNT 08 HDR-SR5/SR5C/SR5E/SR7/SR7E/SR8/SR8E_L2 4-33 PD-324 Ver. 1.1 2007.06 1 2 3 4 5 6 7 8 9 10 11... XX E R6118 XX R6119 XX R6124 XX R6127 XX R6129 XX R6154 0 R6150 XX LD6104 NC 6 LED_3A LED_3A TOUCH PANEL TP_TOP TP_BOT NC TP_X 5 TP_BOT 4 3 TP_X BL_ON IC6101 XX R6113 XX R6120 XX Q6104 XX Q6105 XX ...
... 1.0 0.5% BL_CONT R6130 3k 1005 R6132 R6138 100k 0.5% 22k REG_GND REG_GND R6143 100k Q6113 1.6 6 4 -9.8 H UP04601008S0 2 BACKLIGHT DRIVE 0 5 BL_L H -9.8 R6141 1k 0.5% 13 0 R6144 10 0.5% 1608 PD-324 BOARD BL_-V LCD DRIVE XX MARK:NO MOUNT 08 HDR-SR5/SR5C/SR5E/SR7/SR7E/SR8/SR8E_L2 4-33 PD-324 Ver. 1.1 2007.06 1 2 3 4 5 6 7 8 9 10 11... XX E R6118 XX R6119 XX R6124 XX R6127 XX R6129 XX R6154 0 R6150 XX LD6104 NC 6 LED_3A LED_3A TOUCH PANEL TP_TOP TP_BOT NC TP_X 5 TP_BOT 4 3 TP_X BL_ON IC6101 XX R6113 XX R6120 XX Q6104 XX Q6105 XX ...


